1. Introduction
This manual provides essential information for the safe assembly, operation, and maintenance of your VELOWAVE Ranger 2.0 Electric Fat Tire Mountain Bike. Please read this manual thoroughly before your first ride and retain it for future reference. Proper understanding and adherence to these instructions will ensure optimal performance and longevity of your e-bike.

Figure 1: VELOWAVE Ranger 2.0 Electric Fat Tire Mountain Bike
2. Safety Information
Your safety is paramount. Always wear a helmet and appropriate safety gear when riding. Familiarize yourself with local traffic laws and regulations regarding electric bicycles.
2.1 Pre-Ride Checks
- Brakes: Ensure both front and rear brakes are functioning correctly.
- Tires: Check tire pressure before each ride. The Kenda 26"x4.0" fat tires require specific pressure for optimal performance and safety.
- Battery: Verify the battery is securely locked in place and sufficiently charged.
- Bolts & Fasteners: Inspect all bolts, nuts, and quick releases for tightness.
- Lights: Confirm front and rear lights are operational, especially for night riding.
2.2 Battery Safety
- Use only the charger provided by VELOWAVE.
- Do not expose the battery to extreme temperatures or direct sunlight for extended periods.
- Avoid puncturing, dropping, or disassembling the battery.
- Charge the battery in a well-ventilated area, away from flammable materials.
2.3 Riding Environment
The Ranger 2.0 is equipped with 26"x4.0" fat tires suitable for various terrains including snow, beach, rugged mountain roads, flat roads, and gravel roads. Always adjust your riding style and speed to suit the terrain and weather conditions.

Figure 2: Kenda 26"x4.0" Fat Tires for All-Terrain Use
3. Setup and Assembly
Your VELOWAVE Ranger 2.0 is 85% pre-assembled. The following steps detail the final assembly process.
3.1 Unboxing and Initial Inspection
- Carefully remove the bike and all components from the packaging.
- Inspect for any shipping damage. Contact customer service immediately if damage is found.
- Ensure all accessories listed in the packing list are present.
3.2 Handlebar Installation
- Point the headset towards the front of the bike.
- Place the handlebar in the handlebar mount.
- Screw tight the handlebar clamp bolts evenly.
3.3 Front Wheel Installation
- Remove the protective axle and brake caliper pad from the front fork.
- Find the axle skewer in the tool box.
- Insert the skewer into the wheel axle.
- Screw the end nut onto the skewer.
- Insert the front wheel in between the front fork, aligning the disk between the brake caliper.
- Lift the lever up until parallel with the front fork to secure the wheel.
3.4 Front Light Installation
- Mount the front light to the designated screw on the front fork.
- Connect the light cable to the corresponding cable from the bike's wiring harness.
3.5 Pedal Installation
- Identify the Left (L) and Right (R) markings on the pedals.
- Install the pedals in their respective side crank arms. The right pedal tightens clockwise, the left pedal tightens counter-clockwise.
3.6 Battery Insertion and Charging
- Carefully slide the 48V 15Ah LG Cells battery into the frame's downtube until it clicks securely into place.
- To charge, connect the charger to the battery port on the bike or remove the battery for off-bike charging. Plug the charger into a standard wall outlet. The indicator light on the charger will show charging status (typically red for charging, green for fully charged).
Assembly Video Guide
Video 1: Detailed assembly instructions for the VELOWAVE fat tire mountain bike model. This video demonstrates unboxing, handlebar, front wheel, pedal, and battery installation, along with connecting the front light and charging the battery.
4. Operating Instructions
4.1 Powering On/Off and Display
- To power on the bike, press and hold the power button on the LCD display. Repeat to power off.
- The easy-operation LCD intelligent display shows speed data, pedal assist level, battery indicator, and mileage.
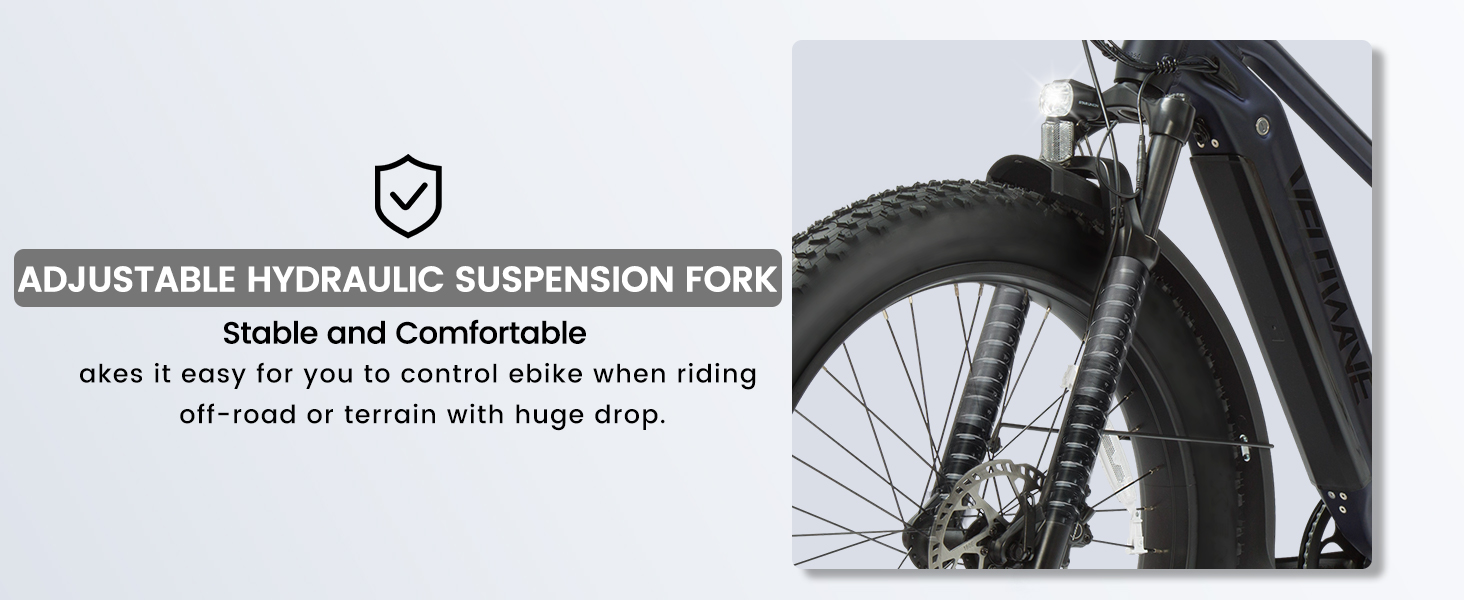
Figure 3: Backlight Color Screen LCD Display showing speed, battery, and assist level.
4.2 Riding Modes
The Ranger 2.0 offers three distinct riding modes:
- Pure Electric Mode: Engages the motor via the thumb throttle for propulsion without pedaling. Max speed: 20 MPH.
- Pedal-Assist Mode: The motor provides assistance as you pedal. You can select from 5 levels of pedal assist via the display. Max speed: 28+ MPH.
- Classic Bike Mode: The motor is disengaged, and the bike operates as a traditional bicycle, relying solely on pedal power.
4.3 Gear Shifting
The bike is equipped with a professional SHIMANO 7-speed rotary gear shifter. Use the shifter to adjust gears according to terrain and desired effort. Higher gears are for speed, lower gears for climbing hills.
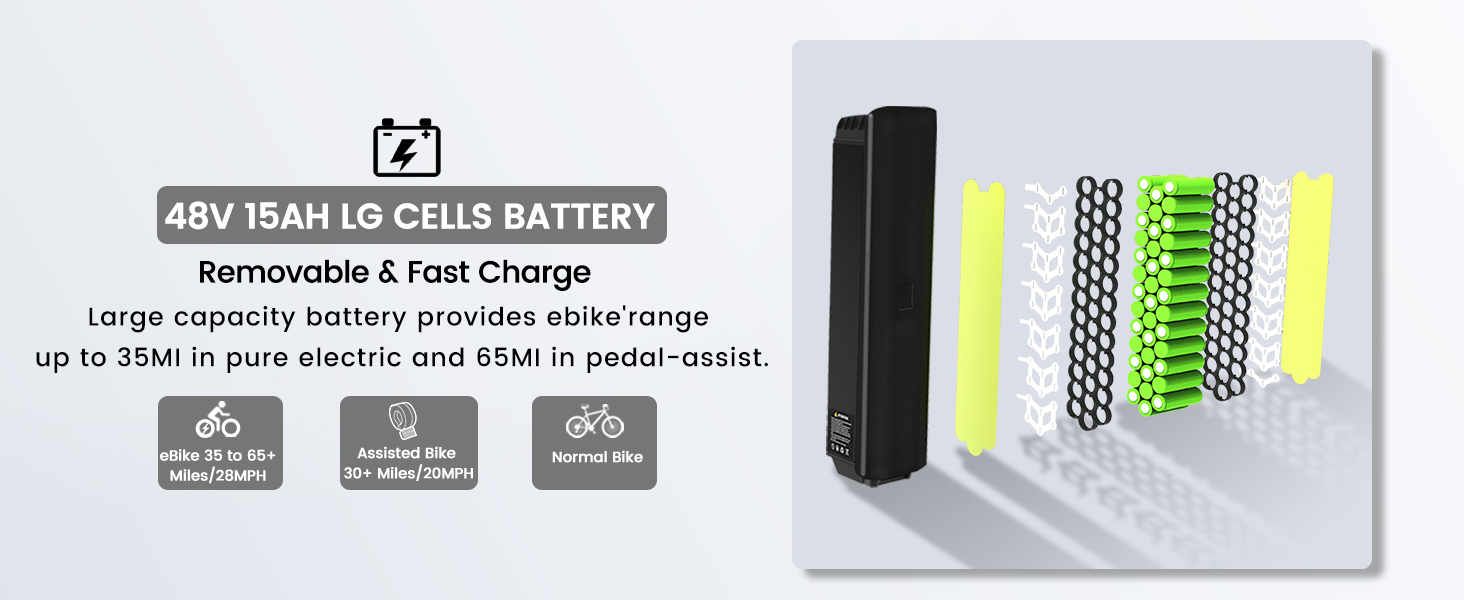
Figure 4: Shimano 7-Speed Drivetrain for versatile riding.
4.4 Braking System
The Ranger 2.0 features dual hydraulic disc brakes for reliable stopping power. Apply both brakes gently and evenly to slow down or stop. Avoid sudden, hard braking, especially at high speeds or on loose surfaces.
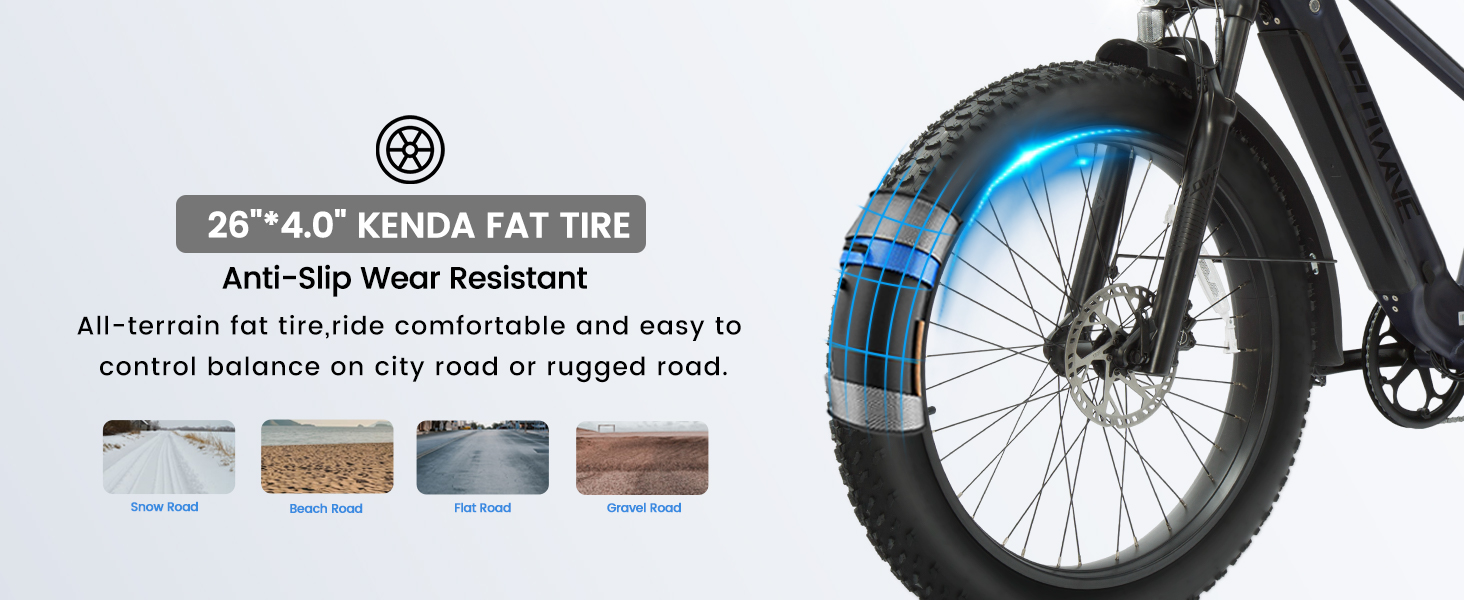
Figure 5: Dual Hydraulic Disc Brakes for strong stopping power.
5. Maintenance
Regular maintenance ensures the safety and performance of your e-bike.
5.1 General Checks
- Keep the bike clean, especially the drivetrain components.
- Lubricate the chain regularly.
- Check brake pads for wear and replace as needed.
- Ensure all electrical connections are secure and free from corrosion.
5.2 Battery Care
- Charge the battery fully after each ride, or at least once a month if not in use.
- Store the battery in a cool, dry place, ideally between 50-70% charge, if storing for extended periods.
- Avoid completely draining the battery, as this can reduce its lifespan.
6. Troubleshooting
This section addresses common issues you might encounter with your VELOWAVE Ranger 2.0.
| Problem | Possible Cause | Solution |
|---|---|---|
| Bike does not power on | Battery not inserted correctly or not charged; loose electrical connection. | Ensure battery is fully inserted and locked. Check battery charge level. Inspect all visible electrical connections. |
| Motor not assisting | Pedal assist level set to 0; brake levers engaged; motor cable loose. | Increase pedal assist level on the display. Release brake levers. Check motor cable connection. |
| Brakes feel weak | Worn brake pads; air in hydraulic lines; misaligned calipers. | Inspect and replace brake pads if worn. If hydraulic, bleeding may be required (professional service recommended). Check caliper alignment. |
| Unusual noises during riding | Loose components; dry chain; rubbing brake rotor. | Check all bolts and fasteners. Lubricate chain. Inspect brake rotor for rubbing and adjust caliper if necessary. |
For issues not listed here or if solutions do not resolve the problem, please contact VELOWAVE customer service.
7. Specifications
| Feature | Detail |
|---|---|
| Model Name | Ranger 2.0 |
| Motor | 750W (Peak 1200W) BAFANG Brushless Rear Hub Motor |
| Battery | 48V 15Ah Removable LG Cells Lithium-ion Battery (720 Wh) |
| Max Speed (Pedal-Assist) | 28+ MPH |
| Max Speed (Throttle) | 20 MPH |
| Range (Pedal-Assist) | Up to 65+ Miles |
| Range (Throttle) | 35+ Miles |
| Wheel Size | 26 Inches |
| Tires | Kenda 26"x4.0" Fat Tires |
| Frame Material | 6061 Aluminum |
| Suspension | Front Hydraulic Suspension Fork |
| Gears | Shimano 7-Speed Rotary Gear Shifter |
| Brakes | Dual Hydraulic Disc Brakes |
| Display | Easy-Operation LCD Intelligent Display |
| Item Weight | 73 Pounds |
| Maximum Weight Recommendation | 225 Pounds |
Note: Range and speed may vary based on rider weight, terrain, weather conditions, and assist level.
8. Warranty and Support
VELOWAVE provides a comprehensive warranty for your electric bike:
- Electrical Components: 2-year warranty on batteries, chargers, motors, controllers, and monitors.
- Frame: Lifetime technical support and warranty on the frame.
For technical support, warranty claims, or any questions, please contact VELOWAVE customer service. Over 50+ offline repair locations are available throughout the US for consultation or repairs.
9. Conclusion
Thank you for choosing the VELOWAVE Ranger 2.0. We hope you enjoy a safe and exhilarating riding experience. Always prioritize safety and follow the guidelines provided in this manual.