1. Introduction
This manual provides detailed instructions for the assembly, operation, and maintenance of your AOGLLATI 140x200cm bed frame. Please read all instructions carefully before beginning assembly and retain this manual for future reference. Proper assembly and care will ensure the longevity and safe use of your bed frame.
2. Safety Information
WARNING: Failure to follow these safety guidelines may result in injury or damage to the product.
- Ensure proper assembly following all instructions provided.
- The maximum load capacity for this bed frame is 300 kg. Do not exceed this weight limit.
- Secure the headboard properly to prevent movement or injury.
- Check for any sharp edges or pinch points during assembly and regular use.
- Keep small parts and packaging materials away from children to prevent choking hazards.
- Do not use power tools for assembly unless explicitly instructed, as this may overtighten fasteners and damage components.
- Ensure all electrical connections (LED, USB ports) are handled safely and correctly. Do not overload the power strip.
3. Package Contents
Before assembly, verify that all components are present and undamaged. If any parts are missing or damaged, contact customer support.
- Upholstered Headboard with integrated LED strip and power module (USB-A, USB-C ports)
- Side Rails (2)
- Footboard
- Center Support Beam
- Wooden Slats (10 pieces)
- Support Legs (9 pieces)
- Hardware Pack (screws, bolts, washers, Allen key)
- Power Adapter for LED and USB ports
- Remote Control for LED lighting
- Instruction Manual
4. Assembly Instructions
Assembly typically requires two adults. Please follow the numbered steps carefully. An Allen key is usually included; a screwdriver may also be needed.
Step 1: Prepare the Area and Identify Parts
Clear a spacious area for assembly. Unpack all components and lay them out. Refer to the parts list to identify each piece. Ensure all hardware is present.
Step 2: Assemble the Headboard
Attach any necessary support brackets or legs to the upholstered headboard. Ensure all connections are secure.
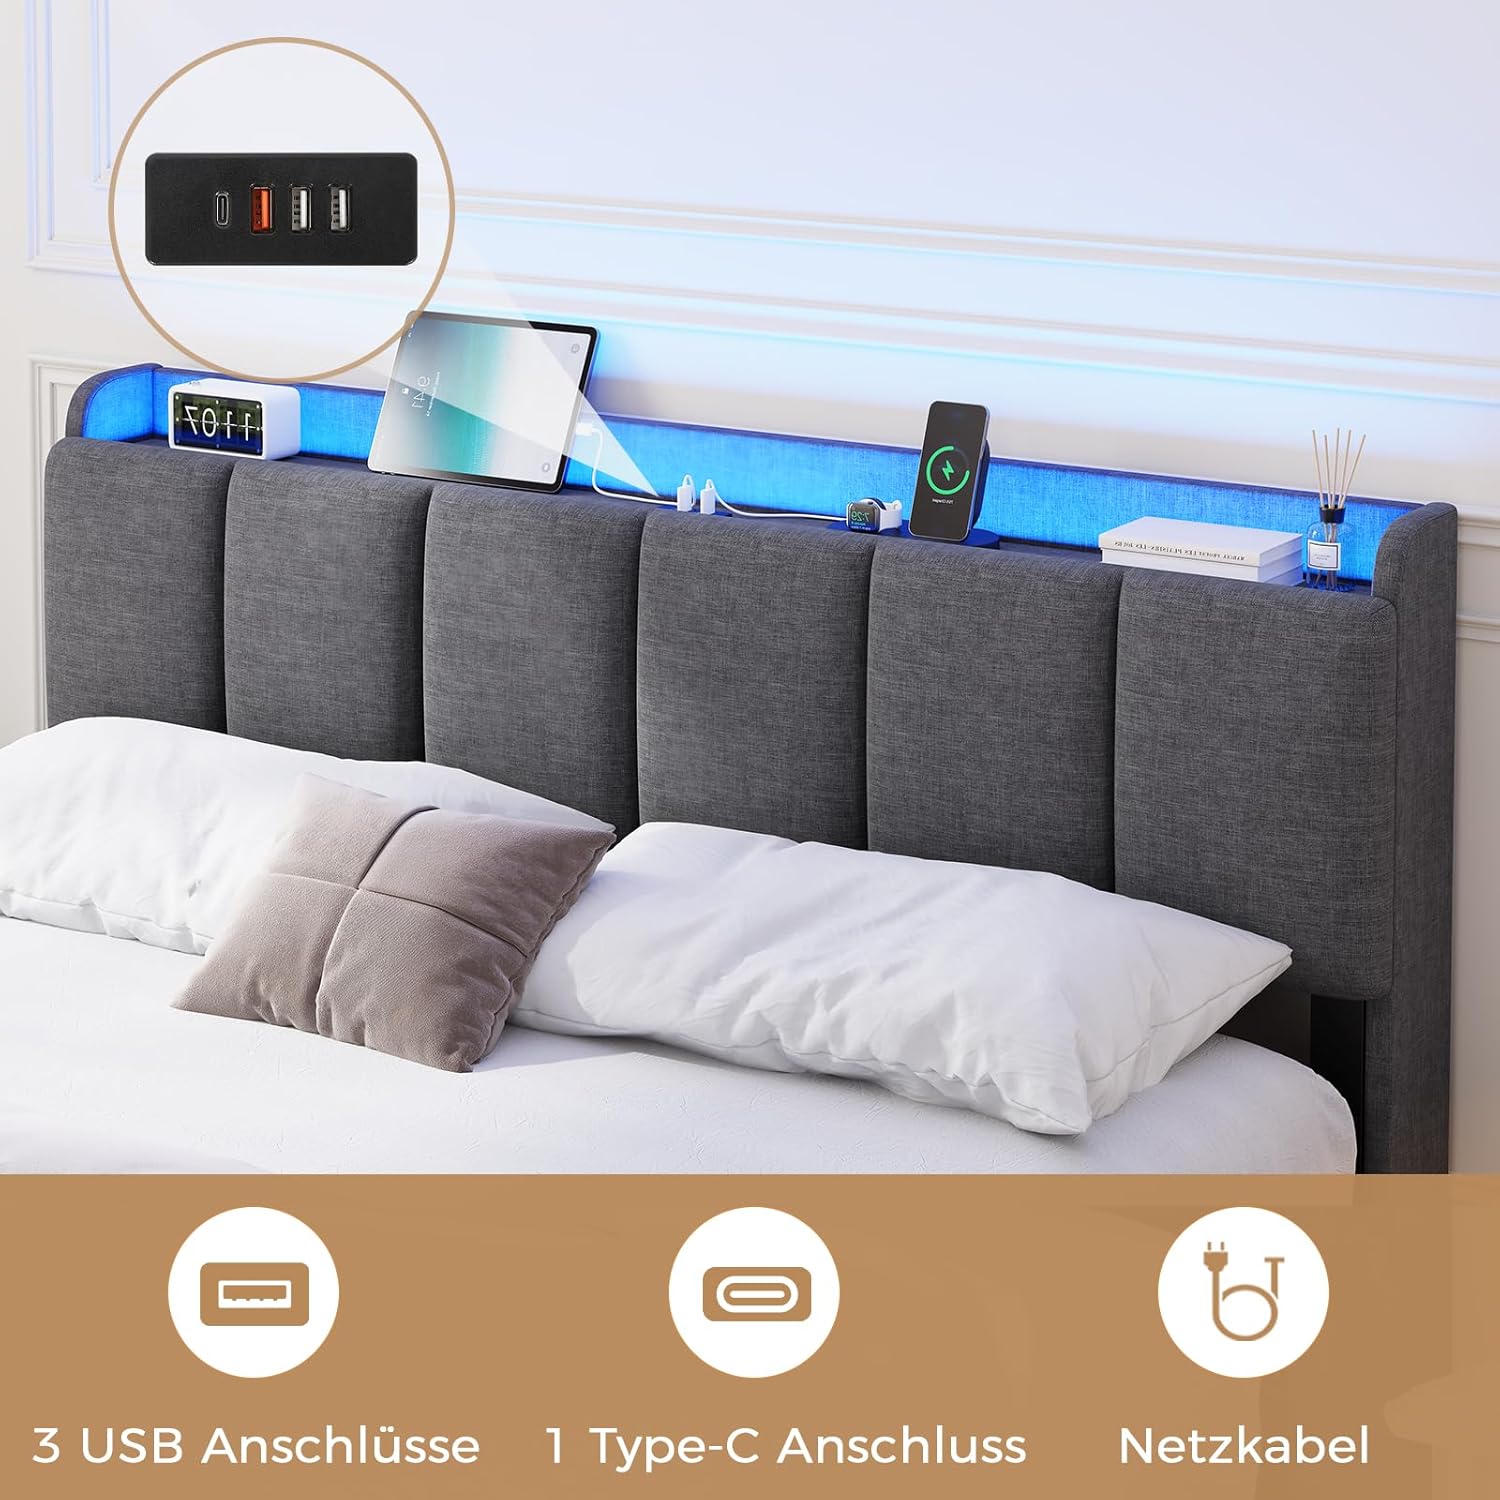
Image: Headboard with integrated LED and USB ports.
Step 3: Connect Side Rails and Footboard
Attach the side rails to the headboard and footboard using the provided hardware. Do not fully tighten screws until all main frame components are aligned.

Image: Assembled bed frame structure.
Step 4: Install Center Support Beam and Legs
Place the center support beam along the middle of the frame and attach it according to the instructions. Screw in all support legs, ensuring they are firmly tightened for stability.

Image: Bed frame dimensions and support leg placement.
Step 5: Attach Wooden Slats
Unroll or place the wooden slats across the frame. Many slats are secured with Velcro strips for easy and silent installation. Ensure each slat is properly seated and secured to prevent movement and noise.

Image: Detail of slat attachment with Velcro.
Step 6: Final Tightening and Electrical Connection
Once all components are in place and aligned, fully tighten all screws and bolts. Connect the power adapter to the headboard's power module and plug it into a wall outlet. Ensure the power cable is routed safely to avoid tripping hazards.

Image: Bed with LED lights and charging ports in use.
5. Operating Instructions
5.1 LED Lighting System
Your bed frame is equipped with an integrated RGB LED strip in the headboard. This system offers multiple colors, dynamic modes, and adjustable brightness.
- Power On/Off: Use the included remote control or the dedicated button on the headboard to turn the LED lights on or off.
- Color Selection: The remote control allows you to choose from 10 million colors.
- Dynamic Modes: Select from 29 dynamic lighting modes for various effects.
- Brightness Adjustment: Adjust the light intensity to your preference using the remote.
- Control via App: Download the compatible mobile application (refer to the headboard module for QR code or app name) to control the LED lighting from your smartphone. The app may offer additional features like music synchronization and timer functions.

Image: Features including LED control options.
5.2 USB Charging Ports
The headboard includes multiple USB ports for convenient charging of your electronic devices.
- USB-A Ports: Two 5V/2A USB-A ports are available for charging smartphones, tablets, and other compatible devices.
- USB-C Port: One 5V/3A USB-C port provides faster charging for compatible devices.
- Power Connection: Ensure the bed frame's power adapter is plugged into a live wall outlet for the USB ports to function.

Image: Bed frame with specifications, including USB features.
6. Maintenance
- Cleaning: For the upholstered parts, use a soft, damp cloth and mild detergent if necessary. Avoid harsh chemicals. For metal parts, wipe with a dry or slightly damp cloth.
- Regular Checks: Periodically check all screws and bolts to ensure they remain tight. Retighten as needed to maintain stability and prevent squeaking.
- Slat Inspection: Inspect wooden slats for any signs of damage or wear. Replace damaged slats promptly to ensure proper mattress support.
- Electrical Components: Ensure the power cable and connections for the LED and USB ports are not pinched or damaged. Unplug the bed from the power outlet before cleaning or performing any maintenance on electrical components.
7. Troubleshooting
- LED Lights Not Working:
- Check if the power adapter is securely plugged into both the headboard module and the wall outlet.
- Ensure the wall outlet is functional.
- Verify the remote control battery is not depleted. - USB Ports Not Charging:
- Confirm the bed frame is plugged into a live power outlet.
- Try a different USB cable or device to rule out device-specific issues. - Bed Frame Squeaks:
- Retighten all assembly screws and bolts, especially those connecting the side rails and support legs.
- Ensure all wooden slats are properly seated and secured. The EVA anti-vibration strips are designed to minimize noise; check if they are correctly positioned. - Unstable Frame:
- Check that all support legs are firmly on the ground and evenly adjusted.
- Ensure all frame connections are fully tightened.
8. Specifications
| Feature | Specification |
|---|---|
| Brand | AOGLLATI |
| Model Number | 3801_1 |
| Color | Linen Grey |
| Product Dimensions (L x W x H) | 216 x 145 x 92 cm |
| Compatible Mattress Size | 140 x 200 cm |
| Maximum Mattress Thickness | 20 cm |
| Material | Upholstered Linen Fabric, MDF, Metal |
| Number of Slats | 10 |
| Ground Clearance | 24.5 cm |
| Maximum Load Capacity | 300 kg |
| Special Features | Integrated RGB LED Lighting, 2x USB-A Ports, 1x USB-C Port |
| Item Weight | 30 Kilograms |
Note: All dimensions are approximate and may vary slightly.
9. Warranty and Support
For warranty information, technical support, or to order replacement parts, please refer to the contact details provided at the point of purchase or visit the official AOGLLATI website. Keep your purchase receipt as proof of purchase.