1. Introduction
This manual provides essential information for the safe and efficient assembly, operation, and maintenance of your TROPOW Polycarbonate Greenhouse. Please read these instructions thoroughly before beginning assembly or use to ensure proper functionality and longevity of your product.
The TROPOW Greenhouse is designed to provide an optimal environment for plant growth, featuring a durable aluminum alloy frame and light-transmitting polycarbonate panels. It includes a roof vent for ventilation and integrated gutters for water management.

Image 1.1: Overview of the TROPOW Polycarbonate Greenhouse.
2. Safety Information
- Always wear appropriate safety gear, including gloves and eye protection, during assembly.
- Ensure the assembly area is clear of obstructions and children.
- Do not assemble the greenhouse in strong winds or adverse weather conditions.
- Securely anchor the greenhouse to the ground to prevent wind damage. Consider a solid base for enhanced stability.
- Regularly inspect the structure for loose parts or damage and address them promptly.
- Keep heating elements or open flames away from polycarbonate panels.
3. Package Contents
Verify that all components are present and undamaged before beginning assembly. If any parts are missing or damaged, please contact customer support.
- Aluminum Alloy Frame Components
- Polycarbonate Panels
- Hardware Kit (screws, nuts, bolts, rivets)
- Roof Vent Assembly
- Door Assembly with Security Lock
- Integrated Gutter Components
- Instruction Manual
4. Setup and Assembly
The TROPOW Greenhouse features a quick assembly structure utilizing a rivet system and sliding panel assembly. Follow the detailed diagrams and instructions provided in the separate assembly guide for step-by-step installation.
- Site Preparation: Choose a level, well-drained location for your greenhouse. Ensure adequate space around the structure for assembly and access.
- Base Installation: Construct a stable and level base. While not explicitly included, a robust foundation is recommended to enhance wind resistance and overall stability.
- Frame Assembly: Assemble the aluminum alloy frame components according to the provided diagrams. Ensure all connections are secure.
- Panel Installation: Slide the polycarbonate panels into the designated frame channels. Ensure panels are fully seated and secured to prevent dislodgement.
- Door and Vent Installation: Install the door assembly and roof vent mechanism. Test their operation to ensure smooth movement.
- Final Securing: Double-check all fasteners and connections. Anchor the greenhouse firmly to the prepared base or ground using appropriate anchoring methods.
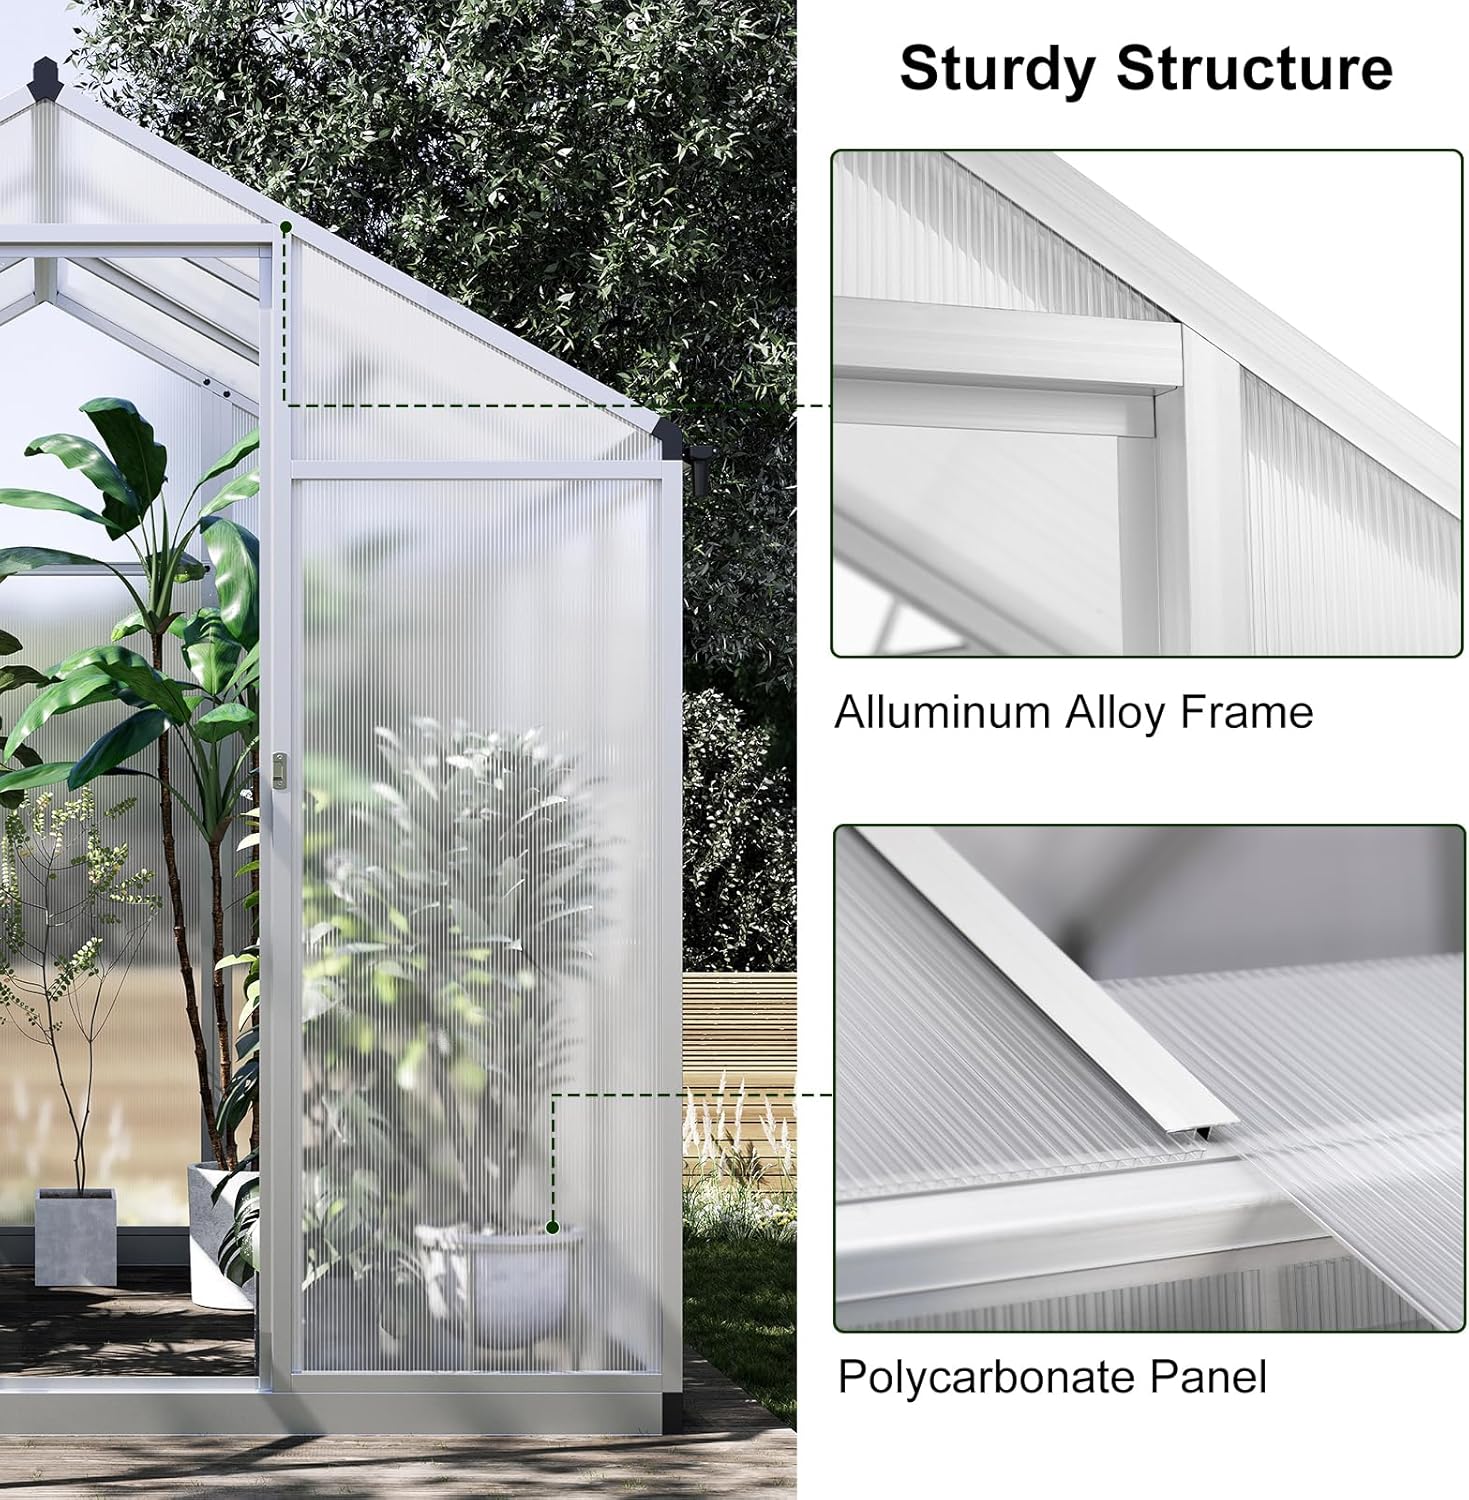
Image 4.1: Detail of the aluminum alloy frame and polycarbonate panel construction.

Image 4.2: Detail of the sturdy door and security lock mechanism.
5. Operating Instructions
5.1 Roof Vent Operation
The greenhouse is equipped with a large roof ventilation window (24" x 23") to regulate internal temperature and humidity. Open the vent manually to allow airflow and reduce heat buildup. Close the vent during cold weather or strong winds to retain heat and protect plants.
5.2 Door Usage
The hinged door provides access to the greenhouse. Use the integrated security lock to secure the door when not in use or during windy conditions. Ensure the door closes completely to maintain internal climate control.
5.3 Water Management
Integrated gutters are designed to effectively drain and collect rainwater. This water can be utilized for irrigation, contributing to sustainable gardening practices.

Image 5.1: Detail of the rooftop vent and integrated gutters.
6. Maintenance
- Cleaning Panels: Clean polycarbonate panels regularly with mild soap and water to maintain light transmission. Avoid abrasive cleaners or tools that could scratch the surface.
- Frame Inspection: Periodically check the aluminum frame for any signs of corrosion, bending, or loose connections. Tighten any loose bolts or screws.
- Vent and Door: Ensure the roof vent and door mechanisms operate smoothly. Lubricate hinges if necessary. Keep gutters clear of debris to ensure proper drainage.
- Anchoring: Re-check the greenhouse's anchoring to the ground, especially after strong winds or heavy rainfall, to ensure it remains secure.
7. Troubleshooting
- Panels becoming loose or dislodged:
- Ensure all panels are correctly inserted into the frame channels and secured with the provided hardware. Verify that the frame itself is stable and properly anchored. Consider adding additional sealant or clips if panels frequently shift.
- Poor ventilation or high humidity:
- Ensure the roof vent is fully open during warm periods. Check for any obstructions preventing airflow. Consider additional ventilation options if the climate requires it.
- Water leakage:
- Inspect panel seams and frame connections for gaps. Apply silicone sealant if necessary. Ensure gutters are clear and properly aligned to direct water away from the structure.
- Greenhouse instability in wind:
- Verify that the greenhouse is securely anchored to a solid base. If experiencing frequent strong winds, reinforce anchoring points or consider a more robust foundation.
8. Specifications
| Feature | Detail |
|---|---|
| Brand | TROPOW |
| Model Number | Green House 820A1 |
| Product Dimensions (L x W x H) | 95" x 74" x 76" (241.3 cm x 187.96 cm x 193.04 cm) |
| Size (D x W) | 6'D x 6.25'W |
| Item Weight | 53 pounds (24.04 kg) |
| Frame Material | Aluminum |
| Cover Material | Polycarbonate (PC) |
| Color | Silver |
| Number of Vents | 1 (Roof Vent: 24" x 23") |
| UPC | 198290760930 |

Image 8.1: Product Dimensions Diagram.
9. Warranty and Support
For warranty information, please refer to the documentation provided at the time of purchase or contact your retailer. For any questions, missing parts, or technical assistance, please contact TROPOW customer support. Provide your model number (Green House 820A1) and purchase details for efficient service.
Customer support contact information can typically be found on the product packaging or the retailer's website.


