1. Introduction
This manual provides detailed instructions for the installation, operation, and maintenance of your CWWK AMD 7840HS/8845HS/7940HS ITX Motherboard. This high-performance motherboard is designed for compact systems, offering robust features for NAS, home server, or mini PC applications. Please read this manual thoroughly before proceeding with installation.
Safety Information
- Always disconnect power before installing or removing components.
- Handle the motherboard by its edges to avoid static discharge. Use an anti-static wrist strap if available.
- Ensure proper ventilation for the system to prevent overheating.
- Do not expose the motherboard to moisture or extreme temperatures.
- Refer to component manuals (CPU, RAM, etc.) for their specific installation guidelines.
2. Key Features and Product Overview
The CWWK ITX Motherboard is equipped with advanced features for high-performance computing and extensive connectivity:
- Equipped with AMD "Zen4" architecture Ryzen5/7/9 series high-performance processors, AMD Ryzen AI Performance up to 10 TOPS.
- Standard Mini-ITX form factor (17x17 cm), compatible with LGA1700 series CPU coolers.
- 1 PCI-E x16 slot (PCIe4.0 x8 signal) for expansion cards like graphics or network cards.
- Dual M.2 NVMe (PCIe4.0 x2) slots for 2280 size SSDs.
- Two SFF-8643 sockets supporting up to 9 SATA3.0 devices via breakout cables.
- Dual-channel SO-DIMM DDR5 slots supporting 5600MHz (backward compatible) and server-level ECC notebook memory.
- Three USB3.2 and one Type-C (USB4) interface with 40Gbps rate.
- Four Intel i226-V 2.5G RJ45 UDE network ports for robust networking.
- HDMI, DisplayPort, and Type-C triple display output, supporting 4K@60Hz.
- Built-in USB3.2 and two USB2.0 pin sockets for front panel connectivity and other applications.
Product Layout

This image provides an angled perspective of the motherboard, highlighting the layout of major components such as the CPU area, RAM slots, PCIe slot, and various I/O ports.

This view offers a clear top-down perspective, useful for identifying component placement and planning your build. Note the central CPU area and surrounding memory and expansion slots.

The underside of the motherboard shows the robust backplate for CPU cooler mounting, ensuring secure and stable installation of cooling solutions.
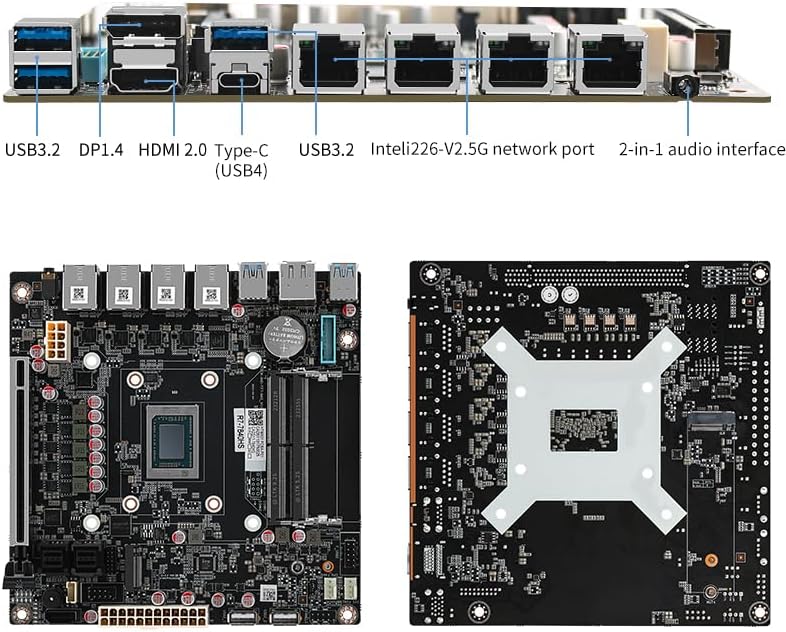
This diagram clearly labels the various input/output ports available on the motherboard's rear panel, including USB, display outputs, network ports, and audio jacks.

This image provides an angled view with labels for internal connectors such as USB 3.0 pin, 8-pin ATX power, system fan, CPU fan, FPANEL, USB 2.0, COM, PCIe x16 slot, SATA, and M.2 NVMe slots.
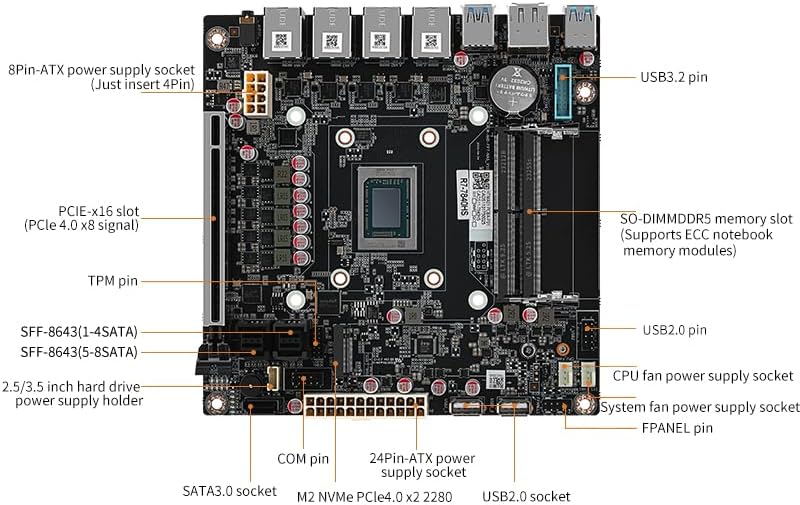
Similar to Figure 2.5, this top-down view offers another perspective with labels for internal connectors, including TPM pin, SFF-8643 sockets, 2.5/3.5 inch hard drive power supply holder, and the 24-pin ATX power supply socket.
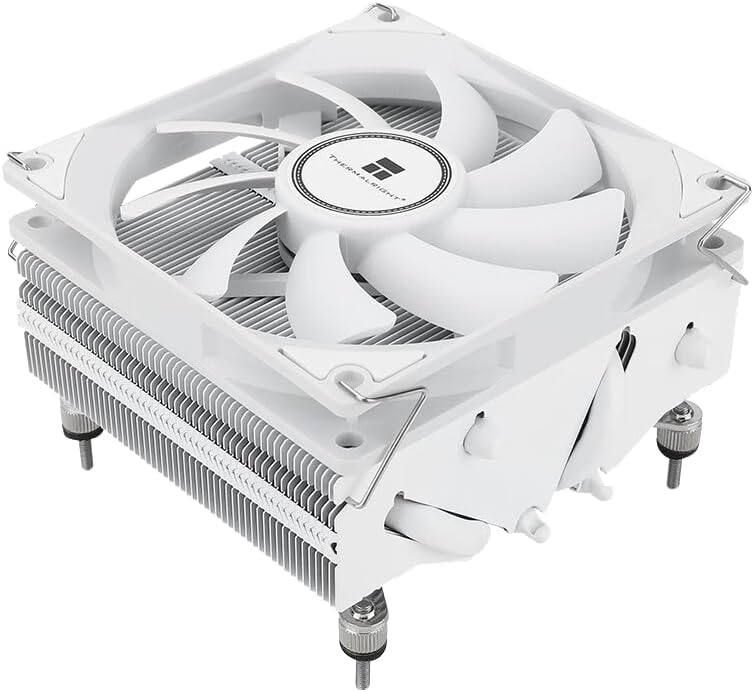
For the 8845HS+FAN variant, a Thermalright CPU cooler is provided to ensure optimal thermal performance for the AMD processor.
3. Installation Guide
3.1 CPU Cooler Installation
- The AMD Ryzen processor is integrated onto the motherboard.
- Apply thermal paste to the CPU's integrated heat spreader (IHS).
- Install the CPU cooler (compatible with LGA1700 mounting) onto the motherboard, securing it with the provided hardware. Refer to the cooler's manual for specific instructions.
3.2 Memory (RAM) Installation
- Locate the two SO-DIMM DDR5 memory slots.
- Open the clips at both ends of the memory slot.
- Align the notch on the DDR5 SO-DIMM module with the key in the memory slot.
- Insert the memory module firmly into the slot until the clips snap into place.
- Ensure both clips are fully closed and the module is seated evenly.
3.3 Storage Device Installation
M.2 NVMe SSD Installation:
- Locate the two M.2 NVMe PCIe 4.0 x2 slots (2280 size).
- Remove the M.2 standoff screw from the motherboard.
- Insert the M.2 SSD into the slot at a 30-degree angle.
- Gently push down the SSD and secure it with the standoff screw.
SATA Drive Installation:
- Connect SATA data cables from your SATA drives to the SFF-8643 sockets on the motherboard. Note that SFF-8643 requires a breakout cable (one to four SATA3.0) for connecting multiple drives.
- Connect SATA power cables from your power supply to the SATA drives.
- The motherboard also features a dedicated SATA3.0 socket and a SATA4PIN power socket for additional connectivity.
3.4 Power Supply Connection
- Connect the 24-pin ATX power connector from your power supply to the 24-pin ATX socket on the motherboard.
- Connect the 8-pin (or 4-pin) CPU power connector from your power supply to the 8-pin CPU power socket on the motherboard. A 500W or more power supply is recommended, especially when using 9 disks.
3.5 Peripheral Connections
- Display: Connect your monitor to the HDMI2.0, DP1.4, or Type-C (USB4) ports on the I/O panel.
- Network: Connect Ethernet cables to the four Intel 2.5G RJ45 ports.
- USB Devices: Connect USB devices to the USB3.2 and Type-C (USB4) ports on the I/O panel. Utilize the internal USB2.0 and USB3.2 pin headers for front panel USB ports.
- Audio: Connect audio devices to the 2-in-1 audio interface.
- Front Panel Connectors: Connect your chassis's front panel cables (power button, reset button, HDD LED, power LED) to the F_PANEL header.
- Fans: Connect system fans and the CPU fan to the designated 4-pin fan power supply pins.
4. Operating System Setup
This motherboard supports Microsoft Windows 10/11 64-bit and Linux operating systems. It only supports EFI mode for booting.
- Prepare a bootable USB drive or optical disc with your desired operating system installer.
- Connect the bootable media to a USB port.
- Power on the system and repeatedly press the designated key (usually Del or F2) to enter the BIOS/UEFI setup.
- Navigate to the Boot menu and ensure "EFI mode" or "UEFI mode" is enabled.
- Set the boot priority to your bootable media.
- Save changes and exit BIOS/UEFI. The system will restart and begin the OS installation process.
- Follow the on-screen instructions to complete the operating system installation.
- After OS installation, install the necessary drivers for chipset, network, audio, and graphics from the CWWK website or the provided driver disc (if applicable).
5. Troubleshooting
| Problem | Possible Cause | Solution |
|---|---|---|
| System does not power on. | Loose power connections, faulty power supply, incorrect front panel wiring. | Check 24-pin and 8-pin power connectors. Ensure power supply is functional. Verify F_PANEL connections (power button). |
| No display output. | Monitor not connected, faulty display cable, incorrect display output selected, RAM not seated correctly. | Ensure monitor is connected to the correct port (HDMI, DP, Type-C). Try different display cables. Reseat RAM modules. |
| System powers on but no POST/boot. | RAM incompatibility or improper seating, CPU not seated correctly, faulty component. | Reseat RAM modules. Try one RAM stick at a time. Ensure CPU is correctly installed. This board can be particular with RAM; ensure your modules are compatible DDR5 SO-DIMM. |
| Operating system not detected. | Incorrect boot order, M.2/SATA drive not detected, OS installed in legacy mode. | Check BIOS/UEFI boot order. Ensure M.2/SATA drives are properly connected and detected in BIOS. Verify OS was installed in EFI/UEFI mode. |
| Network connectivity issues. | Missing network drivers, faulty cable, incorrect network settings. | Install the latest Intel i226-V drivers. Check Ethernet cables. Verify network settings in OS. |
6. Specifications
| Feature | Detail |
|---|---|
| Manufacturer | CWWK |
| Model Name | NAS Board-AMD |
| Processor | Integrated AMD Ryzen 7 7840HS/8845HS/7940HS series |
| Chipset Type | AMD Ryzen |
| RAM Memory Technology | DDR5 SO-DIMM |
| Memory Slots | 2 x SO-DIMM DDR5 (Dual Channel) |
| Memory Clock Speed | 5600 MHz (default), compatible with 4800/5200MHz, supports ECC notebook memory |
| Max Memory Capacity | 64 GB (32GB per slot) |
| Storage Interfaces | 2 x M.2 NVMe PCIe 4.0 x2 (2280), 2 x SFF-8643 (total 9 SATA3.0 via breakout cables), 1 x SATA3.0 socket |
| PCIe Slots | 1 x PCI-E x16 slot (PCIe 4.0 x8 signal) |
| Network | 4 x Intel i226-V 2.5G RJ45 electrical ports |
| Display Outputs | 1 x DP1.4, 1 x HDMI2.0, 1 x Type-C (USB4) - Supports 4K@60Hz |
| USB Ports (Rear I/O) | 2 x USB3.2, 1 x Type-C (USB4), 1 x USB3.2 |
| Internal USB Headers | 2 x USB2.0 sockets, 1 x USB3.2 pin |
| Audio | 1 x Audio (2-in-1 interface) |
| Power Connector | ATX 24PIN + 8PIN |
| Form Factor | Mini-ITX (6.7-in x 6.7-in, 17.0cm x 17.0cm) |
| Operating System Support | Microsoft Windows 10/11 64-Bit, Linux (EFI mode only) |
7. Warranty and Support
Warranty Information
For specific warranty terms and conditions, please refer to the documentation provided with your purchase or contact CWWK PC directly. Warranty coverage typically applies to defects in materials and workmanship under normal use.
Technical Support
If you encounter any issues or require technical assistance, please visit the official CWWK PC store or contact their customer support. You can find more information and contact details at the CWWK PC Store on Amazon.