1. Introduction
Thank you for choosing the Pinelicorn 440W LED Stage Spotlight. This professional lighting equipment is designed to provide powerful and versatile illumination for various stage performances, events, and venues. Featuring a robust cast aluminum shell, adjustable aperture, multiple color options, and both manual and DMX control capabilities, this spotlight offers stable performance and dynamic lighting effects. This manual provides essential information for the safe and effective setup, operation, and maintenance of your new stage spotlight.

Image 1.1: The Pinelicorn 440W LED Stage Spotlight in operation, demonstrating its powerful red beam and available color options (white, red, yellow, blue, green, orange).
2. Safety Instructions
Please read and understand all safety instructions before installing or operating the spotlight. Failure to follow these instructions may result in electric shock, fire, or serious injury.
- Electrical Safety: Ensure the power supply voltage matches the specifications of the spotlight (110-240V, 50/60Hz). Always connect to a grounded outlet. Disconnect power before any cleaning, maintenance, or assembly.
- Heat: The spotlight generates heat during operation. Do not touch the housing or lens immediately after use. Ensure adequate ventilation around the unit. Maintain a safe distance from flammable materials.
- Eye Protection: Do not look directly into the light source when the spotlight is operating, as it can cause eye damage.
- Placement: Install the spotlight on a stable, level surface using the provided tripod. Ensure the tripod is fully extended and locked to prevent tipping. Do not block ventilation openings.
- Moisture: This product is intended for indoor use only. Do not expose the spotlight to rain, moisture, or extreme humidity.
- Servicing: Refer all servicing to qualified personnel. Do not attempt to repair the unit yourself.
3. Package Contents
Verify that all items listed below are included in your package. If any items are missing or damaged, please contact your retailer.
- 1 x 440W Stage Spotlight Unit
- 1 x Power Cable (1.5m/4.92ft)
- 1 x Signal Cable (2m/6.56ft)
- 1 x Tripod Stand
- 1 x English Manual (this document)
4. Specifications
Detailed technical specifications for the Pinelicorn 440W LED Stage Spotlight (Model HY-H09).
| Feature | Specification |
|---|---|
| Model | HY-H09 |
| Material | Cast Aluminium |
| Power Source | Corded Electric |
| Voltage | 110-240V 50/60Hz |
| Power Consumption | 550W |
| Light Source Power | 440W |
| Light Colors | White, Red, Yellow, Blue, Green, Orange |
| Control Signal | Self-signal |
| Control Mode | Stand-alone Mode |
| Control Type | DMX, Manual Control |
| Heat Dissipation System | High-intensity Air-cooled |
| Strobe | 1-7 Times / Sec |
| Color Temperature Correction | 6000K (High), 5600K (Normal), 3200K (Low) |
| Beam Angle | 23° |
| Focus Adjustment Range | Within 100m (328.08ft) |
| Beam Distance | 100-120m (328.08-393.7ft) |
| Power Cable Length | 1.5m (4.92ft) |
| Signal Cable Length | 2m (6.56ft) |
| Stage Spotlight Size | 68 x 29 x 20 cm (26.77 x 11.42 x 7.87 in) |
| Height Adjustable Range (Tripod) | 1.2-1.52m (3.94-4.99ft) |
| Bracket Foot Spacing (Tripod) | 75cm (29.53in) |
| UPC | 763114567189 |
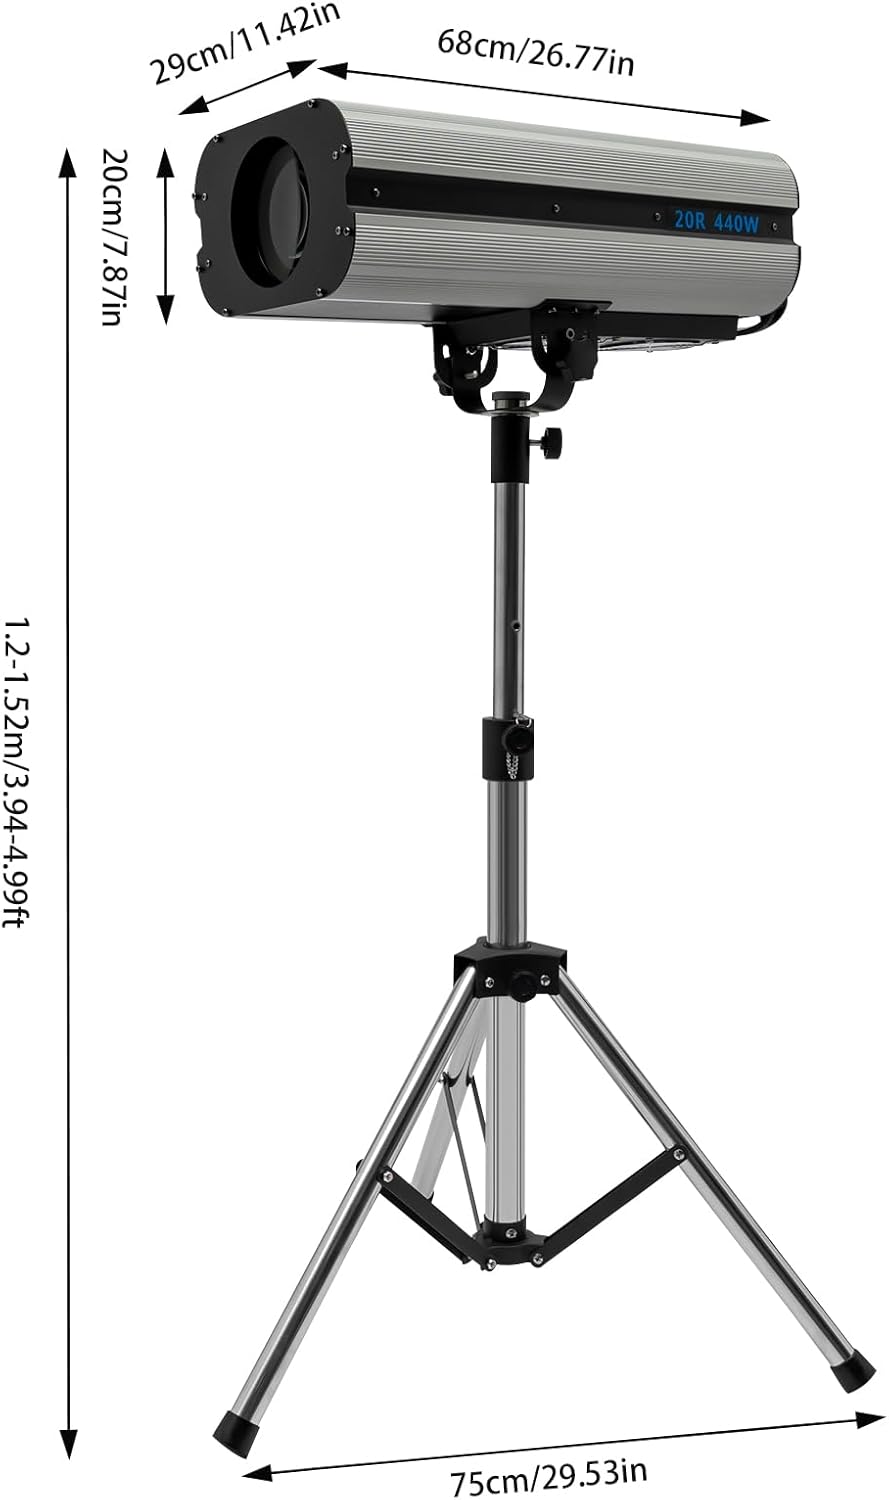
Image 4.1: Dimensional diagram of the spotlight and tripod.
5. Setup
5.1 Tripod Assembly and Spotlight Mounting
- Unfold the tripod legs and ensure they are fully extended and stable.
- Adjust the height of the tripod stand to your desired level (1.2-1.52m / 3.94-4.99ft) using the adjustment knob, then securely tighten it.
- Carefully place the 440W Stage Spotlight unit onto the mounting bracket of the tripod. Secure it firmly using the provided fasteners or locking mechanisms.
- Ensure the spotlight is balanced and stable on the tripod before proceeding.

Image 5.1: Spotlight assembly onto the tripod.

Image 5.2: Fully assembled spotlight on tripod.
5.2 Power and Signal Connections
- Connect the provided power cable to the power input port on the back of the spotlight.
- Plug the other end of the power cable into a suitable grounded electrical outlet (110-240V, 50/60Hz).
- If using DMX control, connect the signal cable from your DMX controller to the DMX IN port on the spotlight. For daisy-chaining multiple units, connect from DMX OUT of the first unit to DMX IN of the next.
6. Operating Instructions
6.1 Powering On/Off
- Locate the main power switch on the control panel.
- Flip the switch to the 'ON' position to power on the spotlight. The unit will initiate a self-test.
- To power off, flip the switch to the 'OFF' position.
6.2 Manual Control Panel Overview
The control panel allows for direct manual adjustment of various lighting parameters.

Image 6.1: Detailed view of the control panel.
- Power Switches: Main ON/OFF switch for the unit.
- Color Buttons: Press buttons labeled WHITE, YELLOW, ORANGE, GREEN, BLUE, RED to select the desired light color.
- Strobe Slider: Adjusts the strobe speed (1-7 times/sec). Move the slider up for faster strobe, down for slower.
- Heating Slider: Controls the heating function.
- Aperture Slider: Adjusts the size of the light beam's aperture. Move the slider to widen or narrow the beam.
6.3 Adjusting Focus and Beam
The spotlight features an adjustable lens for precise focus and beam shaping.

Image 6.2: Front lens and aperture.
- Focus Adjustment: Rotate the focus ring around the lens to sharpen or soften the beam edge. The focus can be adjusted for distances within 100m (328.08ft).
- Aperture Adjustment: Use the 'APERTURE' slider on the control panel to mechanically adjust the size of the light beam. This allows for a narrow, concentrated spot or a wider wash.
6.4 Color Temperature Correction
The spotlight offers three color temperature settings:
- High: 6000K
- Normal: 5600K
- Low: 3200K
These settings can be adjusted via DMX control or specific manual controls if available (refer to the control panel for dedicated buttons or sliders for color temperature, if present beyond the main color selection).
7. Maintenance
Regular maintenance ensures optimal performance and extends the lifespan of your spotlight.
- Cleaning: Disconnect power before cleaning. Use a soft, dry cloth to wipe the exterior of the unit. For the lens, use a specialized lens cleaning solution and a microfiber cloth to avoid scratches. Do not use harsh chemicals or abrasive cleaners.
- Ventilation: Periodically check that the ventilation openings are clear of dust and debris to ensure proper heat dissipation.
- Cable Inspection: Regularly inspect power and signal cables for any signs of damage, fraying, or loose connections. Replace damaged cables immediately.
- Storage: When not in use, store the spotlight in a cool, dry place, away from direct sunlight and extreme temperatures. It is recommended to store it in its original packaging or a protective case.
8. Troubleshooting
If you encounter issues with your spotlight, refer to the following common problems and solutions:
| Problem | Possible Cause | Solution |
|---|---|---|
| Spotlight does not power on. | No power supply; power cable loose or damaged; main power switch off. | Check power outlet; ensure power cable is securely connected; verify main power switch is ON. |
| No light output. | Unit is on but light source is off; internal fault. | Ensure the light source is activated (if applicable via DMX or specific manual control); if problem persists, contact support. |
| Incorrect or no color change. | Color buttons not pressed correctly; DMX signal issue. | Press color buttons firmly; check DMX connections and controller settings. |
| Beam is blurry or unfocused. | Focus ring not adjusted. | Rotate the focus ring on the lens until the beam is sharp. |
| Unit overheats. | Blocked ventilation; prolonged use in high ambient temperature. | Ensure ventilation openings are clear; operate in a well-ventilated area; allow unit to cool down. |
9. Warranty and Support
For warranty information, please refer to the terms and conditions provided at the time of purchase or contact your retailer. If you require technical assistance or have questions not covered in this manual, please contact Pinelicorn customer support or your authorized dealer.
Please have your product model (440W) and UPC (763114567189) available when contacting support.