1. Introduction
The NEEWER FC-16 2.4G Wireless Flash Trigger System is designed to provide reliable wireless control for your DSLR camera's shutter, studio flashes, and speedlight flashes. This system operates on a 2.4GHz frequency, offering 16 selectable channels for stable and interference-free communication. It functions as a 3-in-1 device: a wireless studio strobe trigger, a wireless speedlight trigger, and a wireless camera shutter release. This manual provides detailed instructions for setup, operation, and maintenance.

Image 1.1: The NEEWER FC-16 Wireless Flash Trigger System, showing the transmitter and two receivers.
2. Package Contents
Please verify that all items listed below are included in your package:
- 1 x FC-16 Wireless Transmitter
- 2 x FC-16 Wireless Receiver
- 1 x N1 Camera Shutter Cable (for specific Nikon models)
- 1 x N3 Camera Shutter Cable (for specific Nikon models)
- 2 x 2.5mm to 3.5mm Sync Cable
- 2 x 3.5mm to 6.3mm Adapter
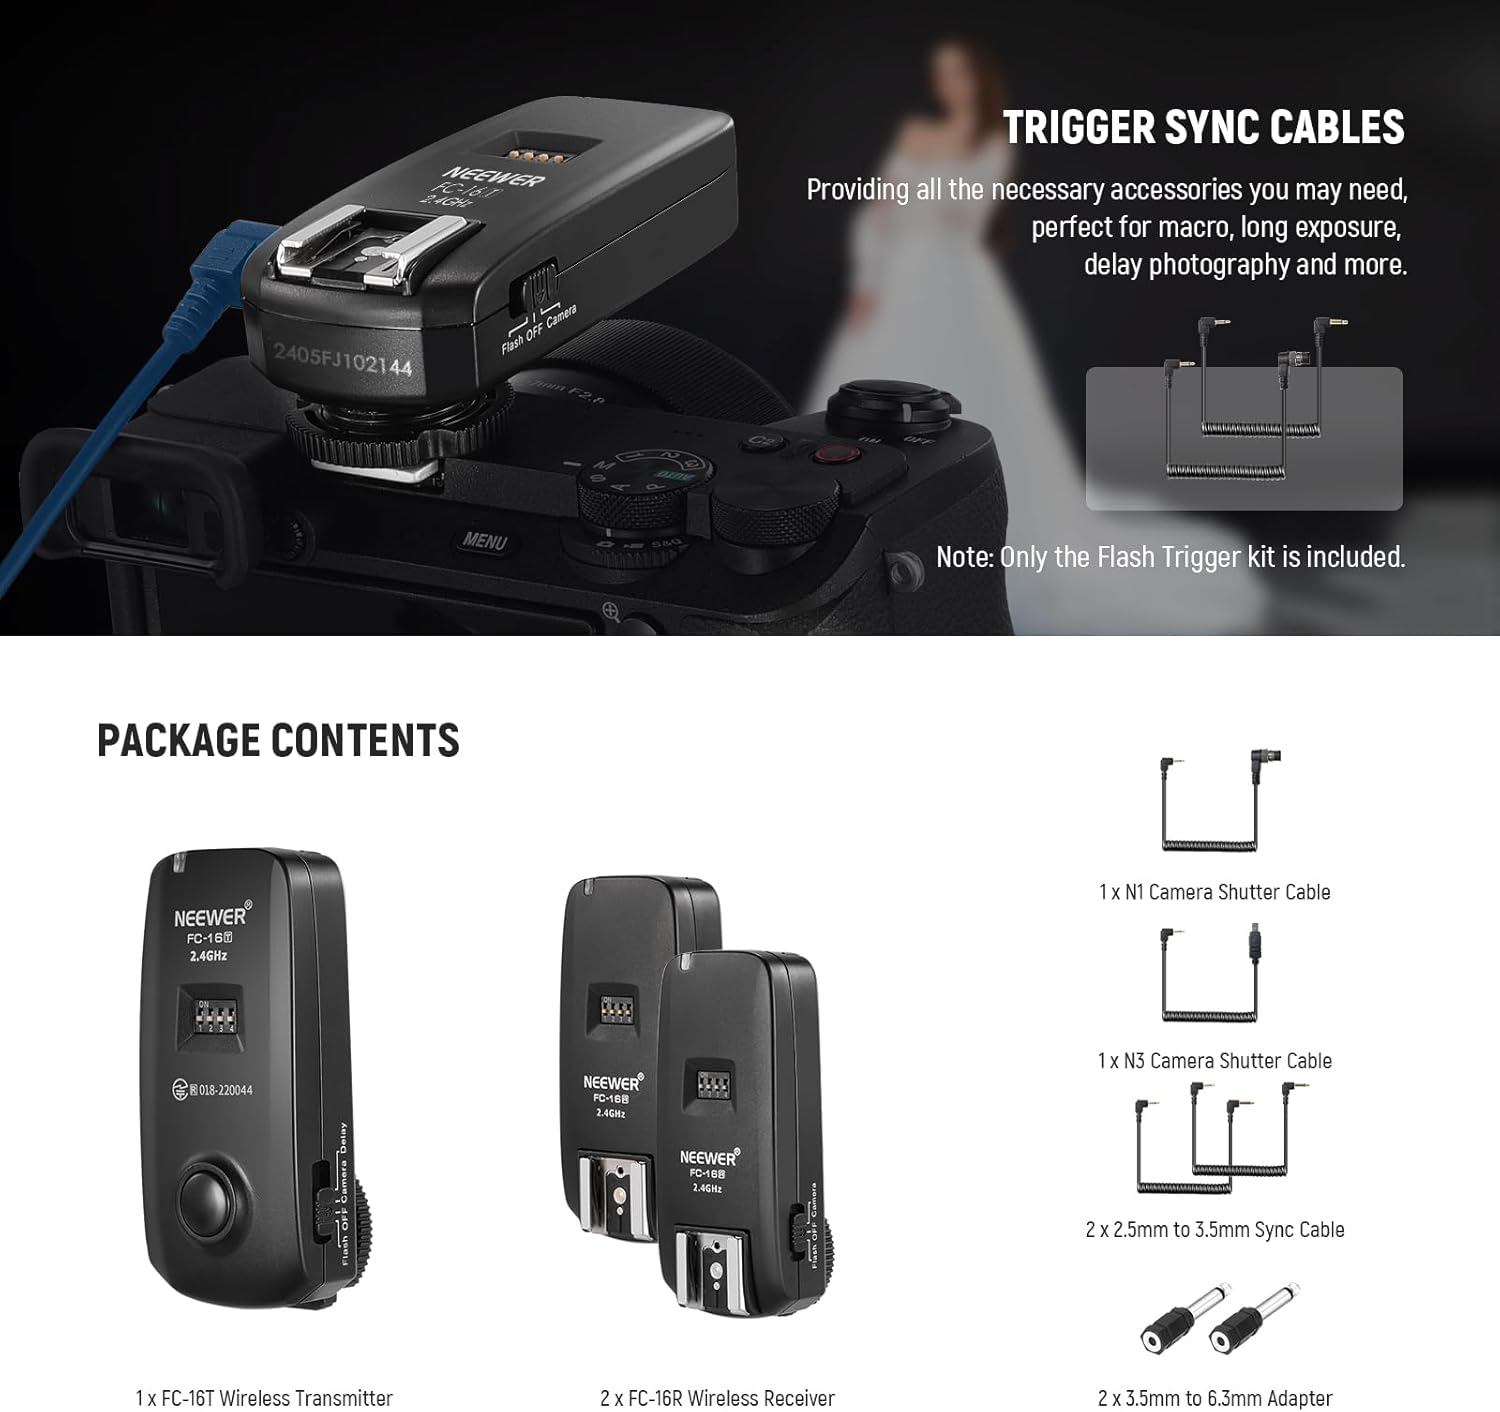
Image 2.1: Contents of the NEEWER FC-16 package, including the transmitter, receivers, and various cables and adapters.
3. Product Overview
Familiarize yourself with the components of the FC-16 transmitter and receiver:
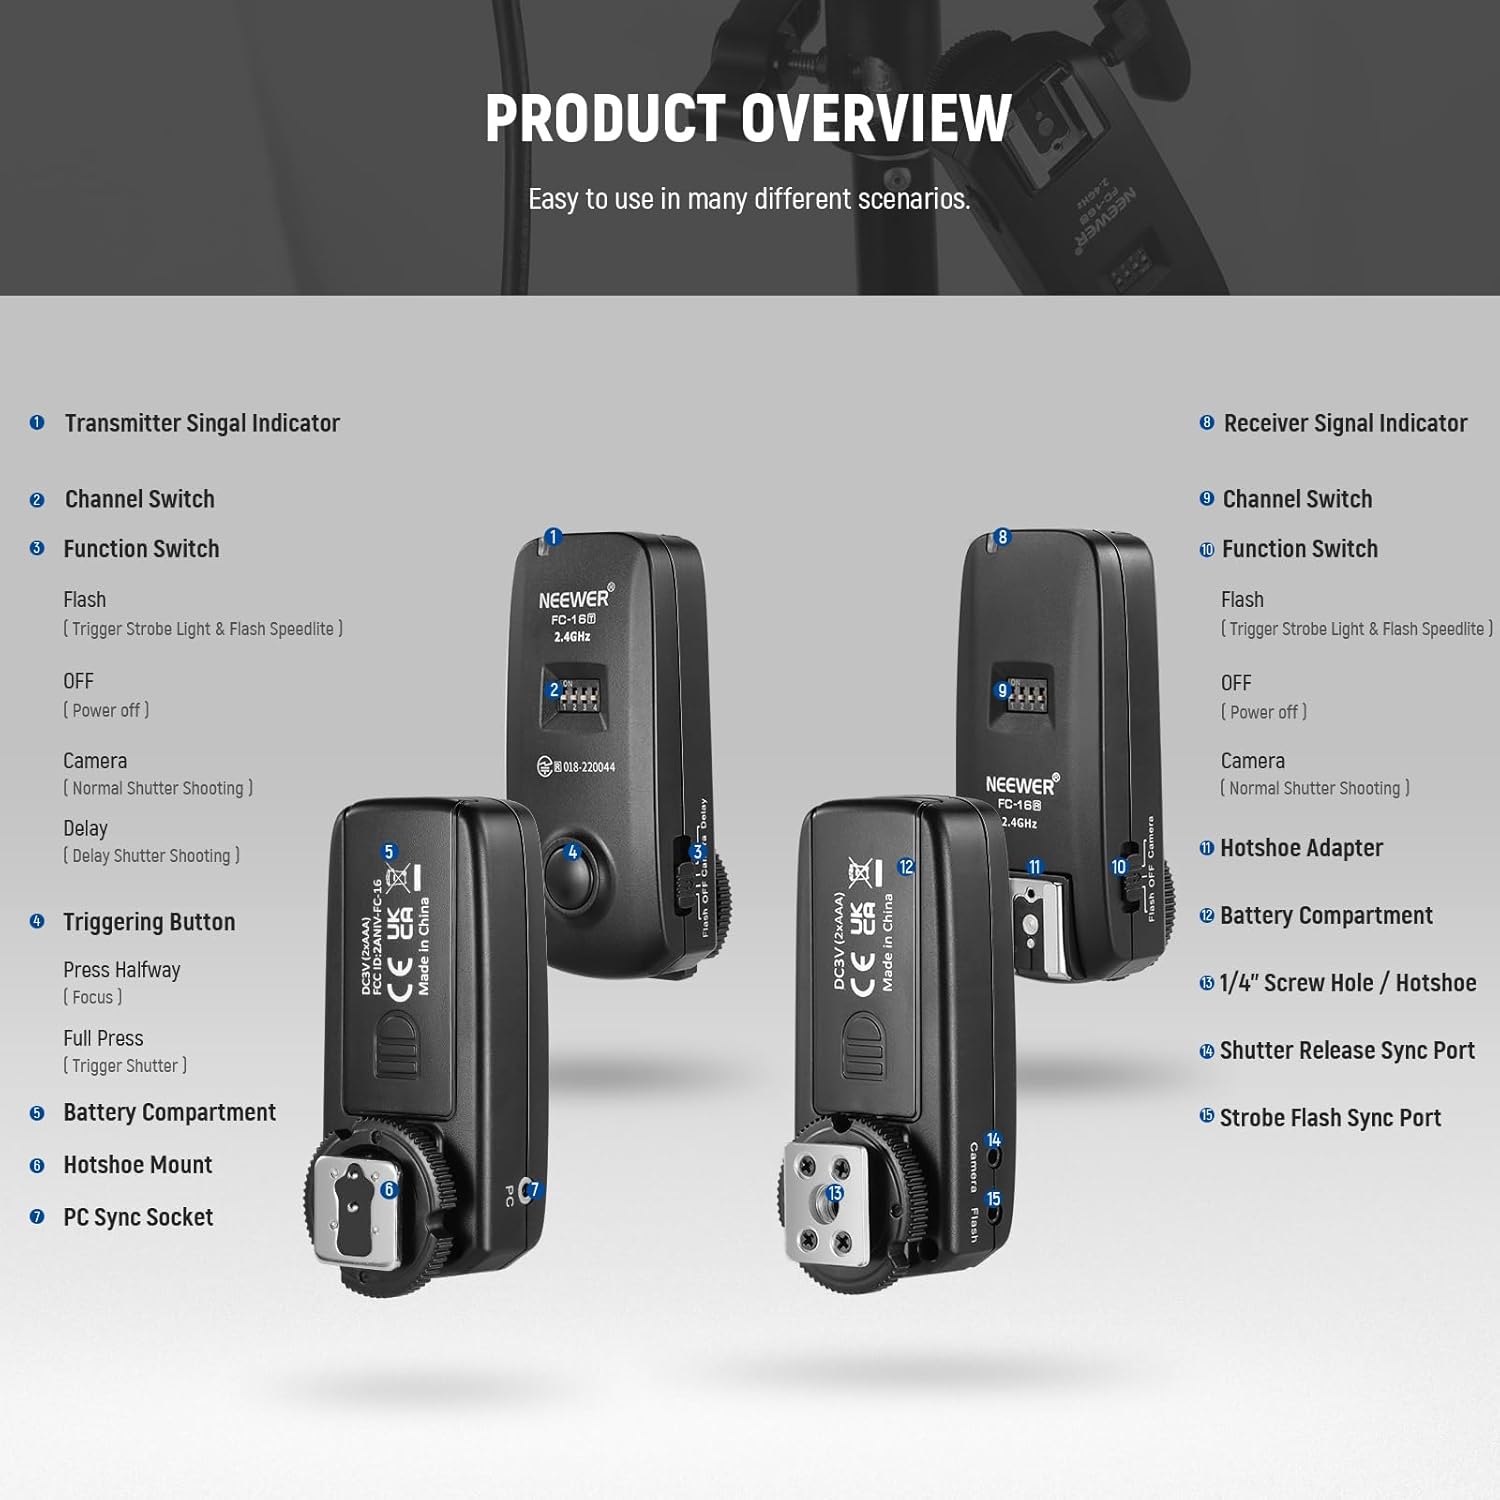
Image 3.1: Detailed diagram illustrating the various parts and functions of the FC-16 transmitter and receiver units.
Transmitter Components:
- Transmitter Signal Indicator: Lights up to indicate power and signal transmission.
- Channel Switch (DIP switches): Used to select one of 16 available channels.
- Function Switch: Selects operation mode (Flash, OFF, Camera, Delay).
- Triggering Button: Half-press for camera focus, full-press for shutter release or flash trigger.
- Battery Compartment: Holds AAA batteries.
- Hotshoe Mount: For mounting on a camera's hotshoe.
- PC Sync Socket: For connecting to cameras or studio flashes with a PC sync port.
Receiver Components:
- Receiver Signal Indicator: Lights up to indicate power and signal reception.
- Channel Switch (DIP switches): Must match the transmitter's channel.
- Function Switch: Selects operation mode (Flash, OFF, Camera).
- Hotshoe Adapter: For mounting speedlights.
- Battery Compartment: Holds AAA batteries.
- 1/4" Screw Hole / Hotshoe: For mounting on light stands or other accessories.
- Shutter Release Sync Port: For connecting to a camera's shutter release port.
- Strobe Flash Sync Port: For connecting to studio flashes.
4. Setup
4.1 Battery Installation
- Open the battery compartment cover on both the transmitter and receiver units.
- Insert two AAA batteries into each unit, ensuring correct polarity (+/-).
- Close the battery compartment covers securely.
4.2 Channel Selection
Both the transmitter and all receivers must be set to the same channel for proper communication. The FC-16 offers 16 channels, selected using the DIP switches:
- Locate the four DIP switches on the side of the transmitter and each receiver.
- Adjust the switches to select your desired channel. Refer to the channel configuration diagram (Image 4.1) for specific settings.
- Ensure the DIP switch settings are identical on the transmitter and all connected receivers.

Image 4.1: Channel selection guide for the FC-16, illustrating the DIP switch settings for channels 0-15.
4.3 Connecting to Camera (Transmitter)
- Slide the transmitter onto your camera's hotshoe and secure it with the locking mechanism.
- Alternatively, if your camera has a PC sync port, connect the transmitter via a PC sync cable (not included).
4.4 Connecting to Flashes (Receivers)
- For Speedlights: Slide the speedlight onto the receiver's hotshoe.
- For Studio Strobes: Connect the receiver's Strobe Flash Sync Port to the studio strobe using a 2.5mm to 3.5mm sync cable and, if necessary, a 3.5mm to 6.3mm adapter.
- Mount the receiver on a light stand using its 1/4" screw hole or integrated hotshoe.
4.5 Connecting for Camera Shutter Release (Receiver)
- Identify the correct N1 or N3 camera shutter cable for your Nikon camera model.
- Connect one end of the shutter cable to the receiver's Shutter Release Sync Port and the other end to your camera's remote port.
5. Operating Instructions
5.1 Power On/Off and Function Mode Selection
- On the transmitter, slide the Function Switch to your desired mode:
- Flash: For triggering external flashes.
- OFF: Powers off the transmitter.
- Camera: For wireless camera shutter release.
- Delay: For delayed camera shutter release.
- On each receiver, slide the Function Switch to:
- Flash: For receiving flash trigger signals.
- OFF: Powers off the receiver.
- Camera: For receiving camera shutter release signals.
- Ensure the transmitter and all active receivers are set to the same channel and appropriate function mode.
5.2 Wireless Flash Triggering
- Set the transmitter's Function Switch to 'Flash'.
- Set the receiver(s)' Function Switch to 'Flash'.
- Mount the transmitter on your camera's hotshoe.
- Mount your speedlight(s) on the receiver(s)' hotshoe or connect studio strobe(s) via sync cable.
- Press the camera's shutter button or the transmitter's Triggering Button to fire the flashes.
5.3 Wireless Camera Shutter Release
- Set the transmitter's Function Switch to 'Camera' or 'Delay'.
- Set one receiver's Function Switch to 'Camera'.
- Connect the receiver to your camera's remote port using the appropriate N1 or N3 cable.
- For instant release: Press the transmitter's Triggering Button halfway to focus, then fully to release the shutter.
- For delayed release: Set the transmitter to 'Delay' mode. Press the Triggering Button fully. The camera will trigger after a short delay (typically 2 seconds).
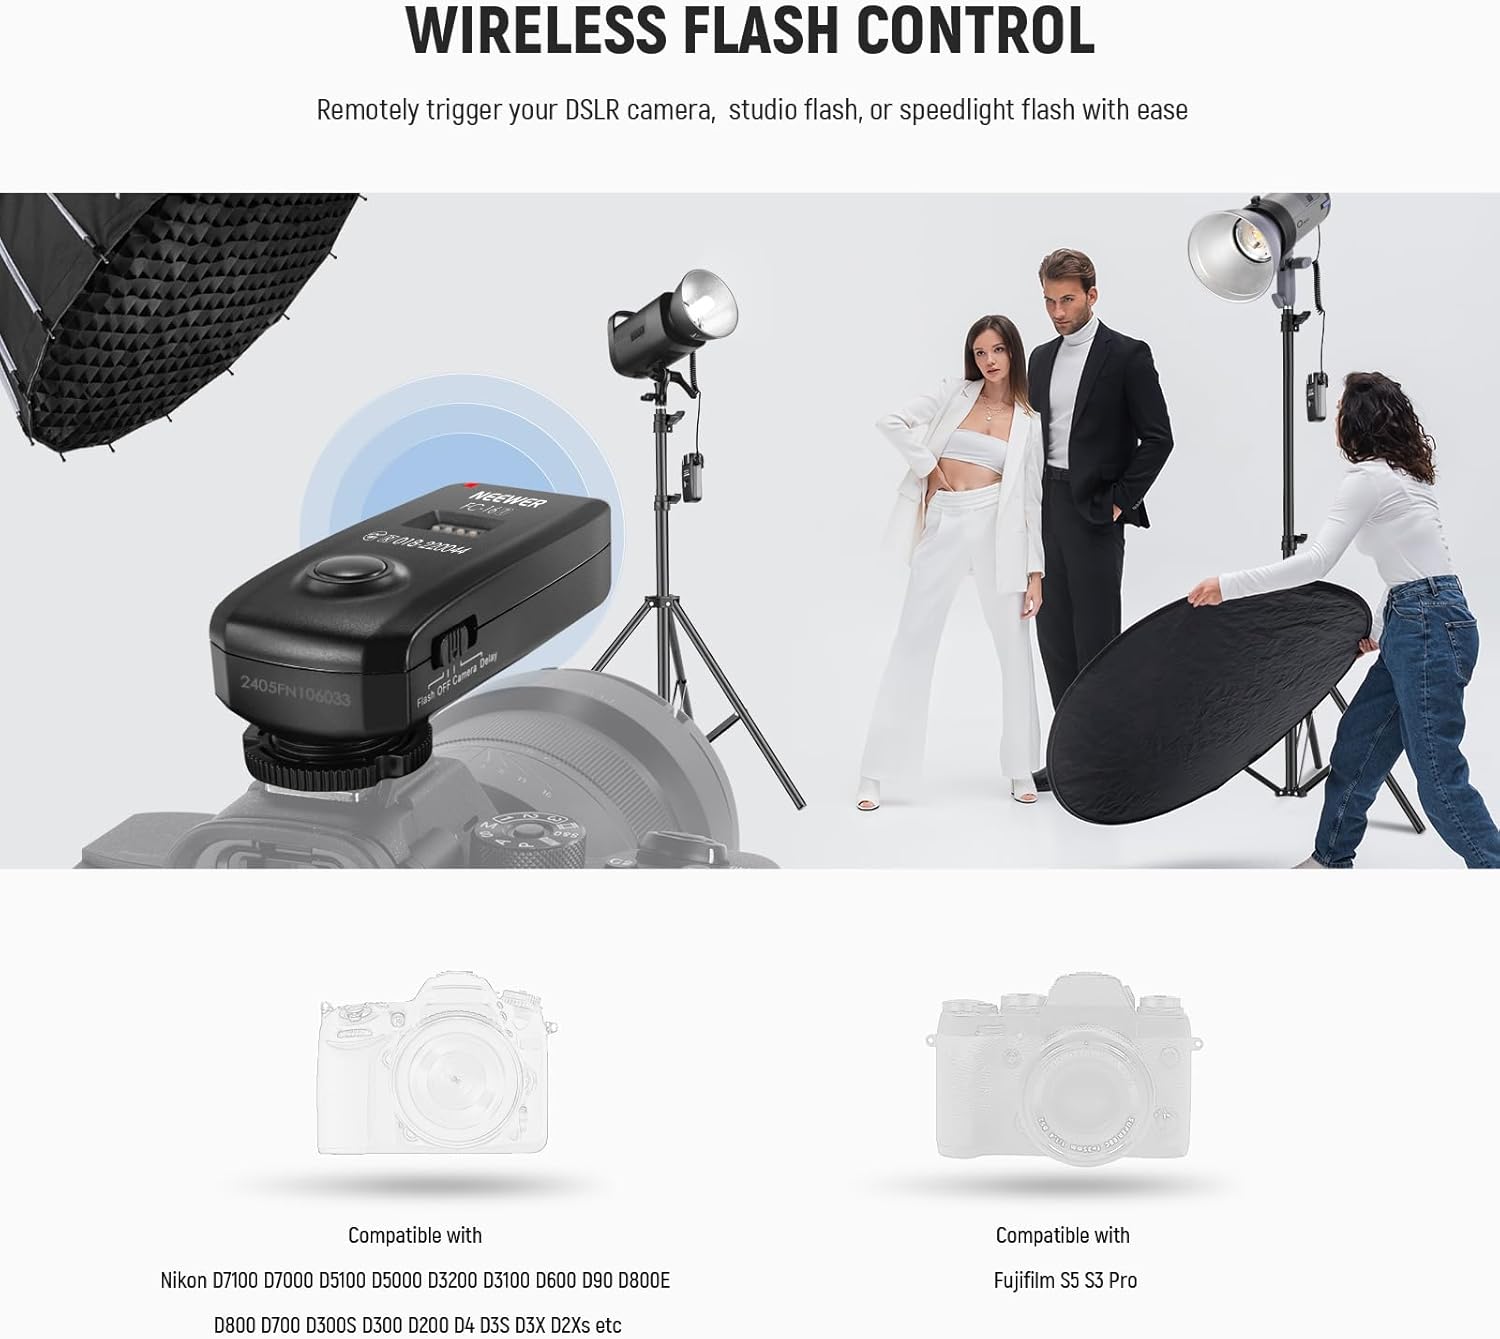
Image 5.1: Example of wireless flash control using the FC-16 system in a studio environment.

Image 5.2: The FC-16's versatile functions as a strobe trigger, speedlight trigger, and camera shutter release.
6. Compatibility
The NEEWER FC-16 system is compatible with a wide range of Nikon DSLR cameras and Fujifilm S5 S3 Pro. Specific Nikon models include:
- Nikon D7100, D7000, D5100, D5000, D3200, D3100, D600, D90
- Nikon D800E, D800, D700, D300S, D300, D200, D4, D3S, D3X, D2Xs
Note: This system does not support TTL (Through-The-Lens) or HSS (High-Speed Sync) modes.
7. Specifications
| Feature | Specification |
|---|---|
| Model Number | 10104086 |
| Wireless Frequency | 2.4GHz |
| Channels | 16 selectable |
| Sync Speed | Up to 1/200s |
| Operating Distance | Up to 82ft / 25m (in obstacle-free areas) |
| Power Source | 2 x AAA batteries (per unit) |
| Functions | Wireless Flash Trigger, Wireless Camera Shutter Release |
| Compatibility | Nikon DSLR cameras (N1/N3 series), Fujifilm S5 S3 Pro |
| Item Weight | 6.3 ounces (total for kit) |
| Package Dimensions | 8.54 x 6.42 x 1.93 inches |

Image 7.1: Illustration of the FC-16's wireless operating range.
8. Troubleshooting
- Issue: Flashes are not firing or camera shutter is not releasing.
Solution:- Ensure fresh AAA batteries are correctly installed in both the transmitter and all receivers.
- Verify that the channel DIP switches on the transmitter and all receivers are set to the exact same channel.
- Check that the Function Switch on both the transmitter and receivers is set to the appropriate mode ('Flash' for flashes, 'Camera' for shutter release).
- Confirm all cables (shutter release, sync cables) are securely connected to the correct ports on the camera, flashes, and receivers.
- Ensure the transmitter is properly seated and locked onto the camera's hotshoe.
- Check the distance between the transmitter and receivers; the maximum effective range is 82ft/25m in obstacle-free areas. Reduce distance or clear obstructions if necessary.
- Test with a different set of batteries or a different camera/flash if possible to isolate the problem.
- Issue: Intermittent triggering or signal interference.
Solution:- Change to a different channel using the DIP switches. There are 16 channels available to avoid interference.
- Ensure there are no other 2.4GHz wireless devices operating nearby that might cause interference.
- Maintain a clear line of sight between the transmitter and receivers.
- Issue: Camera does not focus when the transmitter button is half-pressed.
Solution:- Ensure the transmitter's Function Switch is set to 'Camera' or 'Delay'.
- Verify the receiver is correctly connected to the camera's remote port with the appropriate shutter cable.
- Check camera settings to ensure external shutter release is enabled if applicable.
9. Maintenance
- Keep the units dry. Do not expose them to moisture or rain.
- Clean the units with a soft, dry cloth. Do not use harsh chemicals or abrasive cleaners.
- Remove batteries if the units will not be used for an extended period to prevent leakage.
- Store the units in a cool, dry place away from direct sunlight and extreme temperatures.
- Avoid dropping or subjecting the units to strong impacts.
10. Warranty and Support
For warranty information and technical support, please refer to the official NEEWER website or contact NEEWER customer service directly. Keep your purchase receipt as proof of purchase for any warranty claims.