1. Introduction
This manual provides instructions for the setup, operation, maintenance, and troubleshooting of the DIYmalls 2.8 inch ESP32 Display JC2432W328C Capacitive Touchscreen module. This module integrates an ESP-32 development board with a 2.8-inch capacitive touchscreen display, designed for various embedded projects and development with Arduino IDE.

Image 1.1: The DIYmalls 2.8 inch ESP32 Display JC2432W328C module, showcasing its display and included connection cables.
2. Key Features
- Integrated Module: Combines an ESP-32 development board with a 2.8-inch capacitive touchscreen display.
- Capacitive Touch: Provides responsive and accurate touch input.
- High Resolution: 240x320 pixel TFT LCD with ST7789 driver.
- Programming Support: Compatible with Arduino IDE and ESP32 flash tools for code uploading.
- Connectivity: Features a Type-C port for power and data, along with various 1.25mm connectors for extended I/O, battery, and speaker.
- Wide View Angle: Display offers a view angle greater than 60 degrees.
3. Package Contents
Verify that all items listed below are present in your package:
- 1x 2.8" ESP32 Touchscreen Module (JC2432W328C)
- 2x 1.25mm 2-pin cables
- 2x 1.25mm 4-pin to female Dupont wires
- 2x 1.25mm 4-pin to male Dupont wires
- 1x Plastic storage box
Note: A USB Type-C cable for power and data transfer is not included and must be supplied separately.

Image 3.1: The module and accessories are provided in a clear plastic storage box.
4. Setup Guide
4.1 Hardware Overview
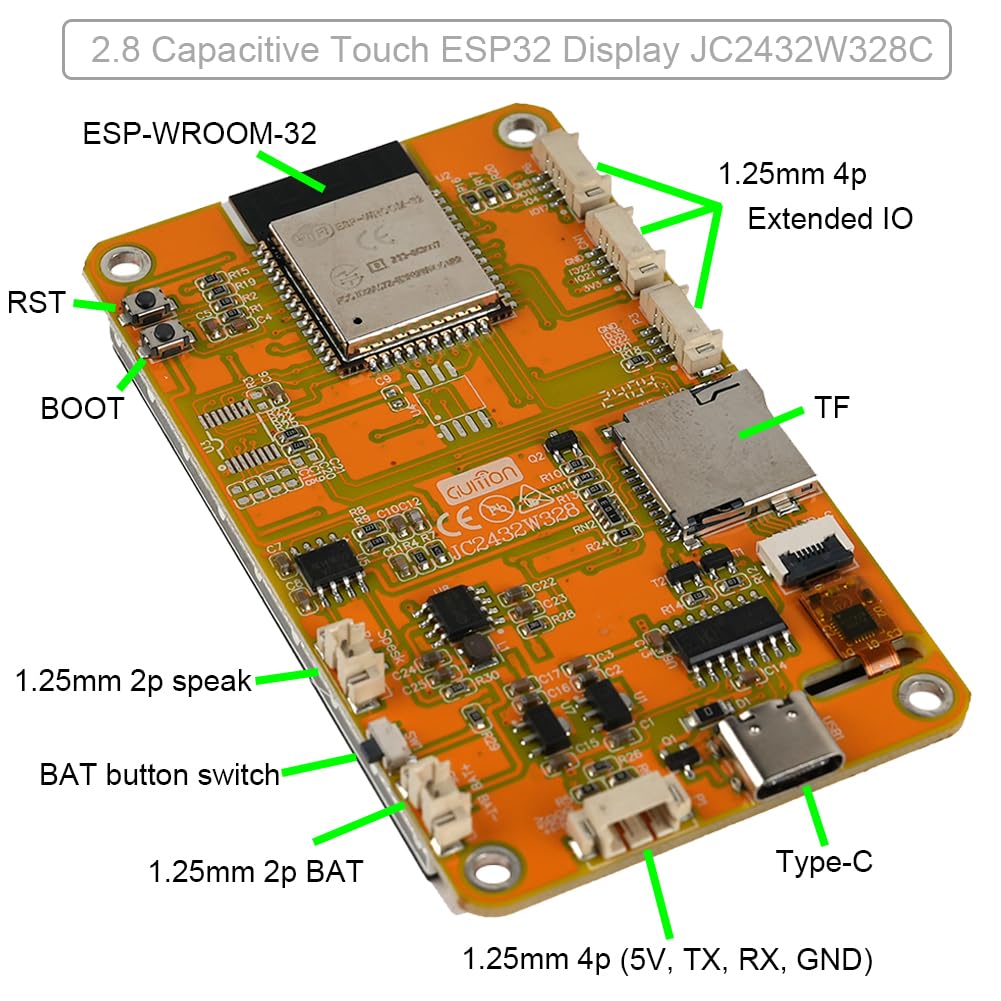
Image 4.1: Back view of the JC2432W328C module, highlighting key components and connection points.
The module features several connection points and components:
- ESP-WROOM-32: The main microcontroller module.
- TF (MicroSD) Card Slot: For external storage.
- Type-C Port: For power supply (5V) and data communication.
- 1.25mm 4p Extended I/O: Connectors for additional input/output.
- 1.25mm 2p Speak: Connector for a speaker.
- 1.25mm 2p BAT: Connector for battery power.
- BAT button switch: Power switch for battery operation.
- RST (Reset) Button: Resets the ESP32 module.
- BOOT Button: Used for entering bootloader mode for flashing firmware.
4.2 Powering the Module
The module can be powered via the Type-C USB port. It is recommended to use a 5V power adapter for stable operation, rather than directly from a PC's USB port, especially during development or when driving peripherals.
- Connect a 5V power adapter to the Type-C port.
- If using a battery, connect it to the 1.25mm 2p BAT connector and ensure the BAT button switch is in the ON position.
4.3 Software Setup (Arduino IDE)
To program the ESP32 Display module using the Arduino IDE, follow these steps:
- Install Arduino IDE: If not already installed, download and install the Arduino IDE from the official Arduino website.
- Add ESP32 Board Manager URL:
- Go to File > Preferences in the Arduino IDE.
- In the "Additional Board Manager URLs" field, add:
https://raw.githubusercontent.com/espressif/arduino-esp32/gh-pages/package_esp32_index.json - Click OK.
- Install ESP32 Boards:
- Go to Tools > Board > Board Manager...
- Search for "esp32" and install the "esp32 by Espressif Systems" package.
- Select Board: Go to Tools > Board > ESP32 Arduino and select the appropriate ESP32 board (e.g., "ESP32 Dev Module" or "ESP32 Wrover Module" depending on the specific ESP-WROOM-32 variant).
- Install Libraries: Depending on your project, you may need to install display and touch libraries (e.g., TFT_eSPI, LovyanGFX, or specific libraries provided by DIYmalls). These can usually be installed via Sketch > Include Library > Manage Libraries...

Image 4.2: Example of uploading code to the ESP32 display using Arduino IDE or ESP32 Download Tool.
5. Operating Instructions
5.1 Basic Operation
Once powered, the module will typically run pre-loaded demo code or your uploaded program. The capacitive touchscreen allows for direct interaction with the display.

Image 5.1: Demonstrating capacitive touch interaction on the display, adjusting a slider.
The display is designed for interactive applications, allowing users to tap, swipe, and use gestures as programmed. The responsiveness of the capacitive touch screen is suitable for various user interface designs.
5.2 Uploading Code
To upload new code to the ESP32 module:
- Connect the module to your computer via the Type-C USB cable.
- Open your sketch in Arduino IDE.
- Select the correct board and COM port under Tools.
- Press the Upload button in the Arduino IDE.
- If the upload fails, you may need to manually put the ESP32 into bootloader mode by holding down the BOOT button, pressing and releasing the RST button, and then releasing the BOOT button.
Alternatively, you can use the ESP32 Flash Tool for uploading compiled binaries (.bin files).
6. Maintenance
- Cleaning: Use a soft, dry, anti-static cloth to clean the display surface. Avoid abrasive cleaners or solvents.
- Storage: Store the module in its original plastic box or an anti-static bag when not in use to protect it from dust and static discharge.
- Handling: Handle the module by its edges to avoid touching sensitive components or the display surface.
- Power Supply: Always use a stable 5V power supply. Incorrect voltage can damage the module.
7. Troubleshooting
| Problem | Possible Cause | Solution |
|---|---|---|
| Display does not turn on. | No power, incorrect power connection, faulty USB cable. |
|
| Code upload fails. | Incorrect COM port, wrong board selected, module not in bootloader mode, driver issues. |
|
| Touchscreen unresponsive or inaccurate. | Software issue, calibration needed, physical damage. |
|
| Display flickers or shows glitches. | Unstable power supply, loose connections, software issues, hardware defect. |
|
8. Technical Specifications
| Feature | Specification |
|---|---|
| Model | JC2432W328C |
| Display Size | 2.8 inch |
| Touch Type | Capacitive Touch |
| Module | ESP32-WROOM-32 |
| Operating Voltage | 5V |
| Resolution | 240x320 pixels |
| Driver IC | ST7789 |
| View Angle | > 60 degrees |
| Port | Type-C USB |
| Dimensions (PCB) | 78.0mm x 42.0mm (approximate, refer to dimension image) |

Image 8.1: Dimensions of the JC2432W328C module.
9. Support and Contact
For technical assistance, documentation, or further inquiries, please contact DIYmalls support.
You can typically find support information by visiting the DIYmalls store page on Amazon and clicking "Ask a question".
For additional resources and community support, consider searching online forums and communities dedicated to ESP32 development and Arduino IDE.
10. Warranty Information
This product is covered by the standard return policy as per the retailer's terms and conditions. For specific warranty details, please refer to the purchase documentation or contact the seller directly.
The buybox_winner return_policy indicates a duration of 30 days for refund/replacement.

