1. Introduction
Thank you for choosing the Lifewit Farmhouse TV Stand (Model 24134). This manual provides essential information for the safe assembly, operation, and maintenance of your new TV stand. Please read all instructions carefully before beginning assembly and retain this manual for future reference.

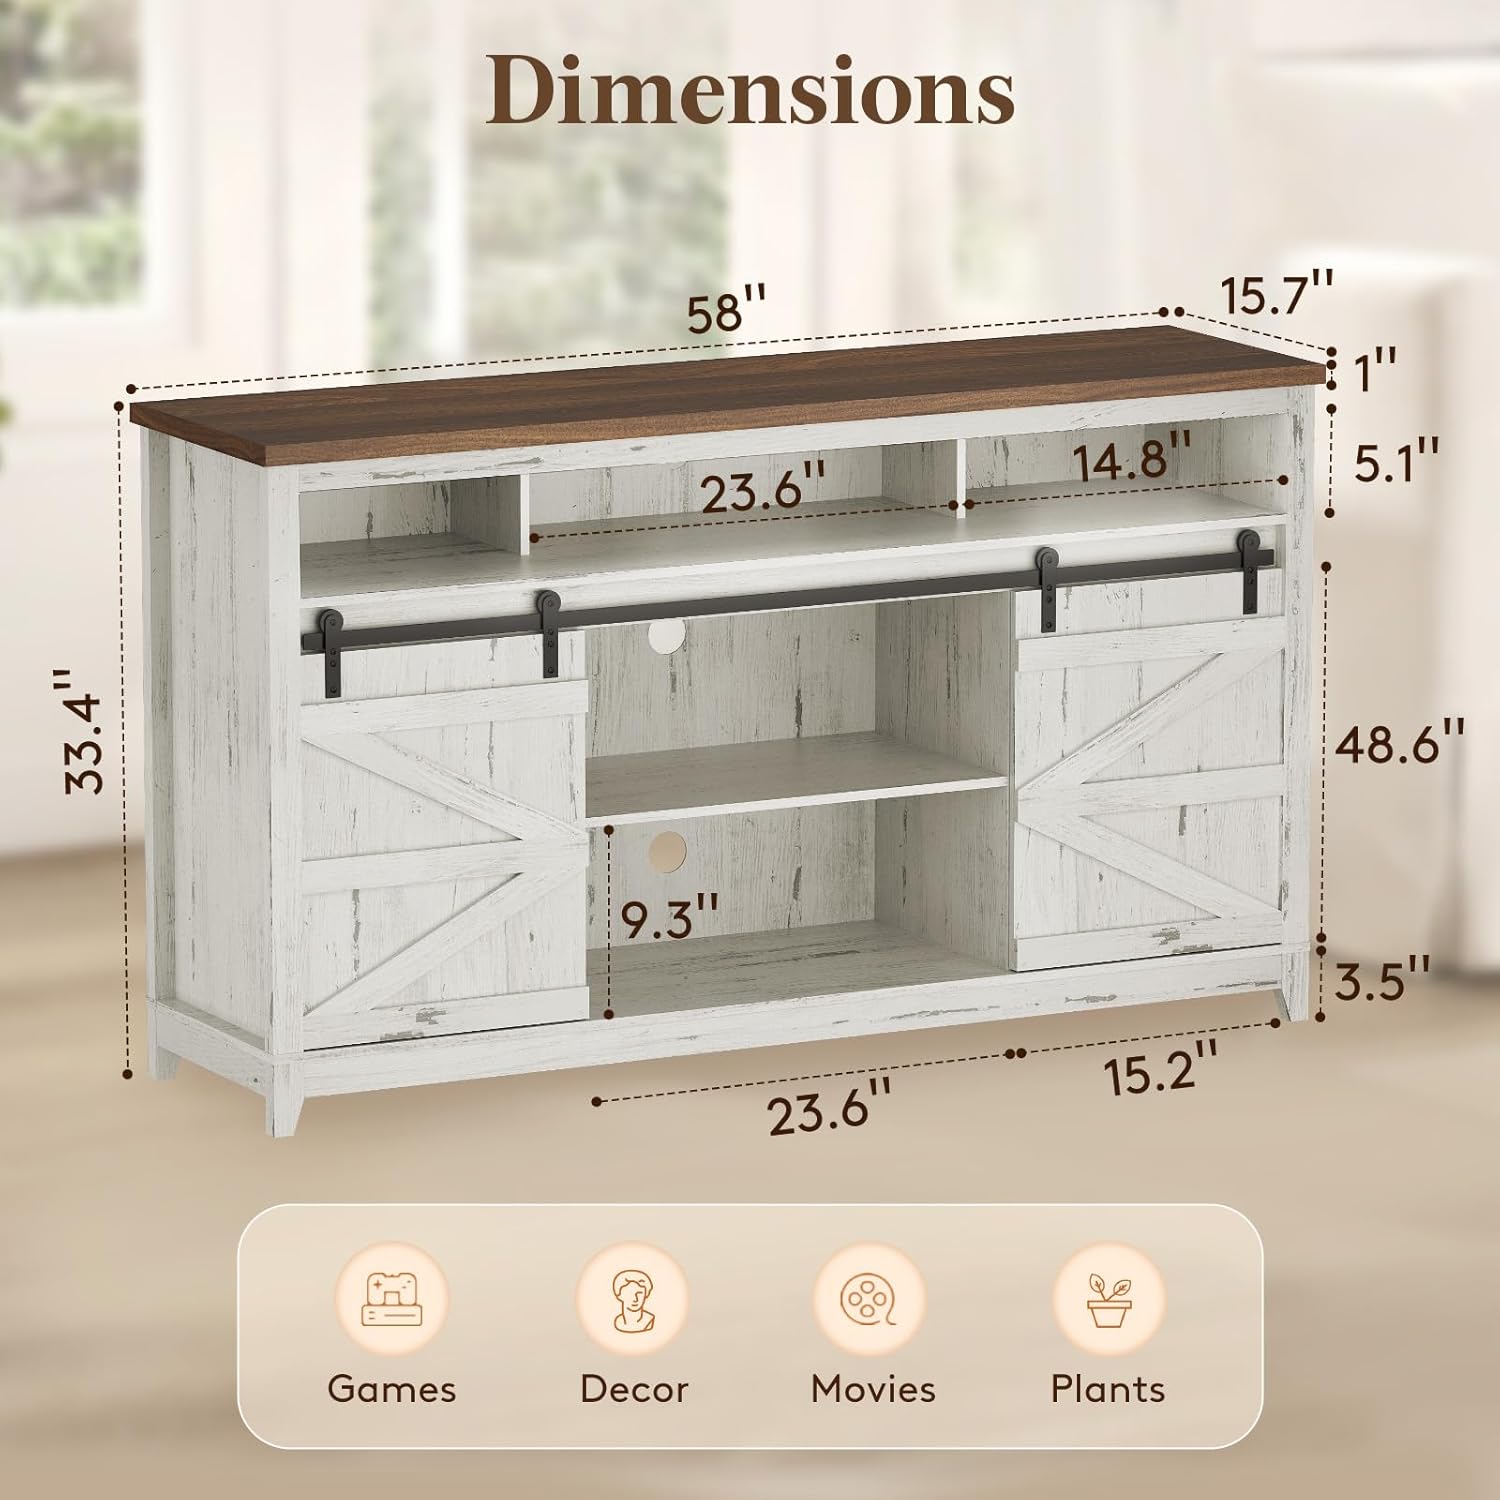
Image: The Lifewit Farmhouse TV Stand in a rustic white finish, featuring a brown top and barn-style sliding doors, positioned in a living room.
2. Safety Information
Important Safety Instructions:
- Always follow the assembly instructions carefully.
- Do not exceed the maximum weight capacity of 300 pounds for the top surface. Individual shelves support up to 25 pounds each.
- Use on a flat, stable surface to prevent tipping.
- Keep small parts away from children during assembly.
- Periodically check all connections to ensure they remain tight.
- Do not stand or climb on the TV stand.
3. Package Contents
Before assembly, verify that all parts listed below are present and undamaged. If any parts are missing or damaged, please contact customer support.
Video: An overview of all components and hardware included in the Lifewit Farmhouse TV Stand package, labeled for easy identification during assembly.
Refer to the assembly video for a visual guide to all included parts and hardware.
4. Assembly Instructions
Please watch the official assembly video for a detailed visual guide. A screwdriver is required for assembly (not included). It is recommended to have two people for assembly.
Video: Comprehensive assembly guide for the Lifewit Farmhouse TV Stand, demonstrating each step from unboxing to final setup.
Step-by-Step Assembly Overview:
- Unpack and Identify Parts: Lay out all wooden panels and hardware. Refer to the parts list in your physical manual or the beginning of the assembly video to identify each component.
- Assemble the Base Frame: Connect the bottom panel and side panels using the provided wooden dowels and screws. Ensure all connections are snug.
- Install Central Dividers: Secure the central divider panels within the main structure.
- Attach the Top Panel: Carefully place and secure the top panel to the assembled frame.
- Install Support Feet: Attach the support feet to the underside of the TV stand for stability.
- Insert Back Panels: Slide the back panels into their grooves and secure them.
- Attach Sliding Door Hardware: Install the rollers and any other necessary hardware to the barn doors.
- Hang Barn Doors: Mount the barn doors onto the sliding track.
- Install Adjustable Shelves: Place the adjustable shelves into the desired positions using the shelf pins.
For detailed visual instructions for each step, please refer to the assembly video above.
5. Operating Instructions
Sliding Barn Doors:
The TV stand features smooth-gliding barn doors. To open or close, gently slide the doors along the top track. The doors can be positioned to cover either the central open storage or the side compartments, offering flexible storage and display options.

Image: A close-up showing the smooth track design of the sliding barn door and the semi-open top shelf for soundbars or small items.
Adjustable Shelves:
The interior shelves are adjustable to accommodate items of various heights. To adjust a shelf, remove any items, lift the shelf, remove the metal pins from their current holes, and reinsert them into the desired new holes. Then, place the shelf back onto the pins.
Cable Management:
The back panel includes circular cutouts for cable management. Route power cords and audio/video cables through these holes to maintain a tidy and organized appearance.