1. Introduction
Thank you for choosing the EUREKA ERGONOMIC Adjustable Keyboard Tray. This manual provides detailed instructions for the assembly, operation, and maintenance of your new keyboard tray. Designed to optimize your workspace and enhance ergonomic comfort, this pull-out tray offers a sturdy and adjustable platform for your keyboard and mouse. Please read this manual thoroughly before installation and use to ensure proper setup and safe operation.

Image: The EUREKA ERGONOMIC Adjustable Keyboard Tray in Maple finish, shown installed under a light-colored desk with a keyboard and mouse on it.
2. Safety Information
To ensure safe operation and prevent damage, please adhere to the following safety guidelines:
- Desk Thickness: Ensure your desk is at least 0.59 inches (15mm) thick for secure mounting.
- Weight Capacity: Do not exceed the maximum weight capacity of 30 lbs (13.6 kg) on the keyboard tray. Overloading can cause damage or instability.
- Compatibility: This keyboard tray is designed for desks made of wood, MDF, or similar materials. It is not compatible with plastic, stone, or glass desks.
- Leg Room: Before final installation, verify that there is sufficient leg room under your desk after the tray is mounted.
- Secure Installation: Ensure all screws and fasteners are tightened securely according to the instructions to prevent the tray from wobbling or detaching.
- Assembly: It is recommended that assembly be performed by at least one person.

Image: Visual representation highlighting the 30 lbs weight capacity of the keyboard tray, indicating its robust construction.
3. Package Contents
Please check the package contents to ensure all parts are present and undamaged. If any parts are missing or damaged, please contact customer support.
- Keyboard Tray (1)
- Sliding Rails (2)
- Mounting Brackets (2)
- Assembly Hardware (Screws, etc.)
- Assembly Tools (Allen wrench, Phillips head screwdriver) - Note: While some tools are included, additional tools may be helpful for installation.
4. Specifications
| Feature | Detail |
|---|---|
| Brand | EUREKA ERGONOMIC |
| Model Number | ERK-POK01-MW-US |
| Product Dimensions | 27.9"W x 20.8"D x 5.43"H (70.8cm W x 52.8cm D x 13.8cm H) |
| Tray Size | Approx. 28" x 11" (71cm x 28cm) |
| Color | Maple |
| Material | Wood (Maple), Metal |
| Item Weight | 9.26 Pounds (4.2 kg) |
| Maximum Weight Capacity | 30 Pounds (13.6 kg) |
| Adjustability | Adjustable height and position via bracket holes |
| Desk Thickness Requirement | 0.59 inches (15mm) and up |
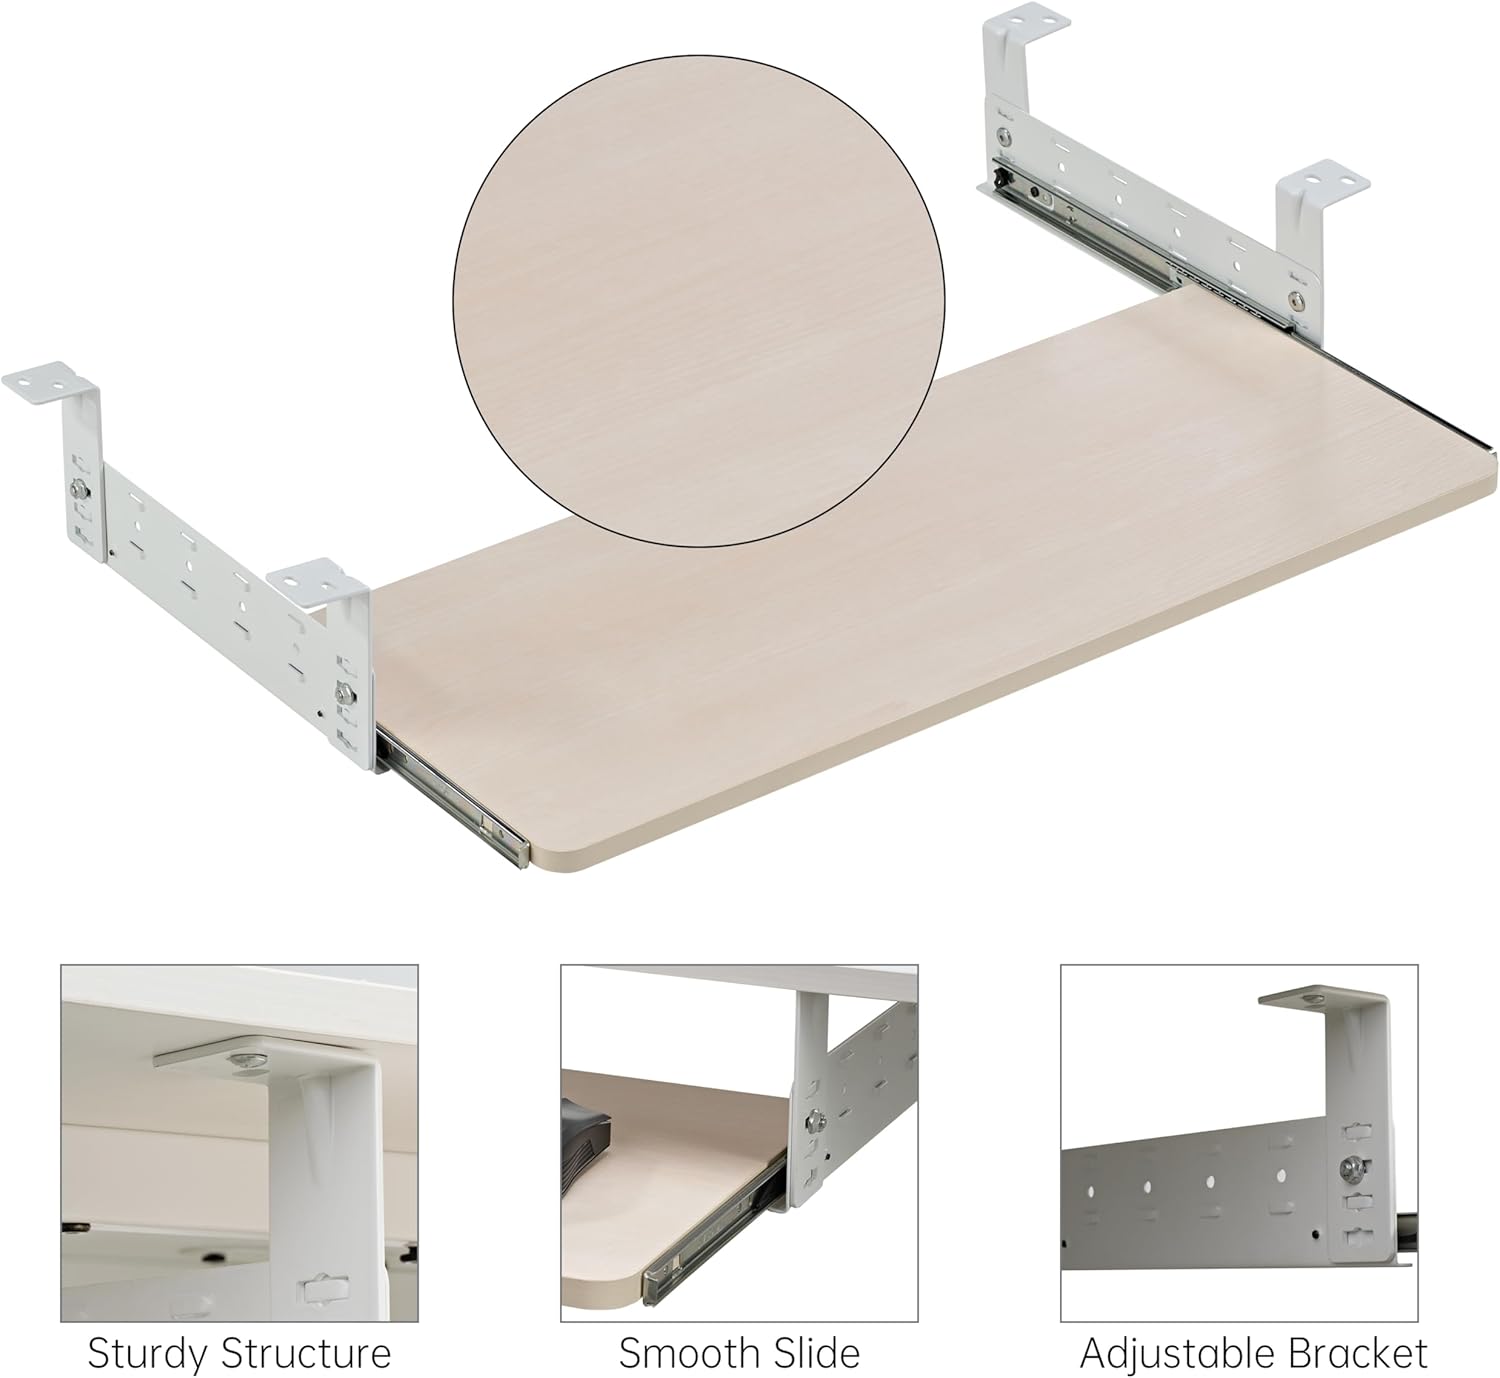
Image: Detailed diagram illustrating the dimensions of the keyboard tray and its mounting brackets, including the 30 lbs weight capacity icon.
5. Setup and Installation
Follow these steps for proper assembly and installation of your keyboard tray. It is recommended to have a clean, flat surface for assembly.
- Prepare Your Desk: Ensure your desk meets the compatibility requirements (wood, MDF, etc.) and has a thickness of at least 0.59 inches. Clear the area under your desk where the tray will be installed.
- Assemble the Tray and Rails: Attach the sliding rails to the keyboard tray using the provided screws. Ensure they are aligned correctly for smooth operation.
- Attach Mounting Brackets to Rails: Secure the mounting brackets to the sliding rails. The brackets feature adjustable holes, allowing you to choose the desired height and position.
- Position Under Desk: With the tray assembled, position it under your desk. Have someone hold it in place or use clamps to temporarily secure it. Determine the optimal position for ergonomic comfort and sufficient leg room.
- Mark Pilot Holes: Once the desired position is found, mark the screw locations through the bracket holes onto the underside of your desk. For wood desks, drilling small pilot holes (e.g., 1/16 inch deep) can help prevent wood splitting and make screw insertion easier.
- Secure to Desk: Using the provided screws and screwdriver, firmly attach the mounting brackets to the underside of your desk. Ensure all screws are tightened securely. Do not overtighten, especially if using a drill, to avoid stripping the wood.
- Test Operation: Once installed, gently slide the tray in and out to ensure smooth movement and stability. Check for any wobbling or loose connections.

Image: Step-by-step diagram illustrating the easy installation process, from assembling the tray to mounting it under the desk.

Image: Visual guide showing how to adjust the height and position of the keyboard tray using the bracket holes, with examples of maximum and minimum clearance.
6. Operating Instructions
The EUREKA ERGONOMIC keyboard tray is designed for simple and efficient use.
- Sliding In/Out: To use the tray, gently pull it towards you until it extends fully. To store it, push the tray back under the desk until it is fully retracted. The high-quality sliding rails ensure smooth and effortless movement.
- Adjusting Height: The mounting brackets allow for height adjustment. If you need to change the height, loosen the screws connecting the brackets to the rails, adjust to the desired hole position, and re-tighten securely. This allows you to find the optimal ergonomic setup for typing.
- Optimizing Space: When not in use, slide the keyboard platform completely under the desk to free up valuable desktop surface area, allowing for a more organized workspace.

Image: Demonstration of the keyboard tray in both its fully extended (slide out) and fully retracted (slide in) positions under a desk.

Image: Animated graphic illustrating the smooth pull-out action of the keyboard tray, emphasizing ease of use and space-saving.
7. Maintenance
Regular maintenance will help prolong the life and performance of your keyboard tray.
- Cleaning: Wipe the tray surface and metal components with a soft, damp cloth. Avoid abrasive cleaners or harsh chemicals that could damage the finish.
- Lubrication: Periodically check the sliding rails. If movement becomes stiff, a small amount of silicone-based lubricant can be applied to the rails to maintain smooth operation.
- Tighten Fasteners: Over time, screws may loosen. Periodically check all assembly screws and tighten them as needed to ensure the tray remains stable and secure.
8. Troubleshooting
If you encounter any issues with your keyboard tray, refer to the following common problems and solutions:
| Problem | Possible Cause | Solution |
|---|---|---|
| Tray is wobbly or unstable. | Loose screws or improper installation. | Ensure all mounting screws are securely tightened. Re-check alignment of brackets and rails. |
| Tray does not slide smoothly. | Dust/debris in rails, lack of lubrication, or misaligned rails. | Clean the sliding rails. Apply a small amount of silicone lubricant. Check if rails are properly aligned and not bent. |
| Tray does not fully retract or extend. | Obstruction under desk or misaligned rails. | Check for any objects blocking the tray's path. Verify rail alignment and ensure no screws are protruding. |
| Insufficient leg room after installation. | Incorrect height adjustment or desk dimensions. | Adjust the height of the tray using the multiple holes on the mounting brackets. Ensure your desk meets the minimum height requirement (28.74 inches). |
9. Warranty and Support
Warranty: The EUREKA ERGONOMIC Adjustable Keyboard Tray comes with a Limited Lifetime Warranty. Please refer to the warranty card included with your product or visit the official EUREKA ERGONOMIC website for full details on warranty coverage and terms.
Customer Support: If you have any questions, require assistance with assembly, or encounter any issues not covered in this manual, please contact our customer support team. Our local customer support team is always ready to provide prompt assistance.
For further information and support, please visit the EUREKA ERGONOMIC Store on Amazon.


