1. Introduction and Product Overview
This manual provides instructions for the Ctuoptuo OPV (Over Pressure Valve) Spring Modification Kit, designed to optimize the brewing pressure of compatible Gaggia Classic Pro and EVO traditional espresso coffee machines. The kit includes 6 Bar, 9 Bar, and 12 Bar springs, allowing users to achieve consistent and high-quality espresso extraction.

Image 1.1: The Ctuoptuo OPV Spring Modification Kit, featuring three springs for different pressure settings.
2. Compatibility
This OPV spring modification kit is compatible with the following Gaggia Classic espresso machine models:
- Gaggia Classic RI9403 (2015 / 2018)
- Gaggia Classic RI9480
- Gaggia Classic RI9380/46 Classic Pro
- Gaggia new Classic (Gaggia Classic Pro / Gaggia Classic 2019 / 2020 / 2021)

Image 2.1: Visual representation of compatible Gaggia Classic models with the OPV springs.
3. Product Function
The Over Pressure Valve (OPV) springs are crucial components for regulating the water pressure during the espresso extraction process. By replacing the stock spring with one of the included springs (6 Bar, 9 Bar, or 12 Bar), you can adjust the maximum brewing pressure of your espresso machine. This adjustment allows for optimal pressure regulation, which is essential for achieving consistent and high-quality espresso shots with balanced flavor and crema.

Image 3.1: The OPV springs shown in context with an espresso machine, illustrating their functional purpose.
4. Package Contents and Specifications
The Ctuoptuo OPV Spring Modification Kit includes the following components:
- 1 x 6 Bar OPV Spring
- 1 x 9 Bar OPV Spring
- 1 x 12 Bar OPV Spring
Each spring is designed to provide a specific pressure setting. The approximate dimensions are as follows:
| Spring Pressure | Approximate Length |
|---|---|
| 6 Bar | 0.715 inches (18.16 mm) |
| 9 Bar | 0.835 inches (21.21 mm) |
| 12 Bar | 0.94 inches (23.88 mm) |
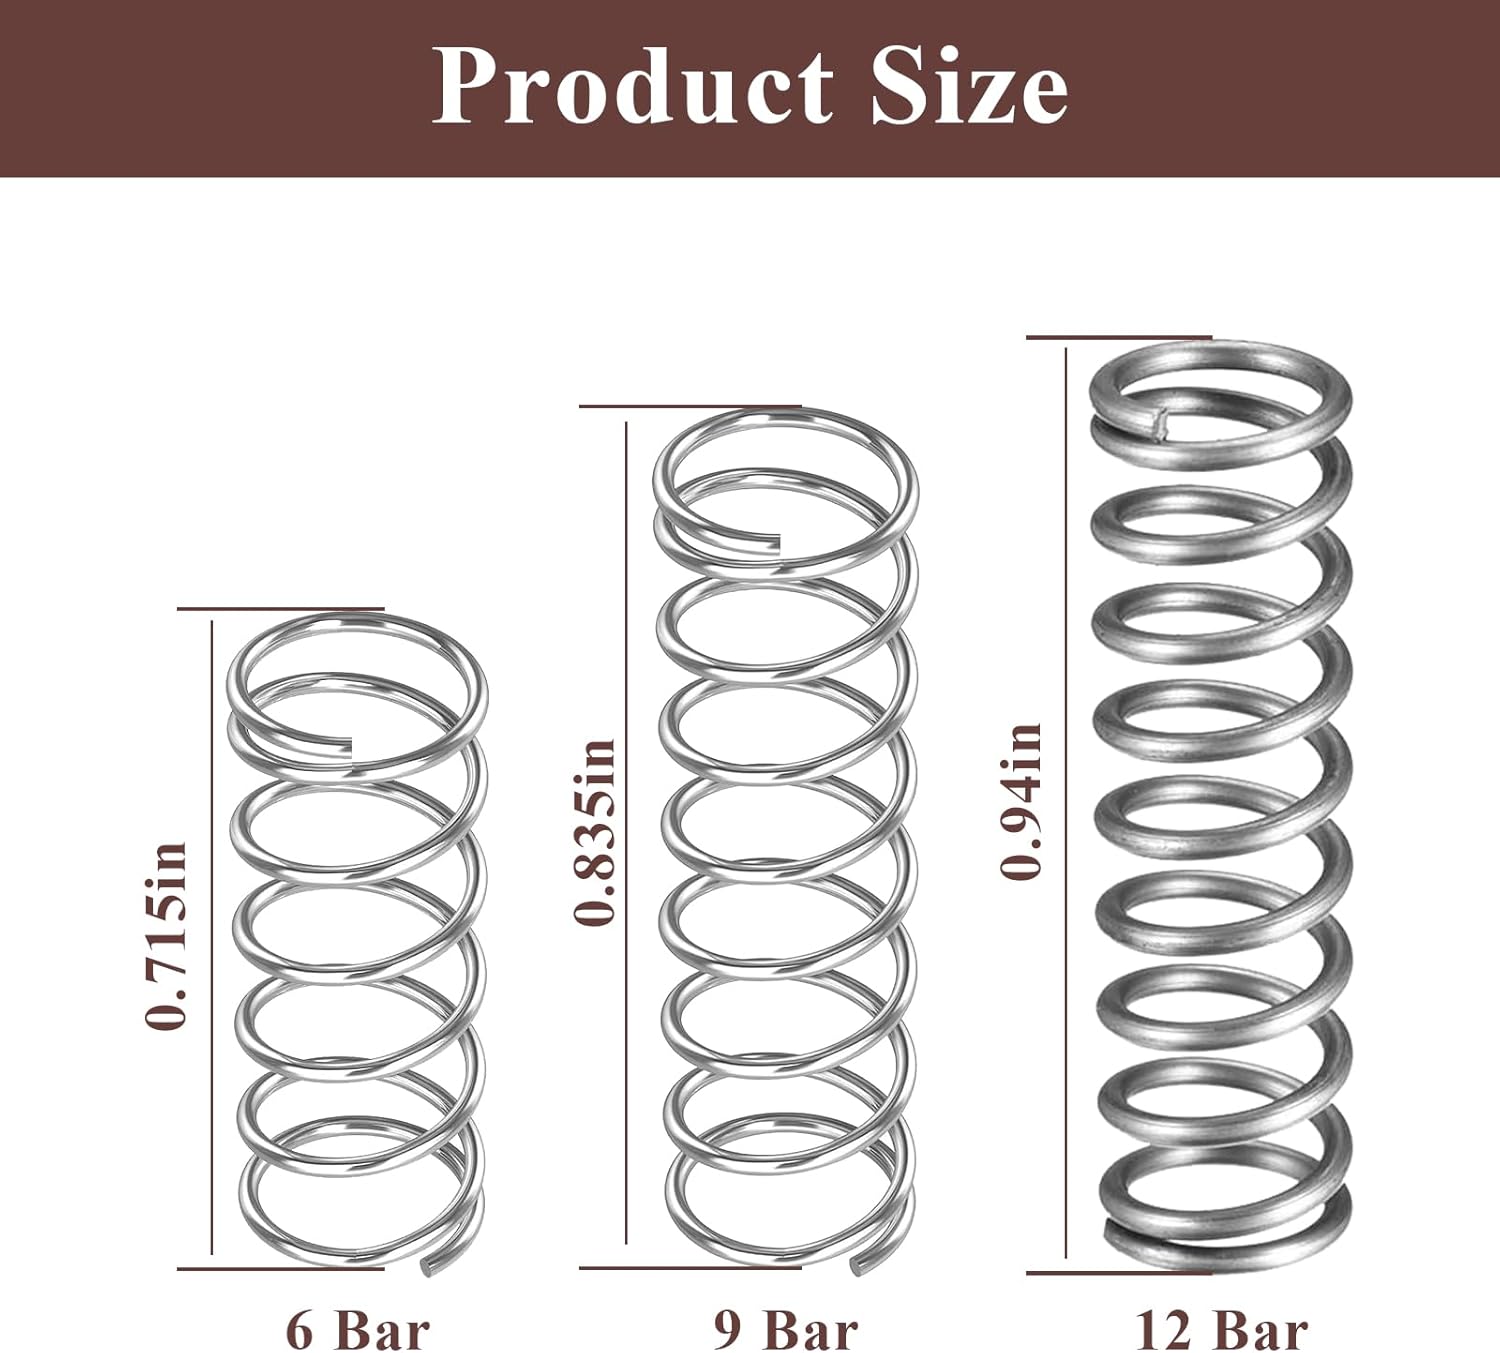
Image 4.1: Detailed dimensions of the 6 Bar, 9 Bar, and 12 Bar OPV springs.
5. Installation (Setup)
The OPV spring modification is a straightforward process that typically takes about 10 minutes. Basic tools required include a 10mm wrench and a screwdriver.
Installation Steps:
- Unplug the Power Cord: Ensure the espresso machine is completely unplugged from the electrical outlet before beginning any work.
- Remove Water Tank Screws: Locate and remove the two screws positioned within the water tank inlet.
- Lift the Top Cover: Carefully lift the top cover of the espresso machine to access the internal components.
- Locate the OPV: Identify the Over Pressure Valve assembly. It is typically connected to a brass nipple.
- Remove Pipe from Brass Nipple: Use a 10mm wrench to carefully remove the pipe connected to the brass nipple.
- Replace the Original Spring: Remove the existing OPV spring and replace it with your desired Ctuoptuo spring (6 Bar, 9 Bar, or 12 Bar). The 9 Bar spring is often recommended for optimal espresso extraction.
- Reattach Pipe: Hand-tighten the brass nipple back to the system.
- Secure with Wrench: Finish tightening the connection with a 10mm wrench. Do not overtighten.
- Reassemble: Carefully lower and secure the top cover, then reinsert the screws in the water tank inlet.
- Plug In: Once fully reassembled, plug the power cord back into the electrical outlet.

Image 5.1: Visual guide for the OPV spring installation process.
6. Operation and Pressure Selection
After installing the desired OPV spring, your espresso machine will operate at the new maximum pressure setting. The choice of spring affects the extraction characteristics of your espresso:
- 6 Bar Spring: Provides a lower pressure extraction, which can be beneficial for certain coffee beans or for experimenting with different flavor profiles.
- 9 Bar Spring: This is widely considered the ideal pressure for traditional espresso extraction, promoting balanced flavors, rich crema, and consistent results. Many modern espresso machines are designed to operate around this pressure.
- 12 Bar Spring: Offers a higher pressure, similar to the stock settings of many older Gaggia Classic models. While it can produce espresso, it may lead to over-extraction or bitterness if not carefully managed with grind size and dose.
Experiment with different springs and adjust your grind size and coffee dose to find the optimal settings for your preferred coffee and taste.
7. Maintenance
The OPV springs are designed for durability and long-term performance. Regular maintenance of your espresso machine, including descaling and cleaning, will help ensure the longevity of all components, including the OPV springs. Periodically inspect the springs for any signs of wear or damage. If a spring appears bent or corroded, it should be replaced to maintain consistent pressure regulation.

Image 7.1: The high-quality construction of the OPV springs ensures durability.
8. Troubleshooting
If you experience issues after installing the OPV spring, consider the following:
- Inconsistent Pressure: Double-check that the spring is correctly seated and that all connections (especially the brass nipple) are securely tightened but not overtightened. Ensure the chosen spring is appropriate for your desired extraction.
- Leaking: If you observe any leaks, immediately unplug the machine and inspect all connections made during installation. Ensure the pipe to the brass nipple is properly sealed.
- No Change in Pressure: Verify that the correct spring was installed and that the installation steps were followed accurately.
For persistent issues, consult online resources or a qualified espresso machine technician.