Introduction
Thank you for choosing the AODK 75-inch Reversible L-Shaped Desk. This manual provides detailed instructions for assembly, operation, maintenance, and troubleshooting to ensure optimal use of your new desk. Please read this manual thoroughly before beginning assembly and retain it for future reference.
Safety Instructions
- Assembly: Assemble the desk on a soft, clean surface to prevent scratches. Ensure all parts are present and undamaged before starting. Do not overtighten screws during assembly.
- Stability: Place the desk on a level surface. Do not stand or sit on the desk.
- Weight Capacity: Do not exceed the recommended weight capacity for any part of the desk, including shelves and drawers.
- Electrical Safety: The integrated power outlet and LED strip are designed for standard household use. Do not overload the outlets. Keep liquids away from electrical components.
- Children: Keep small parts and packaging materials away from children.
Package Contents
Before assembly, verify that all components listed below are included in your package. If any parts are missing or damaged, please contact customer support.
- Desktop Panels (Main, Corner, Side)
- Metal Frame Components (Legs, Support Bars, Brackets)
- 5 Fabric Drawers (2 File Drawers, 3 Under-desk Drawers)
- Monitor Stand
- Movable CPU Stand
- Integrated Power Outlet with USB Ports
- LED Strip Light Kit
- Hardware Pack (Screws, Allen Wrench, Adjustable Foot Pads)
- Instruction Manual
Setup and Assembly
Assembly typically requires two people and approximately 2-4 hours. An Allen wrench is provided; a Phillips head screwdriver may also be useful.
1. Unpacking and Preparation
Carefully unpack all components and lay them out on a clean, soft surface to prevent damage. Identify each part using the provided parts list.
2. Reversible Design Configuration
This desk features a reversible design, allowing you to configure the L-shape to either the left or right side. Decide on your preferred orientation before proceeding with assembly. The main desktop and side storage unit can be swapped.

Image: Fully assembled AODK L-Shaped Desk, illustrating its various components and overall structure.
3. Frame Assembly
- Attach the adjustable foot pads to the bottom of all metal legs.
- Assemble the main desk frame by connecting the legs and support bars using the provided screws. Do not fully tighten screws until all components are aligned.
- Assemble the side storage unit frame similarly.
4. Desktop and Shelf Installation
- Place the main desktop panel onto the main desk frame, aligning screw holes. Secure with screws.
- Install the corner desktop panel and the side desktop panel onto their respective frames.
- Attach the monitor stand to the main desktop using the designated supports.
- Install the 2-tier under-desk storage shelves on the side unit.
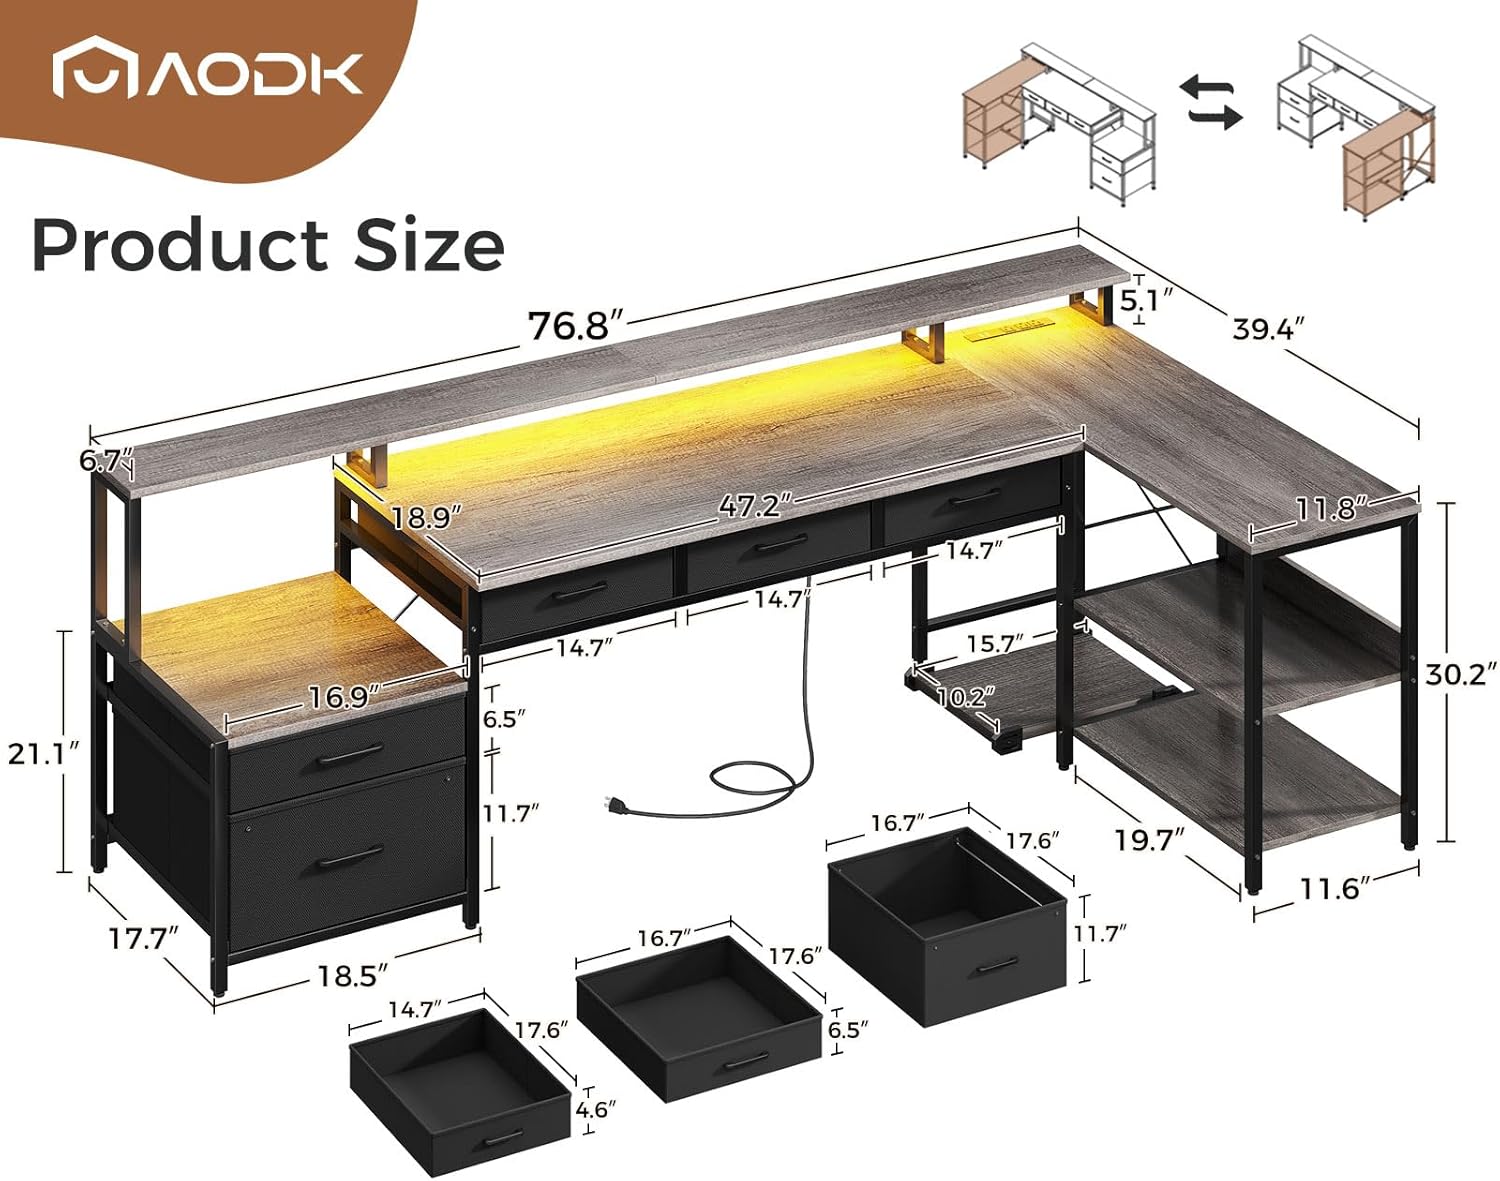
Image: Detailed dimensions of the AODK L-Shaped Desk, including the main desktop, side unit, and drawers.
5. Drawer and CPU Stand Placement
- Assemble the fabric drawers according to their individual instructions (typically folding and inserting a base).
- Insert the 3 under-desk fabric drawers into their designated slots beneath the main desktop.
- Place the 2 file drawers into the file cabinet section of the side storage unit.
- Position the movable CPU stand as desired under the desk.

Image: The three under-desk fabric drawers, demonstrating their storage capacity for office items.
6. Electrical Component Installation
- Carefully install the integrated power outlet into its recessed slot on the desktop. Ensure it is flush and secure.
- Attach the LED strip light to the underside of the monitor stand or desired location using its adhesive backing. Connect the LED strip to its controller and power source.

Image: Features including the ergonomic monitor stand, the mobile CPU holder, and the convenient built-in power strip.
7. Final Tightening
Once all components are in place and aligned, systematically tighten all screws to ensure the desk is stable and secure.
Operating Instructions
1. Power Outlet and USB Ports
The desk includes a built-in power strip with 3 standard AC outlets and 2 USB ports. Plug the desk's power cord into a wall outlet. You can then plug in your devices directly to the desk for convenient charging and power access.
2. LED Strip Lighting
The LED strip offers customizable lighting options:
- Colors: Choose from 7 distinct colors.
- Modes: Select from 13 different lighting modes (e.g., static, flashing, fading).
- Brightness: Adjust the intensity with 8 levels of brightness.
- Flicker Frequencies: Customize the flicker rate with 9 options.
- Memory Function: The LED strip will recall the last used setting when powered on again.
Use the inline controller to cycle through options and adjust settings.

Image: The desk's LED lighting system in operation, providing ambient light for a gaming or work environment.
3. Monitor Stand
The elevated monitor stand is designed to raise your display to an ergonomic viewing height, promoting better posture and reducing neck strain. It also provides additional storage space underneath for small items.
4. Storage Drawers and Shelves
Utilize the 5 fabric drawers (3 under-desk, 2 file drawers) and the 2-tier under-desk shelves to organize documents, office supplies, and other items. The file drawers are suitable for legal/A4 size documents.

Image: The file drawer and other storage compartments, highlighting the desk's organizational features.
Maintenance
- Cleaning: Wipe the desk surfaces with a soft, damp cloth. Avoid harsh chemicals or abrasive cleaners that could damage the finish.
- Spills: Clean up spills immediately to prevent staining or damage to the wood finish.
- Hardware: Periodically check all screws and connections to ensure they remain tight. Retighten if necessary.
- Electrical Components: Ensure the power outlet and LED strip remain dry and free from dust.
Troubleshooting
1. Desk is Unstable/Wobbly
- Solution: Check all assembly screws and tighten them securely. Ensure the desk is on a level surface. Adjust the foot pads on the bottom of the legs to compensate for uneven floors.
2. LED Lights Not Working
- Solution: Verify that the LED strip is properly connected to its controller and power source. Ensure the power source is plugged into a working outlet. Check for any visible damage to the LED strip or wiring.
3. Power Outlets/USB Ports Not Functioning
- Solution: Ensure the desk's main power cord is securely plugged into a functional wall outlet. Test the wall outlet with another device. Avoid overloading the power strip with too many high-power devices.
Specifications
| Brand | AODK |
| Model Name | 7505 |
| Product Dimensions (Overall) | 48"D x 35.31"W x 34.25"H |
| Main Desktop Length | 46.1 inches |
| Color | Grey Oak |
| Base Material | Alloy Steel |
| Top Material Type | Engineered Wood |
| Item Weight | 68.78 Pounds |
| Number of Drawers | 5 (2 File, 3 Under-desk) |
| Number of Shelves | 3 (2 enclosed, 1 monitor stand) |
| Special Feature | Reversible, Built-in Power Outlet, LED Strip, Monitor Stand, Movable CPU Stand |
| Power Outlet | 3 AC Outlets (125V/12A), 2 USB Ports (5V/2A) |
| Power Cord Length | 78 inches |
Warranty Information
The AODK 75-inch Reversible L-Shaped Desk comes with a Limited Warranty. For specific details regarding warranty coverage, duration, and claims process, please refer to the warranty card included in your package or contact AODK customer support directly. Keep your proof of purchase for warranty validation.
Customer Support
If you have any questions, require assistance with assembly, or encounter any issues with your AODK L-Shaped Desk, please do not hesitate to contact our customer support team. We are committed to providing prompt and helpful service.
Contact Information:
- Website: Visit the AODK Store on Amazon
- Email: Refer to your product packaging or warranty card for specific email contact.
- Phone: Refer to your product packaging or warranty card for specific phone contact.
Please have your model number (7505) and purchase date ready when contacting support.


