1. Introduction
The Weasch THC15A is a digital LCD programmable timer switch designed for controlling electrical appliances based on preset schedules. It supports up to 28 scheduled ON/OFF times daily or weekly, offering flexibility and energy efficiency for various applications. This manual provides detailed instructions for installation, programming, and operation to ensure safe and effective use of your timer switch.
2. Product Features
- Rated Control Voltage: Input AC 200-240V 50/60HZ, Output AC 240V
- Contact Capacity: 16A, 240V AC
- Time Range: 1 Minute to 168 Hours
- Maximum Programmes: 28 Times (Daily/Weekly)
- Built-in 1.2V40Ma rechargeable battery for power-off memory (≥60 days)
- Large LCD screen for clear display
- DIN Rail Installation
3. Safety Information
Please read and understand all safety instructions before installation and operation. Failure to follow these instructions may result in electric shock, fire, or serious injury.
- Always disconnect power at the circuit breaker before installing or servicing the timer switch.
- Installation should be performed by a qualified electrician or in accordance with local electrical codes.
- Do not exceed the maximum load rating of 16A, 240V AC.
- Ensure all wire connections are secure and properly insulated.
- Do not expose the device to moisture or extreme temperatures.
4. Package Contents
Verify that all items are present in the package:
- 1 x Weasch THC15A Timer Switch
5. Product Overview
Familiarize yourself with the components of the THC15A timer switch.

Figure 5.1: Front View of THC15A Timer Switch. This image shows the front of the timer switch, featuring the LCD display, control buttons, and terminal connections at the bottom.

Figure 5.2: Back View of THC15A Timer Switch. The back of the timer switch displays the weekly programmable electronic timer label, input/output specifications, and DIN rail mounting mechanism.
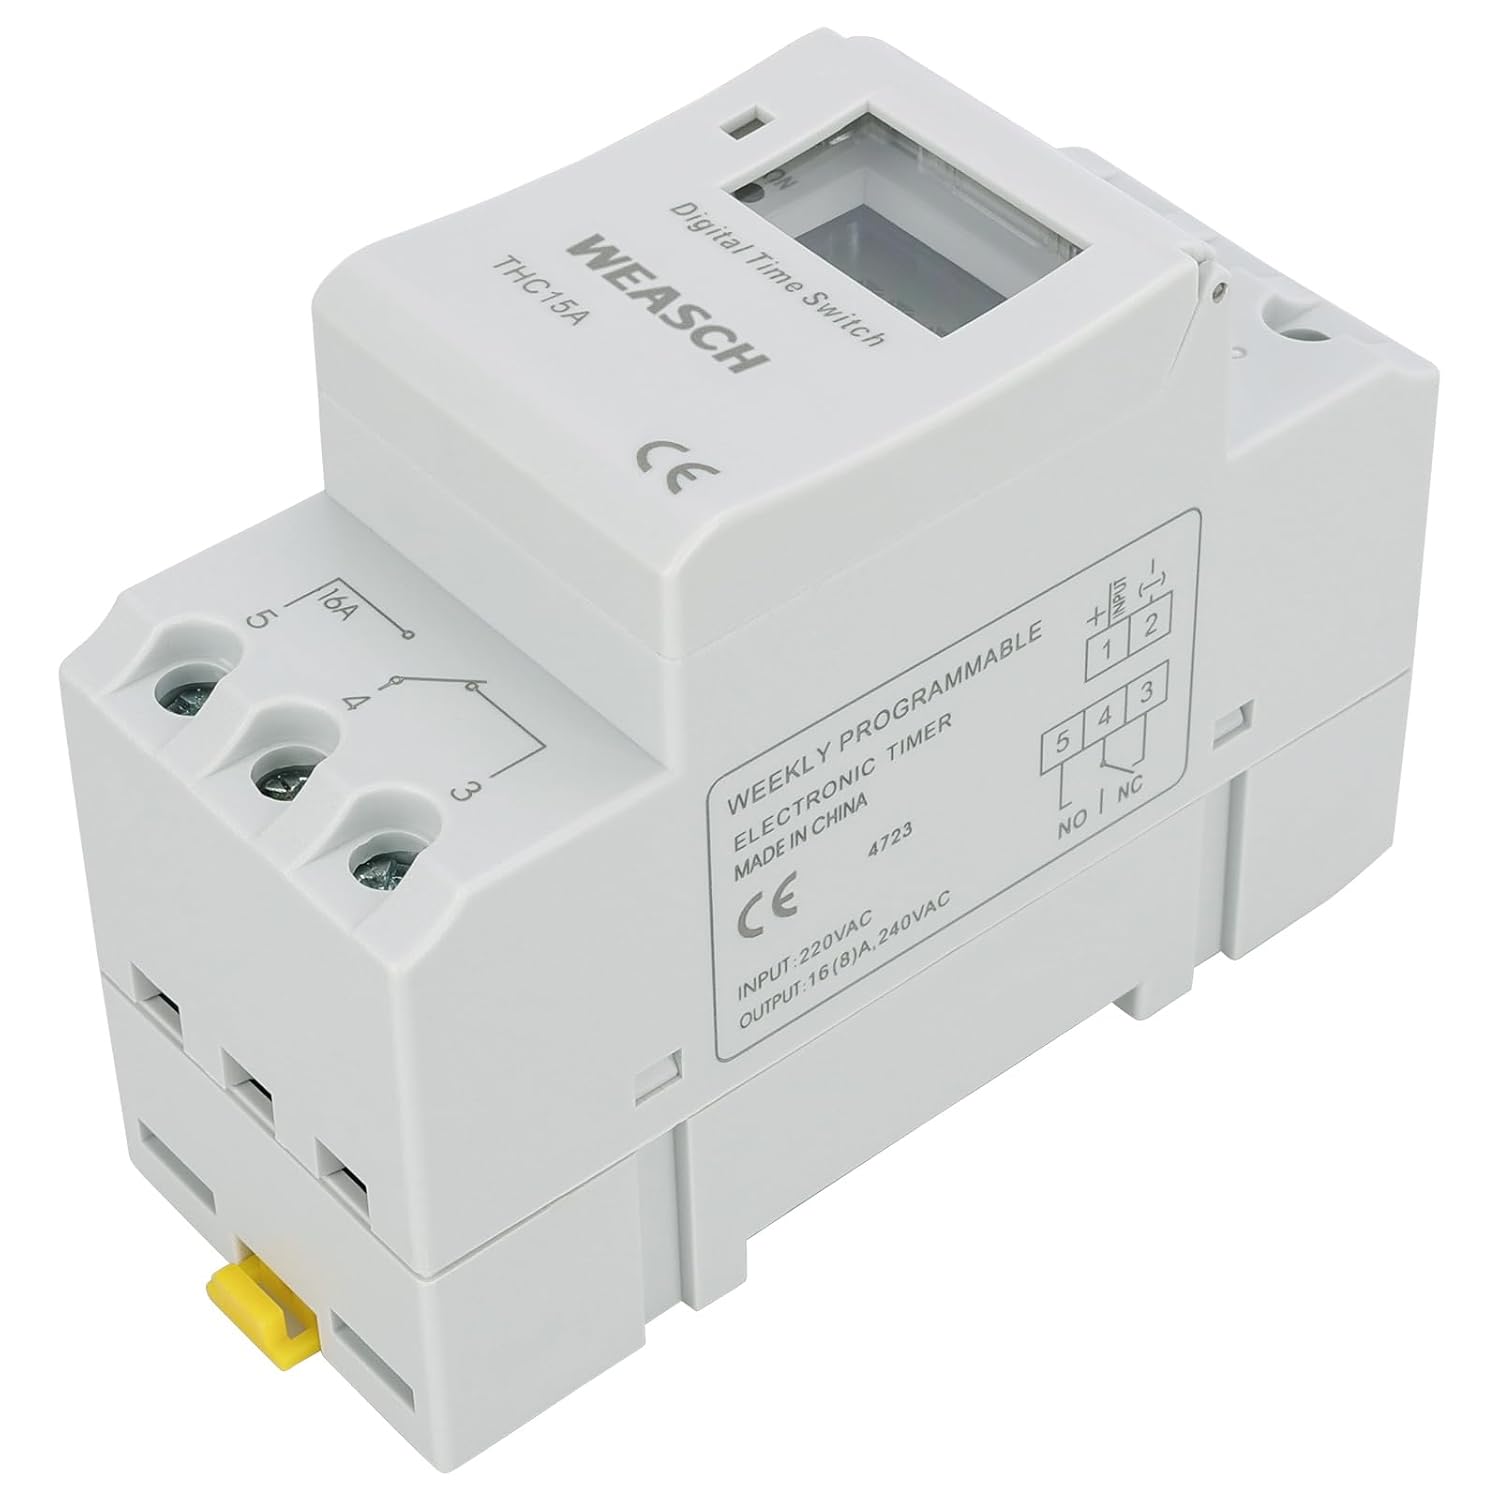
Figure 5.3: Timer Switch with Cover Open. This view highlights the control buttons (D+, H+, M+, Reset, Manual) and the LCD display for programming.
6. Installation
The THC15A timer switch is designed for DIN rail mounting. Follow these steps for proper installation:
- Mounting: Securely attach the timer switch to a standard 35mm DIN rail. Ensure the yellow latch at the bottom is engaged to hold it in place.
- Wiring: Connect the timer switch according to the wiring diagram. Ensure the input power (AC 200-240V) is connected to terminals 1 and 2, and the load is connected to terminals 3, 4, and 5 (normally open/normally closed contacts).
- Power On: After wiring, restore power at the circuit breaker. The LCD display should illuminate.

Figure 6.1: DIN Rail Mounting. The timer switch is shown securely attached to a standard DIN rail, demonstrating the installation method.

Figure 6.2: Wiring Diagram. This diagram illustrates the correct connections for input power and the controlled load to the timer switch terminals.
Video 6.3: Product Overview and Installation. This video demonstrates the physical features of the Weasch THC15A timer switch and shows how to mount it on a DIN rail.
7. Programming and Operation
The THC15A timer switch allows for precise scheduling of your electrical devices. Refer to the programming instructions below and the detailed image for button functions.

Figure 7.1: Programming Interface and Technical Data. This image provides a visual guide to the programming buttons and a table of technical specifications.
A. Functional Description of Buttons
| Step | Key | Programming Function |
|---|---|---|
| 1 | Press P | Setting 1 ON time (display 1on) |
| 2 | Press H+/M+ | Setting hours and minutes |
| 3 | Press D+ | To select same every day, or different time each day |
| 4 | Press P | Setting 1 OFF time (display 1off) |
| 5 | Press H+/M+ | Setting hours and minutes turn off time |
| 6 | Press D+ | If you want the same every day, you need not press this key |
| 7 | Repeat step 2-6 | Set 2-28 on/off time |
| 8 | Press CLOCK | End |
If you do not require 28 settings, press CLOCK to end.
B. Adjusting Clock
Press and hold CLOCK and then press DAY key, HOUR key, MIN key respectively to adjust the clock time to accurate DATE, HOUR, MINUTE. In 24-Hour-Format, 'AM' or 'PM' will appear on the LCD screen. In 24-Hour-Format LCD screen shall indicate 0:00-23:59.
C. Start to Programming the Timer
- Press TIMER key, LCD screen shall show "1 ON".
- Press DAY key to select any of 15-combination of Daily-Programs to your application demand. Continuing to press DAY key, LCD shall alternating indicate among 15-combinations.
- Press HOUR, MIN respectively to set desired Hour and Minute for "1 ON".
- After finished setting of "1 ON", press TIMER key again, "1 OFF" shall appear on LCD screen.
- Press DAY key to select any of 15-combination of Daily-Programs to your application demand continuing to press DAY key, LCD shall alternating indicate among 15-combinations.
- Repeat programming procedure "3" to set desired Hour & Minute for "1 OFF".
- When finished setting "1 ON" & "1 OFF", press TIMER, "2 ON" shall appear on LCD screen.
- Repeat programming procedure above to complete rest of ON/OFF program-period (event).
- When finished program-setting (event), press CLOCK, Timer shall start to execute programs.
8. Technical Specifications
| Specification | Value |
|---|---|
| Rated Control Voltage | AC 200-240V 50/60HZ |
| Output Voltage | AC 240V |
| Contact Capacity | 16A, 240V AC |
| Time Range | 1 Minute to 168 Hours |
| Maximum Programmes | 28 Times (Day/Week) |
| Error Correction | 1 sec/day (25°C) |
| Power Consumption | ≤2W |
| Service Life (Mechanical) | 107 |
| Service Life (Electrical) | 107 |
| Display | LCD |
| Minimum Interval | 1 minute |
| Weight | Approx. 115 g (0.5 Kilograms) |
| Power Reserve | 3 Years (Built-in 1.2V40Ma rechargeable battery) |
| Ambient Temperature | -10°C to +40°C |
| Ambient Humidity | 35-85% RH |
| Material | Plastic |
| Product Dimensions (D x W x H) | 1.42"D x 3.54"W x 2.56"H (36mm x 90mm x 65mm) |
9. Maintenance
The Weasch THC15A timer switch requires minimal maintenance. Keep the device clean and free from dust. The built-in rechargeable battery provides power-off memory and is designed for long-term use. If the display becomes dim or unresponsive after a power outage, allow the unit to remain powered for several hours to recharge the internal battery.
10. Troubleshooting
- Display is blank: Check power supply to terminals 1 and 2. Ensure the internal battery has sufficient charge (allow unit to be powered for several hours if recently unpowered).
- Programs not executing: Verify that the current time and day are set correctly. Ensure the timer is in 'AUTO' mode (if applicable, check the 'Manual' button for mode selection). Re-check programming steps for errors.
- Load not switching: Confirm wiring connections to terminals 3, 4, and 5 are correct. Check the load device for functionality. Ensure the timer's contact capacity is not exceeded.
- Incorrect time: Adjust the clock as described in Section 7B.
11. Warranty and Support
For warranty information or technical support, please refer to the product packaging or contact Weasch customer service through the retailer where the product was purchased. Keep your purchase receipt as proof of purchase.