1. Introduction
This manual provides comprehensive instructions for the installation, operation, and maintenance of your YIMU K4303 Car Backup Camera System. Please read this manual thoroughly before use to ensure proper functionality and safety.

Image 1.1: The YIMU K4303 Car Backup Camera System, featuring a 4.3-inch monitor and a camera designed for license plate mounting.
Product Overview
The YIMU K4303 is a wired car backup camera system designed to enhance driving safety by providing a clear view of the area behind or in front of your vehicle. It features a 4.3-inch monitor, a high-definition camera with night vision, and adjustable parking guide lines. The system is IP69K waterproof and offers flexible installation options for various vehicle types.
2. Package Contents
Please verify that all items listed below are included in your package:
- 1 x 4.3-inch Monitor
- 1 x Backup Camera
- 1 x Car Charger
- 1 x Power Cable (for monitor)
- 1 x 26ft Power Cable (for camera connection)
- 1 x Suction Cup Holder (for monitor)
- 1 x Self-adhesive Adhesive Pad (for monitor)
- 1 x Small Bracket (for alternative camera mounting)
- 1 x Screw (for camera mounting)
- 2 x Tie Straps (for cable management)
- 1 x User Manual

Image 2.1: All components included in the YIMU K4303 Car Backup Camera System package.
Video 2.1: An unboxing and overview of the YIMU K4303 backup camera system components.
3. Setup and Installation
Follow these steps for proper installation of your YIMU K4303 system.
3.1 Monitor Installation
- Attach the suction cup holder to the back of the monitor.
- Clean the desired mounting surface on your dashboard or windshield.
- Press the suction cup firmly onto the surface and engage the locking lever to secure it.
- Adjust the monitor angle for optimal viewing.
Video 3.1: Demonstration of the monitor installation process using the suction cup mount.
3.2 Camera Installation
The camera offers two primary installation methods:
- License Plate Frame Mounting: The camera comes pre-installed on a license plate bracket. Simply mount it over your vehicle's rear license plate.
- Alternative Mounting: Use the small additional bracket to attach the camera to the front, side, or another suitable location on your vehicle.

Image 3.1: Various installation methods for the camera, including license plate, front, and side mounting options.
3.3 Wiring Connections
The system requires a single power supply connection. Connect the camera and monitor using the provided 4-pin video power cable. Then, choose one of the following power options:
- Cigarette Lighter/USB Power (Continuous Use): Plug the car charger into your vehicle's cigarette lighter socket or a USB port (USB adapter not included). This method provides continuous power, suitable for front or side camera use.
- Reversing Light Power (Reverse Camera Only): Connect the power cable to your vehicle's reversing lights. This will activate the camera system automatically when the vehicle is put into reverse.
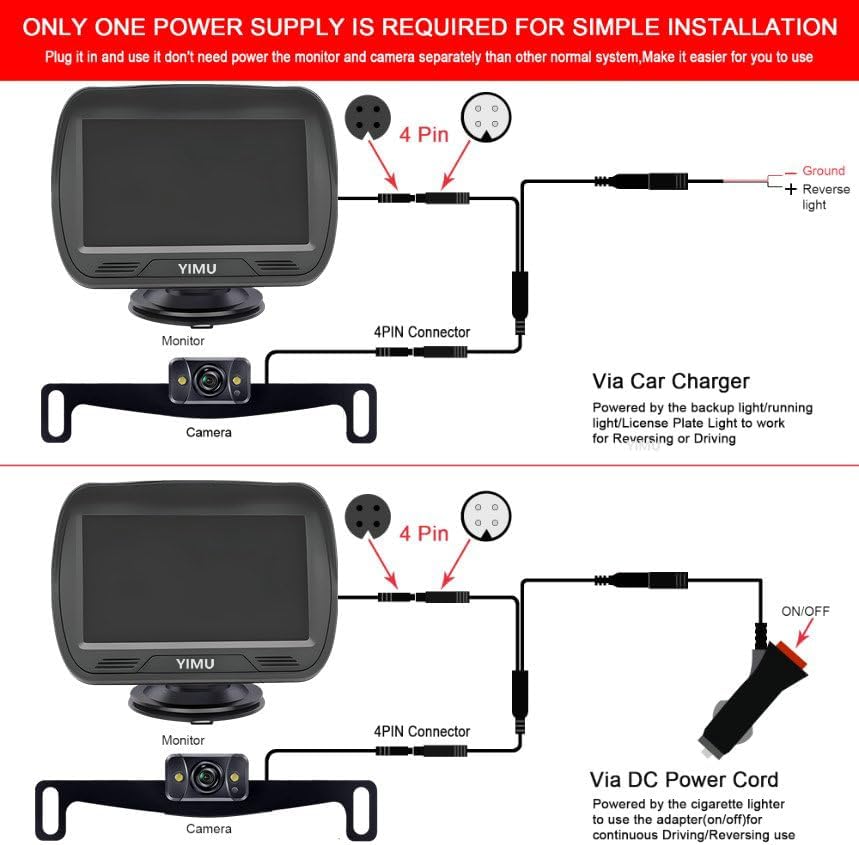
Image 3.2: Detailed wiring diagram for connecting the camera and monitor to either a cigarette lighter for continuous power or to the reversing lights for reverse-only activation.
4. Operating Instructions
4.1 Basic Operation
Once properly installed and powered, the monitor will display the camera feed. If connected to reversing lights, the display will activate automatically when reverse gear is engaged.
4.2 Adjusting Parking Guide Lines
The system allows for customization of the parking guide lines:
- Turn guide lines on or off.
- Adjust the width of the guide lines.
- Move guide lines left or right.
- Adjust the height of the guide lines.

Image 4.1: Visual representation of the adjustable parking guide lines feature.
4.3 Image Settings
You can adjust various image parameters on the monitor, including brightness, contrast, and image flip (mirror/normal view).
Video 4.1: Demonstration of adjusting menu settings on the monitor, including guide lines, brightness, and contrast.
4.4 Front/Rear Camera Switching
The camera can function as either a rear-view (mirror image) or front/side-view (normal facing image) camera. To switch between modes, locate the green wire on the camera cable. Cutting this green wire will change the image from mirror view to normal facing view.

Image 4.2: Instructions for switching the camera view by modifying the green wire.
5. Maintenance
- Cleaning: Regularly clean the camera lens and monitor screen with a soft, damp cloth. Avoid abrasive cleaners.
- Cable Inspection: Periodically check all cables for signs of wear, damage, or loose connections.
- Mounting Security: Ensure the monitor and camera mounts remain secure to prevent dislodgement during driving.
- Waterproof Rating: The camera is IP69K waterproof, designed to withstand high-pressure, high-temperature jet sprays. However, avoid prolonged submersion or intentional exposure to extreme conditions.

Image 5.1: The camera's IP69K waterproof rating ensures durability in diverse weather conditions.
6. Troubleshooting
| Problem | Possible Cause | Solution |
|---|---|---|
| No image on monitor |
|
|
| Image flickering or distorted |
|
|
| Parking lines not visible or incorrect |
|
|
| Camera image is reversed (mirror image) but intended for front view |
|
|
7. Specifications
- Model Number: K4303
- Screen Size: 4.3 Inches
- Display Technology: LCD
- Optical Sensor Technology: CMOS
- Lens Type: Wide Angle
- Real Angle of View: 150 Degrees
- Waterproof Rating: IP69K
- Voltage: 24 Volts (compatible with 12V systems via car charger)
- Product Dimensions: 7.7 x 4.9 x 3.4 inches
- Item Weight: 1.3 pounds
- Connector Type: RCA (via 4-pin cable)
- Installation Type: Surface Mount, Roof Mount (for camera)
8. Warranty and Support
YIMU offers a 2-Year Service, a 30-Day Money-Back Guarantee, and Lifetime Technical Support with every purchase. For any questions or assistance with your YIMU K4303 backup camera system, please contact YIMU customer service.
For further information or support, please visit the official YIMU store: YIMU Store on Amazon