GOXIUHAN GXH3706H
GOXIUHAN GXH3706H Matte Black Tub Shower Faucet Set Instruction Manual
1. Introduction
This manual provides detailed instructions for the installation, operation, maintenance, and troubleshooting of your GOXIUHAN GXH3706H Matte Black Tub Shower Faucet Set. Please read this manual thoroughly before beginning installation or use to ensure proper function and longevity of your product.
2. Important Safety Information
Important Compatibility Note: The GOXIUHAN tub shower trim kit is not compatible with other brand valves and cartridges (e.g., Moen, Delta, Kohler). The existing shower valve body and trims must be removed and replaced with the included GOXIUHAN valve for proper installation and function. Failure to do so will result in improper operation and potential damage.
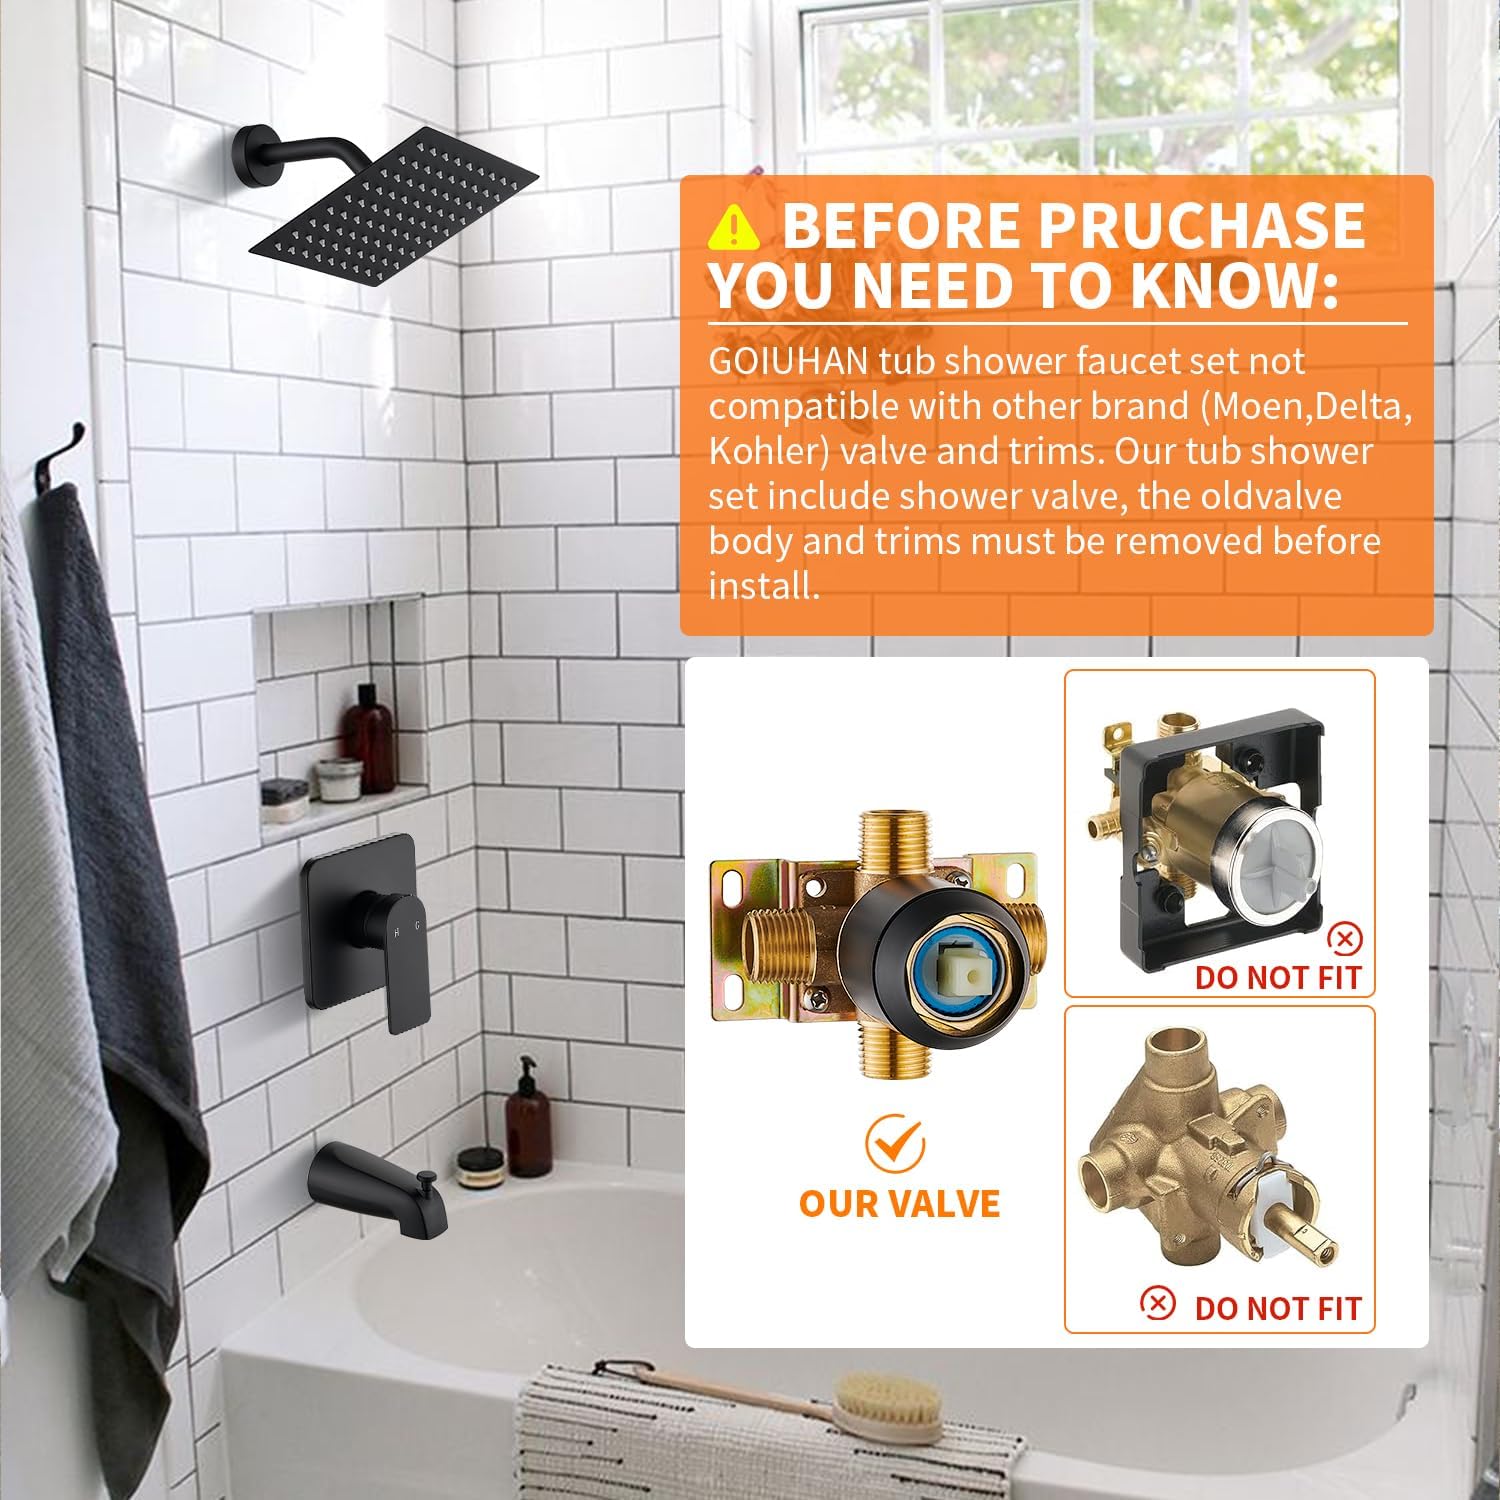
This image illustrates the critical compatibility requirement for the GOXIUHAN shower valve. It clearly shows that only the GOXIUHAN valve (labeled 'OUR VALVE') is compatible, while valves from other brands are explicitly marked as 'DO NOT FIT'. This emphasizes the necessity of replacing any existing valve with the one provided in the kit.
Always turn off the main water supply before beginning any plumbing work. If you are unsure about any installation steps, consult a qualified plumber.
3. Package Contents
The GOXIUHAN GXH3706H Matte Black Tub Shower Faucet Set includes the following components:

This image displays all the individual parts included in the package, providing a visual checklist for users to verify they have received all necessary components before starting installation.
- 8-inch Rainfall Shower Head
- 6-inch Shower Arm
- Shower Valve with Trim Kit (including escutcheon and handle)
- 5.3-inch Tub Spout with Diverter
- Installation Hardware (screws, anchors, etc.)
4. Product Specifications
| Brand | GOXIUHAN |
| Model Number | GXH3706H |
| Color | Matte Black |
| Material | Brass (valve body), 304 Stainless Steel (shower head), Metal (handle) |
| Finish Type | Matte |
| Number of Handles | 1 |
| Mounting Type | Wall Mount |
| Shower Head Size | 8 inches (square) |
| Tub Spout Reach | 5.3 inches |
| Installation Method | Wall-Mounted |
| Item Weight | 4.31 pounds (approx. 1.96 Kilograms) |

This image provides precise measurements for the shower head (8 inches square, 1.9 inches thick), the control handle and its escutcheon (4.7 inches high, 4 inches wide), and the tub spout (5.3 inches long, 2.5 inches high). These dimensions are crucial for planning installation and ensuring proper fit within the bathroom space.
5. Setup and Installation
Tools Required (Not Included):
- Adjustable Wrench
- Screwdriver (Phillips and Flathead)
- Plumber's Tape
- Pipe Cutter (if modifying existing pipes)
- Drill (if new mounting holes are needed)
- Level
- Sealant/Caulk
Installation Steps:
- Preparation: Turn off the main water supply to your home. Clear the work area and protect surrounding surfaces.
- Remove Old Fixtures: Carefully remove any existing shower head, tub spout, and especially the old shower valve and trim. As noted in the safety section, the GOXIUHAN valve must be used.
- Install Shower Valve: Mount the new GOXIUHAN shower valve body securely within the wall. Ensure proper hot and cold water connections (NPT1/2") are made. The valve body is constructed from brass for durability.
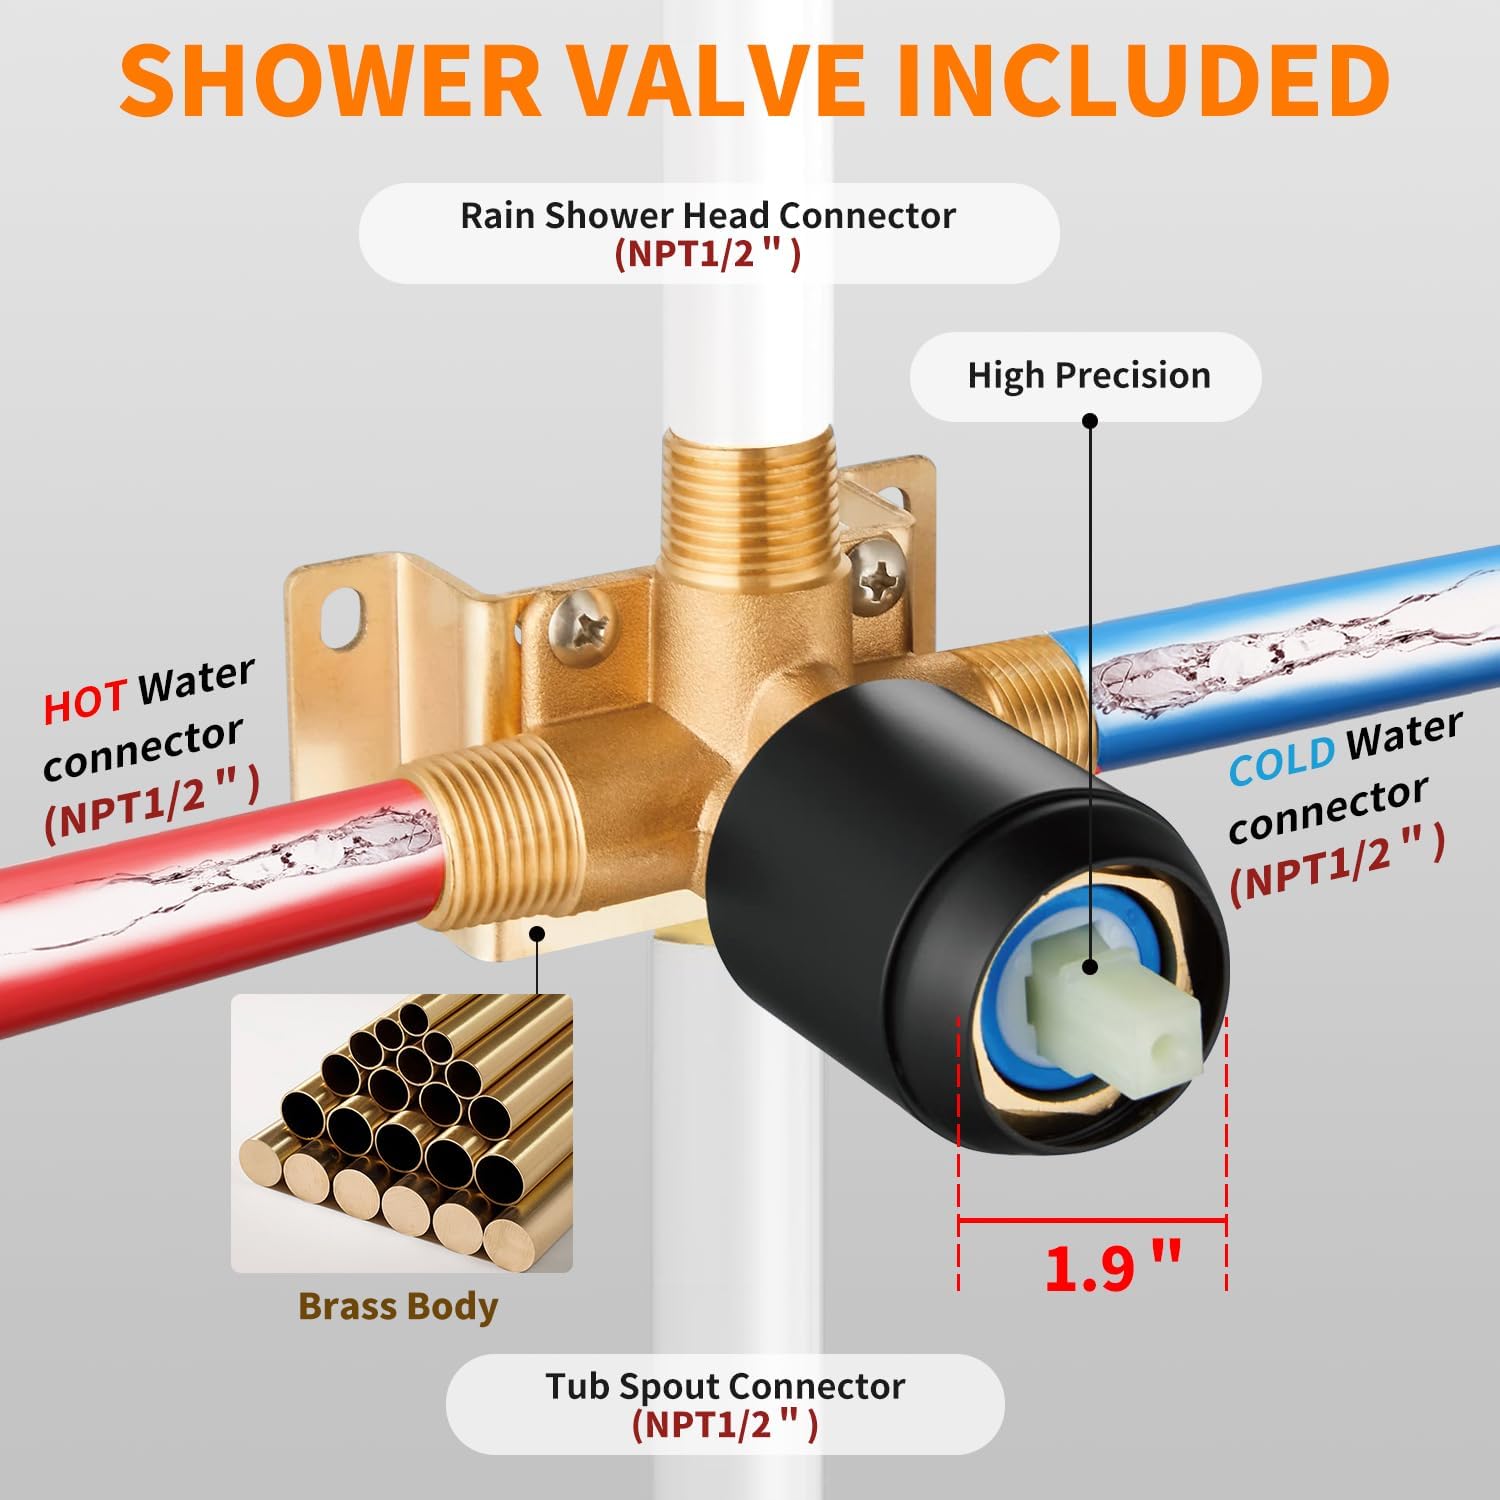
This image highlights the brass construction of the shower valve and its connection points for hot water, cold water, rain shower head, and tub spout, all using NPT1/2" connectors. It also shows the compact 1.9-inch depth of the valve, which is important for in-wall installation.
- Install Shower Arm: Thread the 6-inch shower arm into the wall connection. Apply plumber's tape to threaded connections to prevent leaks.
- Attach Shower Head: Secure the 8-inch rainfall shower head to the shower arm. The shower head features a 360-degree adjustable angle connector for optimal positioning.

This image showcases the 8-inch rainfall shower head, emphasizing its 304 stainless steel material, soft silicone nozzles for easy cleaning, and the 360-degree adjustable angle connector that allows users to direct the water flow.
- Install Tub Spout: Attach the 5.3-inch tub spout to its connection point. Ensure it is securely fastened and sealed.
- Install Trim Kit: Place the escutcheon (cover plate) over the valve and secure it to the wall. Install the single handle onto the valve stem.
- Test: Turn on the main water supply and carefully check all connections for leaks. Test the function of the shower head, tub spout, and temperature control.
6. Operating Instructions
Water Flow and Temperature Control:
The single handle controls both water flow and temperature.

This image illustrates the functionality of the single-handle design, showing how rotating the handle left or right adjusts the water temperature (hot or cold) and lifting/pushing it adjusts the water flow rate.
- To turn on/off: Rotate the handle.
- To adjust temperature: Rotate the handle left for hot water and right for cold water.
- To adjust flow: Lift the handle to increase flow, push down to decrease.
Tub Spout Diverter:
The tub spout includes a diverter to switch water flow between the tub spout and the shower head.

This image focuses on the metal tub spout and its integrated diverter knob. It demonstrates the simple 'lift up' action to activate the shower head and 'press down' to return water flow to the tub spout, highlighting its ease of operation.
- To use the tub spout: Ensure the diverter knob is in the down position.
- To divert water to the shower head: Pull the diverter knob on the tub spout upwards. Push it down to return water to the tub spout.
7. Maintenance and Care
Cleaning the Finish:
Clean the matte black finish regularly with a soft cloth and mild soap or non-abrasive cleaner. Avoid harsh chemicals, abrasive cleaners, or scouring pads, as these can damage the finish.
Cleaning Shower Head Nozzles:
The 8-inch rainfall shower head features soft silicone nozzles. To remove mineral buildup and maintain optimal spray performance, gently rub the nozzles with your finger or a soft brush.
General Care:
Periodically check all connections for tightness and leaks. Address any issues promptly to prevent water damage.
8. Troubleshooting
Low Water Pressure:
- Check if the main water supply to your home is fully open.
- Inspect the shower head nozzles for mineral buildup and clean them if necessary (refer to Maintenance section).
- Ensure the shower valve is fully open.
Leaks:
- Check all threaded connections for tightness. If necessary, disassemble, reapply plumber's tape, and reassemble.
- Inspect O-rings and gaskets for proper seating and any signs of damage. Replace if worn.
Temperature Control Issues:
- Ensure hot and cold water lines are connected correctly to the valve during installation.
- If the issue persists, it may indicate a problem with the valve cartridge. Consult a qualified plumber for diagnosis and repair.
9. Warranty and Support
This product comes with a manufacturer's warranty. Please refer to the warranty card included with your purchase for specific terms and conditions, including coverage duration and limitations.
For technical support, replacement parts, or warranty claims, please contact GOXIUHAN customer service through the retailer where the product was purchased or visit the official GOXIUHAN website for contact information. When contacting support, please have your model number (GXH3706H) and purchase date available.
no relevant documents
Ask a question about this manual
Ask about setup, troubleshooting, compatibility, parts, safety, or missing instructions. Manuals+ will review the question and use this page’s manual context to help answer it.