1. Introduction
This manual provides essential instructions for the assembly, operation, and maintenance of your MELLCOM 12 x 24 FT Heavy Duty Carport. This portable garage is designed to offer robust protection for vehicles such as cars, trucks, motorcycles, or recreational vehicles from various outdoor elements, including sun, rain, wind, and snow. Please read these instructions carefully before beginning assembly and retain this manual for future reference.
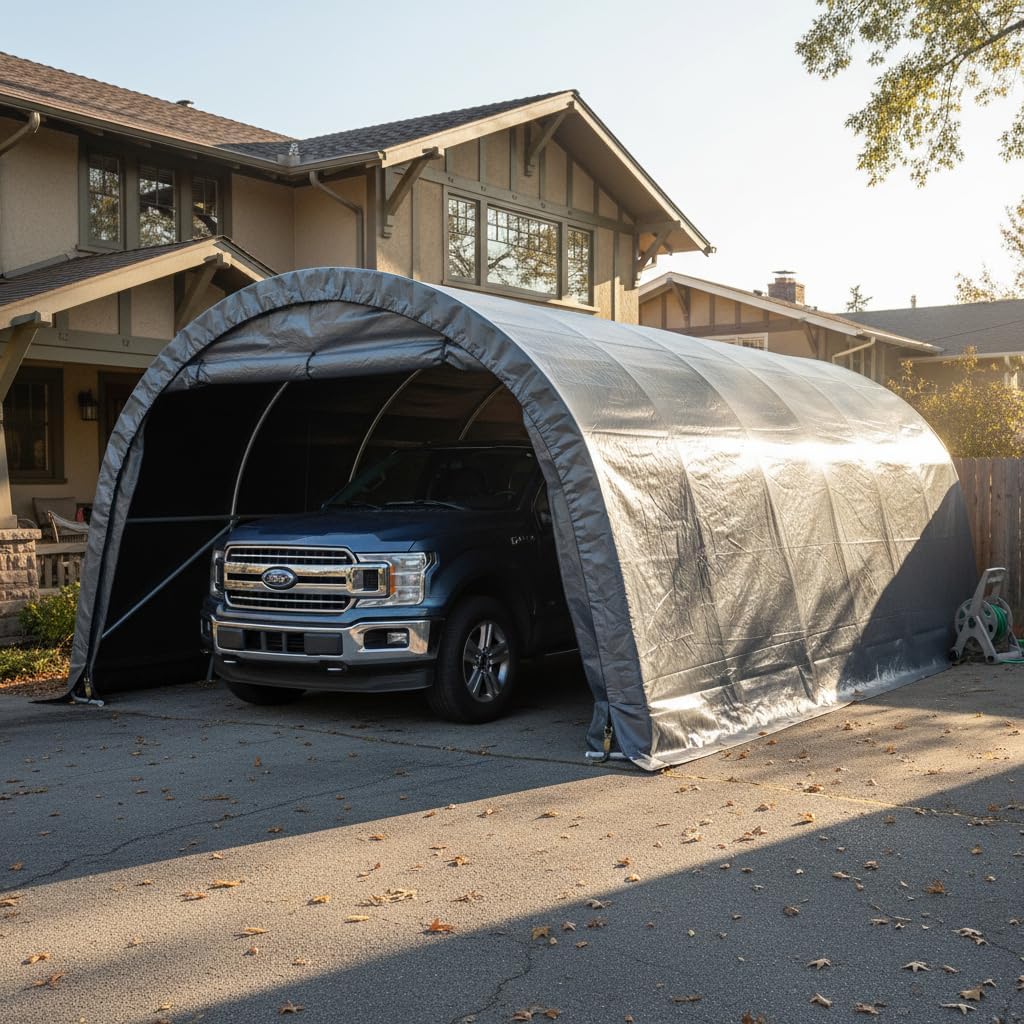
A MELLCOM 12x24 FT carport providing shelter for a truck, illustrating its function as a portable garage for vehicles.
Key Features:
- Smart Arch Structure Design: The carport's arched roof is engineered to prevent the accumulation of rainwater and snow, enhancing structural integrity.
- Durable 240G PE Fabric: The cover is waterproof, fade-resistant, and UV-resistant, ensuring year-round protection.
- Triple-Access Doors: Features a double-zipper door design with three usage options: fully rolled up, half rolled up, or completely closed.
- Rock-Solid Stability: Equipped with 7 top beams, 14 ground bars, and a 1-1/2 inch (Dia.) rust-resistant galvanized steel framework for enhanced stability.
- Generous Dimensions: Exterior dimensions of 12'W x 24'D x 8'H, with a maximum entrance height of 8'.
2. Safety Information
Your safety is paramount. Please adhere to the following safety guidelines:
- Always ensure the carport is properly anchored to the ground, especially during high winds or adverse weather conditions. Inadequate anchoring can lead to structural failure and potential injury or property damage.
- Exercise caution when operating the triple-access doors to prevent tripping hazards.
- Do not use the carport near open flames or heat sources.
- Regularly inspect all components for wear, damage, or loose connections. Replace damaged parts immediately.
- Ensure the assembly area is clear of obstructions and hazards.
- Assembly typically requires at least two to three adults. Do not attempt to assemble alone.
3. Components List
Before assembly, verify that all parts are present and undamaged. Refer to the packing list provided with your carport for a complete inventory. Key components include:
- Galvanized Steel Frame Pipes (various lengths and bends)
- Joint Connectors
- 240G PE Fabric Cover
- Triple-Access Zipper Doors (front and rear panels)
- Rope Tightener Shafts (4 units)
- Ground Spikes/Anchors
- Ropes/Straps for securing
- Assembly Hardware (bolts, nuts, washers)

Detailed view of the carport's robust construction, including the rope tightener shafts for secure cover tension, the heavy-duty steel pipe framework, and the ground spikes essential for stable anchoring.
4. Assembly Instructions
The MELLCOM carport is designed for hassle-free setup, but careful attention to detail is required. It is recommended that 2-3 people assist with the assembly. All necessary instructions and hardware are included.
Pre-Assembly:
- Unpack all components and lay them out. Verify against the parts list.
- Identify and separate similar-looking bolts and pipes to avoid confusion during assembly.
- Choose a level, clear area for installation. Ensure adequate space around the carport for assembly.
Assembly Steps:
Follow the detailed graphical instructions provided in your product packaging. General steps include:
- Assemble the Base Frame: Connect the ground bars and corner pieces to form the rectangular base.
- Erect the Arch Frame: Assemble the arched steel pipes according to the diagram, connecting them with the appropriate joint connectors. The 1-1/2 inch (Dia.) rust-resistant galvanized steel framework ensures stability.
- Attach Top Beams: Install the 7 top beams to connect the arched sections, providing additional structural rigidity.
- Install the Cover: Carefully drape the 240G PE fabric cover over the assembled frame. Ensure it is centered and evenly distributed.
- Secure the Cover: Use the rope tightener shafts and ropes to securely fasten the cover to the frame, ensuring a snug fit to prevent flapping in wind.
- Install Doors: Attach the triple-access zipper doors to the front and rear openings.
- Anchor the Carport: Drive the ground spikes firmly into the ground through the designated anchor points on the base frame. For added security, especially in areas prone to strong winds, consider using additional anchoring methods such as concrete steel stakes or sandbags.
This video provides a visual overview of the MELLCOM Heavy Duty Carport, showcasing its design, structural integrity, and ability to protect against various weather conditions like wind, rain, and snow. It also highlights key components such as rope tighteners, heavy-duty steel pipes, and ground spikes, along with the versatile triple-access door options.
5. Operating Instructions
Triple-Access Doors:
The carport features a double-zipper door design, offering three convenient ways to manage access and ventilation:
- All Rolled Up: Unzip both zippers and roll the door panel completely upwards, securing it with the attached straps. This provides maximum access and ventilation.
- Half Rolled Up: Unzip the door partially and roll up the upper section, securing it. This allows for partial access or ventilation while maintaining some protection.
- All Closed: Ensure both zippers are fully closed to provide complete enclosure and protection from the elements.
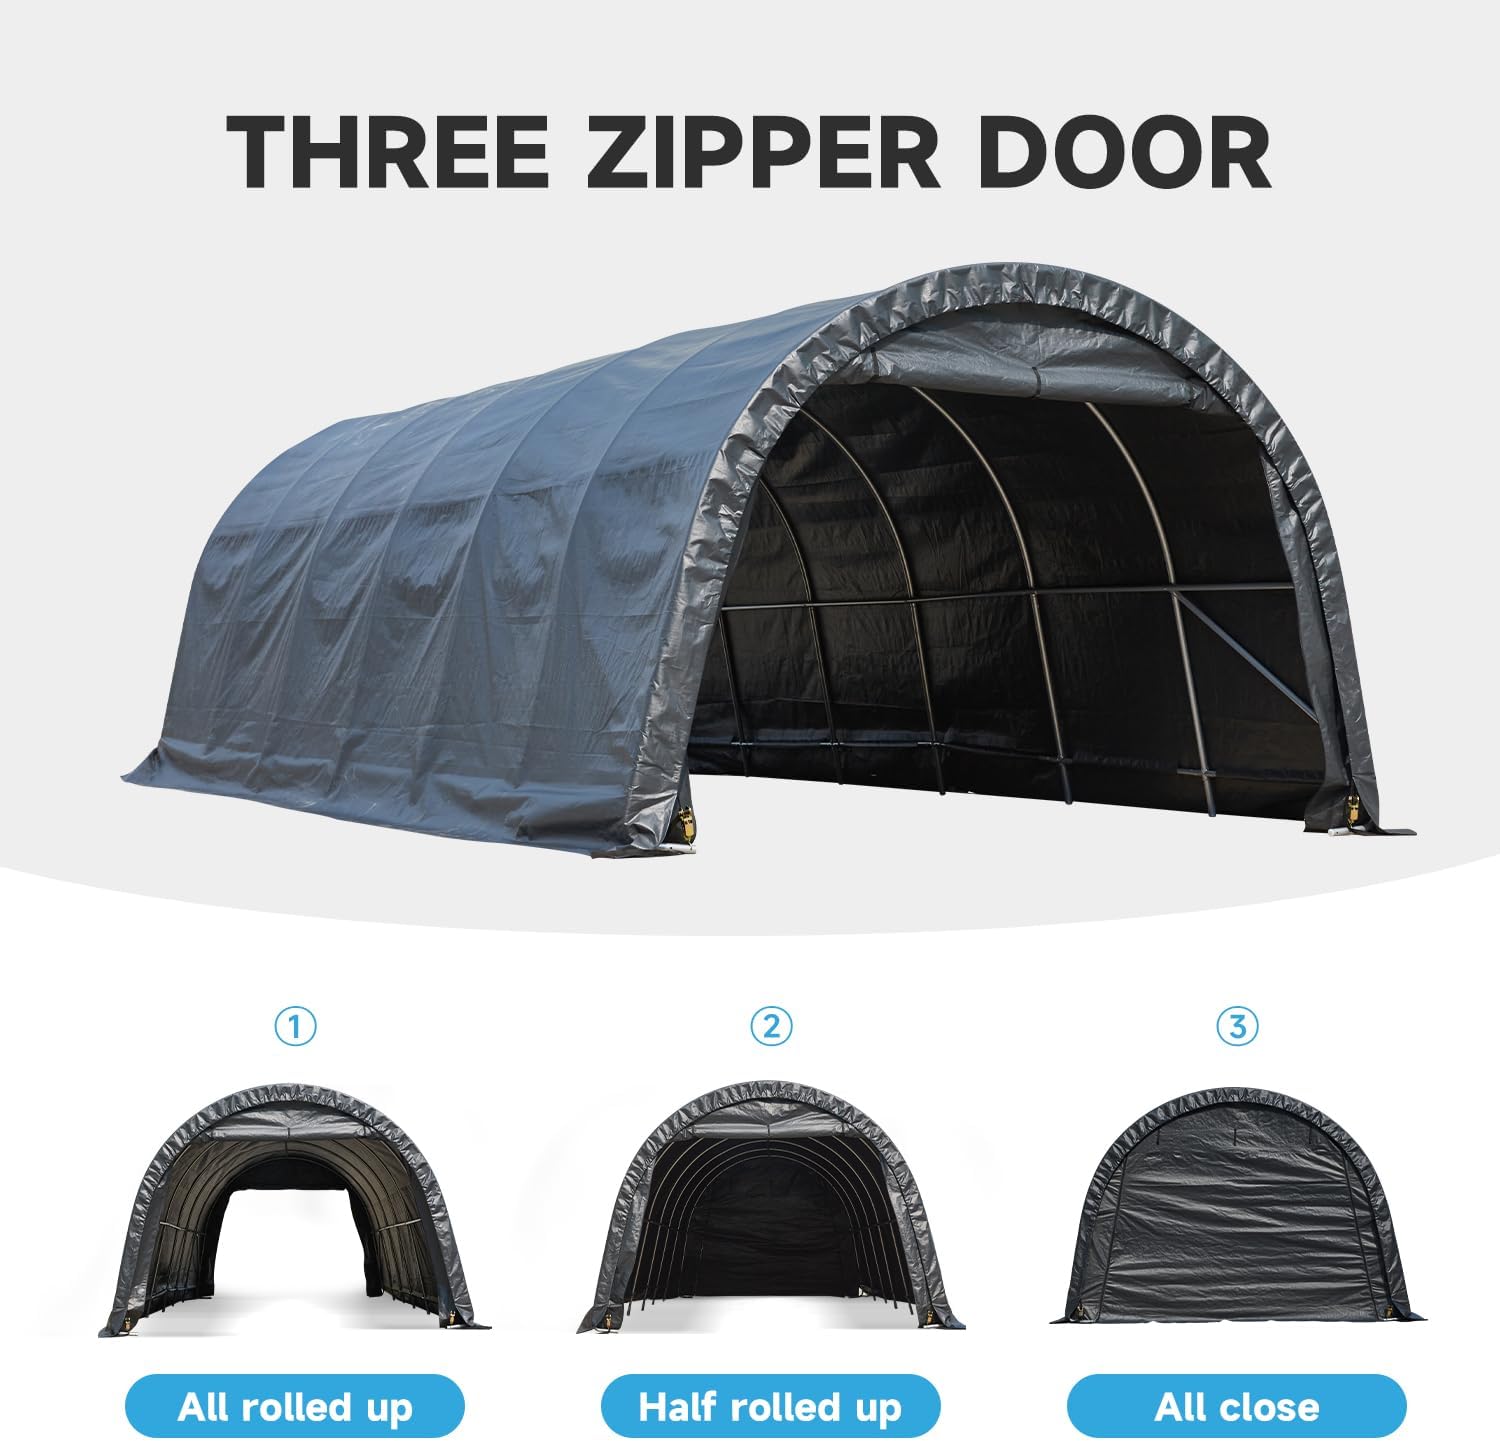
The carport features a versatile triple-access door design, allowing the front panel to be fully rolled up, half rolled up, or completely closed for varying access and protection needs.
6. Maintenance
Proper maintenance will extend the life of your MELLCOM carport.
- Regular Inspection: Periodically check all frame connections, ropes, and anchors for tightness and wear. Tighten any loose bolts or re-secure anchors as needed.
- Cover Care: The 240G PE fabric is waterproof, fade-resistant, and UV-resistant. Clean the cover with mild soap and water. Avoid harsh chemicals or abrasive cleaners that could damage the material.
- Snow Removal: While the arc top design helps prevent accumulation, heavy snowfall should be removed promptly to prevent excessive load on the structure. Use a soft brush or broom to clear snow from the cover.
- Wind Protection: In anticipation of strong winds, ensure all anchors are securely fastened and consider adding extra tie-downs or weights for increased stability.
- Zipper Care: Keep zippers clean and lubricated to ensure smooth operation.

The innovative arc top design of the carport facilitates the runoff of rainwater and prevents snow accumulation, enhancing the structure's stability and longevity.

This image demonstrates the carport's heavy-duty frame, designed to withstand snow loads and provide reliable shelter for vehicles even in winter weather.

The carport cover is made from 240 GSM PE fabric, providing excellent protection against water, tears, and harmful UV rays, ensuring durability in various weather conditions.
7. Troubleshooting
This section addresses common concerns and issues you might encounter with your carport.
- Carport Instability: Ensure all frame connections are tight and ground anchors are fully engaged. In high wind areas, additional anchoring (e.g., concrete steel stakes, heavier-duty ground anchors) may be necessary. Verify that the carport is installed on level ground.
- Tarp Deterioration: The 240G PE fabric is designed for durability. However, prolonged exposure to extreme weather conditions can affect its lifespan. Regular cleaning and inspection for small tears can help. If significant deterioration occurs, contact MELLCOM for replacement options.
- Difficulty with Door Zippers: Ensure zippers are clean and free of debris. Apply a silicone-based lubricant if they are stiff. Avoid forcing zippers, as this can cause damage.
- Water Accumulation on Roof: The arc top design is intended to shed water. If water pools, check that the frame is correctly assembled and the cover is taut and evenly stretched. Adjust tension ropes if necessary.
8. Specifications

This image illustrates the overall dimensions of the carport, measuring 12 feet in width, 24 feet in length, and 8 feet in height.
| Specification | Detail |
|---|---|
| Brand | MELLCOM |
| Model Number | 12 x 24 FT |
| Product Dimensions (L x W x H) | 288"L x 144"W x 96"H (12'W x 24'D x 8'H) |
| Floor Area | 288 Square Feet |
| Peak Height | 8 FT |
| Frame Material | Galvanized Steel (1-1/2 inch / 38mm diameter, 1mm thickness) |
| Joint Connector Material | Metal (42mm diameter, 1.2mm thickness) |
| Cover Material | 240G PE Fabric |
| Color | Black |
| Item Weight | 215.99 Pounds |
| UV Protection | UV Resistant |
| Water Resistance Level | Water Resistant |
| Closure Type | Zipper |
| Required Assembly | Yes |
9. Warranty and Support
MELLCOM stands behind the quality of its products. For specific warranty details, including coverage and duration, please refer to the warranty information provided with your purchase or contact MELLCOM customer support directly. If you encounter any issues or require assistance with your carport, please reach out to MELLCOM customer service for expert guidance and support.