SWTHM HT21-401-003-03
Instruction Manual
SWTHM String Trimmer Spools and Cap
Model: HT21-401-003-03, HT22-401-03-05
Brand: SWTHM
1. Product Overview
This product provides replacement spools and a cap for various Hyper Tough 20V MAX Cordless String Trimmers. The package includes six pre-wound trimmer replacement spools and one string trimmer spool cap, designed for easy and quick replacement.
The spools are pre-wound with 0.06-inch (1.6mm) diameter nylon line, each approximately 17 feet (5.2 meters) in length. The cap is designed to cover the blade area, offering protection during operation.
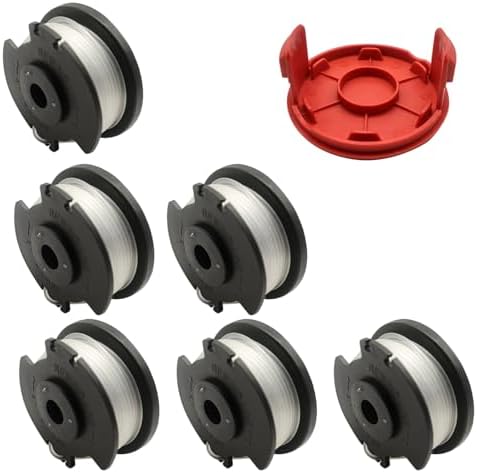
Image: Contents of the package, showing six replacement spools and one red spool cap.

Image: A string trimmer in a grassy area, highlighting compatibility with various Hyper Tough models.
2. Compatibility
These replacement spools and cap are compatible with the following Hyper Tough string trimmer models:
- Hy-per Tou-gh 20V Max Cordless 13-inch Battery Powered String Trimmer, HT22-401-03-05
- Hy-per Tou-gh 20V MAX Cordless 12-Inch String Trimmer, HT19-401-003-06
- Hy-per Tou-gh 20V MAX Cordless Trimmer Sweeper Combo, HT19-401-003-07
- Hy-per Tou-gh 20V Max Cordless 12-Inch String Trimmer, HT21-401-003-02
- Hy-per Tou-gh 20V MAX Cordless 13-inch String Trimmer, HT21-401-003-03
Ensure your trimmer model matches one of the listed compatible models for proper fit and function.
3. Setup and Installation
Replacing the string trimmer spool and cap is a straightforward process. No additional tools are typically required as the spools are pre-wound for quick assembly and disassembly.
- Power Off: Before beginning, ensure your string trimmer is powered off and the battery is removed (for cordless models) to prevent accidental startup.
- Remove Old Cap and Spool: Locate the existing spool cap on your trimmer head. Depending on your trimmer model, you may need to press tabs or twist the cap to remove it. Carefully lift out the old, empty, or damaged spool.
- Insert New Spool: Take a new pre-wound replacement spool. Align the line with the eyelet or guide on the trimmer head. Insert the spool into the trimmer head, ensuring it sits securely.
- Attach New Cap: Place the new red spool cap over the installed spool. Press down firmly or twist until it clicks into place, ensuring it is securely fastened.
Refer to your specific string trimmer's instruction manual for detailed steps on spool and cap replacement, as procedures may vary slightly between models.

Image: A string trimmer head with a new spool and cap detached, illustrating the components involved in replacement.

Image: A close-up view of the spool and cap correctly installed on a string trimmer head.
4. Operating Instructions
Once the replacement spool and cap are securely installed, your string trimmer is ready for use. These spools are designed to work with single-line feed cutting systems, often featuring an automatic feed mechanism.
- Automatic Line Feed: Most compatible trimmers will automatically feed new line as needed during operation. Avoid manually pulling the line unless instructed by your trimmer's manual for specific situations.
- Optimal Performance: For best results, operate your string trimmer according to its manufacturer's guidelines. The 0.06-inch diameter line is suitable for general trimming tasks.

Image: A person operating a string trimmer in a lawn, demonstrating typical use.

Image: A close-up of the string trimmer head actively cutting grass, showing the line in motion.
5. Maintenance
Proper maintenance of your replacement spools and cap will ensure their longevity and optimal performance.
- Storage: Store unused spools in a cool, dry place away from direct sunlight and extreme temperatures. This helps preserve the integrity of the nylon line.
- Inspection: Periodically inspect the spool cap for cracks or damage. A damaged cap may not secure the spool properly or protect the user effectively. Replace the cap if any damage is observed.
- Line Condition: If you notice the line frequently breaking or performing poorly, ensure it is not tangled on the spool and that the spool is correctly seated.
6. Troubleshooting
If you encounter issues with your replacement spools or cap, consider the following:
- Spool Does Not Fit: Double-check the compatibility list in Section 2. Ensure your trimmer model is listed. If it is not, the spool may not be designed for your specific trimmer.
- Line Not Feeding: Verify that the spool is correctly seated and the line is not tangled. Ensure the cap is securely attached. Consult your trimmer's manual for specific line feeding mechanisms.
- Line Breaking Frequently: This can occur if the line is old, stored improperly, or if you are cutting against hard surfaces. Ensure the line is feeding smoothly and avoid hitting obstacles.
7. Specifications
| Attribute | Detail |
|---|---|
| Product Name | Trimmer Spool Line & Cap |
| Shell Material (Spool & Cap) | ABS |
| Thread Material (Line) | Nylon |
| Spool Weight (each) | 25g (approx. 0.88 oz) |
| Cap Weight | 17g (approx. 0.60 oz) |
| Spool Dimensions | 54mm (diameter) x 20mm (height) |
| Cap Dimensions | 74mm (diameter) x 32mm (height) |
| Line Length (per spool) | 17FT (5.2M) |
| Line Diameter | 0.06 inches (1.6mm) |
| Package Contents | 6 Trimmer Replacement Spools, 1 String Trimmer Spool Cap |
| Package Dimensions | 6.3 x 4.72 x 1.38 inches |
| Item Weight (Total) | 5.9 ounces |

Image: A diagram illustrating the precise dimensions of both the replacement spool and the cap.

Image: A close-up of a spool with the line extended, indicating its diameter (0.06in/1.6mm) and length (17FT/5.2M).
8. Safety Information
Always prioritize safety when working with power tools and their accessories. When using a string trimmer with these replacement parts, please observe the following safety precautions:
- Personal Protective Equipment (PPE): Always wear appropriate personal protective equipment, including long pants and safety goggles, to protect against flying debris and potential injury.
- Trimmer Safety: Follow all safety guidelines provided in your string trimmer's original instruction manual.
- Power Disconnection: Always disconnect the power source (e.g., remove the battery) from the trimmer before performing any maintenance, installation, or inspection.
9. Warranty and Support
For specific warranty information regarding this product, please refer to the terms provided by the seller or manufacturer at the time of purchase. If you have any questions, require technical assistance, or need to report an issue, please contact the seller directly through the platform where the purchase was made.
Ask a question about this manual
Ask about setup, troubleshooting, compatibility, parts, safety, or missing instructions. Manuals+ will review the question and use this page’s manual context to help answer it.