1. Introduction
This manual provides detailed instructions for the installation, operation, and maintenance of your YOSEC F-153F Waterproof Smart Fingerprint Cabinet Lock. Please read this manual thoroughly before installation and use to ensure proper function and longevity of the product. Keep this manual for future reference.
2. Product Features
- Biometric Security: Unlock with fingerprint scanner for enhanced security and convenience - no keys required.
- Touchscreen Keypad: Digital touchscreen keypad allows keyless entry with custom code or temporary access codes.
- Waterproof Design: Weatherproof construction protects internal components from rain, snow, and moisture.
- Remote Access: Control lock remotely via smartphone app for secure access management.
- Easy Installation: Simple DIY installation with all necessary hardware and instructions included.
3. Product Components
The package includes the following components:
- Keypad Panel
- Lock Body
- Striking Plate
- Fixing Screws
- Manual
- USB Key (E-key)

Image: Overview of the lock components and their dimensions.
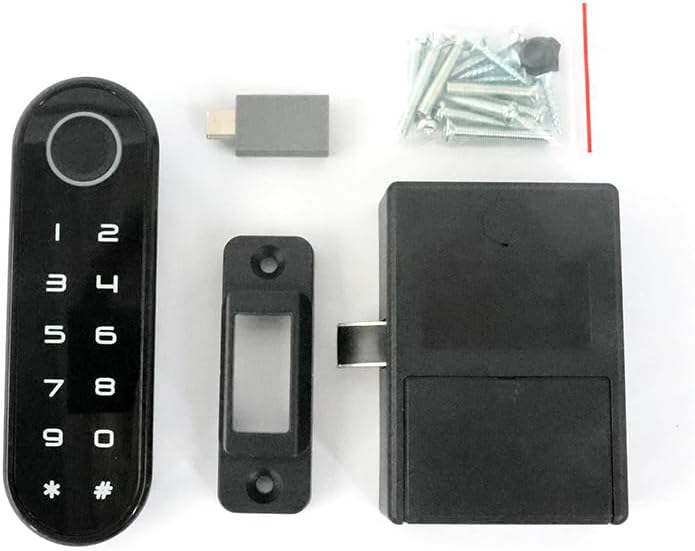
Image: All included components laid out, including the keypad panel, lock body, striking plate, screws, and E-key.
4. Product Specifications
| Feature | Detail |
|---|---|
| Brand | YOSEC |
| Model Number | F-153F |
| Lock Type | Biometric, Keypad |
| Material | Plastic |
| Item Dimensions (L x W x H) | 1.5 x 0.6 x 4.7 inches |
| Item Weight | 0.1 Pounds |
| Special Features | Back-Lit Keypad, Fingerprint, Portable, Touchscreen, Weather Resistant |
| Recommended Uses | Furniture drawer, gym locker, sauna cabinet |
| Connectivity Protocol | Wi-Fi |
5. Installation Guide
This section details the steps for installing your smart fingerprint cabinet lock. Ensure you have all components listed in Section 3 before beginning.

Image: Multiple installation methods for drawers, single-door, and double-door cabinets.
5.1 Pre-installation Considerations
- Locate Mounting Holes: If the lock panel is installed in one piece with the lock box, first locate the mounting holes.
- Door Inset: For door insets, the latch needs to be flush or slightly indented at the edge of the door panel.
- Door Cover: For door covers, the latch needs to be indented one more side panel thickness.
- Marking Holes: Re-mark the mounting hole locations on your furniture.
- Drill Holes: Combine with the provided opening size drawing to drill necessary holes in the door panel.
5.2 Connecting and Securing the Lock
- Connect Wires: Pass the wires from the keypad panel through the center hole of the door.
- Connect Lock Box: Connect the lock box to the keypad panel. Ensure the side with 4 metal dots faces out.
- Secure Lock Box: Secure the lock box with the lock panel using the long screws provided.
- Mount Latch: Position the latch mounting height. For door inserts, go in one door panel thickness deeper. For door outer covers, mount the latch directly against the edge of the side panel. Ensure the distance between the latch and the side of the door remains unchanged.
- Screw Latch: Screw the latch into place.
Video: Detailed guide on how to install the fingerprint cabinet lock on a drawer or cabinet door.
6. Operation Instructions
This section covers the various ways to operate your YOSEC F-153F lock, including fingerprint and code management.
Video: Comprehensive guide on how to operate the digital keypad fingerprint cabinet lock, including setup and usage.
6.1 Recording Fingerprints
There are two methods to record fingerprints:
- Method 1 (Direct Recording):
a. Press and hold the sensor area until the green light comes on (approx. 5 seconds).
b. Take your finger away when the green light comes on.
c. When the blue light is on, press your finger on the sensor to record. Repeat 6 times.
d. Two drops of green light indicate entry is complete. The blue light will remain on to continue with other fingerprints. - Method 2 (Using User Code):
a. Press and hold the "*" key for two seconds, release after a beep.
b. Enter the user code (initial code: 1234) followed by "#" to confirm.
c. Then press "4#".
d. The blue light will turn on, indicating it's recording fingerprints. Press your finger and remove it, repeating 6 times.
e. Two drops of green light indicate entry is complete.
6.2 Changing the User Code
The initial user code is 1234.
- Press and hold the "*" key for two seconds, release after a beep.
- Enter the old user code (1234) followed by "#" to confirm.
- Then press "1#".
- Enter the new user code followed by "#" to confirm. End of change.
6.3 Changing the Manager Code
The initial manager code is 543215.
- Press and hold the "*" key for two seconds, release after a beep.
- Enter the old manager code (543215) followed by "#" to confirm.
- Then press "2#".
- Enter the new manager code followed by "#" to confirm. End of change.
6.4 Recovering Factory Settings
To clear all fingerprint codes and restore factory settings:
- Press and hold the "*" key for two seconds, release after a beep.
- Enter the administrator password (initial admin password: 543215) followed by "#" to confirm.
- Then press "5#".
- Four beeps indicate factory reset is complete.
6.5 Using the E-key
The E-key can be used if fingerprint passwords are forgotten or invalid, or if the battery is low.
- Open the side port cover on the keypad panel.
- Insert the E-key into the port. The lock will open once automatically.
- After the latch is extended, enter "11#" to restore factory settings (two ticks).
- The E-key can also be used to change the locking mode.
6.6 Changing the Locking Mode
The lock supports Auto, Manual, and Public modes. Auto mode is the default.
- Press and hold the "*" key for two seconds, release after a beep.
- Enter the manager code (initial: 543215) followed by "#" to confirm.
- Then press "3#".
- Choose your desired mode:
a. Enter "1#" for Auto mode.
b. Enter "2#" for Manual mode.
c. Enter "3#" for Public mode. - Two ticks indicate the mode has changed.
7. Battery Management & Emergency Power
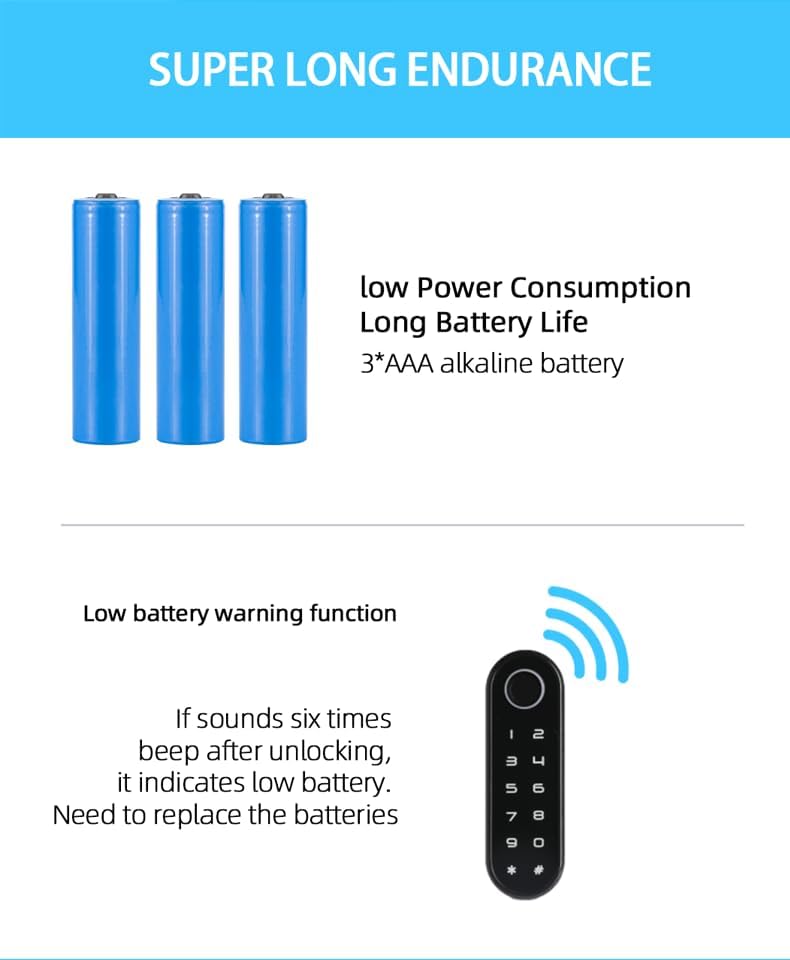
Image: Illustration of low power consumption, long battery life (3*AAA alkaline battery), and low battery warning function.
7.1 Low Battery Alert
When the battery is low, the lock will emit six beeps after unlocking. This indicates that the batteries need to be replaced soon.
7.2 External Power Supply (Type-C Interface)
If the battery runs out completely and the lock does not respond, you can use an external power source:
- Open the side soft rubber cover on the keypad panel.
- Plug in an external power source, such as a power bank, through the Type-C interface to temporarily power the lock and unlock it.
- After unlocking, please replace the internal batteries with new ones.

Image: The Type-C interface on the lock panel for emergency charging with a power bank.
Video: Demonstrates low battery alert and how to use an external power supply via the Type-C interface.
8. Waterproof Feature
The YOSEC F-153F lock features an IP66 waterproof rating for its keypad panel, protecting it from water splashes and dust. Please note that while the panel is waterproof, the rear lock body is not.

Image: The IP66 waterproof touch screen panel of the lock, showing water resistance.
Video: Demonstration of the waterproof capabilities of the fingerprint cabinet drawer lock.
9. Troubleshooting
- Lock not responding: Check battery levels. If completely drained, use an external power source via the Type-C port (refer to Section 7.2).
- Fingerprint not recognized: Ensure your finger is clean and dry. Re-record your fingerprint if issues persist (refer to Section 6.1). Unrecorded fingerprints cannot unlock the device.
- Forgotten code: Use the E-key to restore factory settings, then set a new manager and user code (refer to Section 6.4 and 6.5).
- Locking mode issues: Verify the current locking mode and change it if necessary using the manager code (refer to Section 6.6).
10. Safety Information
- Do not expose the lock body to water or excessive moisture.
- Use only recommended AAA alkaline batteries.
- Keep the E-key in a safe and accessible location for emergency use.
- Avoid using abrasive cleaners on the touchscreen panel.
- Ensure proper installation to prevent accidental damage or malfunction.
11. Warranty and Support
For warranty information or technical support, please refer to the product packaging or contact YOSEC customer service directly. Keep your purchase receipt as proof of purchase.


