1. Introduction
This manual provides essential instructions for the safe and efficient operation, setup, and maintenance of your Generic Portable PCP Air Compressor. This compact and portable compressor is designed for inflating PCP air rifles, air pistols, paintball guns, and HPA tanks, offering versatile power options (12V DC or 110V/220V AC).
Please read this manual thoroughly before operating the compressor to ensure proper use and to prevent damage or injury. Keep this manual for future reference.
2. Safety Information
WARNING: Operating high-pressure equipment can be dangerous if not handled correctly. Always follow safety guidelines.
- Ensure the compressor is placed on a stable, level surface during operation.
- Do not operate the compressor in wet conditions or near flammable materials.
- Always wear appropriate eye protection when operating or maintaining the compressor.
- Monitor the pressure gauge and temperature display closely during operation. Immediately turn off the power switch if the pressure exceeds 28MPa (4000 PSI) or if the temperature becomes excessively high.
- Never point the inflation nozzle at yourself or others.
- Ensure all connections are secure before starting the compressor.
- Allow the compressor to cool down after extended use.
- Keep children and unauthorized personnel away from the operating compressor.
3. Package Contents
Verify that all items are present in the package:
- 1 x PCP Air Compressor Unit
- 1 x Transformer (for AC power)
- 1 x 8MM Quick Connector
- 1 x Repair Kit (includes vulnerable parts)
4. Product Features
- Dual Power Modes: Operates on 12V DC (car battery) or 110V/220V AC (household electricity via transformer).
- High Pressure Output: Achieves up to 30MPa (300 Bar / 4500 Psi).
- Temperature Digital Display: Real-time monitoring of the machine's operating temperature.
- Pressure Gauge: Real-time display of cylinder pressure.
- Built-in Cooling Fan: Enhances cooling efficiency for prolonged operation.
- Oil-Free Design: Eliminates the need for lubricating oil.
- External Oil-Water Separation Filter: For easy maintenance and moisture removal.
- 8MM Quick Connector: For fast and secure connections to airguns and tanks.
- Portable Design: Compact with a high-hardness plastic handle for easy transport.
- Manual Shutdown: Equipped with clear power on/off buttons.

Figure 1: Labeled components of the Portable PCP Air Compressor.
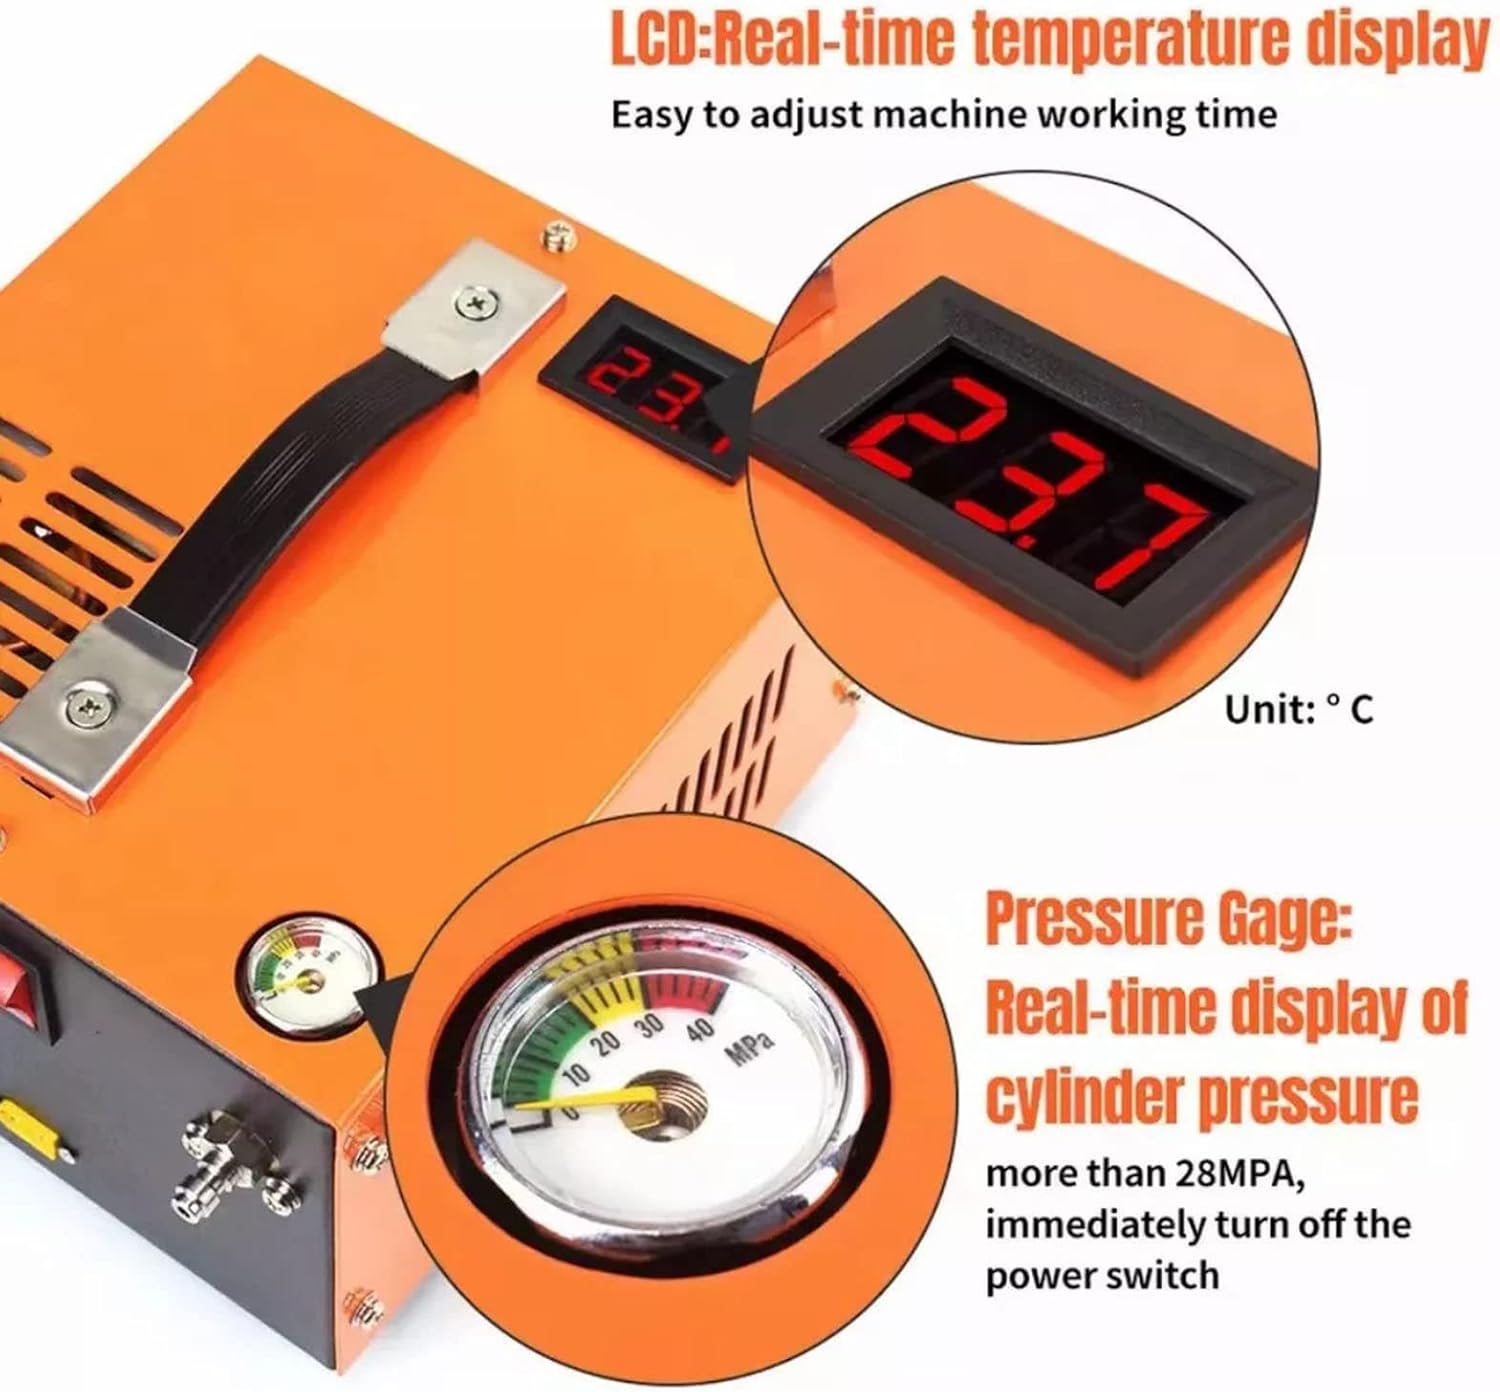
Figure 2: Real-time temperature display and pressure gauge for monitoring.
5. Setup
Follow these steps to set up your compressor:
- Connect the Quick Connector: Attach the 8MM quick connector to the compressor's air outlet. Ensure it is securely fastened.
- Connect to Airgun/Tank: Attach the hose assembly from the quick connector to your PCP airgun or HPA tank. Ensure a secure, foster-type locking connection.
- Connect Power Supply:
- For Household AC Power (110V/220V): Connect the provided transformer to a suitable wall outlet, then connect the transformer's output to the compressor's power input.
- For 12V DC Car Battery Power: Use the provided battery clamps to connect directly to a 12V car battery. Ensure correct polarity (red to positive, black to negative).

Figure 3: Connecting the compressor to household AC power via transformer or 12V DC car battery.

Figure 4: Detailed view of the professional transformer connections.
6. Operating Instructions
Once setup is complete, follow these steps to operate the compressor:
- Turn on Fan Switch: Locate the fan switch on the side of the compressor and turn it to the 'ON' position. This activates the cooling fan, which is essential for preventing overheating.
- Tighten Pressure Relief Valve: Ensure the pressure relief valve (often a brass knob) is fully tightened clockwise to seal the system.
- Turn on Compressor Switch: Locate the main power switch for the compressor and turn it to the 'ON' position. The compressor will begin to operate.
- Monitor Pressure and Temperature: Continuously monitor the pressure gauge and the digital temperature display. The compressor is designed to reach 30MPa (4500 Psi). If the pressure exceeds 28MPa (4000 PSI) or the temperature rises excessively, immediately turn off the compressor.
- Manual Shutdown: Once the desired pressure is reached, turn off the main compressor switch.
- Release Pressure: Slowly loosen the pressure relief valve counter-clockwise to release any residual pressure in the hose before disconnecting.
- Disconnect: Disconnect the hose from your airgun/tank and then disconnect the power supply.
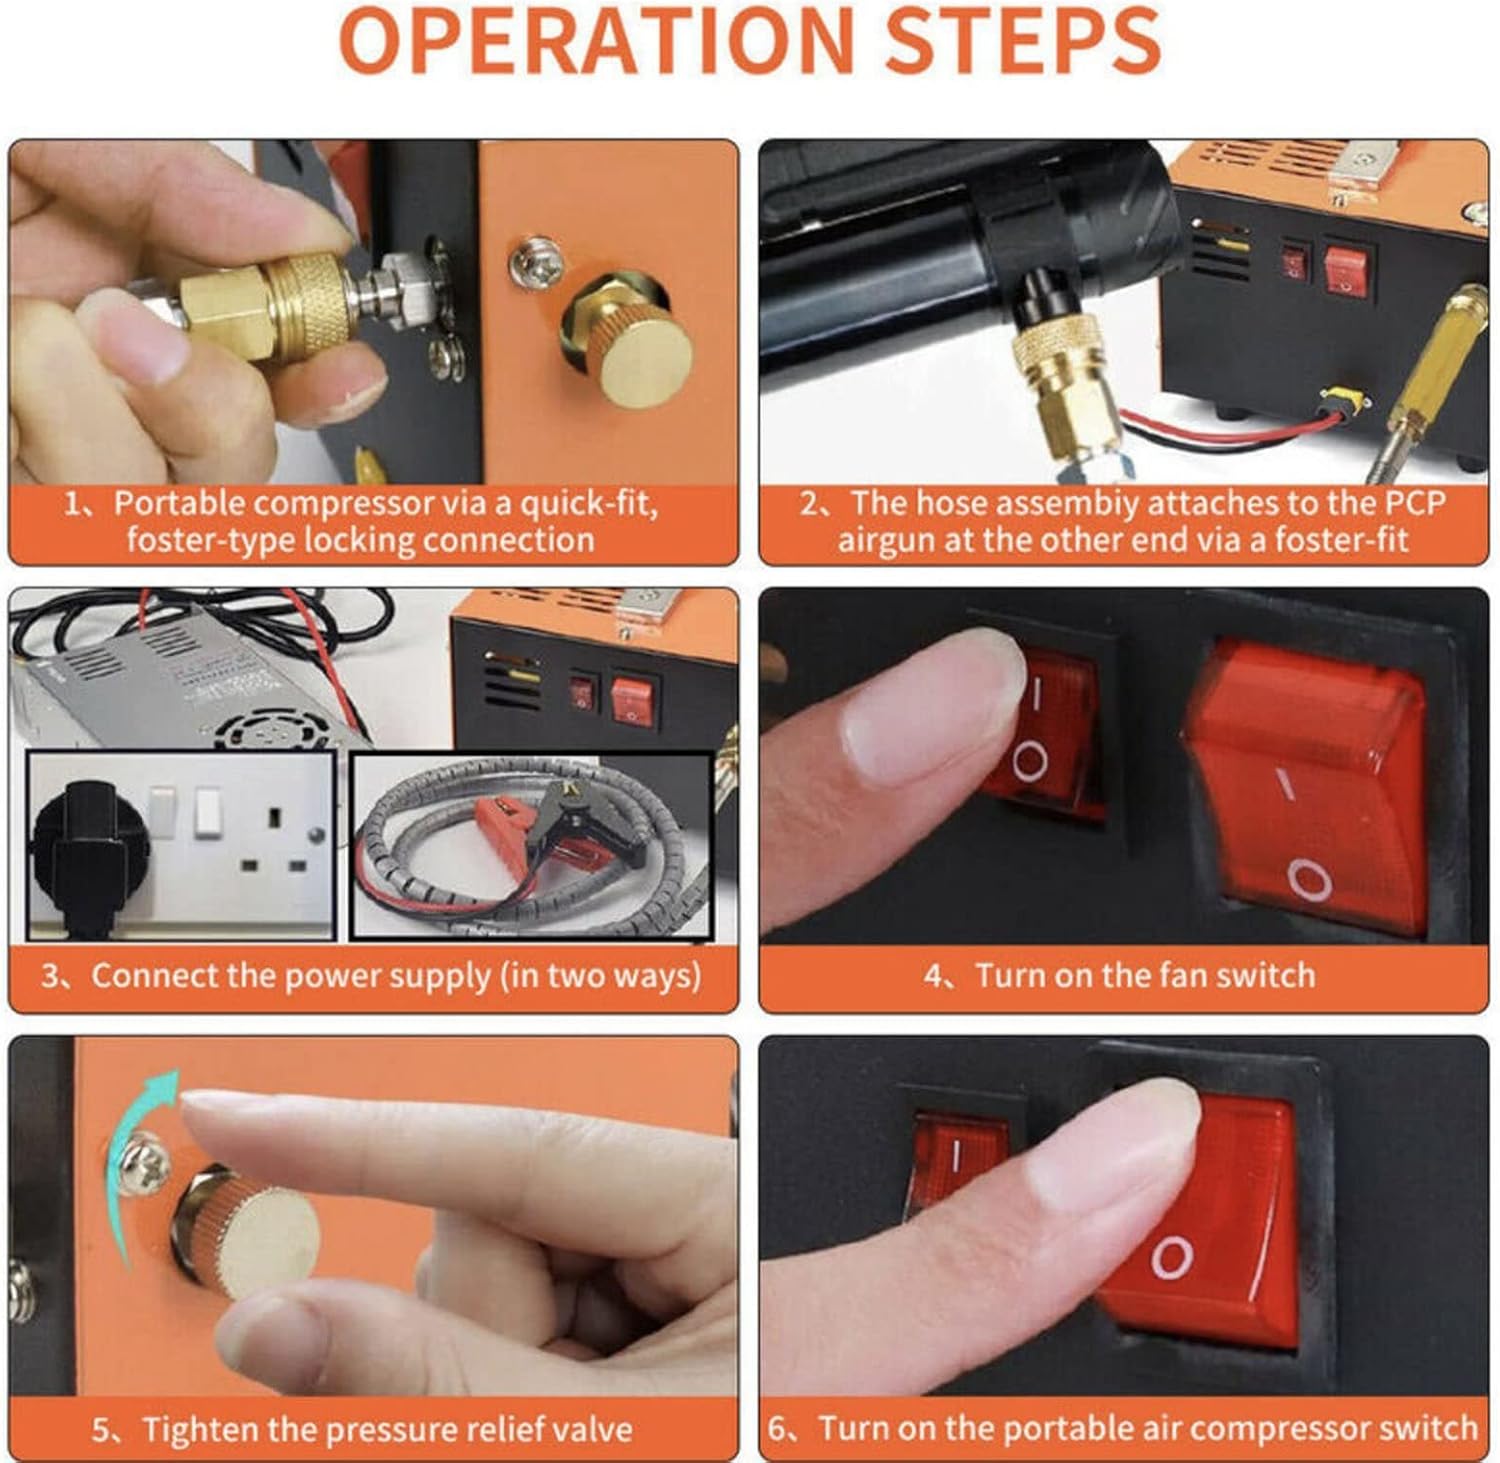
Figure 5: Step-by-step visual guide for compressor operation.
7. Maintenance
Regular maintenance ensures the longevity and optimal performance of your compressor.
- Moisture Filter: The compressor features an external oil-water separation filter. Regularly check and drain any accumulated moisture from this filter to prevent water from entering your airgun or tank. Refer to the repair kit for replacement filter elements if necessary.
- Cleaning: Keep the exterior of the compressor clean and free from dust and debris. Ensure the cooling fan vents are unobstructed.
- Storage: Store the compressor in a dry, cool place away from direct sunlight and extreme temperatures.
- Inspection: Periodically inspect all hoses, connections, and electrical cords for any signs of wear or damage. Replace any damaged components immediately.
8. Troubleshooting
If you encounter issues with your compressor, refer to the following common troubleshooting steps:
- Compressor does not start:
- Check power connections to ensure they are secure and the power source is active.
- Verify that both the fan switch and the main compressor switch are in the 'ON' position.
- Compressor runs but does not build pressure:
- Ensure the pressure relief valve is fully tightened.
- Check all hose connections for leaks. Tighten any loose connections.
- Inspect the quick connector and hose for damage or blockages.
- Compressor overheats:
- Ensure the cooling fan switch is 'ON' and the fan is operating.
- Check that the cooling vents are not obstructed.
- Allow the compressor to cool down between uses, especially after prolonged operation.
- Excessive moisture in air output:
- Drain the external oil-water separation filter.
- Replace the filter element if it appears saturated or damaged.
If problems persist after attempting these steps, contact customer support.
9. Specifications
| Voltage | 110V/220V AC, 12V DC |
| Power | 300W |
| Working Pressure | 30MPa / 300Bar / 4500Psi |
| Shut Down Method | Manually |
| Cooling Method | Built-in Fan |
| Lubrication | Oil-free |
| Quick Connector | 8MM Female Port |
| Included Components | Filters, Nozzles, Pressure Gauge |
10. Applications
The Generic Portable PCP Air Compressor is suitable for a variety of high-pressure air applications, including:
- PCP Air Rifles and Air Pistols
- Paintball Guns
- HPA Tanks
- Other high-pressure air systems requiring up to 4500 PSI
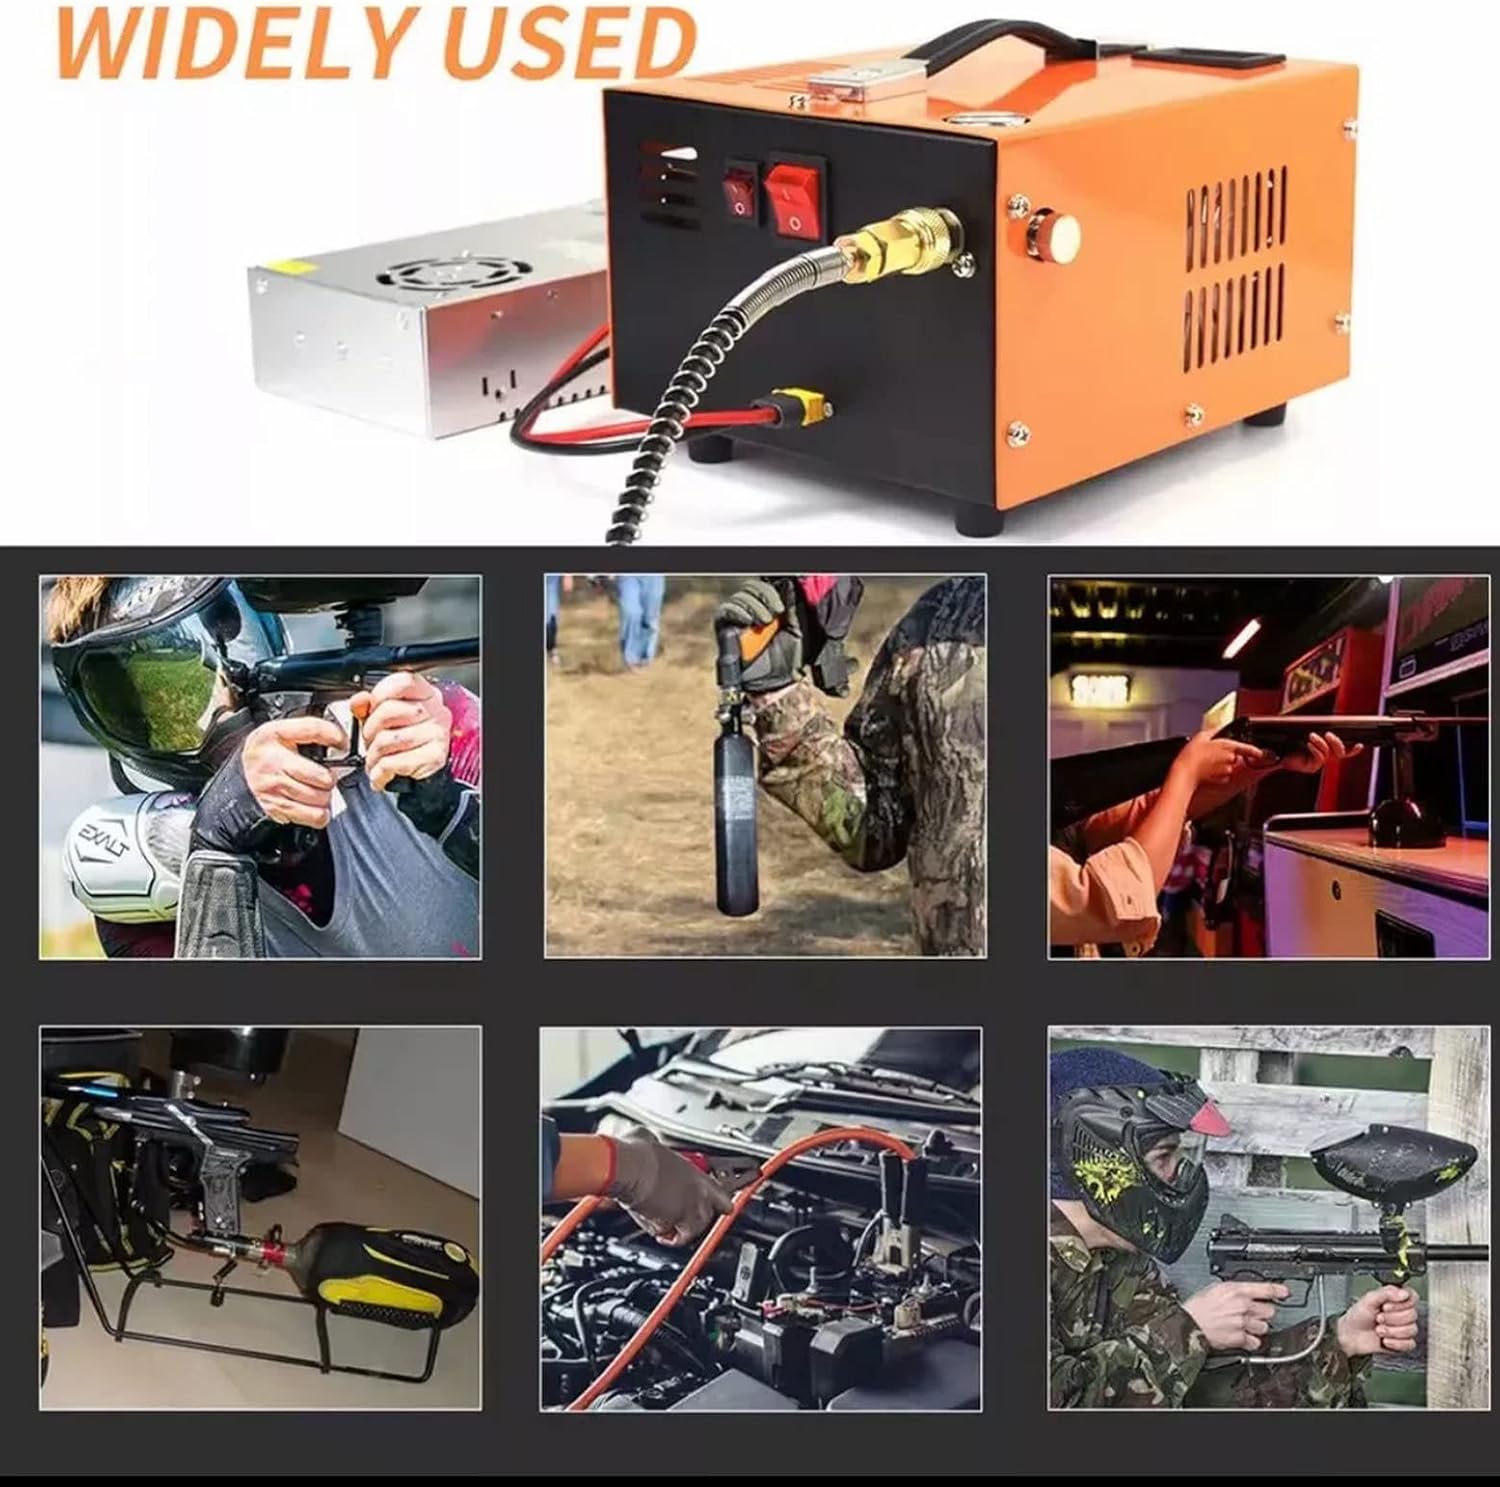
Figure 6: Wide range of applications for the portable air compressor.


