Inefala Inefala-A3507IT53-C888
Inefala Wireless Backup Camera System User Manual
Model: Inefala-A3507IT53-C888
1. Introduction
Thank you for choosing the Inefala Wireless Backup Camera System. This manual provides detailed instructions for the installation, operation, and maintenance of your new device. Please read this manual thoroughly before use to ensure proper functionality and safety.
2. Product Overview and Key Features
The Inefala Wireless Backup Camera System is designed to enhance your driving safety by providing a clear view of the area behind your vehicle. Its wireless design simplifies installation, making it suitable for a wide range of vehicles.

Figure 2.1: Inefala Wireless Backup Camera System components.
Key Features:
- Wireless Design & Easy Installation: Automatic wireless connection between camera and monitor, eliminating the need for complex wiring through the vehicle.
- 5-inch HD IPS Monitor: Features an 800x480 resolution IPS screen for clear, color-accurate images and a wide horizontal viewing angle.
- AHD 720P License Plate Camera: Equipped with a 170° wide viewing angle, IP69 waterproof rating, and 6 IR LEDs for enhanced night vision. Designed for easy mounting on the license plate without drilling.
- Adjustable Parking Lines: Guide lines can be enabled/disabled and adjusted for height and width to match your vehicle's dimensions, aiding in safe reversing.
- Flexible Installation Methods: The monitor can be mounted on the central console or windshield using the included suction cup, with 360° vertical rotation and 75° front-to-back tilt.
- Stable Signal Transmission: Provides stable signal transmission up to 320 feet (approximately 97 meters) in open areas, free from interference.
- Image Flip Function: Supports mirror mode, normal mode, inverted front image, and inverted mirror image for versatile viewing options.
- Wide Compatibility: Suitable for various 12V vehicles including cars, trucks, SUVs, vans, RVs, pickups, buses, and trailers.

Figure 2.2: Stable signal transmission and camera features.

Figure 2.3: Image flip functionality and camera specifications.
3. Package Contents
Please check the package contents upon opening to ensure all items are present and undamaged.
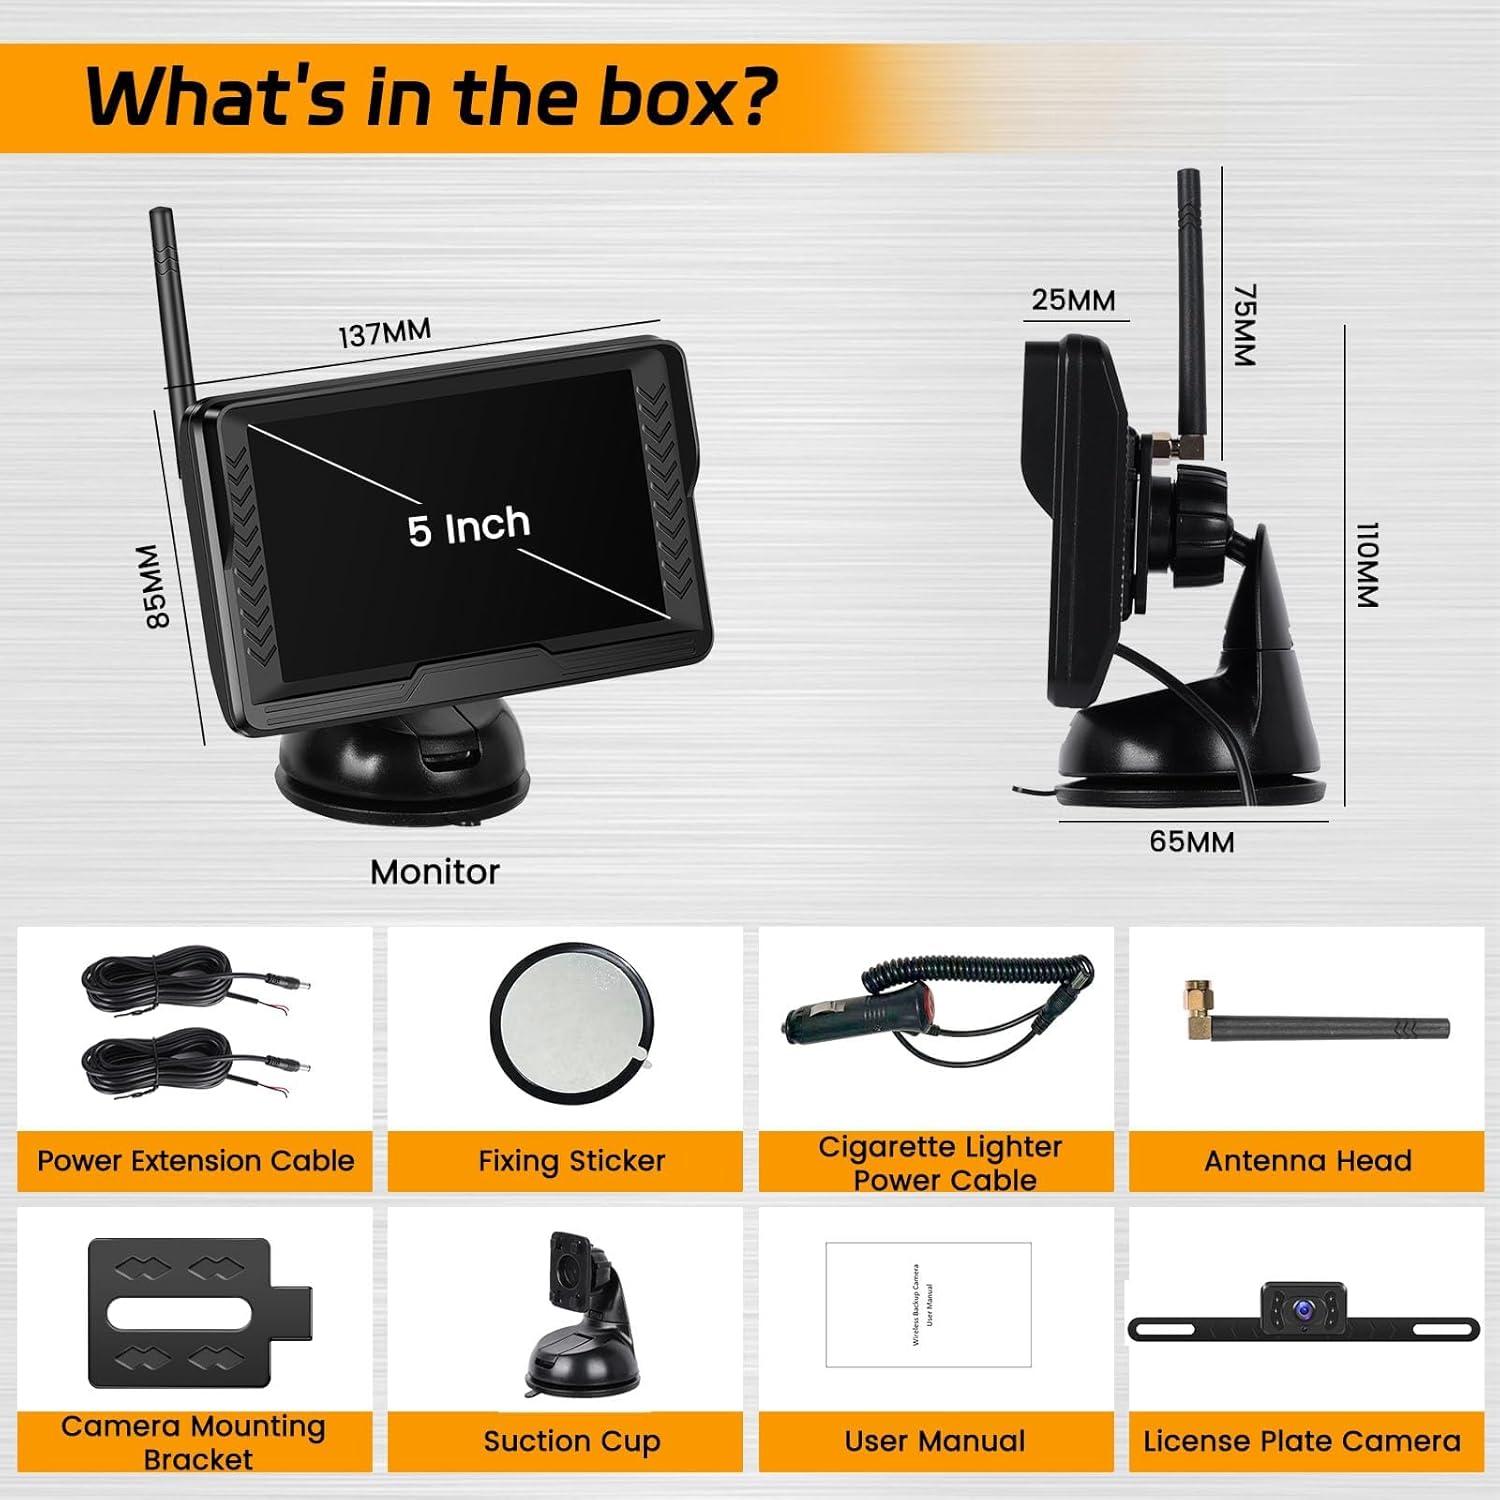
Figure 3.1: What's in the box?
- 5-inch IPS Monitor
- License Plate Camera
- Suction Cup Mount for Monitor
- Cigarette Lighter Power Cable
- Power Extension Cable (for camera)
- Antenna Head
- Camera Mounting Bracket
- Fixing Sticker
- User Manual (this document)
- Screws (for camera mounting)
4. Setup and Installation
The Inefala Wireless Backup Camera System is designed for simple 3-step installation, typically completed within 10 minutes.
4.1 Camera Installation
- Mount the Camera: Attach the license plate camera to your vehicle's rear license plate using the provided screws and mounting bracket. Ensure the camera lens is clear and unobstructed.
- Connect Camera Power:
- Connect the red wire of the camera's power cable to the positive (+) wire of your vehicle's reverse light.
- Connect the black wire of the camera's power cable to the negative (-) wire (ground) of your vehicle's reverse light or chassis ground.
Note: This connection ensures the camera powers on automatically when you engage reverse gear.
4.2 Monitor Installation
- Attach Suction Cup Mount: Secure the suction cup mount to the back of the 5-inch IPS monitor.
- Mount the Monitor: Choose a suitable location on your dashboard or windshield that does not obstruct your view. Press the suction cup firmly onto the surface and engage the locking mechanism.
- Connect Monitor Power: Plug the cigarette lighter power cable into your vehicle's 12V cigarette lighter socket.
- Adjust Monitor Angle: The monitor mount allows for 360° vertical rotation and 75° front-to-back tilt. Adjust the monitor to your preferred viewing angle.

Figure 4.1: Easy 3-step installation process.

Figure 4.2: Wireless wiring method and transmission range.

Figure 4.3: Monitor mounting options.
4.3 Power Up the System
Once both the camera and monitor are installed and powered, the system will automatically connect wirelessly. Engage reverse gear to activate the camera view on the monitor.
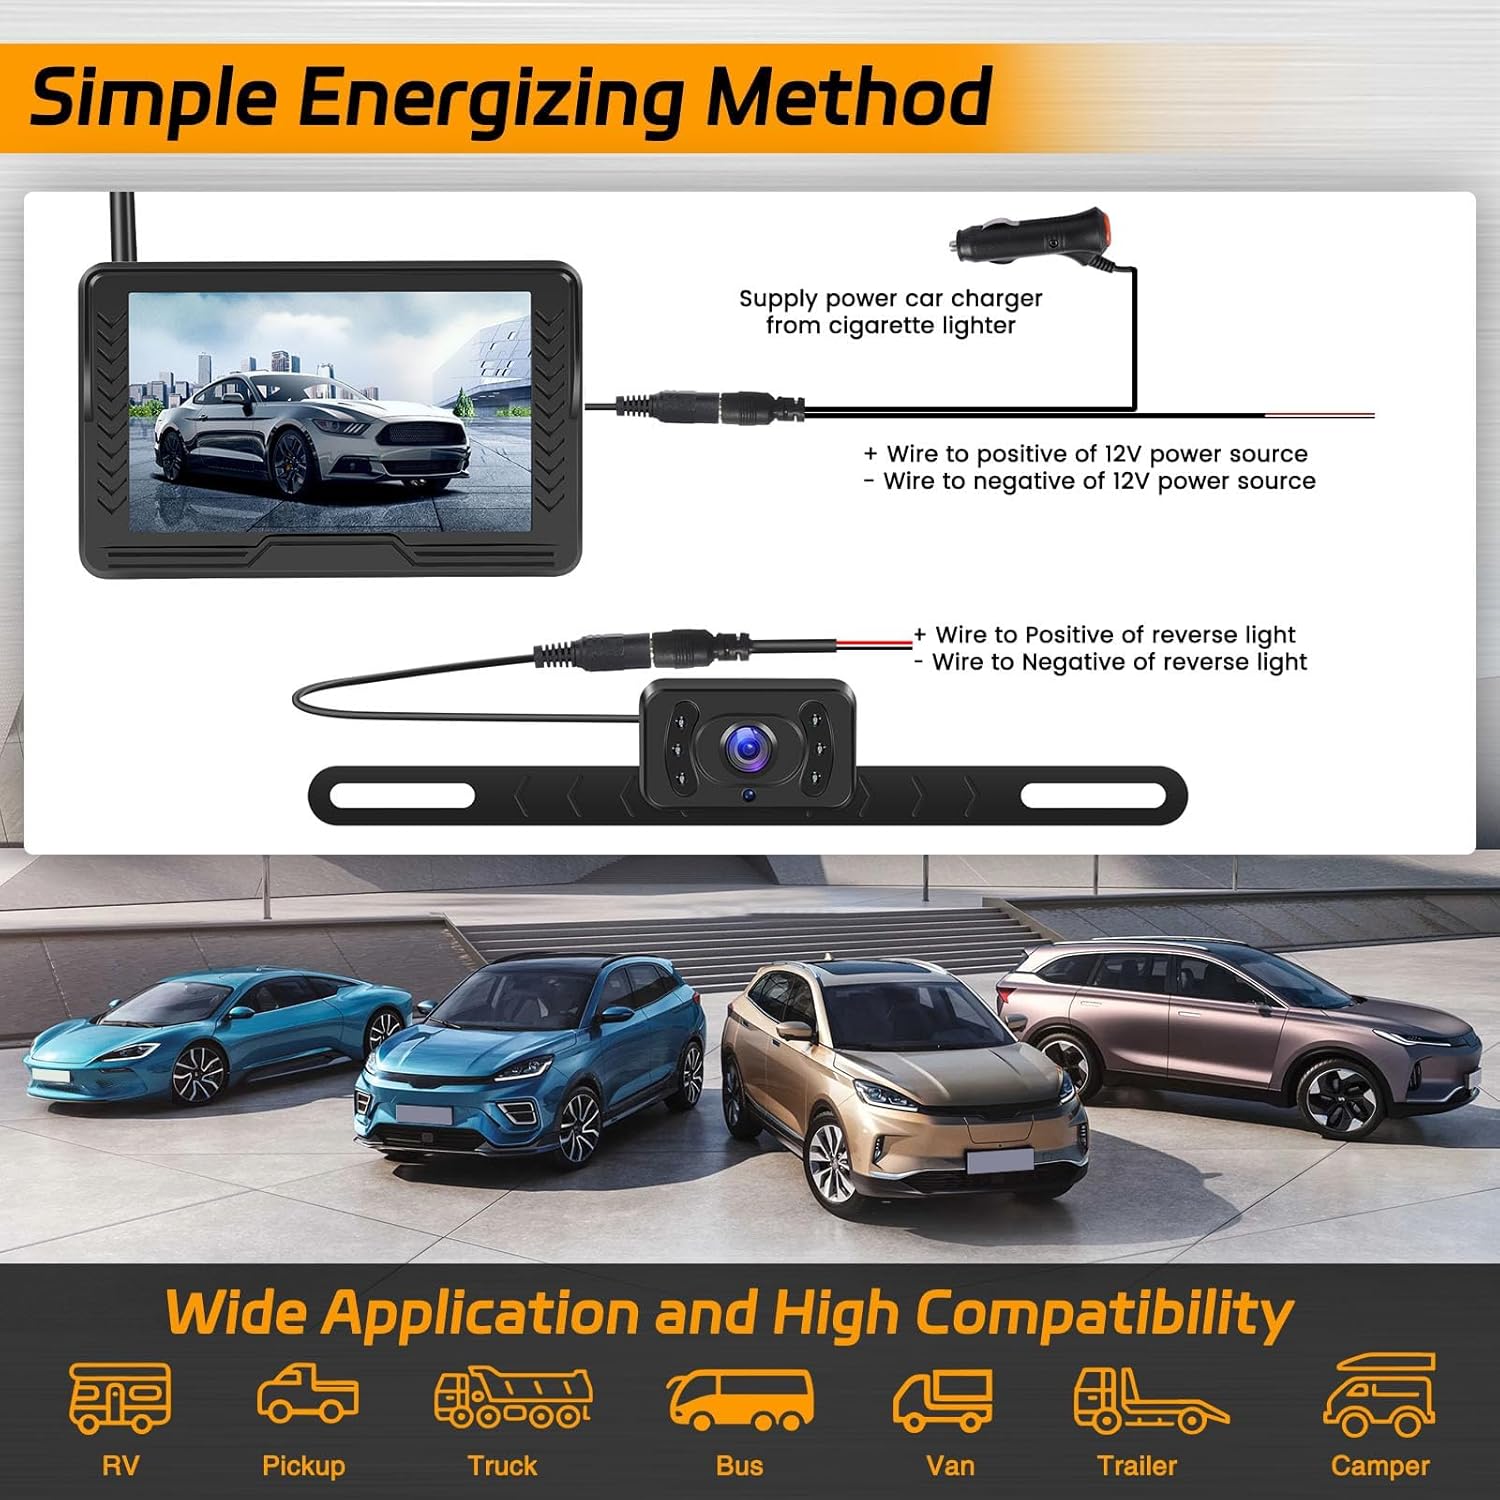
Figure 4.4: Power connection and vehicle compatibility.
5. Operating Instructions
5.1 Adjustable Parking Lines
The system allows you to customize the parking guide lines displayed on the monitor. This feature helps in precise parking and maneuvering.
- Enable/Disable: Use the monitor's controls to turn the parking lines on or off.
- Adjust Width: Modify the horizontal spread of the guide lines.
- Adjust Height: Change the vertical position of the guide lines to match your vehicle's rear bumper and perspective.
- Move Guide Lines: Shift the entire set of guide lines left or right.

Figure 5.1: Customizing parking guide lines.

Figure 5.2: Guide line adjustment options.
5.2 Image Flip Modes
The monitor supports various image display modes to suit different preferences and mounting orientations.
- Mirror Mode: Standard view for backup cameras, showing a mirrored image (as if looking in a rearview mirror).
- Normal Mode: Displays a non-mirrored image.
- Inverted Front Image: Flips the image vertically and horizontally.
- Inverted Mirror Image: Flips the mirrored image vertically.
Refer to the monitor's menu settings to switch between these modes.
5.3 Monitor Controls
The monitor features buttons for navigation and settings adjustment. These are typically located on the side or back of the monitor.
- Menu/OK/Exit (long press): Access the main menu, confirm selections, or exit current menu.
- Reverse Line Switch/Last: Toggle parking lines on/off, or navigate to the previous option in a menu.
- Next: Navigate to the next option in a menu.

Figure 5.3: Monitor dimensions and button functions.
6. Maintenance
Proper maintenance ensures the longevity and optimal performance of your Inefala Backup Camera System.
- Cleaning the Camera Lens: Regularly clean the camera lens with a soft, damp cloth to remove dirt, dust, or water spots that may obscure the view. Avoid abrasive cleaners.
- Cleaning the Monitor Screen: Use a soft, lint-free cloth to wipe the monitor screen. For stubborn smudges, a screen cleaner designed for electronics can be used sparingly.
- Check Connections: Periodically inspect all power connections to ensure they are secure and free from corrosion.
- Environmental Care: While the camera is IP69 waterproof, avoid exposing the monitor to extreme temperatures or direct moisture.
7. Troubleshooting
If you encounter issues with your system, please refer to the following common problems and solutions before contacting support.
| Problem | Possible Cause | Solution |
|---|---|---|
| No image on monitor / "No Signal" |
|
|
| Image is blurry or distorted |
|
|
| Parking lines not appearing or incorrect |
|
|
| Monitor not turning on |
|
|
8. Specifications
| Feature | Description |
|---|---|
| Brand | Inefala |
| Model Number | Inefala-A3507IT53-C888 |
| Monitor Screen Size | 5 Inches |
| Monitor Type | IPS HD (800x480 resolution) |
| Camera Resolution | AHD 720P |
| Camera Viewing Angle | 170° |
| Waterproof Rating | IP69 |
| Night Vision | Yes (6 IR LEDs) |
| Wireless Transmission Distance | Up to 320 feet (approx. 97 meters) in open areas |
| Operating Voltage | DC 12V |
| Connectivity Technology | Wireless |
| Color | Black |
| Power Output | 1.8 Watts |
9. Warranty and Support
Inefala provides comprehensive support for its products.
- Manufacturer's Warranty: This product comes with a 24-month manufacturer's warranty.
- Online Support: Lifetime online support is available for inquiries. Responses are typically provided within 133 hours.
- Contact: For technical assistance, warranty claims, or any other questions, please refer to the contact information provided on the Inefala official website or your purchase platform.
Ask a question about this manual
Ask about setup, troubleshooting, compatibility, parts, safety, or missing instructions. Manuals+ will review the question and use this page’s manual context to help answer it.