1. Introduction and Overview
This manual provides essential instructions for the safe and efficient operation, setup, and maintenance of your Generic 8-inch Electric Bench Grinder with LED Light. This heavy-duty bench grinder is designed for various tasks including grinding, sharpening, deburring, polishing, and cleaning. It features a powerful 4.8 Amp, 3/4 HP motor and infinite variable speed control, allowing adjustment from 2000 RPM to 3600 RPM to suit different materials and applications. The integrated adjustable gooseneck LED light enhances visibility, and transparent safety shields offer protection during use.
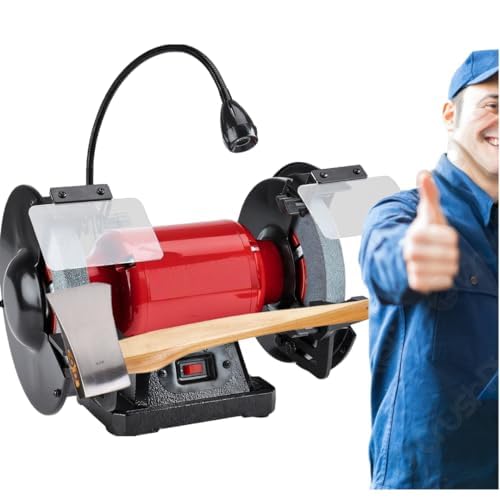
Figure 1: Generic 8-inch Electric Bench Grinder with LED Light. This image shows the red motor housing, two grinding wheels, adjustable tool rests, transparent eye shields, and the flexible LED work light.
2. Important Safety Instructions
WARNING: Read all safety warnings and instructions. Failure to follow the warnings and instructions may result in electric shock, fire, and/or serious injury.
- Always wear ANSI-approved safety goggles or a face shield during operation.
- Wear appropriate respiratory protection to avoid inhaling dust particles.
- Ensure the work area is clean, well-lit, and free from obstructions.
- Keep children and bystanders away while operating the grinder.
- Securely mount the bench grinder to a workbench before use to prevent movement.
- Inspect grinding wheels for cracks or damage before each use. Replace damaged wheels immediately.
- Adjust tool rests to within 1/16 inch (1.6 mm) of the grinding wheel.
- Never grind on the side of the wheel unless the wheel is specifically designed for side grinding.
- Do not apply excessive pressure to the grinding wheel; let the grinder's speed do the work.
- Unplug the grinder from the power source before making adjustments, changing accessories, or performing maintenance.
- Use only accessories recommended by the manufacturer.
- Do not operate in damp or wet conditions.
- Ensure the power switch is in the "OFF" position before plugging in the tool.
3. Setup and Assembly
- Unpacking: Carefully remove all components from the packaging. Inspect for any shipping damage.
- Mounting: Securely bolt the bench grinder to a sturdy workbench using appropriate fasteners (not included). Ensure the grinder is stable and will not move during operation.
- Tool Rests: Attach the tool rests to the grinder. Adjust them so they are approximately 1/16 inch (1.6 mm) from the grinding wheels and slightly below the center line of the wheel. Tighten securely.
- Eye Shields: Install the transparent eye shields. Adjust their position to provide maximum protection without obstructing your view of the workpiece.
- LED Light: Position the adjustable gooseneck LED light to illuminate your primary work area on the grinding wheel.
- Power Connection: Ensure the power switch is in the "OFF" position. Plug the grinder into a standard 120 Volt AC grounded electrical outlet.
4. Operation
- Pre-Operation Check: Before each use, verify that all guards, tool rests, and eye shields are properly installed and secured. Inspect grinding wheels for any damage.
- Starting the Grinder: Turn the power switch to the "ON" position. Allow the grinder to reach full operating speed before beginning work.
- Adjusting Speed: Use the infinite variable speed control to set the desired RPM (from 2000 RPM to 3600 RPM). Lower speeds are generally suitable for finer work or heat-sensitive materials, while higher speeds are for faster material removal.
- Grinding Technique:
- Hold the workpiece firmly against the tool rest.
- Apply light, even pressure to the grinding wheel. Avoid jamming the workpiece into the wheel.
- Move the workpiece across the face of the wheel to ensure even wear and prevent grooving.
- For sharpening, maintain a consistent angle against the wheel.
- Periodically cool the workpiece in water to prevent overheating and loss of temper.
- Using the LED Light: Adjust the flexible gooseneck LED light to provide optimal illumination on your grinding area for improved precision and safety.
- Stopping the Grinder: Turn the power switch to the "OFF" position. Wait for the wheels to come to a complete stop before leaving the machine unattended or performing any adjustments.
5. Maintenance
Regular maintenance ensures optimal performance and extends the life of your bench grinder. Always unplug the tool before performing any maintenance.
- Cleaning: Keep the grinder clean and free of dust and debris. Use a soft brush or compressed air to clean the motor vents and housing.
- Wheel Inspection: Regularly inspect grinding wheels for wear, cracks, or chips. Replace worn or damaged wheels promptly.
- Wheel Dressing: Use a wheel dresser to true and clean the grinding wheels, restoring their cutting efficiency and shape.
- Tool Rest Adjustment: Ensure tool rests remain properly adjusted to within 1/16 inch (1.6 mm) of the wheel.
- Cord Inspection: Check the power cord for any signs of damage. Do not use the grinder if the cord is frayed or damaged.
6. Troubleshooting
| Problem | Possible Cause | Solution |
|---|---|---|
| Grinder does not start. | No power, faulty switch, motor issue. | Check power outlet and circuit breaker. Ensure power cord is securely plugged in. Contact qualified service personnel if switch or motor is suspected. |
| Excessive vibration. | Unbalanced wheel, loose mounting, worn bearings. | Inspect wheels for damage or imbalance; dress or replace if necessary. Tighten mounting bolts. If bearings are suspected, seek professional service. |
| Grinder slows down under light load. | Overloaded, dull wheel, motor issue. | Reduce pressure on workpiece. Dress or replace grinding wheel. Ensure proper voltage supply. |
| Sparks are excessive or inconsistent. | Dull or glazed wheel, incorrect material. | Dress the grinding wheel to expose fresh abrasive. Ensure the material being ground is suitable for the wheel type. |
7. Specifications
- Model: 201522E-B-G
- Brand: Generic
- Motor: 4.8 Amp, 3/4 HP
- Voltage: 120 Volts AC
- Maximum Rotational Speed: 3600 RPM
- Variable Speed Range: 2000 RPM - 3600 RPM
- Wheel Diameter: 8 inches
- Wheel Type: Aluminum Oxide
- Material: Cast Iron
- Item Weight: 35 Pounds
- Power Source: Corded Electric
- Included Components: 8 in. Bench Grinder with LED Light
8. Warranty and Support
Warranty information for this product is not provided in the available product details. For specific warranty terms, technical support, or service inquiries, please refer to the documentation included with your purchase or contact the retailer or manufacturer directly.
Please retain your purchase receipt as proof of purchase for any warranty claims.