1. Introduction
This manual provides detailed instructions for the installation, operation, maintenance, and troubleshooting of your DYISLAND LD-210S Hydraulic Disc Brake System for electric scooters. Please read this manual thoroughly before installation and use to ensure safe and optimal performance.
The LD-210S hydraulic brake kit features a 2-PIN power-off sensor, pre-filled mineral oil, and a split design for easy installation. It is constructed from CNC aluminum alloy for durability and efficient heat dissipation.
2. Product Components
Your DYISLAND LD-210S Hydraulic Disc Brake System package includes the following items:
- One set of hydraulic brake levers (left and right, or two left, or two right depending on variant)
- One set of hydraulic brake calipers (front and rear)
- Pre-filled brake hoses (Front: 1300mm, Rear: 2100mm)
- Mounting screws (M6*18mm)
- Two sets of brake hose connectors and auxiliary fittings (copper needles, copper sleeves, sealing rings)
- Detachable 2-PIN waterproof power-off sensors (cable length 300mm)
3. Setup and Installation
3.1. Determine Brake Type
Before installation, identify the correct brake type (LL, LR, or RR) required for your electric scooter. This depends on the position of the brake rotor on your front and rear wheels and your preferred lever configuration.
3.2. Brake Lever Installation
- Remove the existing brake levers from your handlebar.
- Loosen the screw on the new brake handle.
- Slide the new brake handle onto the handlebar.
- Adjust the brake lever to a comfortable angle and tighten the screw securely.
3.3. Brake Caliper Installation
- Align the brake caliper with the mounting holes on your scooter's frame. The hole spacing is 74mm (2.91 inches).
- Use the provided M6*18mm screws to attach the caliper to the frame. Do not fully tighten the screws yet.
- Ensure the brake pads are centered over the disc rotor. You may need to add gaskets between the caliper and the frame for proper alignment.
- Once aligned, tighten the screws with a 5mm wrench.
3.4. Hose Connection
The brake hoses are pre-filled with environmentally friendly mineral oil. No bleeding is required for initial use if the hoses are connected correctly without oil leakage.
- Carefully remove the protective cap from the end of the brake hose.
- Insert the copper needle and copper sleeve into the oil pipe end.
- Connect the hose to the brake lever and caliper. Tighten the connecting screws by hand, then use an 8mm open-end wrench to further tighten several times to ensure a secure, leak-free seal.
- Pass the oil line through the scooter body hole from above and route it along the bottom, ensuring it forms a smooth arc without kinks.
3.5. Power-Off Sensor Connection
The brake system includes a detachable 2-PIN waterproof power-off sensor. Connect the sensor cable (300mm length) to your scooter's electric induction control system. Ensure the wiring port matches.
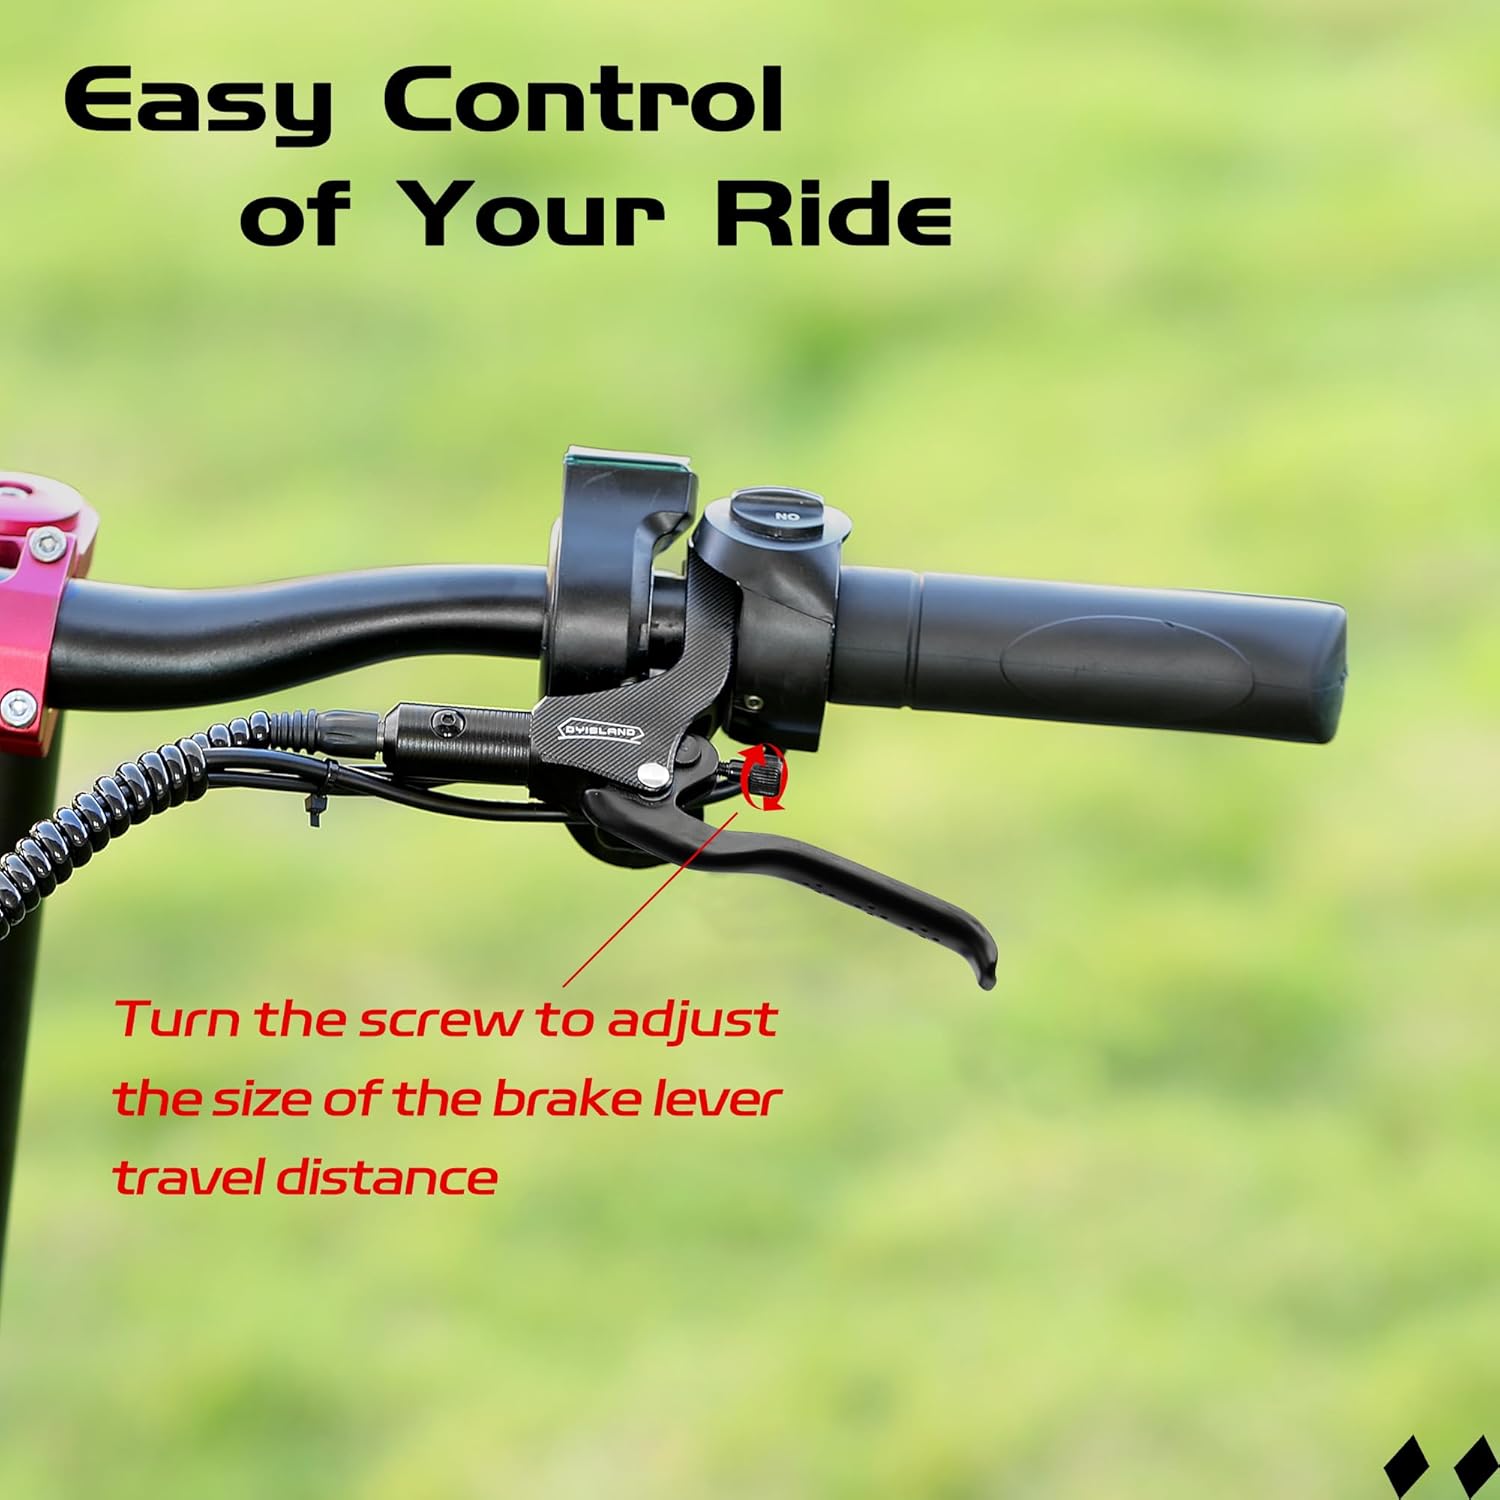
3.6. Brake Lever Travel Adjustment
The brake lever features a screw adjustment function. Rotate the adjusting knob to customize the travel distance of the brake lever according to your personal preference, providing a comfortable and flexible braking operation.

4. Operating Instructions
The DYISLAND LD-210S Hydraulic Disc Brake System provides reliable stopping power for your electric scooter. When the brake lever is engaged, the hydraulic fluid transmits pressure to the calipers, causing the brake pads to clamp onto the disc rotor, slowing down or stopping the wheel.
The integrated power-off sensor sends a signal to the motor when braking, cutting off power output to enhance safety during deceleration.

5. Maintenance
5.1. Brake Bleeding
While the hoses are pre-filled, over time, air may enter the hydraulic system, leading to a spongy brake feel. Bleeding the brakes removes air and restores firm lever feel.
5.2. Brake Pad Replacement
Regularly inspect brake pads for wear. Replace them when they are worn down to approximately 1mm thickness. Ensure to use compatible replacement pads.
5.3. Cleaning
Keep brake calipers and rotors clean from dirt, oil, and debris. Use a clean cloth and appropriate brake cleaner. Avoid using lubricants or oil on brake components.
6. Troubleshooting
- Spongy Brake Lever: This usually indicates air in the hydraulic system. Refer to Section 5.1 for brake bleeding instructions.
- Poor Braking Performance: Check brake pad wear, disc rotor condition, and ensure the system is properly bled. Also, verify the power-off sensor connection.
- Brake Noise (Squealing/Grinding): This can be caused by contaminated pads/rotors, misaligned calipers, or worn pads. Clean components, check alignment, or replace pads.
- Oil Leakage: Inspect all connections for tightness. Ensure sealing rings and copper fittings are correctly installed. If leakage persists, contact support.
7. Specifications
| Feature | Specification |
|---|---|
| Model Name | LD-210S Hydraulic brakes set for electric scooter |
| Brand Name | DYISLAND |
| Material | Aluminum (CNC aluminum alloy body, aluminum alloy hand bar) |
| Brake Fluid | Non-corrosive mineral brake fluid (pre-filled) |
| Front Brake Hose Length | 1300mm (51 inches) |
| Rear Brake Hose Length | 2100mm (83 inches) |
| Caliper Hole Spacing | 74mm (2.91 inches) |
| Power-Off Sensor | Detachable 2-PIN waterproof connector (300mm cable) |
| Caliper Type | Dual Piston |
| Brake Disc Material | High manganese 410 stainless steel |
8. Warranty Information
The DYISLAND LD-210S Hydraulic Disc Brake System comes with a one-month warranty from the date of purchase. This warranty covers manufacturing defects and material flaws under normal use. It does not cover damage resulting from improper installation, misuse, accidents, or unauthorized modifications. For warranty claims, please retain your proof of purchase and contact customer support.
9. Customer Support
If you encounter any issues during installation, operation, or maintenance that are not covered in this manual, please contact DYISLAND customer support for assistance. You can typically find contact information on the product packaging or the official DYISLAND website.
For further assistance, please visit the DYISLAND Store on Amazon.