1. Important Safety Instructions
Please read this manual carefully before using your Ferre F9S60GF.PI gas stove. Keep it for future reference. Failure to follow these instructions could result in fire, explosion, electric shock, or other hazards, causing property damage, personal injury, or death.
- Gas Safety: Ensure proper ventilation. Do not store or use gasoline or other flammable vapors and liquids in the vicinity of this or any other appliance.
- Installation: Installation must be performed by a qualified installer, service agency, or gas supplier. Ensure all connections are secure and leak-free.
- Children Safety: Keep children away from the appliance during operation. Do not allow children to play with the controls.
- Hot Surfaces: The appliance surfaces become hot during use. Avoid touching hot surfaces. Use oven mitts when handling hot items.
- Ventilation: Ensure adequate ventilation in the kitchen area when the appliance is in use.
- Cleaning: Always disconnect the appliance from the power supply and gas supply before cleaning.
- Maintenance: Do not attempt to repair or replace any part of your appliance unless specifically recommended in this manual. All other servicing should be referred to a qualified technician.
2. Product Overview
The Ferre F9S60GF.PI is a premium free-standing full gas stove designed for efficient and versatile cooking. It features a robust construction and advanced safety mechanisms.
Key Features:
- 6 Gas Burners (including 1 Wok Burner + Mini Wok)
- Gas Oven with Oven Fan
- Gas Grill with Turnspit
- Full Safety Flame Failure Device
- Full Ignition System
- Touch Screen Digital Timer and Thermostat
- Cast Iron Grids with Trivet
- Glass Lid
- Adjustable Legs for flexible height (875 to 905 mm)
- Spacious 112Ltr Oven Volume
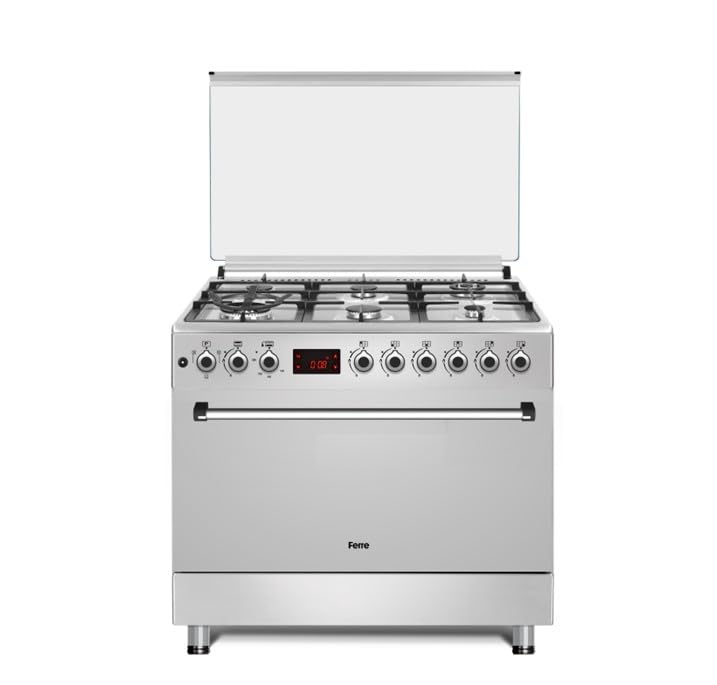
Figure 1: Front view of the Ferre F9S60GF.PI 6 Burner Gas Stove. This image shows the six gas burners on the cooktop, the control panel with the digital timer, and the oven door below.
3. Setup and Installation
Important: Installation must be carried out by a qualified and certified gas technician in accordance with local regulations and standards.
3.1 Unpacking
- Carefully remove all packaging materials.
- Check the appliance for any signs of damage. If damaged, do not install and contact your supplier.
- Ensure all accessories (trays, wire grid, turnspit) are present.
3.2 Positioning
- Place the stove on a flat, stable, and heat-resistant surface.
- Ensure adequate clearance from adjacent walls and cabinets as per local building codes.
- Use the adjustable legs to level the appliance and achieve the desired height (875 to 905 mm).
3.3 Gas Connection
- Connect the appliance to the gas supply using approved flexible gas hoses or rigid piping.
- Perform a leak test on all connections using a soapy water solution. Never use an open flame to check for leaks.
- Ensure the gas type matches the appliance's specifications (Natural Gas or LPG, depending on the model configuration).
3.4 Electrical Connection
- Connect the appliance to a properly grounded electrical outlet.
- The electrical connection is required for the ignition system, oven fan, and digital timer.
4. Operating Instructions
4.1 Using the Gas Burners
- Place a suitable cooking utensil on the desired burner grid.
- Push and turn the corresponding burner control knob counter-clockwise to the maximum flame setting.
- The integrated ignition system will automatically spark. Hold the knob in for a few seconds until the flame is stable.
- If the flame does not ignite, release the knob, wait a few seconds, and repeat the process.
- Adjust the flame size by turning the knob between the maximum and minimum settings.
- To turn off, turn the knob clockwise to the "OFF" position. The flame failure device will automatically cut off the gas supply if the flame extinguishes.
4.2 Using the Gas Oven
- Open the oven door.
- Push and turn the oven control knob to the desired temperature setting.
- The oven igniter will spark. Hold the knob in for approximately 10-15 seconds until the flame is stable.
- Close the oven door. The oven fan will distribute heat evenly.
- Monitor cooking progress through the oven door glass.
- To turn off, turn the oven control knob to the "OFF" position.
4.3 Using the Gas Grill with Turnspit
- Position the turnspit rod and forks as required for your food item.
- Push and turn the grill control knob to the grill setting.
- Hold the knob in for a few seconds until the grill flame ignites and is stable.
- Activate the turnspit motor (if applicable, refer to specific control panel instructions).
- Always grill with the oven door slightly ajar to prevent overheating.
- To turn off, turn the grill control knob to the "OFF" position.
4.4 Using the Digital Timer
The touch screen digital timer can be used to set cooking durations or as a minute minder. Refer to the specific icons and functions on the control panel for detailed operation. Typically, you will press a 'Mode' button, then use '+' and '-' buttons to set the time, and confirm. The timer may also control automatic oven shut-off.
5. Maintenance and Cleaning
Warning: Always ensure the appliance is switched off and disconnected from the power and gas supply, and has cooled down completely before cleaning or performing any maintenance.
5.1 Cooktop Cleaning
- Remove the cast iron grids and burner caps/crowns.
- Clean the stainless steel surface with a soft cloth and a mild detergent. Avoid abrasive cleaners or scouring pads that can scratch the surface.
- Wash burner caps and crowns in warm soapy water, rinse, and dry thoroughly before reassembling. Ensure burner ports are not blocked.
- Clean the glass lid with a glass cleaner.
5.2 Oven Cleaning
- Remove oven trays, wire grid, and turnspit. These can be washed in warm soapy water.
- Wipe the interior of the oven with a damp cloth and a non-abrasive oven cleaner. Follow the cleaner manufacturer's instructions.
- For stubborn stains, a paste of baking soda and water can be applied, left for a while, then wiped clean.
- Clean the oven door glass with a glass cleaner.
5.3 General Maintenance
- Regularly check gas hoses and connections for any signs of wear or damage.
- Ensure the oven fan is free from obstructions.
- Do not use harsh chemicals or steam cleaners on any part of the appliance.
6. Troubleshooting
Before contacting service, please check the following common issues and solutions:
| Problem | Possible Cause | Solution |
|---|---|---|
| Burner does not ignite. | No gas supply, power outage, clogged burner port, igniter malfunction. | Check gas valve. Ensure appliance is plugged in. Clean burner ports. If problem persists, contact service. |
| Oven does not heat. | No gas supply, oven control knob not held long enough, igniter malfunction. | Check gas valve. Hold oven knob for 10-15 seconds during ignition. Contact service if issue continues. |
| Uneven cooking in oven. | Incorrect rack position, oven fan obstruction, faulty thermostat. | Adjust rack position. Ensure oven fan is clear. Contact service for thermostat issues. |
| Gas smell. | Gas leak. | Immediately turn off gas supply. Open windows. Do not operate electrical switches. Contact gas supplier and qualified technician immediately. |
7. Specifications
| Feature | Detail |
|---|---|
| Model Number | F9S60GF.PI |
| Dimensions (D x W x H) | 60D x 90W x 90H centimetres |
| Adjustable Height | 875 to 905 mm (with legs) |
| Burners | 6 Gas Burners (1 Wok Burner + Mini Wok) |
| Oven Capacity | 112 Liters |
| Oven Type | Gas Oven with Fan |
| Grill Type | Gas Grill with Turnspit |
| Safety Features | Full Safety Flame Failure, Full Ignition |
| Control Panel | Touch Screen Digital Timer and Thermostat |
| Cooktop Grids | Cast Iron with Trivet |
| Lid | Glass Lid |
| Color | Stainless Steel |
| Care Instructions | Indoor use only |
8. Warranty and Support
The Ferre F9S60GF.PI gas stove comes with a 24-month warranty from the date of purchase, covering manufacturing defects and faulty workmanship under normal domestic use.
What the Warranty Covers:
- Repair or replacement of parts found to be defective due to manufacturing faults.
What the Warranty Does Not Cover:
- Damage caused by improper installation, misuse, abuse, or neglect.
- Damage caused by unauthorized repairs or modifications.
- Normal wear and tear, cosmetic damage, or consumable parts.
- Damage from power surges or incorrect voltage supply.
For warranty claims or technical support, please contact your retailer or the authorized Ferre service center with your proof of purchase and model number.


