
1. Introduction
The Yankok HT-376 is a versatile modular plug crimper designed for network and telecommunication applications. This all-in-one tool integrates crimping, stripping, cutting, and cable testing functionalities, making it suitable for various connector types including RJ45 (8P8C), RJ12/RJ11 (6P6C, 6P4C, 6P2C), RJ10, and RJ9 (4P4C, 4P2C). It features a full-cycle ratcheting mechanism for precise crimps and a built-in cable tester for verifying wire connections.
2. Safety Information
- Always wear appropriate eye protection when using this tool.
- Keep fingers clear of cutting and crimping dies to prevent injury.
- Ensure the tool is clean and free of debris before and after each use.
- Store the tool in a dry, secure place, out of reach of children.
- Do not use the tool for purposes other than its intended design.
- The built-in cable tester requires batteries (not included). Ensure correct battery insertion.
- This tool is NOT for use on AMP/TYCO style plugs.
- This tool does NOT crimp pass-through connectors.
3. Package Contents
Verify that all items are present in the package:
- 1x Yankok HT-376 Cable Tester Crimper
- 1x Replacement Blade Set
- 1x User Guide (this document)
4. Product Features
- All-in-one Modular Crimper: Crimps RJ45 (8P8C), RJ12/RJ11 (6P6C, 6P4C, 6P2C), RJ10, and RJ9 (4P4C, 4P2C) modular plugs.
- Built-in RJ45 Cable Tester: Integrated diode tester with LED lights to check wire connection status for UTP and STP cables (RJ45, RJ12, RJ11). Displays 8-pin wire configuration.
- Integrated Cable Stripper and Cutter: Strips and cuts Ethernet, paired-conductor, twisted pair, voice, and data cables. Features a blade guard for safety.
- Full-cycle Ratchet Mechanism: Ensures complete compression of the connector before release, providing reliable crimps.
- Durable Construction: Crimping dies are precision ground from high-carbon steel. The tool body is steel with a black-oxide finish for durability.
- Locking Feature: Allows for convenient storage after use.
5. Setup
5.1. Battery Installation for Cable Tester
The built-in cable tester requires batteries (not included). Locate the battery compartment on the detachable tester unit. Insert the required batteries, ensuring correct polarity. Close the compartment securely.
5.2. Tool Preparation
Before use, ensure the tool is clean and the blades are sharp. The tool is ready for immediate use out of the package for crimping, stripping, and cutting functions.
6. Operating Instructions
6.1. Cable Stripping
- Open the crimper handles.
- Locate the stripping blade section, typically marked "STRIP LENGTH" or with a blade guard.
- Insert the cable into the appropriate stripping slot (e.g., "12MM ROUND CABLE" for round cables).
- Rotate the tool around the cable 1-2 times to score the insulation.
- Carefully pull the stripped insulation off the cable, exposing the internal wires.

Figure 1: Cable stripping and cutting mechanism. The image highlights the quality blade for easy stripping and cutting, showing a cable being stripped and another being cut.
6.2. Cable Cutting
- Open the crimper handles.
- Locate the cutting blade section, typically marked "CUT".
- Place the cable into the cutting slot.
- Squeeze the handles firmly to cut the cable cleanly.
6.3. Modular Plug Crimping
- Prepare the cable by stripping the outer jacket to the appropriate length (refer to connector specifications).
- Arrange the individual wires according to the desired wiring standard (e.g., T568A or T568B for RJ45).
- Trim the wires evenly to the correct length for the connector.
- Insert the prepared wires into the modular plug, ensuring each wire reaches the end of its channel.
- Select the correct crimping die on the tool for your connector type (e.g., 8P for RJ45, 6P for RJ11/RJ12, 4P for RJ9/RJ10).
- Insert the modular plug with the cable into the chosen crimping die.
- Squeeze the handles firmly and completely until the ratcheting mechanism releases. This ensures a full and secure crimp.
- Remove the crimped connector from the tool.
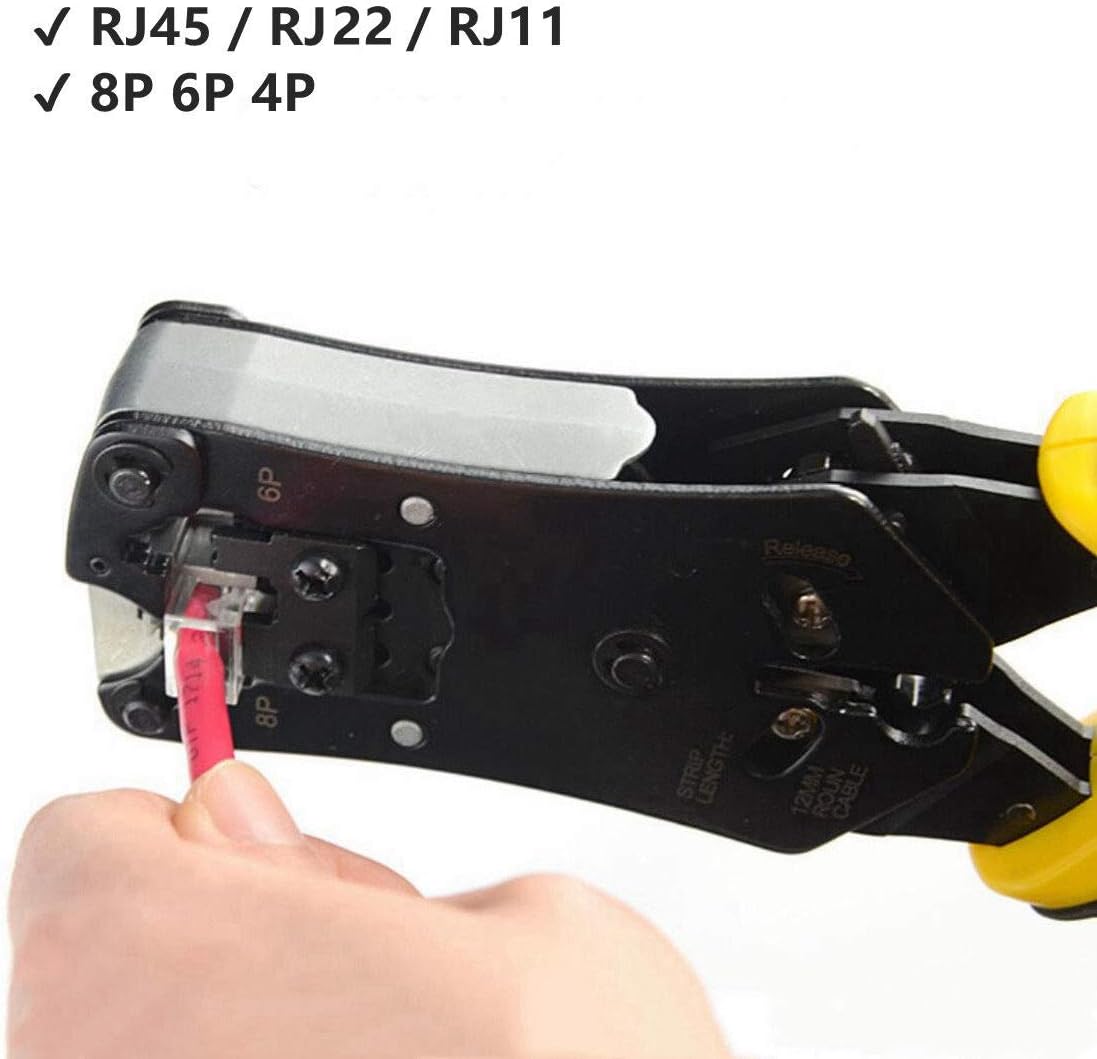
Figure 2: Crimping various modular plugs. The image illustrates the tool's capability to crimp RJ45, RJ22, and RJ11 connectors, indicating support for 8P, 6P, and 4P plugs.
6.4. Cable Testing
- Separate the detachable cable tester unit from the main crimper body.
- Connect one end of the crimped cable to the RJ45 port on the main crimper unit.
- Connect the other end of the cable to the RJ45 port on the detachable tester unit.
- Turn on the tester unit (if it has a power switch).
- Observe the LED indicators on both units. The LEDs will light up sequentially (1-8) to indicate proper wire continuity.
- If there are issues (e.g., open circuits, shorts, mis-wires, reversals, split pairs), the corresponding LEDs will not light up correctly or will indicate the fault.
- The tester supports both UTP and STP cables.
- The tester has two modes: Single Test or Continuous Test. Refer to the tester unit for mode selection.
- An auto power-saving feature and low power indicator are included.

Figure 3: UTP/STP Cable Test Jack. This image displays the detachable cable tester unit and its RJ45 port, along with the LED indicators for testing cable continuity.
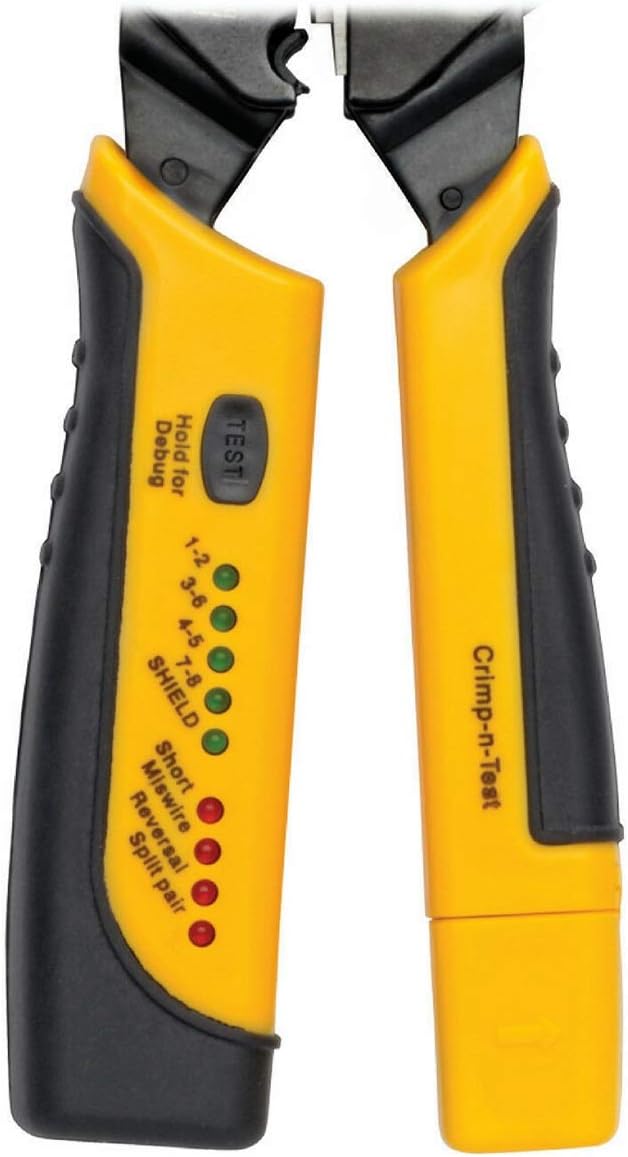
Figure 4: Cable Tester LED Indicators. A detailed view of the tester unit showing LEDs for 1-8 pins, Shield, Short, Miswire, Reversal, and Split Pair, along with the 'TEST' button.
7. Maintenance
- Cleaning: After each use, wipe the tool clean with a dry cloth to remove any debris or wire fragments.
- Blade Replacement: The tool includes a replacement blade set. To replace the cutting or stripping blades, carefully loosen the retaining screws, remove the old blade, insert the new blade, and tighten the screws. Exercise caution as blades are sharp.
- Lubrication: Periodically apply a light machine oil to the pivot points and moving parts to ensure smooth operation.
- Storage: Utilize the locking feature to keep the handles closed for compact and safe storage. Store in a dry environment to prevent rust.
8. Troubleshooting
| Problem | Possible Cause | Solution |
|---|---|---|
| Crimped connector is loose or wires pull out easily. |
|
|
| Cable tester LEDs do not light up or show incorrect sequence. |
|
|
| Cable jacket not stripping cleanly. |
|
|
9. Specifications
| Brand: | Yankok |
| Model Number: | YKNT-MDC-HT376 (HT-376) |
| Compatible Connectors: | RJ45 (8P8C), RJ12 (6P6C), RJ11 (6P4C, 6P2C), RJ10 (4P4C), RJ9 (4P2C) |
| Handle Material: | High Carbon Steel |
| Grip Type: | Ergonomic |
| Specific Uses: | Networking, Telecommunication, Data Cabling, Home Office, Professional Data Centers |
| Cable Tester: | Built-in, detachable, for UTP/STP (RJ45, RJ12, RJ11) |
| Power for Tester: | Batteries (not included) |
10. Warranty Information
Yankok products are manufactured to high-quality standards. For specific warranty details, including coverage period and terms, please refer to the warranty card included with your purchase or visit the official Yankok website. Keep your proof of purchase for any warranty claims.
11. Support
For technical assistance, troubleshooting, or product inquiries, please contact Yankok customer support. You can find contact information on the official Yankok website or through the retailer where the product was purchased.
Visit the Yankok Store on Amazon for more products and information.