FJ3390TY-A
User Manual: FJ3390TY-A Smart Weather Station
Model: FJ3390TY-A | Brand: Generic
1. Introduction
Thank you for purchasing the FJ3390TY-A Smart Weather Station. This device is designed to provide accurate indoor and outdoor temperature and humidity readings, along with a comprehensive weather forecast, all displayed on a large, easy-to-read color screen. It connects to your network for precise data and offers convenient features like a USB charging port and app-based settings. Please read this manual carefully before use to ensure proper operation and longevity of your device.
2. Package Contents
Upon opening the package, please verify that all the following items are included:
- 1 x FJ3390TY-A Smart Weather Station (Main Unit)
- 1 x Wireless Outdoor Sensor
- 1 x Power Plug (US / EU, depending on region)
- 1 x User Manual
If any items are missing or damaged, please contact your retailer or manufacturer support.
3. Setup Guide
3.1 Powering the Main Unit
The weather station main unit requires a power adapter for continuous operation and full functionality, especially for the backlight and Wi-Fi features. Batteries can serve as a backup power source.
- Connect the provided power plug to the DC 5V input port on the back of the weather station.
- Plug the power adapter into a standard electrical outlet.
- Optionally, insert 2 x 1.5V LR06 AA batteries (not included) into the battery compartment for backup power.

Image: The main weather station unit connected to its power adapter, illustrating the primary power source for continuous operation and Wi-Fi functionality. The unit is shown from the side, highlighting the power input port.
3.2 Installing Batteries in the Wireless Outdoor Sensor
The wireless outdoor sensor operates on batteries.
- Open the battery compartment on the back of the wireless outdoor sensor.
- Insert 2 x LR03 AAA batteries (not included), ensuring correct polarity (+/-).
- Close the battery compartment securely.
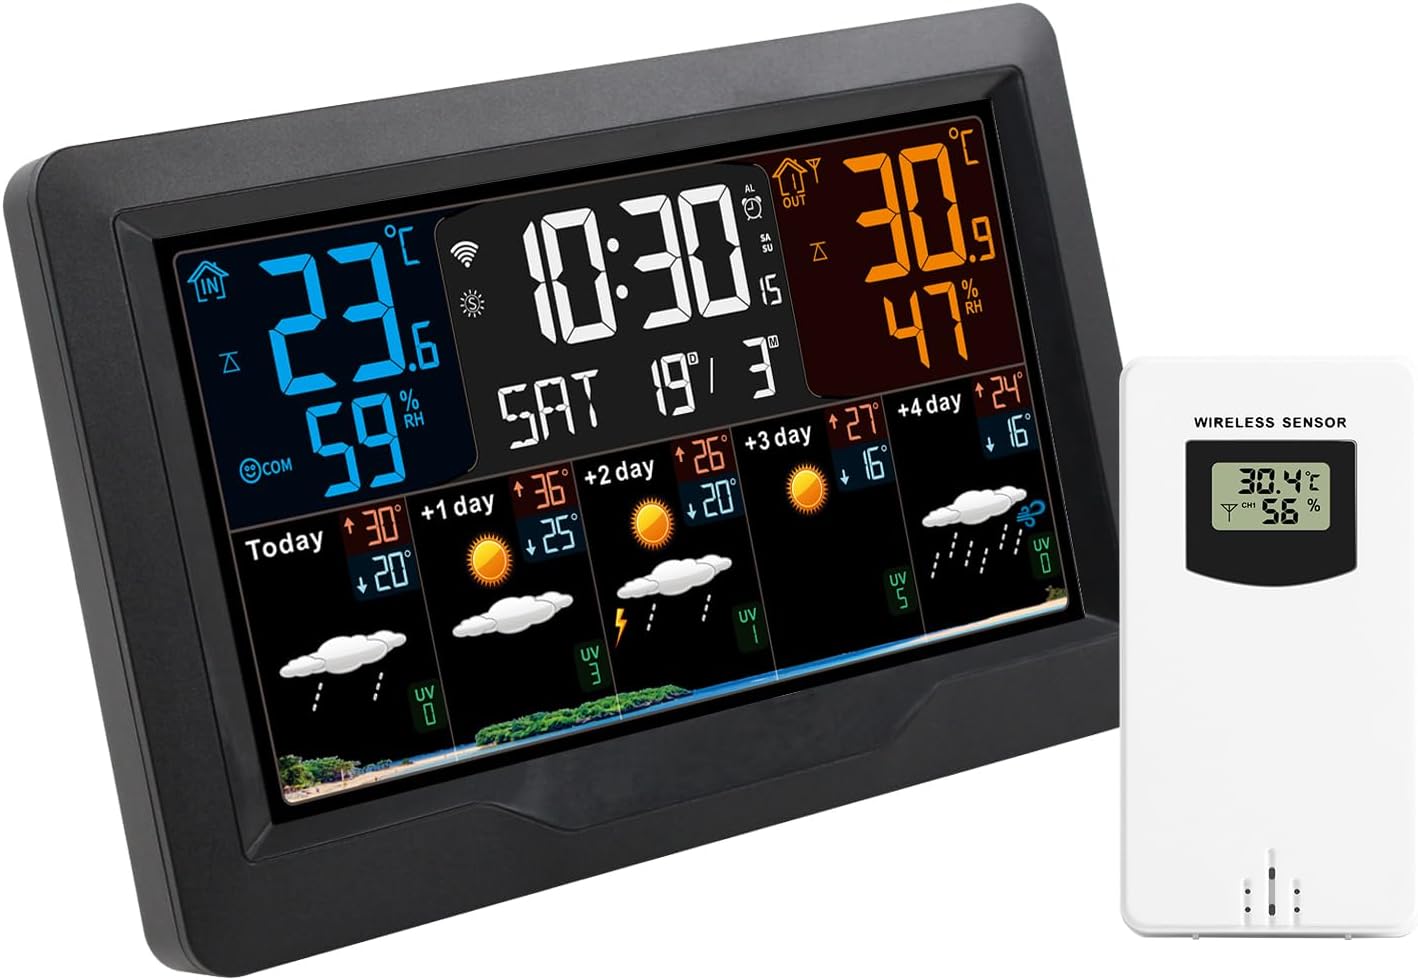
Image: The FJ3390TY-A Smart Weather Station main unit with its large color display, positioned next to the compact white wireless outdoor sensor. This image provides a clear view of both primary components of the system.
3.3 Initial Pairing and Wi-Fi Connection
The weather station automatically attempts to pair with the outdoor sensor and connect to Wi-Fi upon first power-up.
- Place the outdoor sensor within range of the main unit (up to 60 meters in an open area).
- The main unit will display outdoor temperature and humidity once connected.
- Download the companion Smart APP (details typically found in the included user manual or on the product packaging).
- Follow the in-app instructions to connect the weather station to your Wi-Fi network. This enables network data acquisition for more accurate forecasts and time synchronization.

Image: A visual representation of the weather station's connectivity with a mobile app, emphasizing how the app simplifies setup and allows for network data download to enhance accuracy. Multiple small weather station displays are shown around a central one, indicating various settings or data points.
3.4 Placement of the Weather Station and Sensor
Proper placement ensures optimal performance and accurate readings.
- Main Unit: Can be placed on a table using its integrated stand or hung on a wall. Choose a central location indoors, away from direct sunlight or heat sources that could affect indoor temperature readings.
- Outdoor Sensor: Can be wall-mounted or placed on a flat surface. For best results, place it in a shaded area, protected from direct rain and sunlight, to ensure accurate temperature and humidity readings. Avoid placing it near large metal objects or electronic devices that could interfere with the wireless signal.

Image: Two common placement options for the weather station are shown: mounted on a wall above a shelf and standing on a tabletop. This illustrates the versatility of the unit's design for various indoor environments.
4. Operating Instructions
4.1 Display Overview
The large color screen provides a wealth of information at a glance.

Image: The weather station's color screen displaying various data points including current time, alarm clock status, calendar, indoor and outdoor temperature and humidity, and a multi-day weather forecast. The image highlights the comprehensive information available on the display.
Key information displayed includes:
- Time & Date: Current time (12/24HR format), calendar, and day of the week.
- Indoor Temperature & Humidity: Current readings for your indoor environment.
- Outdoor Temperature & Humidity: Readings from the wireless sensor.
- Weather Forecast: Predicted weather conditions for the day and the next 4 days.
- Predicted Max/Min Temperature: Forecasted high and low temperatures.
- UV Index: Ultraviolet index information.
4.2 Understanding Weather Forecast Icons
The weather station uses various icons to represent different weather conditions. The product automatically downloads network data and synchronizes updates for accurate forecasts.

Image: A grid displaying 23 distinct weather icons, ranging from sunny and cloudy to various types of rain, snow, and other atmospheric conditions like fog and sandstorm. This chart helps users interpret the weather forecast displayed on the station's screen.
4.3 Setting Time, Date, and Units
These settings can typically be adjusted via the Smart APP for convenience, or manually using the buttons on the device (refer to the specific button functions in the included user manual).
- Temperature Units: Switch between Celsius (℃) and Fahrenheit (℉).
- Time Format: Select 12-hour or 24-hour format.
4.4 Alarm Function
The weather station features three daily alarms with a snooze function.
- Setting Alarms: Use the device buttons or the Smart APP to set up to three independent alarms.
- Snooze: When an alarm sounds, press the snooze button (usually a prominent button on top or front) to temporarily silence it for 5 minutes.
4.5 Backlight Control
The backlight provides visibility in low-light conditions.
- When powered by the adapter, the backlight can be continuously on with 4 adjustable brightness levels.
- When operating on battery power only, the backlight will illuminate for 15 seconds after a button press to conserve energy.
4.6 USB Charging Function
The main unit includes a USB output port for charging external devices.
- Connect your USB charging cable to the USB output port on the weather station.
- Connect the other end of the cable to your device (e.g., smartphone, tablet) to begin charging.

Image: The rear view of the weather station, highlighting the USB charging interface and the power adapter interface. This image demonstrates the simple and convenient setup of the product's connectivity ports.
5. Maintenance
To ensure the longevity and accuracy of your weather station, follow these simple maintenance guidelines:
- Cleaning: Wipe the main unit and sensor with a soft, damp cloth. Do not use abrasive cleaners or solvents, as they may damage the display or casing.
- Battery Replacement: Replace batteries in the outdoor sensor when the low battery indicator appears on the main unit. For the main unit, ensure the power adapter is connected, or replace backup batteries if used.
- Sensor Placement: Periodically check the outdoor sensor's placement to ensure it remains protected from direct elements and is free from debris that could obstruct its vents.
- Storage: If storing the device for an extended period, remove all batteries from both the main unit and the sensor to prevent leakage.
6. Troubleshooting
If you encounter issues with your weather station, please refer to the following common problems and solutions:
| Problem | Possible Cause | Solution |
|---|---|---|
| No display on main unit | No power; dead batteries (if on backup); power adapter not connected. | Ensure power adapter is securely plugged in. Replace AA batteries if using backup power. |
| Outdoor temperature/humidity not displayed or inaccurate | Sensor out of range; dead sensor batteries; interference; sensor not paired. | Move sensor closer to main unit. Replace AAA batteries in sensor. Avoid placing near large metal objects. Re-pair sensor (refer to full manual for pairing steps). |
| Wi-Fi connection issues | Incorrect Wi-Fi password; router too far; network issues. | Double-check Wi-Fi password in the app. Move weather station closer to router. Restart router. Ensure 2.4GHz Wi-Fi network is used if applicable. |
| Inaccurate indoor readings | Main unit placed near heat/cold source. | Relocate the main unit away from direct sunlight, vents, or appliances that emit heat/cold. |
For further assistance, please consult the comprehensive user manual included in your package or contact customer support.
7. Specifications
Detailed technical specifications for the FJ3390TY-A Smart Weather Station:
- Perpetual Calendar: Up to Year 2099
- USB Output Port: 1 (for charging)
- Humidity Range (Indoor & Outdoor): 1%RH ~ 99%RH
- Temperature Range (Indoor): -10℃ ~ 50℃ (14℉ ~ 122℉)
- Temperature Range (Outdoor): -40℃ ~ 70℃ (-40℉ ~ 158℉)
- Power Supply (Weather Station): 2 x 1.5V LR06 AA batteries (not included); Power Input: DC 5V > 1A (Power Adapter)
- Power Supply (Wireless Outdoor Sensor): 2 x LR03 AAA batteries (not included)
- Material: ABS
- Item Size (Weather Station): 20.5 * 13 * 3 cm / 8.07 * 5.12 * 1.18 inch
- Item Weight (Weather Station): 415g / 14.64oz
- Wireless Sensor Transmission: 433.92MHZ RF, 60 meters range (open area)
- Connectable Sensors: Up to 3 wireless outdoor sensors (1 included)

Image: A diagram illustrating the physical dimensions of both the weather station host (205 x 130 x 30mm) and the wireless sensor (50 x 96 x 34mm). This provides a clear visual reference for the product's size.
8. Warranty and Support
This product is manufactured by Generic. For specific warranty information, including duration and coverage, please refer to the warranty card included in your product packaging or contact the seller directly. Keep your purchase receipt as proof of purchase.
For technical support, troubleshooting assistance beyond this manual, or inquiries regarding parts and service, please contact the retailer from whom you purchased the product or the manufacturer's customer service department. Contact details are typically provided in the product packaging or on the manufacturer's official website.
Ask a question about this manual
Ask about setup, troubleshooting, compatibility, parts, safety, or missing instructions. Manuals+ will review the question and use this page’s manual context to help answer it.