1. Introduction
This manual provides essential information for the proper use and maintenance of your GOUYESHO Remote Control for Walkingpad treadmills. Please read this manual thoroughly before use to ensure optimal performance and longevity of your device.
2. Product Overview
The GOUYESHO Remote Control is designed to provide convenient control over compatible Walkingpad treadmill models. It features a simple, ergonomic design with clearly marked buttons for various functions.

Image: Front and back view of the GOUYESHO Walkingpad remote control. The front shows the control buttons, and the back shows the battery compartment cover.
2.1 Button Functions
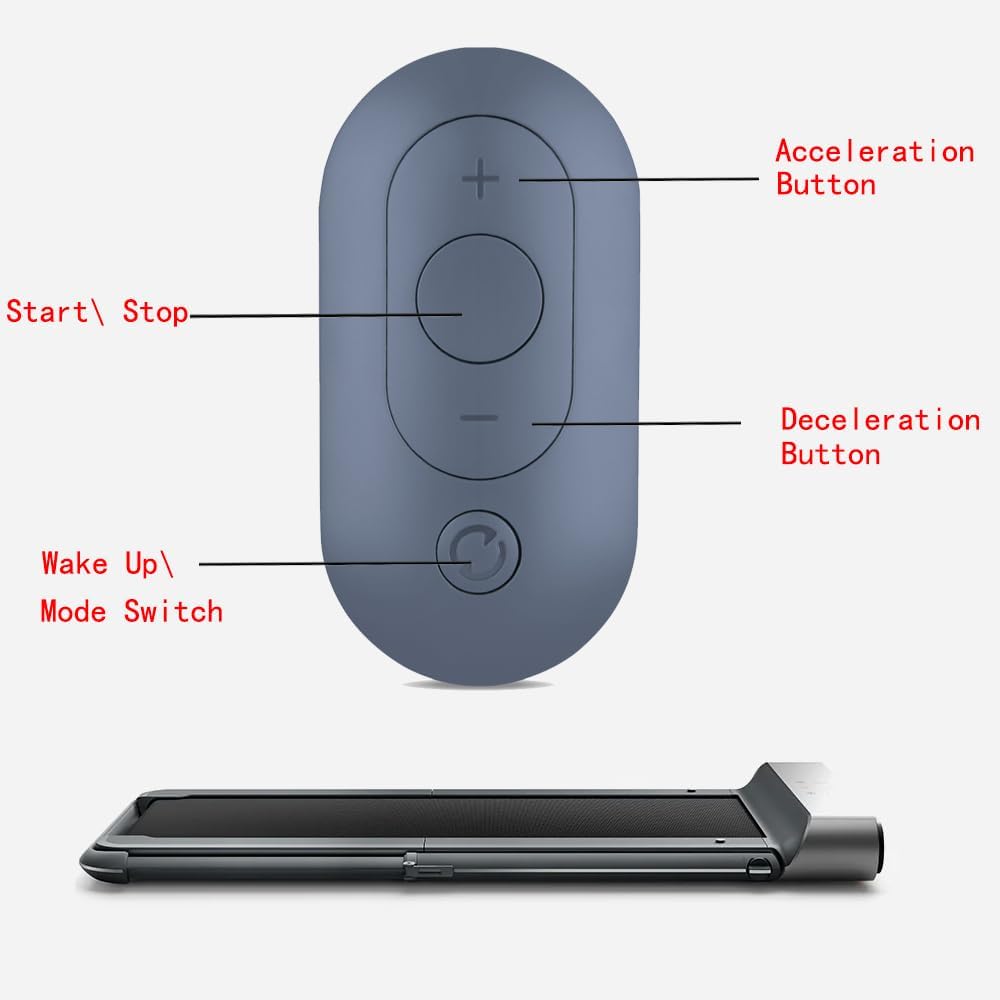
Image: GOUYESHO Walkingpad remote control with labels indicating the function of each button. The top button is 'Acceleration Button' (+), the middle circular button is 'Start/Stop', the button below it is 'Deceleration Button' (-), and the bottom circular button is 'Wake Up/Mode Switch'.
- Acceleration Button (+): Increases the speed of the Walkingpad.
- Start/Stop Button (Central Circle): Initiates or pauses the Walkingpad operation.
- Deceleration Button (-): Decreases the speed of the Walkingpad.
- Wake Up/Mode Switch Button (Bottom Circle): Used to wake up the Walkingpad or switch between modes. This button is also crucial for the pairing process.
3. Setup
3.1 Battery Installation
The remote control requires one CR2032 alkaline button cell battery (not included). Follow these steps to install the battery:
- Locate the battery compartment on the back of the remote control.
- Use a coin or a flat tool to twist the battery cover counter-clockwise to unlock and remove it.
- Insert one CR2032 battery with the positive (+) side facing upwards.
- Replace the battery cover and twist it clockwise to lock it securely.

Image: The back of the remote control showing the battery compartment and a separate CR2032 lithium battery, indicating where the battery should be inserted.
3.2 Pairing Instructions
To pair the remote control with your Walkingpad treadmill, follow these steps:
- Ensure your Walkingpad treadmill is powered off.
- Restart the Walkingpad treadmill.
- Immediately after restarting, press and hold the "Wake Up/Mode Switch" button (the round button at the bottom of the remote, next to the lanyard eyelet) for 5 seconds.
- The Walkingpad should indicate successful pairing (e.g., a beep or a light indicator).

Image: An illustration showing the remote control being held near a Walkingpad treadmill, with arrows pointing to a specific round button on the treadmill's frame. Text overlays indicate the steps: "1. Turn off the power and restart the walking pad" and "2. Press this button for 5 seconds". This button on the treadmill is the pairing button.
Important Note: This remote control is specifically designed for Walkingpad C2, A1, A1 Pro, R1 Pro, R2, and Z1 models. It is not compatible with treadmills from other brands.
4. Operating Instructions
Once paired, the remote control allows you to manage your Walkingpad treadmill conveniently.
- Start/Stop: Press the central circular button to start or stop the treadmill.
- Adjust Speed: Use the '+' button to increase speed and the '-' button to decrease speed.
- Wake Up/Mode Switch: Press the bottom circular button to wake the treadmill from standby or to cycle through available modes (if applicable to your Walkingpad model).

Image: A person is shown walking on a Walkingpad treadmill, with a hand holding the remote control in the foreground, illustrating typical use.
5. Maintenance
To ensure the longevity and proper functioning of your remote control, follow these maintenance guidelines:
- Cleaning: Wipe the remote control with a soft, dry cloth. Do not use abrasive cleaners or solvents.
- Storage: Store the remote control in a cool, dry place away from direct sunlight and extreme temperatures.
- Battery Replacement: Replace the CR2032 battery when the remote's responsiveness decreases or if it stops functioning. Refer to the "Battery Installation" section for instructions.
- Avoid Water: Keep the remote control away from water and other liquids to prevent damage.
6. Troubleshooting
If you encounter issues with your remote control, try the following solutions:
- Remote Not Responding:
- Check if the battery is installed correctly and has sufficient charge. Replace the battery if necessary.
- Ensure there are no obstructions between the remote control and the Walkingpad treadmill.
- Verify that the remote is within the effective operating range (up to 10 meters).
- Pairing Issues:
- Re-attempt the pairing process as described in Section 3.2.
- Confirm that your Walkingpad model (C2, A1, A1 Pro, R1 Pro, R2, Z1) is compatible with this remote control. This remote is not designed for other brands or models.
- Ensure the Walkingpad is properly restarted before attempting to pair.
- Intermittent Functionality:
- This could indicate a low battery. Replace the battery.
- Ensure the remote control is not exposed to strong electromagnetic interference.
7. Specifications
Below are the technical specifications for the GOUYESHO Remote Control:
| Feature | Detail |
|---|---|
| Brand | GOUYESHO |
| Model Number | 21074a00-8e05-4378-ad60-2a75502e977a |
| Connectivity Technology | Infrared |
| Compatible Devices | Walkingpad C2/A1/A1 Pro/R1 Pro/R2/Z1 |
| Max Supported Devices | 1 |
| Number of Buttons | 1 (referring to the main control area, though there are multiple distinct buttons) |
| Controller Type | Button Control |
| Maximum Range | 10 Meters |
| Battery Type | CR2032 Alkaline (not included) |
| Manufacturer | RETROSUN |
| ASIN | B0D4HT85MD |
7.1 Dimensions

Image: The remote control shown with its approximate dimensions: 3.31 inches (length), 0.39 inches (thickness), and 1.89 inches (width).
- Length: Approximately 3.31 inches
- Width: Approximately 1.89 inches
- Thickness: Approximately 0.39 inches
8. Warranty and Support
Information regarding specific warranty terms or customer support contact details for this product is not available in the provided data. Please refer to the product packaging or the seller's information on the purchase platform for warranty details and support contacts.