Riflevault AKM-70
Riflevault 6.0 Cu ft Digital Money Safe Instruction Manual
Model: AKM-70
Product Overview
The Riflevault 6.0 Cu ft Digital Money Safe is designed to provide secure storage for your valuables, firearms, and important documents. Featuring a backlit keypad, dual alarm system, and versatile interior organization, this unassembled safe offers robust protection and convenient access. Please read this manual thoroughly before assembly and operation to ensure proper use and maximum security.
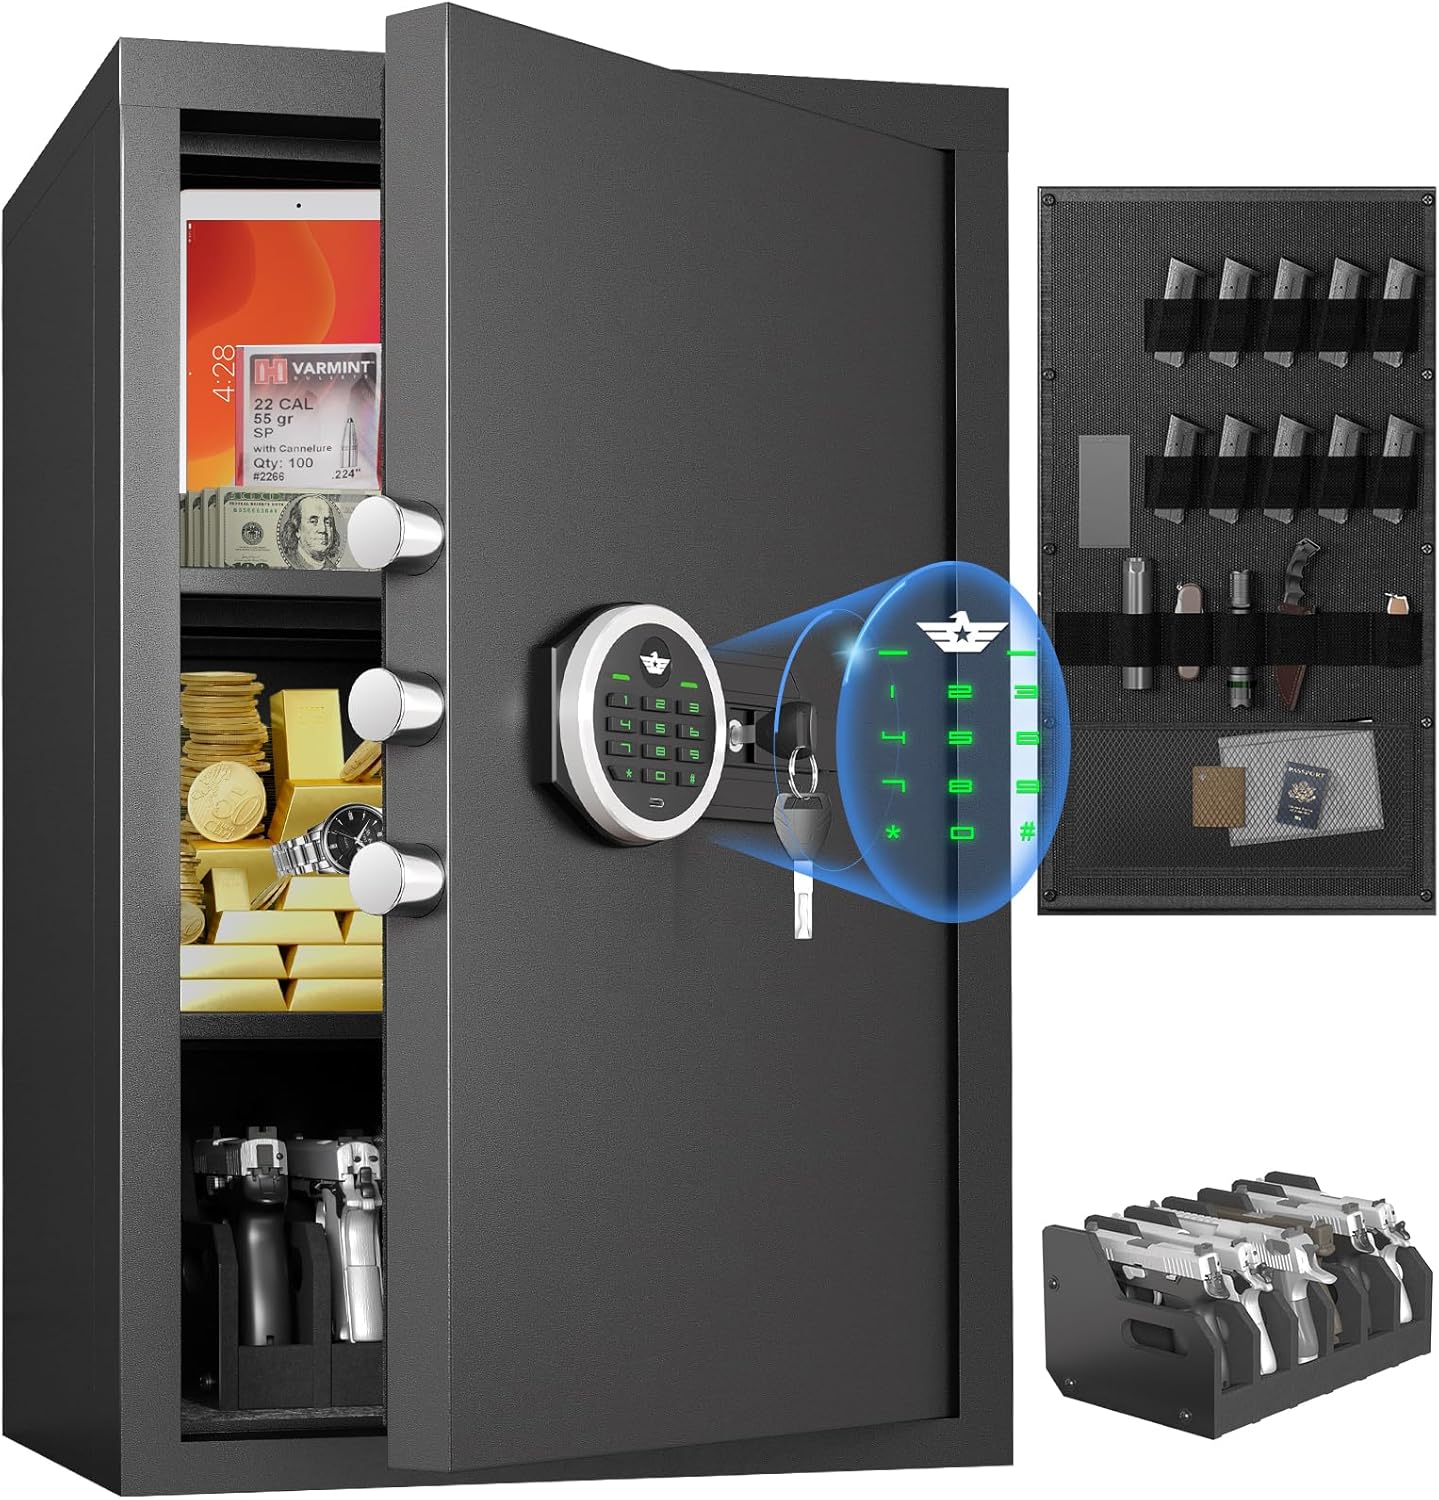
Figure 1: Riflevault 6.0 Cu ft Digital Money Safe
Included Components
Before beginning assembly, ensure all components listed below are present in your package:
- 1 x Large Unassembled Safe Box (various panels)
- 2 x Emergency Keys
- 4 x Expansion Screws (for mounting)
- 1 x Gun Rack
- 1 x Pistol Rack (requires assembly)
- 1 x Magnetic Light (battery not included)
- 1 x User Manual (this document)
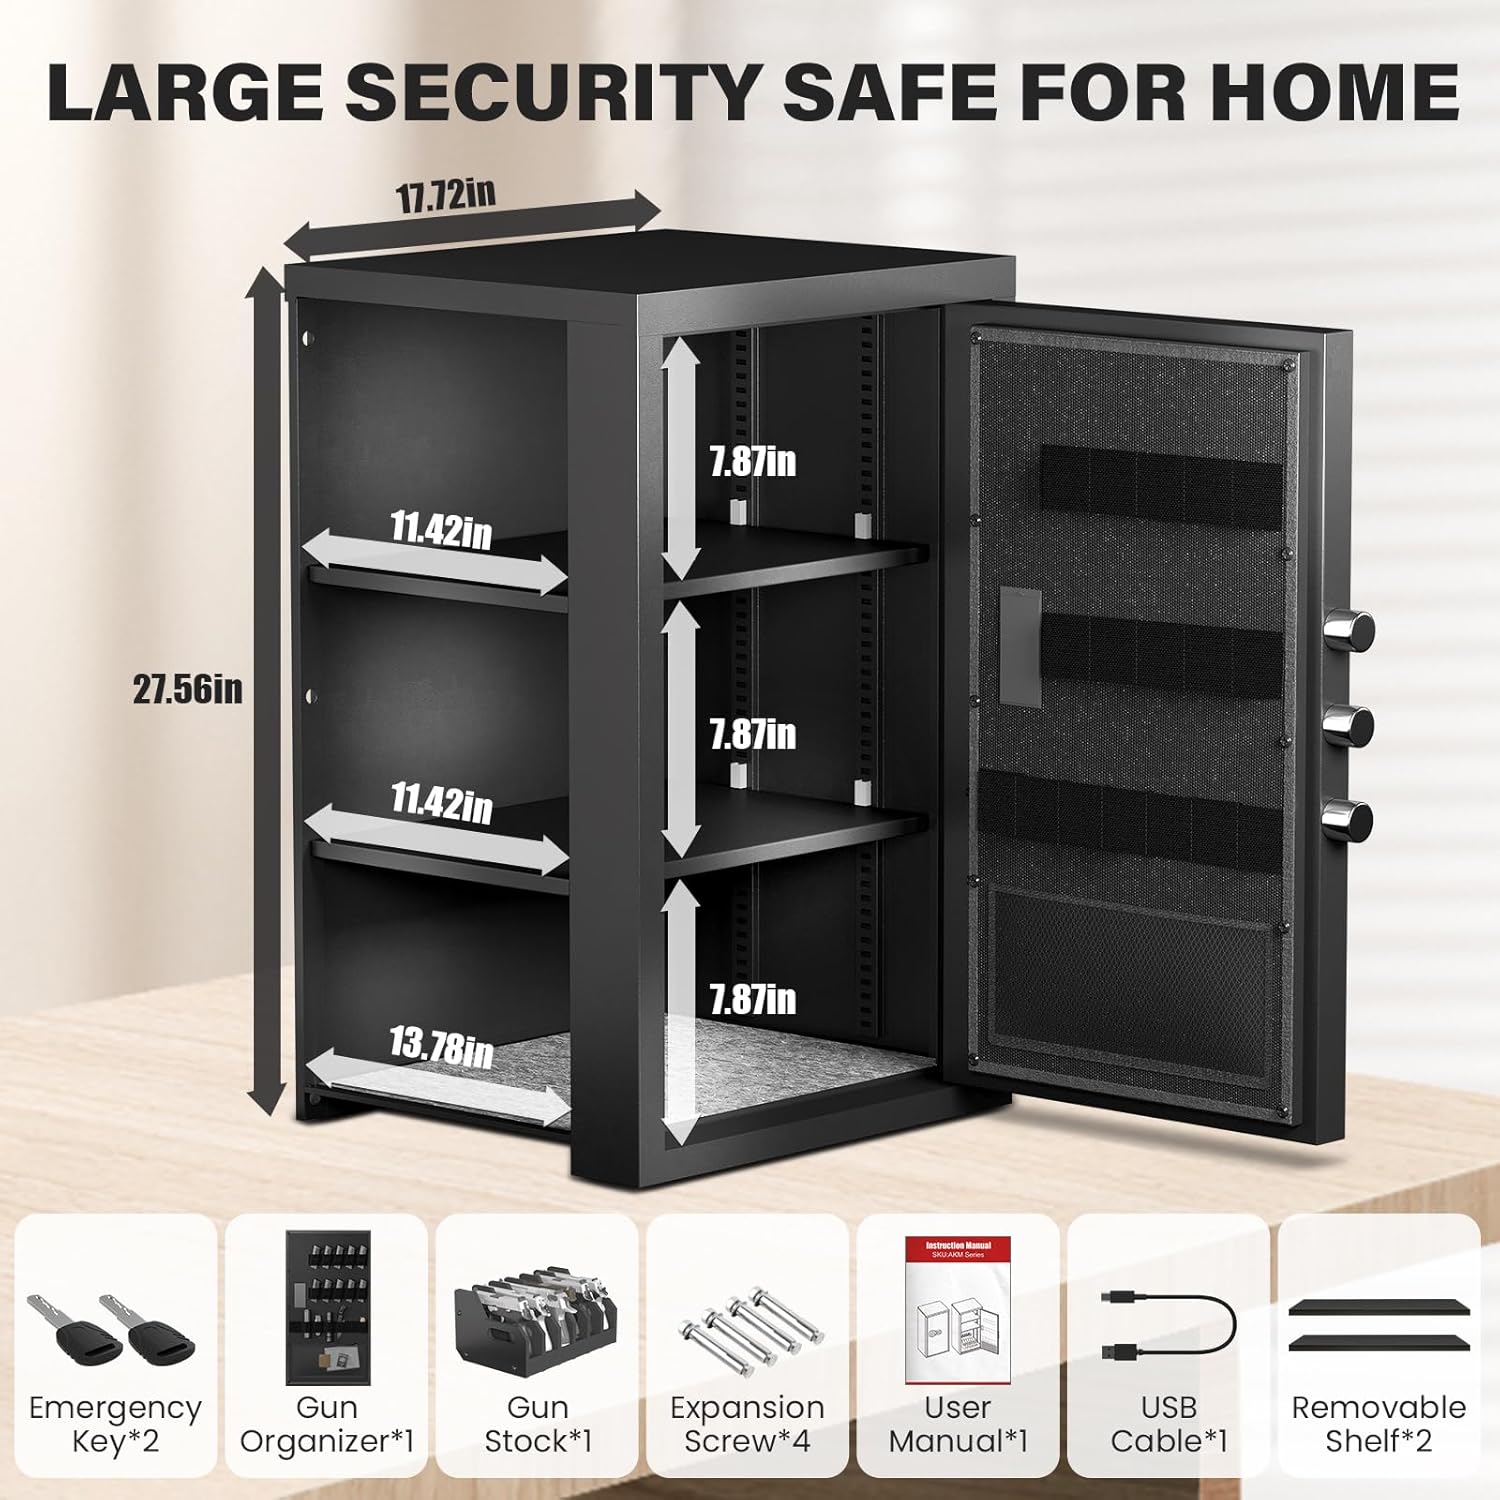
Figure 2: All Included Components
Assembly Instructions
The Riflevault safe is designed for easy assembly. An electric drill is recommended to expedite the process. Follow these steps carefully:
Video Guide: Safe Assembly
Video 1: Large Unassembled Safe Box Instruction. This video provides a visual guide for the complete assembly process.
Step-by-Step Assembly
- Prepare Components: Unpack all parts and identify them using the labels (A, B, C, D, F, G, H, I, J, K, L, M, N, O, P, Q). Ensure you have all necessary screws and tools.
- Left Plate Installation: Attach the left side panel (A) to the base panel (C) using the provided screws (M). Ensure the alignment is correct.
- Right Plate Installation: Attach the right side panel (B) to the base panel (C) using the provided screws (M). Verify secure connections.
- Door Installation: Carefully align and attach the door panel (D) to the assembled side and base panels. Ensure the hinges are properly seated and secure with screws (M).
- Top Plate Installation: Place the top panel (G) onto the assembled structure, ensuring it aligns with all sides. Secure it with screws (M).
- Bottom Plate Installation: Insert the bottom panel (F) into the base of the safe. This panel often includes pre-attached feet or supports.
- Mount the Cabinet (Optional): If wall mounting, identify the pre-drilled holes on the back of the safe. Use the expansion screws (K) to secure the safe to a sturdy wall.
- Shelf and Gun Stock Installation:
- Insert the shelf clips (P) into the desired slots on the interior side panels.
- Place the removable shelves (H) onto the installed clips.
- Assemble the pistol rack (I) by connecting its components with the provided screws (J).
- Place the assembled pistol rack and the gun rack (J) inside the safe as desired.
- Final Checks: Ensure all screws are tightened, and all panels are securely in place. Test the door mechanism.

Figure 3: Safe Assembly Diagram
Operating Instructions
Unlocking Methods
Your Riflevault safe offers three primary methods for access:
- Password + Knob (Daily Use): Enter your programmed digital password on the backlit keypad. Once the correct password is entered, turn the knob to open the safe.
- Key + Knob (Emergency Override): In case you forget your password or the battery runs out, insert one of the emergency keys into the keyhole, turn it, and then turn the knob to open the safe.
- USB Type-C + Password + Knob (Battery Depleted): If the battery is completely drained, connect a USB Type-C power source to the port on the keypad. This will temporarily power the keypad, allowing you to enter your password and turn the knob to open the safe.
Important: Always keep the emergency keys and USB Type-C cable in a secure location outside the safe to ensure access in all situations.

Figure 4: Three Ways to Access Your Safe
Setting/Changing Passwords
Refer to the detailed instructions provided within the safe's digital keypad interface for setting and changing your personal password. Typically, this involves pressing a reset button inside the safe or a specific key sequence on the keypad, followed by entering your new desired password.
Dual Alarm System
The safe is equipped with a dual alarm system for enhanced security:
- Incorrect Password Alarm: If three consecutive incorrect passwords are entered, the alarm will activate.
- Violent Vibration Alarm: The alarm will also activate if the safe detects violent vibrations or tampering.
The alarm emits a 70-decibel sound for 30 seconds. To stop the alarm, enter the correct password.
Figure 5: Dual Alarm System
Mute Function
You can activate the mute function on the keypad to silence button presses and alarm sounds, if preferred. Consult the keypad's specific instructions for enabling/disabling this feature.
Internal LED Light
The safe features an automatic LED light that illuminates the interior when the safe is opened with the correct password, aiding visibility. An additional magnetic LED light is also included for extra convenience (requires battery, not included).

Figure 6: Magnetic Suction Light and Internal LED Light
Interior Organization
The safe's interior is designed for flexible storage:
- Adjustable/Removable Shelves: The two included shelves can be adjusted to different heights or removed entirely to accommodate larger items.
- Gun Rack: The gun rack can hold approximately 4-5 submachine guns up to 25 inches long (e.g., EVO, MP5).
- Pistol Rack: The pistol rack can securely hold up to 6 pistols, preventing scratches and keeping them organized.
- Door Organizer: The door features an organizer with pockets and straps for magazines, keys, glasses, documents, and other small valuables.
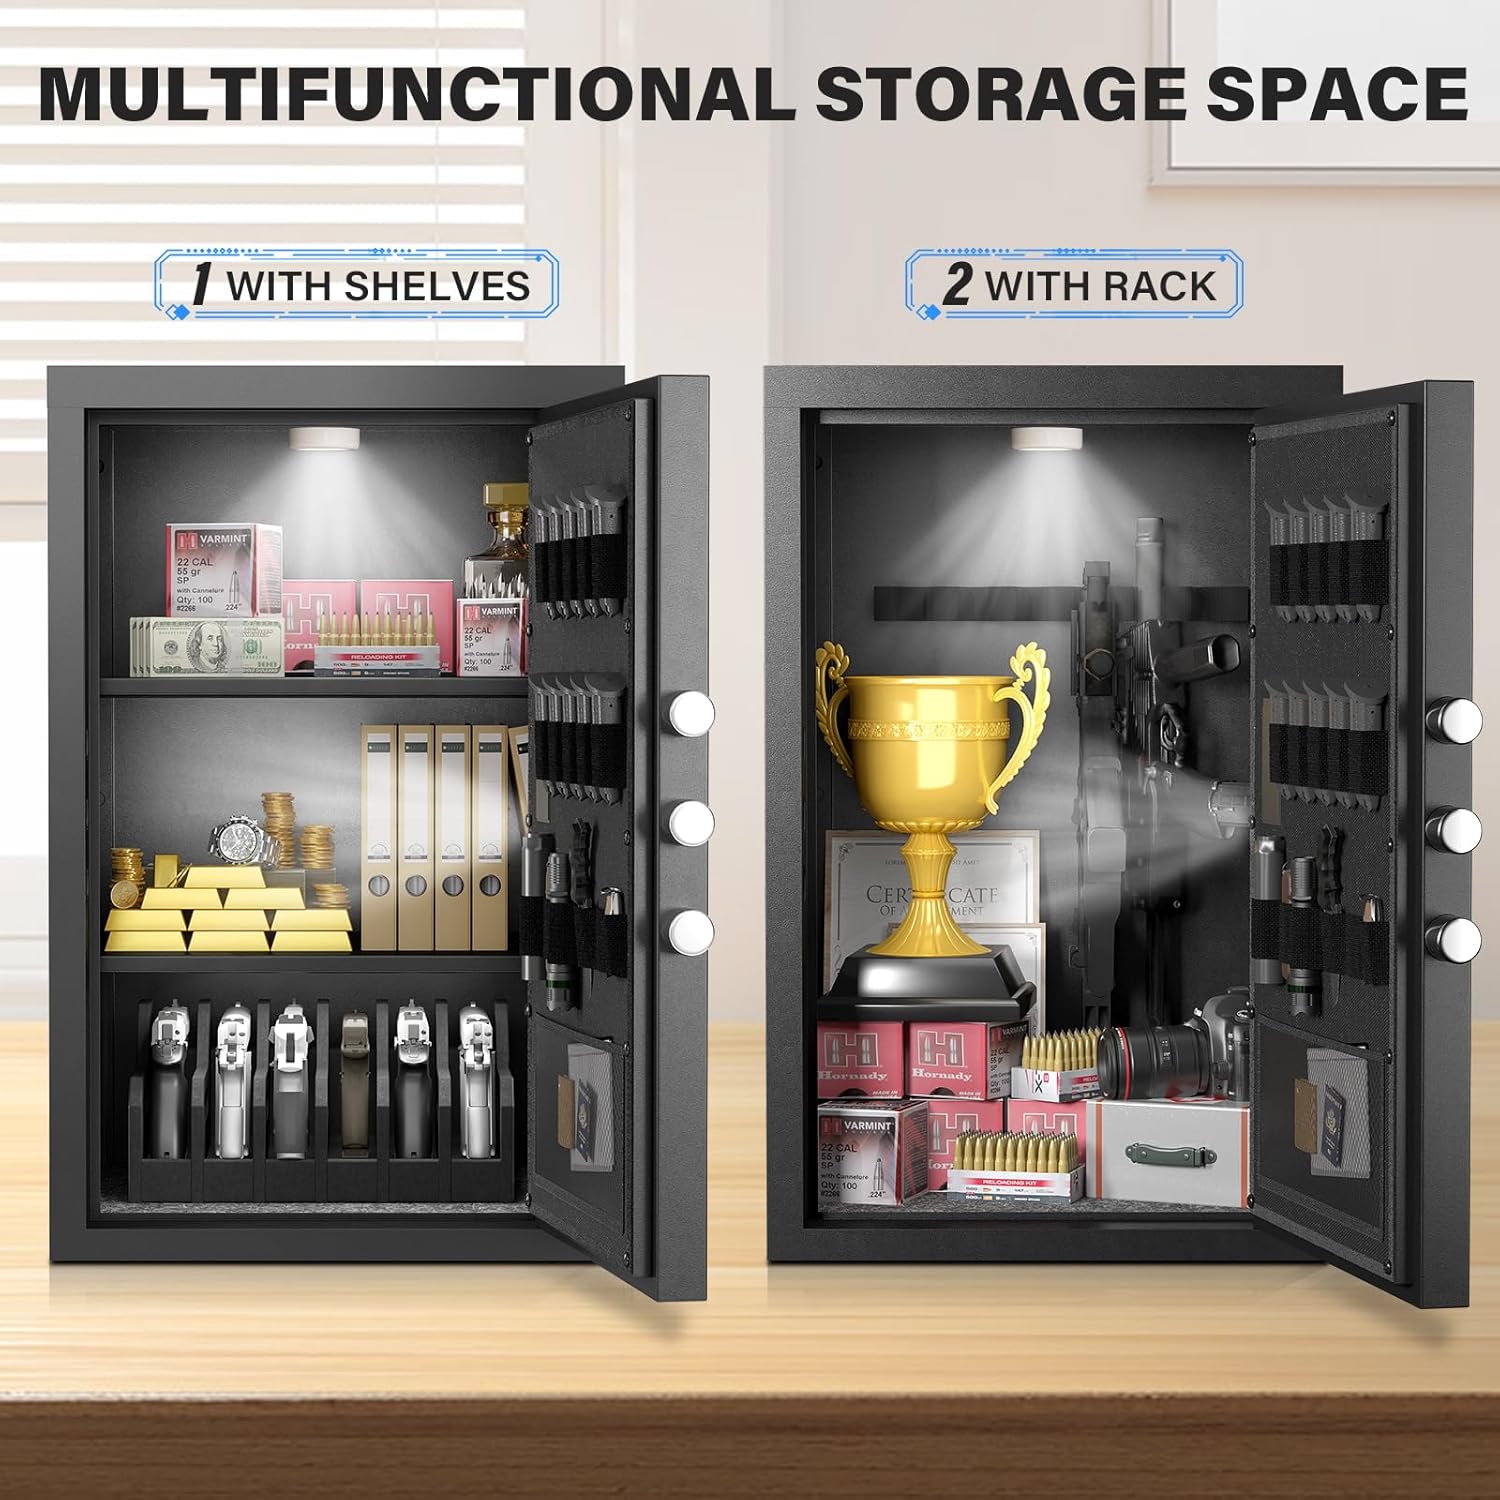
Figure 7: Multifunctional Storage Space

Figure 8: Multifunctional Gun Organizer on Door
Maintenance
- Cleaning: Wipe the exterior and interior surfaces with a soft, damp cloth. Avoid abrasive cleaners or solvents that could damage the finish.
- Battery Replacement: Replace the keypad batteries regularly (e.g., annually) to prevent power loss. Use the recommended battery type.
- Keypad Care: Keep the keypad clean and dry. Avoid pressing keys with excessive force.
- Locking Bolts: Periodically check the locking bolts for any obstructions or signs of wear. Ensure they extend and retract smoothly.
Troubleshooting
| Problem | Possible Cause | Solution |
|---|---|---|
| Safe does not open with password. | Incorrect password entered; Low battery; Keypad malfunction. | Re-enter password carefully; Use emergency key; Replace batteries; Use USB-C power. |
| Alarm sounds unexpectedly. | Incorrect password attempts; Violent vibration detected. | Enter correct password to disarm; Ensure safe is stable and not being tampered with. |
| Door does not close or latch properly. | Obstruction in door frame; Misalignment during assembly. | Check for obstructions; Re-check assembly steps, especially panel alignment. |
| Internal light not working. | Magnetic light battery depleted; Sensor issue. | Replace battery in magnetic light; Ensure safe door is fully opened to trigger sensor. |
Specifications
| Feature | Detail |
|---|---|
| Brand | Riflevault |
| Model Number | AKM-70 |
| Capacity | 6.0 Cubic Feet |
| External Dimensions (D x W x H) | 15.75" x 17.71" x 27.56" |
| Internal Dimensions (D x W x H) | 15.47" x 17.32" x 26.38" |
| Lock Type | Electronic Combination Lock |
| Material | Alloy Steel (unassembled) |
| Color | Black |
| Item Weight | 48.15 Pounds |
| Alarm System | Audible & Vibration (70 dB) |
| Special Features | Backlit Keypad, LED Light, Mute Function, Removable Shelves, Gun Rack, Pistol Rack, Door Organizer |
Warranty and Support
For warranty information, technical support, or any questions regarding your Riflevault safe, please refer to the contact details provided on the product packaging or the official Riflevault website. Keep your purchase receipt for warranty claims.
Ask a question about this manual
Ask about setup, troubleshooting, compatibility, parts, safety, or missing instructions. Manuals+ will review the question and use this page’s manual context to help answer it.