MIZISNR UG-240
MIZISNR UG-240 Wireless Lavalier Microphone System User Manual
Model: UG-240 | Brand: MIZISNR
Introduction
This manual provides detailed instructions for the setup, operation, maintenance, and troubleshooting of your MIZISNR UG-240 4-Channel UHF Wireless Lavalier Microphone System. Please read this manual thoroughly before using the product to ensure optimal performance and longevity.
Product Components
The MIZISNR UG-240 system includes the following items:
- 1 x Receiver Unit
- 4 x Lavalier Microphones (with bodypack transmitters)
- 4 x Headset Microphones (with bodypack transmitters)
- 1 x Power Adapter for Receiver
- 1 x 6.35mm Audio Cable
- 1 x User Manual
- Batteries (8 x AA batteries required, typically not included)
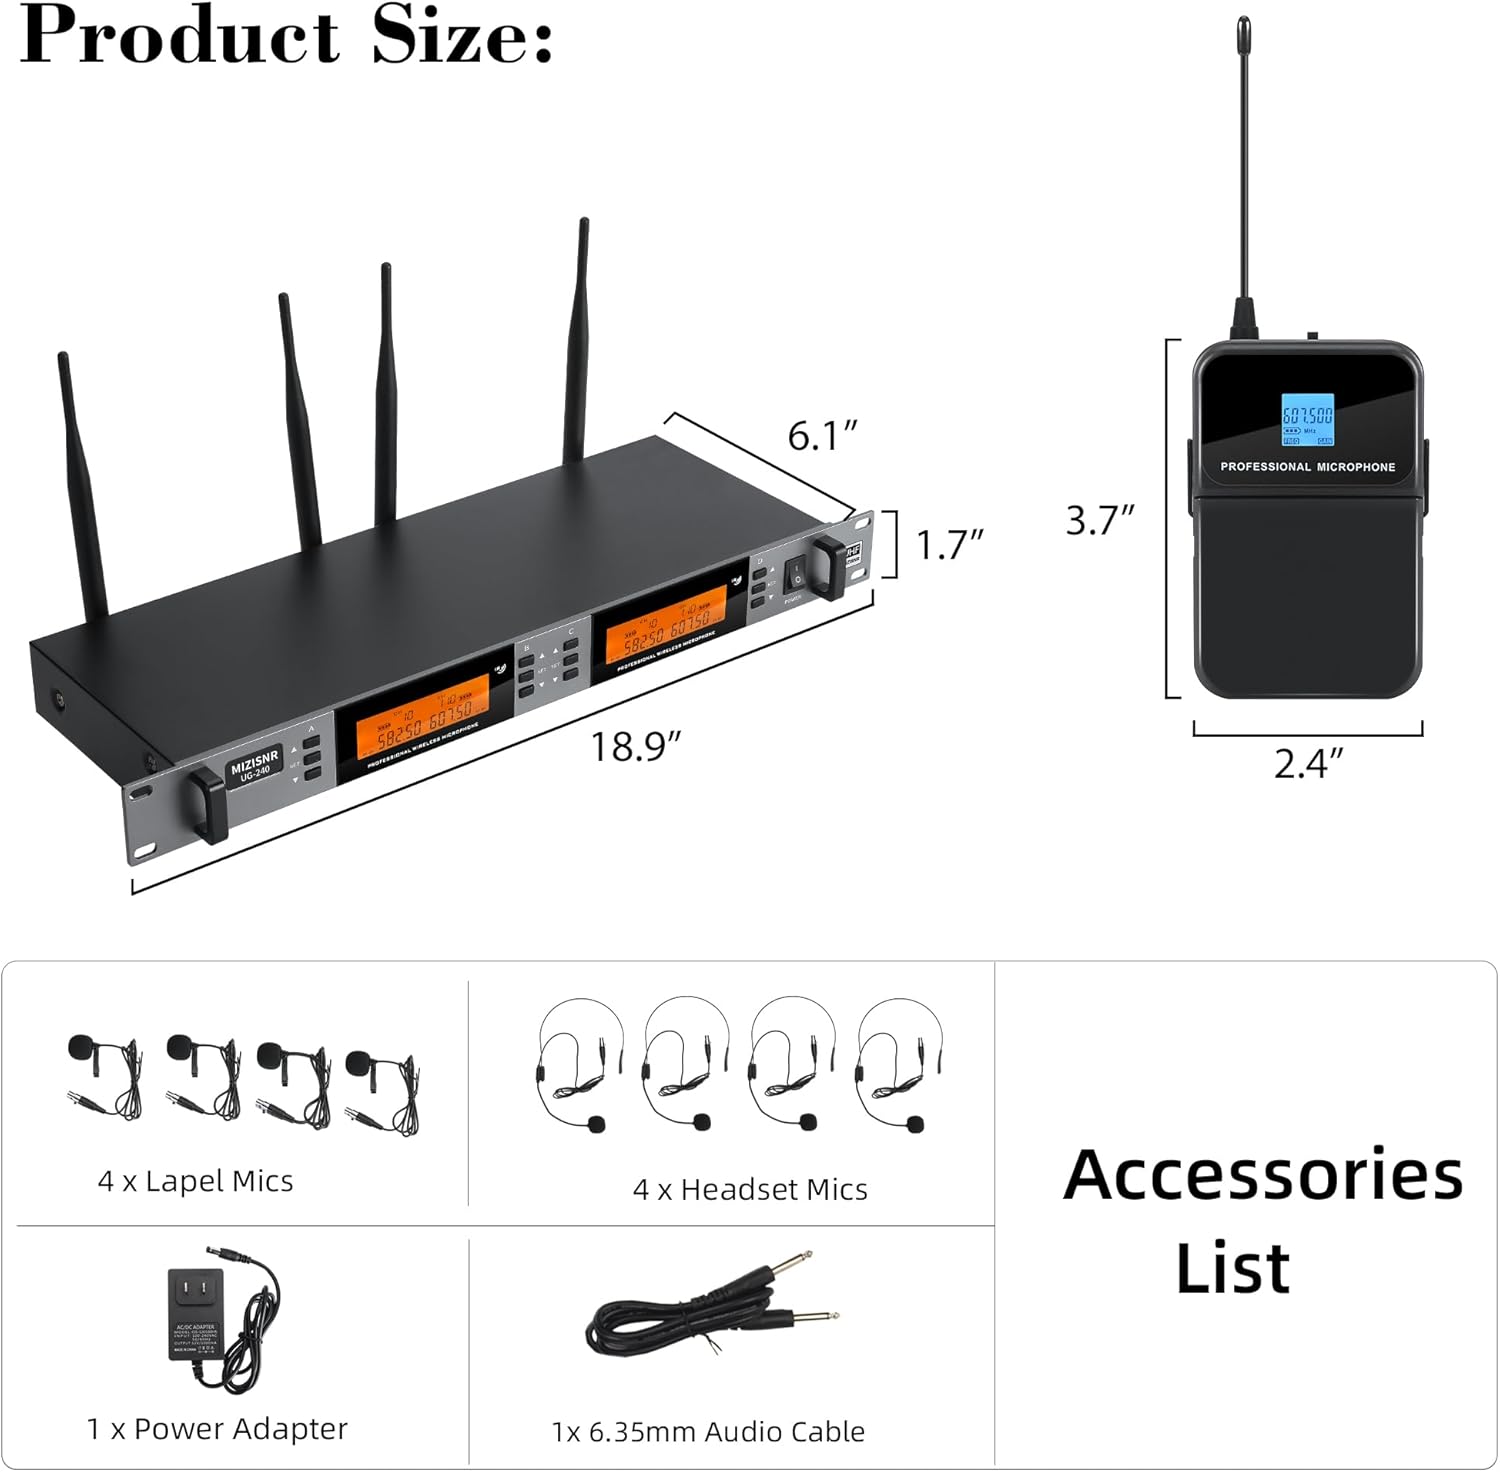
Figure 1: All included components of the MIZISNR UG-240 system.
Product Overview
Receiver Unit
The receiver unit is the central hub for the wireless microphone system. It features:
- LCD Display: Shows channel, frequency, and signal status for each microphone.
- Power Switch: Turns the receiver on or off.
- Microphone Controls (A, B, C, D): Individual controls for each channel.
- Confirm Buttons: Used for frequency selection and locking functions.
- Power Input: Connects to the included power adapter.
- Mix Output: A combined 6.35mm (1/4") TRS output for all channels.
- Balanced Outputs (Mic A, B, C, D): Individual XLR outputs for each microphone channel.
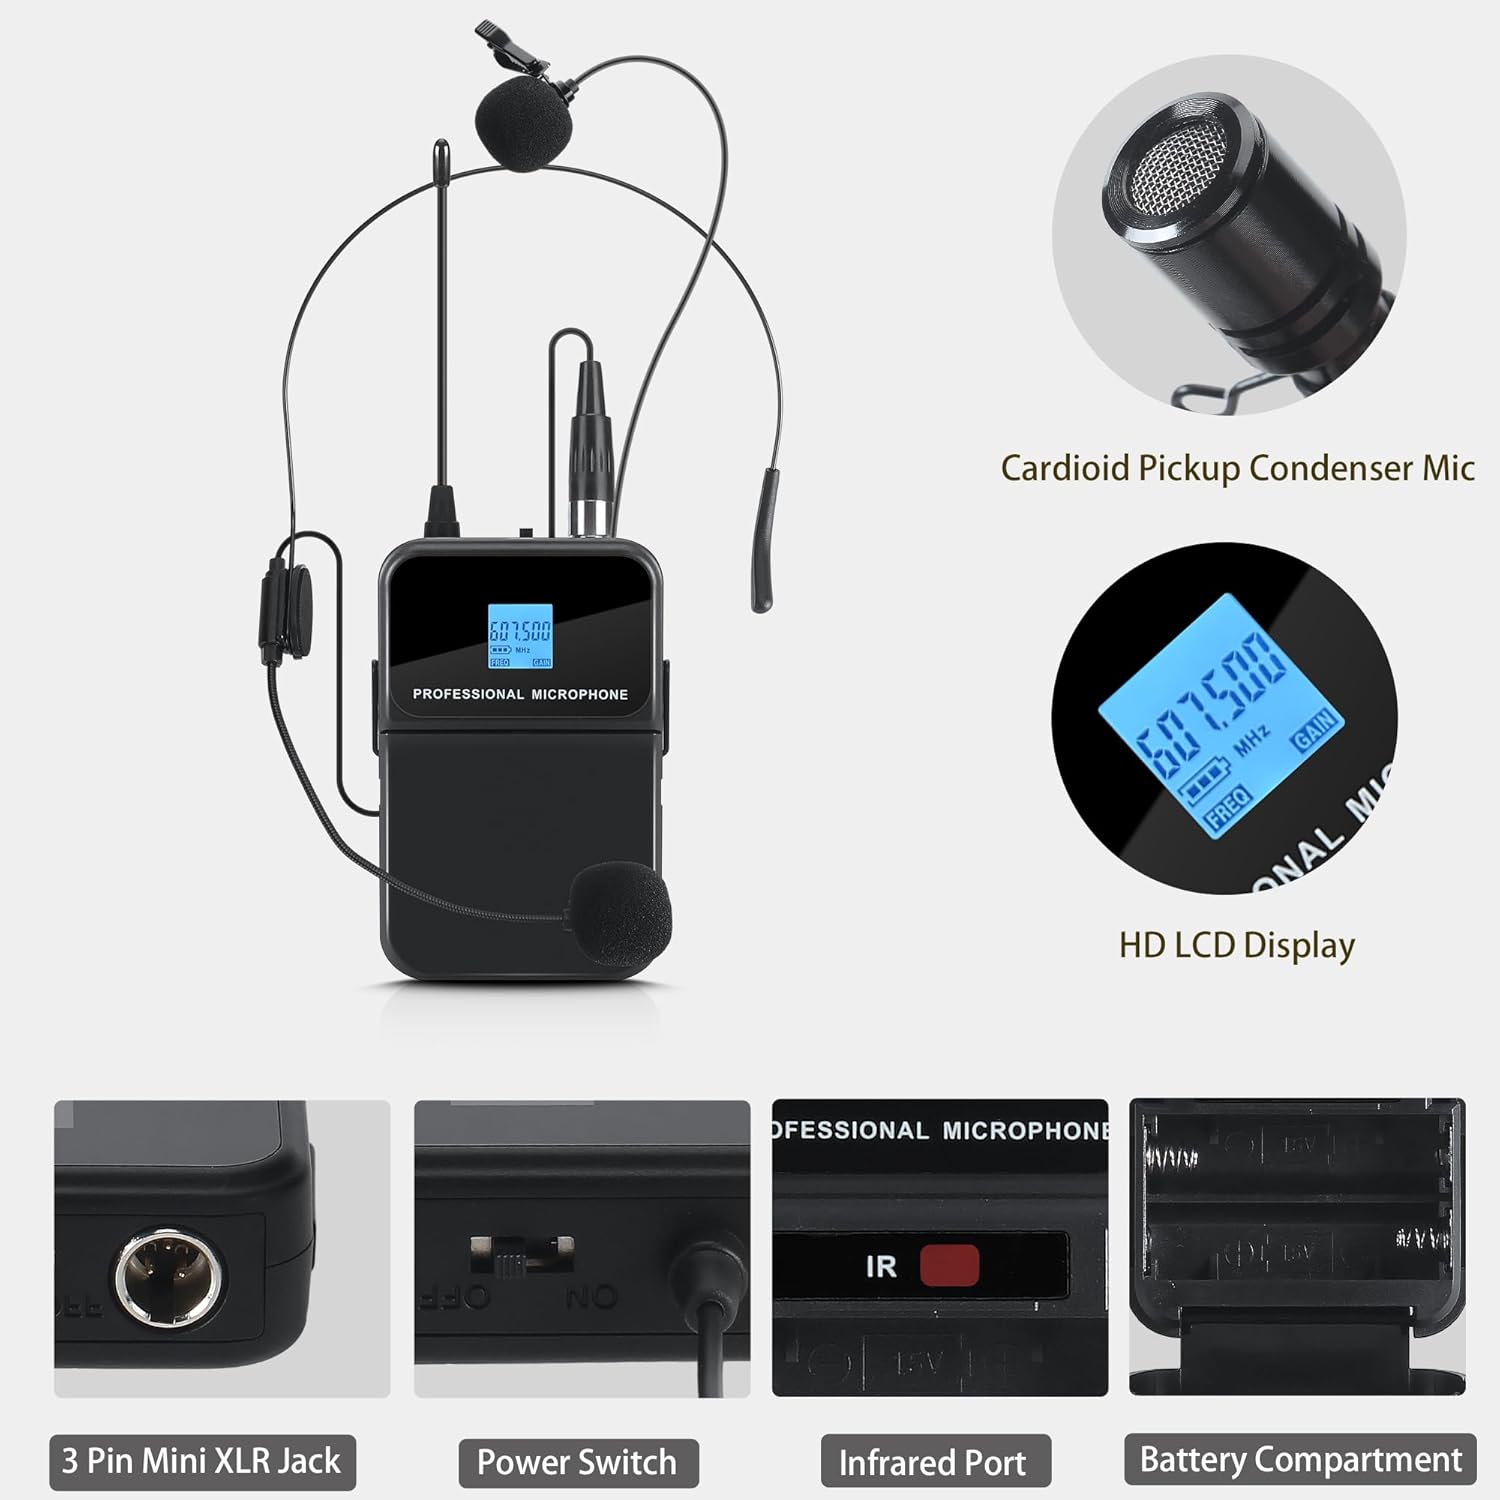
Figure 2: Front and Rear Panel of the Receiver Unit.
Bodypack Transmitters (for Lavalier and Headset Mics)
Each bodypack transmitter connects to either a lavalier or headset microphone and sends the audio signal wirelessly to the receiver. Key features include:
- Cardioid Pickup Condenser Mic: High-quality microphone capsule for clear audio capture.
- HD LCD Display: Shows current frequency and battery status.
- 3 Pin Mini XLR Jack: Connection point for lavalier or headset microphones.
- Power Switch: Turns the transmitter on or off.
- Infrared (IR) Port: Used for automatic frequency synchronization with the receiver.
- Battery Compartment: Holds two AA batteries.

Figure 3: Bodypack Transmitter Details.
Setup Instructions
- Unpack Components: Carefully remove all items from the packaging and inspect for any damage.
- Connect Receiver Power: Connect the included power adapter to the DC input on the rear of the receiver unit and plug it into a power outlet.
- Connect Audio Output: Connect the receiver's audio output to your audio system (mixer, amplifier, PA system) using either the 6.35mm (1/4") TRS Mix Output or the individual XLR Balanced Outputs.
- Install Batteries in Transmitters: Open the battery compartment on each bodypack transmitter and insert two AA batteries, observing correct polarity.
- Connect Microphones: Plug the 3-pin mini XLR connector of each lavalier or headset microphone into the corresponding jack on a bodypack transmitter.
- Power On: Turn on the receiver unit using its power switch. Then, turn on each bodypack transmitter.
- Frequency Synchronization (IR Sync):
- On the receiver, select the desired channel (A, B, C, or D) for synchronization.
- Press the 'SET' button on the receiver for the selected channel. The display will indicate it's ready for IR sync.
- Align the IR port on the bodypack transmitter with the IR sensor on the receiver.
- The frequency will automatically synchronize. Repeat for all four microphones.

Figure 4: Receiver Connectivity Options.
Operating Instructions
Power On/Off
To power on the system, first turn on the receiver, then each bodypack transmitter. To power off, reverse the order: turn off transmitters first, then the receiver.
Frequency Adjustment
The system offers 200 adjustable frequencies (100 per microphone pair) to avoid interference and ensure clear audio transmission.
- Auto Scan: The receiver can automatically scan and locate the best available frequency. This is typically initiated by pressing a dedicated 'SCAN' or 'SET' button on the receiver for a few seconds.
- Manual Frequency Selection: You can manually cycle through available frequencies for each channel using the control buttons on the receiver. After selecting a new frequency, perform an IR sync with the corresponding transmitter.

Figure 5: Flexible and Expandable Frequency Options.
Lock Function
To prevent accidental changes to settings during operation, the receiver's display can be locked.
- To Lock/Unlock: Long press the 'SET' buttons on both sides of the display simultaneously for a few seconds. The display will indicate when it is locked or unlocked.

Figure 6: Lockable Screen Function.
Volume Control
The system features volume control, typically adjusted via the connected audio mixer or amplifier. Ensure appropriate gain staging to prevent distortion or feedback.
Maintenance
- Battery Replacement: Replace AA batteries in the bodypack transmitters when the low battery indicator appears on their LCD displays. Always use fresh, high-quality batteries.
- Cleaning: Use a soft, dry cloth to clean the receiver and transmitters. Avoid using liquid cleaners or solvents, which can damage the electronic components.
- Storage: When not in use for extended periods, remove batteries from transmitters and store the system in a cool, dry place away from direct sunlight and extreme temperatures.
Troubleshooting
| Problem | Possible Cause | Solution |
|---|---|---|
| No sound output |
|
|
| Interference or static |
|
|
| Short operating range |
|
|
| Feedback (howling sound) |
|
|
Specifications
| Feature | Specification |
|---|---|
| Brand | MIZISNR |
| Model Number | UG-240 |
| Microphone Form Factor | Microphone System (Lavalier & Headset) |
| Number of Channels | 4 |
| Adjustable Frequencies | 200 (100 per microphone) |
| Operation Range | Up to 300 feet (91 meters) |
| Connectivity Technology | UHF Wireless, 6.35mm Jack, XLR |
| Polar Pattern | Unidirectional (Cardioid) |
| Power Source (Transmitters) | 2 x AA batteries per transmitter (8 AA batteries total required) |
| Material | Metal |
| Receiver Dimensions (L x W x H) | 18.9 x 6.1 x 1.7 inches |
| Item Weight | 5.74 pounds |
| Compatible Devices | Amplifier, Audio Interface, Audio Mixer, PA System |
| Special Feature | Volume Control, Auto Scan, Auto Memory, Lock Function |
Warranty and Support
MIZISNR is committed to providing high-quality products and customer satisfaction. While specific warranty details are not provided in this manual, we offer reliable after-sales support.
If you have any questions, concerns, or require assistance with your MIZISNR UG-240 Wireless Lavalier Microphone System, please do not hesitate to contact our customer support team. We aim to provide satisfactory solutions within 24 hours.
For support, please refer to the contact information provided on the product packaging or the official MIZISNR website.