
1. Introduction and Overview
The Targa TID-AUT700 is a motorized in-dash Android media entertainment system designed for vehicle integration. This unit features a 7-inch touchscreen display that retracts and extends, offering a versatile interface for various media and connectivity options. It is equipped with Bluetooth for hands-free communication, multiple media inputs, and a powerful audio output.
Key Features:
- Detachable Face for security
- Motorized 7-inch Touchscreen display
- 65W x 4 audio output
- AM/FM radio with RDS (Radio Data System)
- Bluetooth hands-free calling and audio streaming
- Auxiliary (Aux), USB, and SD Card Input for media playback
- Includes a remote control for convenient operation
- Supports CarPlay and Android Auto functionality
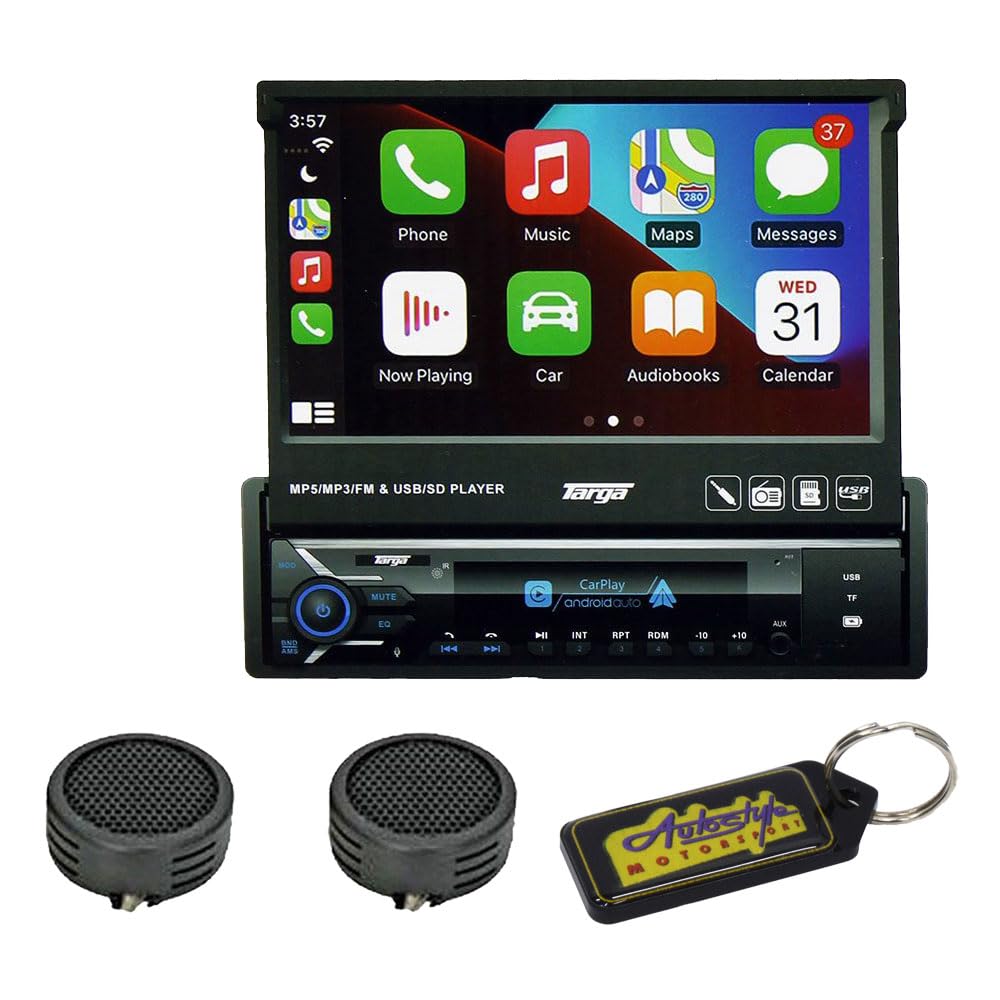
Figure 1: Targa TID-AUT700 unit with its 7-inch motorized touchscreen extended. The screen displays a user interface with icons for Phone, Music, Maps, Messages, Now Playing, Car, Audiobooks, and Calendar. Below the screen, the main unit features control buttons, a volume knob, and ports for USB and SD cards.
2. Setup and Installation
Proper installation is crucial for optimal performance and safety. It is highly recommended that a qualified professional install this unit. Incorrect wiring can cause damage to the unit or your vehicle.
2.1 Wiring Connections
- Power: Connect the yellow wire to a constant 12V power source, the red wire to an accessory 12V power source (switched with ignition), and the black wire to a chassis ground.
- Speakers: Connect speaker wires to the corresponding vehicle speaker wires. Ensure correct polarity (+/-) for each speaker. The unit supports 4-channel output.
- Antenna: Connect the vehicle's radio antenna to the unit's antenna input.
- Remote Control Wire: If applicable, connect the blue/white wire to the amplifier remote turn-on lead.
- Parking Brake Wire: For safety, connect the parking brake wire to the vehicle's parking brake circuit. Video playback may be restricted unless the parking brake is engaged.
2.2 Mounting the Unit
Install the unit into a standard single-DIN opening using the provided mounting sleeve and hardware. Secure the unit firmly to prevent movement during vehicle operation.
2.3 Detachable Face Installation
To attach the detachable face panel, align the panel with the main unit and gently push until it clicks into place. To remove, press the release button (if present) and pull the panel away from the unit. Store the detachable face in a protective case when not in use.
3. Operating Instructions
3.1 Power On/Off
- Power On: Press the PWR/MODE button or turn the ignition key to the ACC or ON position.
- Power Off: Press and hold the PWR/MODE button for a few seconds, or turn the ignition key to the OFF position.
3.2 Motorized Screen Operation
The 7-inch screen is motorized. Use the dedicated screen open/close buttons (often labeled with arrows or a screen icon) on the unit or remote control to extend or retract the display. Ensure no obstructions are in the screen's path.
3.3 Touchscreen Interface
Navigate the unit's functions by touching the icons and menus on the 7-inch display. Swipe gestures may be used for scrolling through lists or pages. The interface is designed to be intuitive, similar to a smartphone or tablet.
3.4 Radio (AM/FM with RDS)
- Select Radio Mode: Press the MODE button until 'Radio' or 'FM/AM' is displayed.
- Auto Scan: Press the SCAN button to automatically search and store strong stations.
- Manual Tuning: Use the TUNE +/- buttons to manually adjust the frequency.
- Presets: Touch and hold a preset number on the screen to save the current station.
3.5 Bluetooth Hands-Free
- Pairing: On your mobile device, search for Bluetooth devices and select 'TID-AUT700' (or similar name). Enter the default PIN (usually '0000') if prompted.
- Making Calls: Use the touchscreen dial pad or access your phone's contacts via the unit.
- Receiving Calls: Press the ANSWER button on the screen to accept an incoming call.
- Audio Streaming: Once paired, you can stream audio from your device to the unit.
3.6 Media Playback (USB/SD/Aux)
- USB/SD: Insert a USB drive into the USB port or an SD card into the SD card slot. The unit should automatically switch to the corresponding mode or allow selection from the source menu.
- Aux Input: Connect an external audio device (e.g., MP3 player) to the 3.5mm Aux-in jack using an audio cable. Select 'AUX' from the source menu.
- File Support: The unit supports MP3, MP5, and other common audio/video formats.
3.7 Sound Settings
Access the audio settings menu on the touchscreen to adjust equalizer (EQ) presets, bass, treble, balance, and fader settings to customize your listening experience.
3.8 CarPlay / Android Auto
Connect your compatible iPhone or Android smartphone via USB to enable CarPlay or Android Auto. This allows you to access navigation, music, messages, and other apps directly from the unit's touchscreen, providing a safer and more integrated driving experience.
4. Maintenance
4.1 Cleaning the Unit
- Use a soft, dry cloth to wipe the unit's surface.
- For the touchscreen, use a soft, lint-free cloth slightly dampened with a screen cleaner solution. Avoid harsh chemicals or abrasive materials.
- Ensure the unit is powered off before cleaning.
4.2 Detachable Face Care
When the face panel is detached, store it in its protective case to prevent scratches or damage. Avoid exposing it to direct sunlight or extreme temperatures.
5. Troubleshooting
If you encounter issues with your Targa TID-AUT700, refer to the following common problems and solutions:
| Problem | Possible Cause | Solution |
|---|---|---|
| No power to the unit. | Incorrect wiring; blown fuse; ignition off. | Check power connections (yellow, red, black wires). Inspect vehicle's fuse box and unit's fuse. Ensure ignition is on. |
| No sound from speakers. | Speaker wires disconnected; volume too low; mute function active. | Verify speaker wire connections. Increase volume. Check if the unit is muted. |
| Bluetooth pairing failure. | Device not in pairing mode; incorrect PIN; interference. | Ensure both devices are in pairing mode. Re-enter PIN '0000'. Move closer to the unit. Restart both devices. |
| Screen not extending/retracting. | Obstruction; motor malfunction; power issue. | Check for any physical obstructions. Ensure unit has stable power. If problem persists, contact support. |
| Touchscreen unresponsive. | Software glitch; screen damage. | Perform a soft reset (refer to unit's reset button, usually a small pinhole). If damage is visible, contact support. |
If these solutions do not resolve the issue, please contact customer support.
6. Specifications
- Model: TID-AUT700
- Display: 7-inch Motorized Touchscreen
- Face Panel: Detachable
- Audio Output: 65W x 4
- Radio Tuner: AM/FM with RDS
- Connectivity: Bluetooth Hands-free, Aux Input, USB Input, SD Card Input
- Compatibility: CarPlay, Android Auto
- UPC: 745853662875
7. Warranty Information
This Targa TID-AUT700 unit comes with a 6-month warranty from the date of purchase. This warranty covers manufacturing defects under normal use. It does not cover damage caused by improper installation, accident, misuse, abuse, neglect, unauthorized modification, or normal wear and tear. Please retain your proof of purchase for warranty claims.
8. Support
For further assistance, technical support, or warranty inquiries, please contact your retailer or the manufacturer's customer service department. Have your model number (TID-AUT700) and proof of purchase ready when contacting support.


