1. Introduction
Thank you for choosing the Camnoon Electronic Refrigerant Fluoride Meter. This digital manifold gauge is designed for accurate measurement and diagnosis of pressure and vacuum in air conditioning and refrigeration systems. It provides reliable data for maintenance and repair tasks. Please read this manual thoroughly before operation to ensure correct usage and optimal performance.

Figure 1.1: Camnoon Electronic Refrigerant Fluoride Meter (Set A)
2. Safety Information
Always observe the following safety precautions to prevent injury and damage to the device:
- Ensure all connections are secure before applying pressure.
- Wear appropriate personal protective equipment (PPE), including safety glasses and gloves, when handling refrigerants.
- Do not exceed the specified pressure overload limit of 10000 Kpa (10 Mpa, 100 bar).
- Avoid exposing the device to extreme temperatures, moisture, or corrosive environments.
- Do not attempt to disassemble or modify the meter. Refer all servicing to qualified personnel.
- Dispose of batteries and refrigerants according to local regulations.
3. Package Contents
Verify that all items are present in your package. The contents vary depending on the set purchased:
Set A:
- 1 x Camnoon Electronic Manifold Gauge
Set B:
- 1 x Camnoon Electronic Manifold Gauge
- 2 x Connectors
- 1 x Bottle Opener
- 1 x Hose Set
- 1 x Wrench
- 1 x Storage Box

Figure 3.1: Camnoon Electronic Refrigerant Fluoride Meter (Set B) with included accessories.
4. Product Features
The Camnoon Electronic Refrigerant Fluoride Meter incorporates advanced features for efficient and accurate system diagnostics:
- Metallic Interface: Constructed from durable metal material, ensuring wear resistance and corrosion resistance for long-term use.
- High Stability Chip: Equipped with a built-in 32-bit digital processing unit and high-accuracy data acquisition unit for stable and precise pressure measurements.
- Dual Pressure Testing: Provides real-time vacuum degree and pressure values, offering a reliable basis for evaluating the operational status of refrigeration systems.
- Integrated Refrigerant Database: Includes data for 92 types of NIST refrigerants, allowing users to switch between common refrigerants as needed for various maintenance scenarios. Features intelligent diagnostic capabilities for system malfunctions.
- Leakage Detection: Capable of recording leakage time and speed, simplifying operation and providing direct readings of process data.
- Foldable Hook: Designed with a convenient foldable hook for easy carrying and storage.
- 1/4" Flared Fittings: Features compact ball valve ends with leak-resistant back fittings to ensure dependable connections.
- Built-in Brass Valves: Spherical structure and strong sealing performance for reliable operation.
- Temperature Display: Displays evaporation and condensation temperatures, aiding in determining the degree of subcooling and superheat for optimal refrigeration capacity and expansion valve settings.

Figure 4.1: Durable metallic interfaces for secure connections.

Figure 4.2: High stability chip for precise measurements.
5. Specifications
| Parameter | Value |
|---|---|
| Pressure Test Unit | Kpa, Mpa, bar, inHg, PSI |
| Pressure Test Range | 0-6000 Kpa |
| Pressure Test Resolution | 1Kpa |
| Pressure Test Accuracy | ±0.5%(FS)+5dgt |
| Pressure Overload Limit | 10000 Kpa (10 Mpa, 100 bar) |
| Vacuum Degree Test Unit | Kpa, Mpa, bar, inHg, PSI |
| Vacuum Degree Test Range | -101 to 0Kpa |
| Vacuum Degree Test Resolution | 1Kpa |
| Battery | 3 * AA batteries (not included) |
| Item Size | 165 x 110 x 60 mm (6.5 x 4.3 x 2.4 inches) |
| Material | Metal |
| Built-in Refrigerants | 92 types (NIST) |
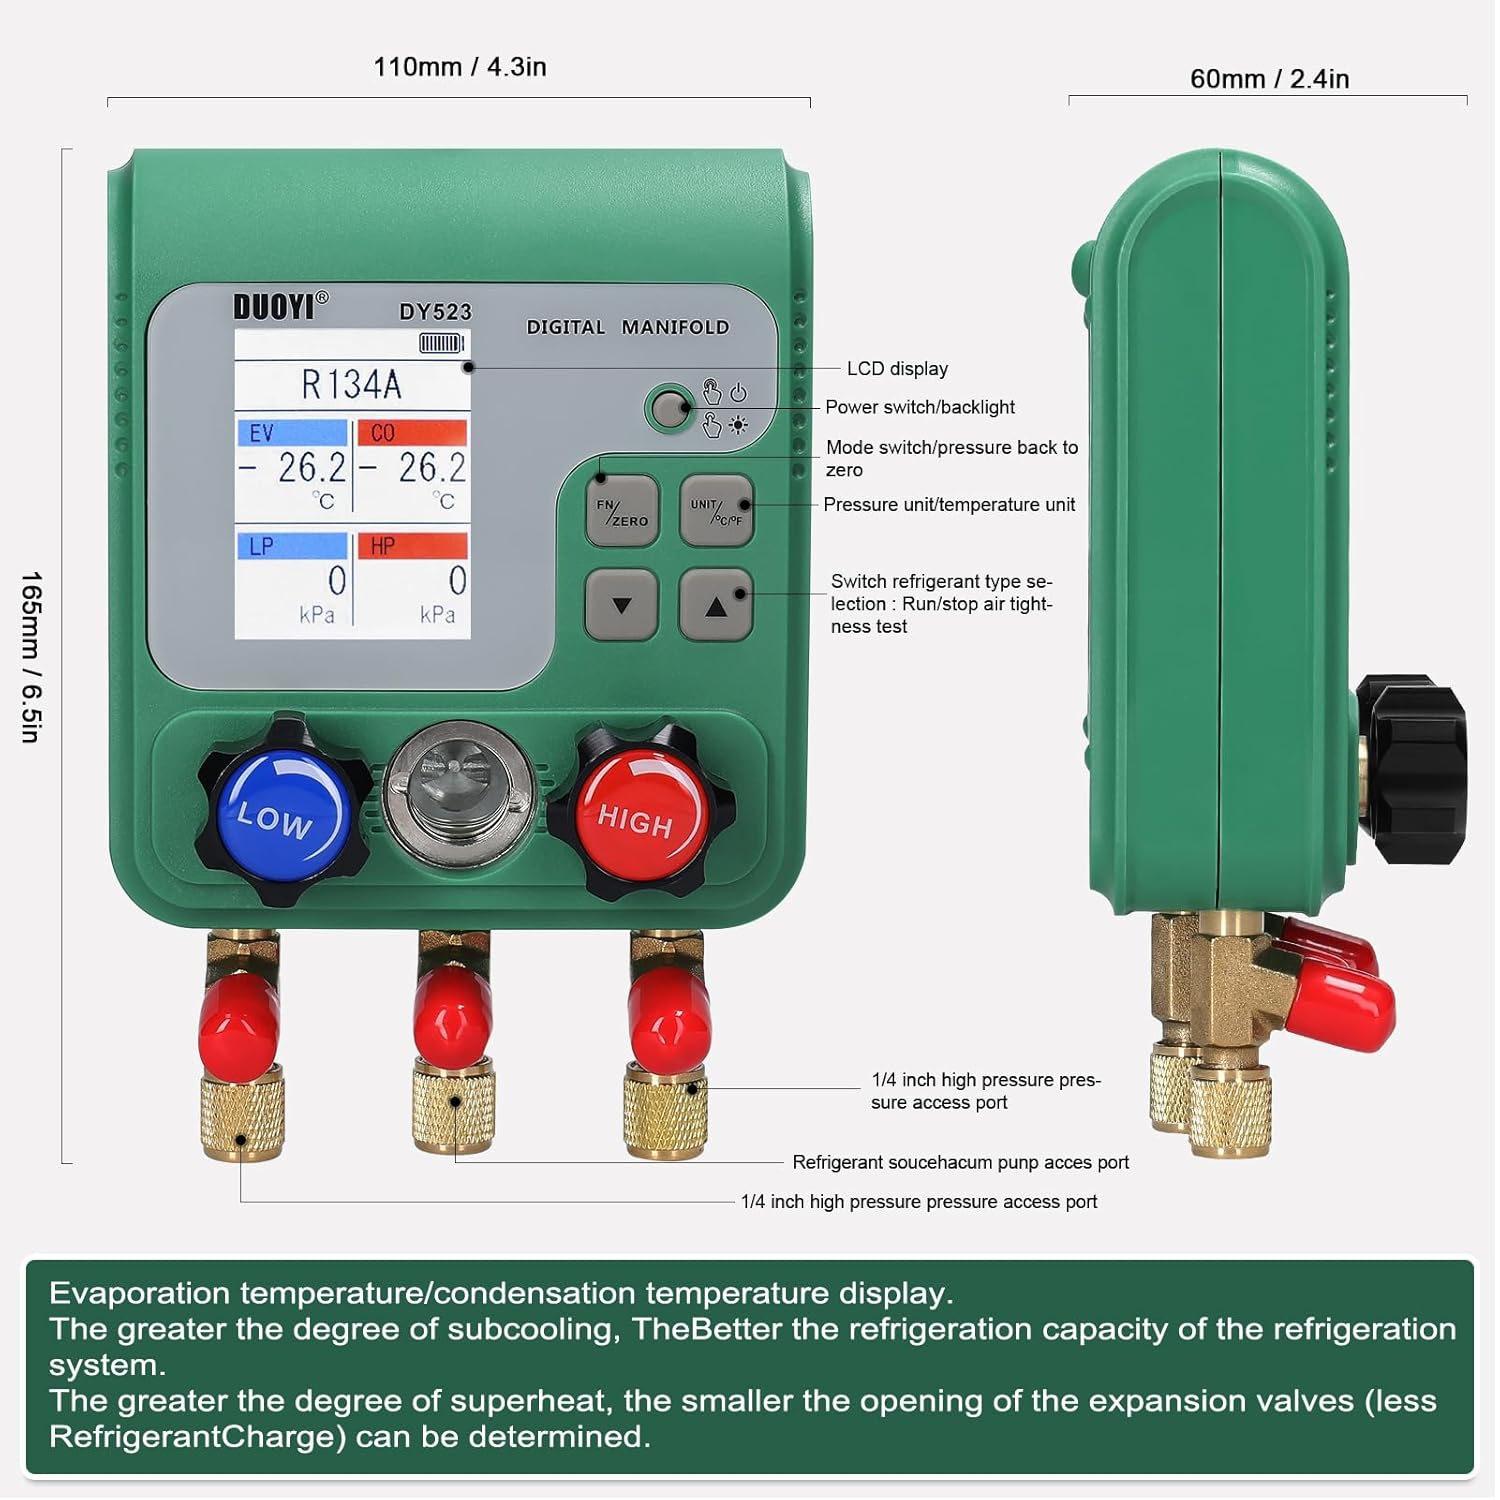
Figure 5.1: Device dimensions and component overview.
6. Setup
Follow these steps for initial setup of your Camnoon Electronic Refrigerant Fluoride Meter:
- Battery Installation: Open the battery compartment on the back of the unit. Insert 3 AA batteries, ensuring correct polarity. Close the compartment securely.
- Hose Connection: Connect the appropriate refrigerant hoses (if included in your set) to the LOW, HIGH, and SERVICE ports on the manifold gauge. Ensure all connections are tight to prevent leaks.
- System Connection: Connect the hoses to the refrigeration or air conditioning system's low-pressure, high-pressure, and service ports as required for your specific task (e.g., charging, evacuation, pressure testing).
7. Operating Instructions
This section outlines general operating procedures. Refer to specific HVAC/R service guidelines for detailed application steps.
- Power On: Press the power button to turn on the device. The LCD display will illuminate.
- Refrigerant Selection: Use the 'FN' button to cycle through the built-in refrigerant types until the desired refrigerant (e.g., R134A) is displayed.
- Unit Selection: Press the 'UNIT' button to select the preferred pressure and temperature units (e.g., Kpa, PSI, °C, °F).
- Zeroing: Before taking measurements, ensure the system is isolated and press the 'ZERO' button to calibrate the pressure sensors to zero.
- Pressure Measurement: Open the appropriate valves on the manifold to measure the high-side (HP) and low-side (LP) pressures of the system. The values will be displayed in real-time.
- Vacuum Measurement: For evacuation, connect the vacuum pump to the service port. The meter will display the vacuum degree in real-time.
- Temperature Display: The device will calculate and display evaporation and condensation temperatures based on the selected refrigerant and measured pressures.
- Leakage Test: The meter can record leakage time and speed. Consult the on-screen prompts or a more detailed guide for specific leakage test procedures.
- Power Off: Press and hold the power button to turn off the device after use.
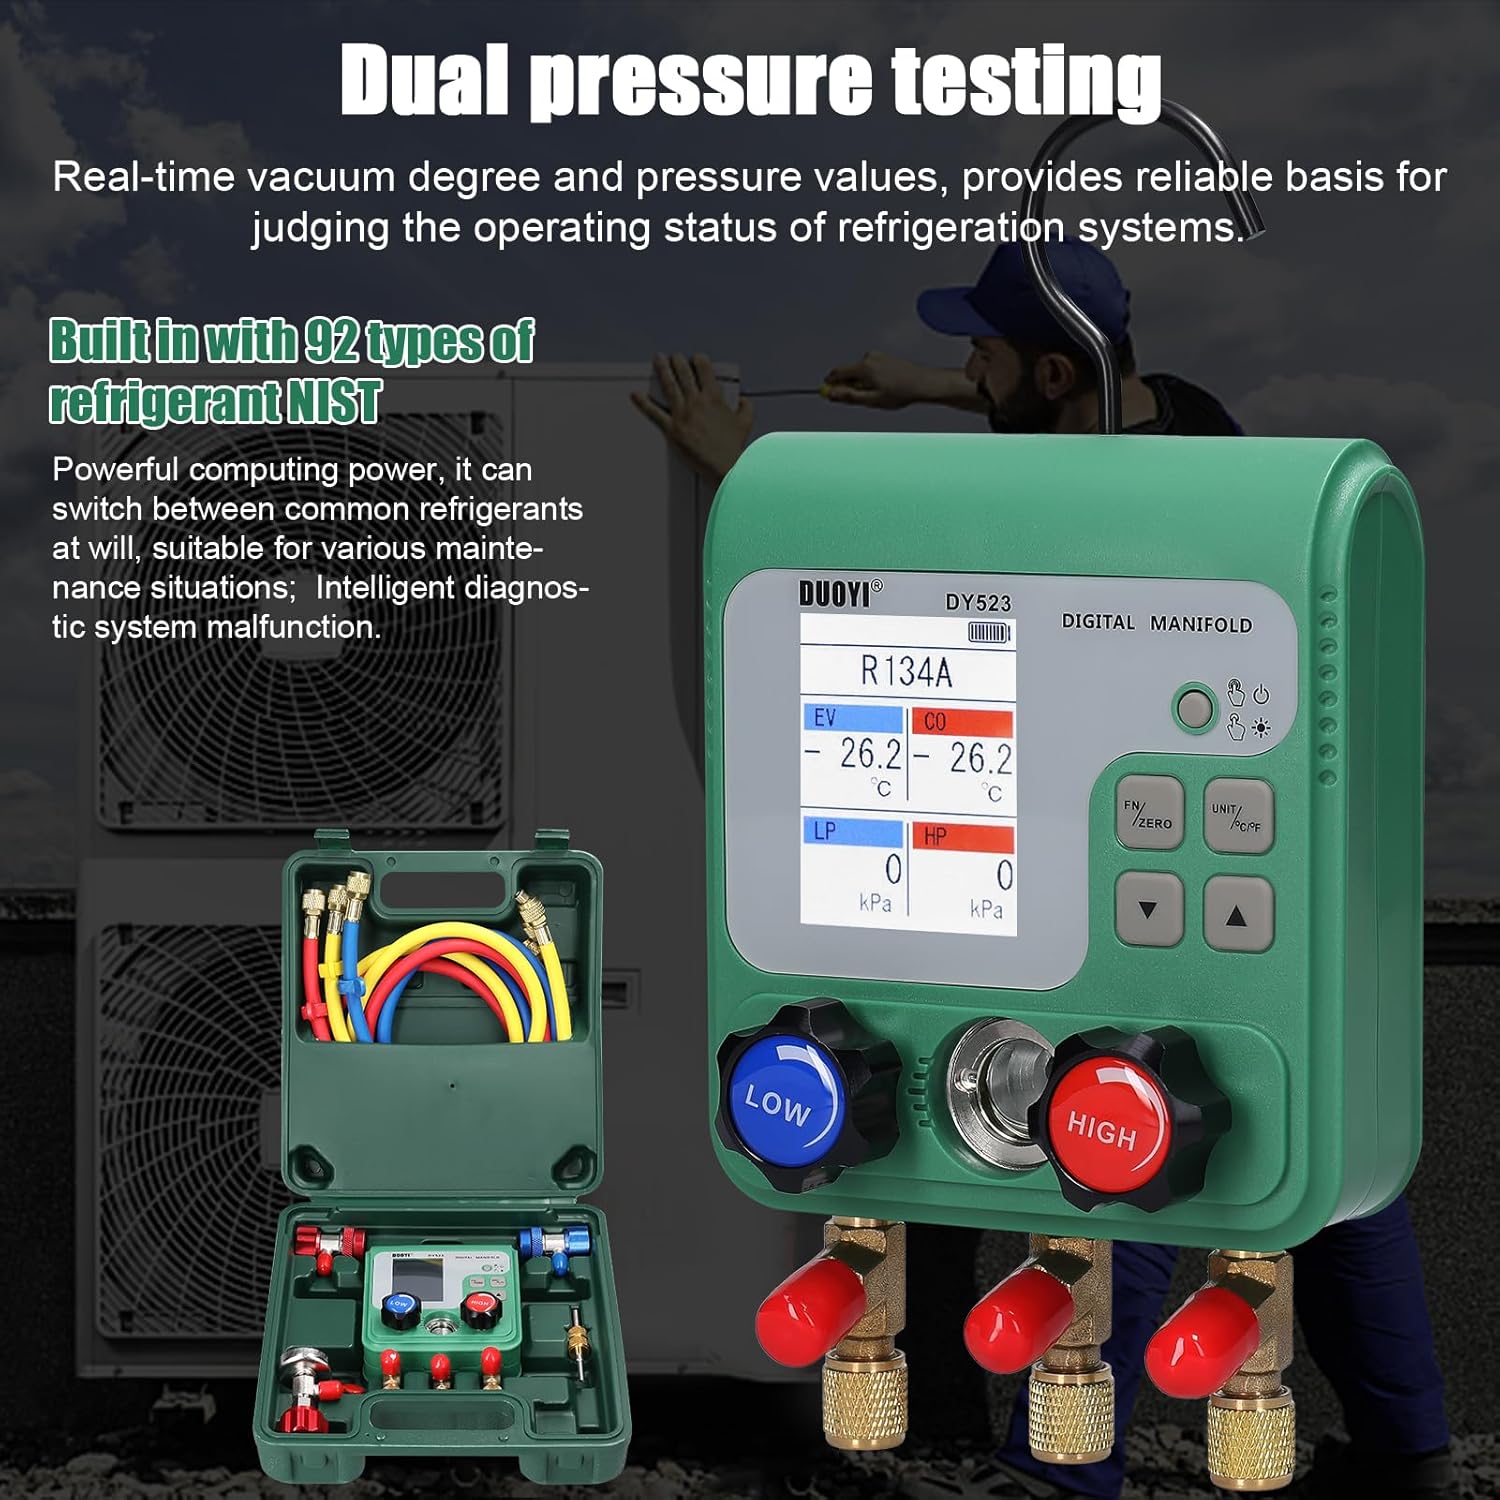
Figure 7.1: Dual pressure testing in progress.
8. Maintenance
Proper maintenance ensures the longevity and accuracy of your meter:
- Cleaning: Wipe the device with a soft, dry cloth. Do not use abrasive cleaners or solvents.
- Storage: Store the meter and its accessories in the provided storage box (if applicable) in a cool, dry place away from direct sunlight and extreme temperatures.
- Battery Replacement: Replace batteries when the low battery indicator appears on the display to ensure continuous operation and prevent data loss.
- Hose Inspection: Regularly inspect refrigerant hoses for cracks, wear, or damage. Replace damaged hoses immediately to prevent refrigerant leaks.
- Calibration: While the device features high accuracy, periodic professional calibration may be recommended for critical applications.
9. Troubleshooting
If you encounter issues with your Camnoon Electronic Refrigerant Fluoride Meter, refer to the following common problems and solutions:
| Problem | Possible Cause | Solution |
|---|---|---|
| Device does not power on | Dead or incorrectly installed batteries | Check battery polarity; replace with new AA batteries. |
| Inaccurate pressure readings | Uncalibrated sensor, leaky connections, incorrect refrigerant selected | Perform zero calibration; check all hose connections for leaks; verify correct refrigerant type. |
| Display shows 'Err' or abnormal values | Sensor malfunction, system overload | Power off and restart the device. Ensure pressure is within operating limits. If problem persists, contact support. |
| Cannot switch refrigerant types | Button malfunction, software issue | Ensure the 'FN' button is pressed firmly. Restart the device. |
If the problem persists after attempting these solutions, please contact customer support.
10. Warranty and Support
Camnoon products are manufactured to high-quality standards. For warranty information, please refer to the documentation provided at the time of purchase or contact your retailer. For technical support or service inquiries, please reach out to Camnoon customer service through the official channels or your point of purchase.