mangoal MG-010U
User Manual: Front 4K & Rear 1080p Dash Cam for Audi Q4 e-tron
Brand: Mangoal | Model: MG-010U
Introduction
This manual provides comprehensive instructions for the installation, operation, and maintenance of your Mangoal Front 4K & Rear 1080p Dash Cam, specifically designed for Audi Q4 e-tron models 2022, 2023, and 2024. This OEM-look dash cam offers UHD 2160P video recording, Wi-Fi connectivity with app control, and comes with a 128GB card for immediate use. Please read this manual thoroughly before installation and use to ensure proper functionality and safety.

Figure 1: Mangoal Front 4K & Rear 1080p Dash Cam for Audi Q4 e-tron.
What's Included
Verify that all items listed below are present in your package:
- Mangoal OEM Look 4K Dashcam x1
- 128G MircoSD Card x1
- User Manual x1 (This document)
- Rain Fall Sensor Adapter x1
- Rear Cam x1
- Rear Cam Cable x1
- Crowbar x1
- Strap x2


Figure 2: All included components.
Installation Guide
Follow these steps for proper installation of your dash cam. It is recommended to watch the provided installation videos for a visual guide.
Front Dash Cam Installation
Step 1: Pry off the Rain-Fall Sensor Cover
Using the provided crowbar tool, carefully pry off the rain-fall sensor cover located behind your rearview mirror. This will expose the wiring area.

Figure 3: Carefully prying off the sensor cover.
Step 2: Remove the Original Car Sensing Cable
Locate the original car sensing cable connected to the rain-fall sensor. Gently disconnect this cable.
Figure 4: Disconnecting the original cable.
Step 3: Plug in the Auto-Dimming Power Adapter
Connect the Auto-Dimming Power Adapter from the dash cam to the now-disconnected car sensing cable. Ensure a secure connection.
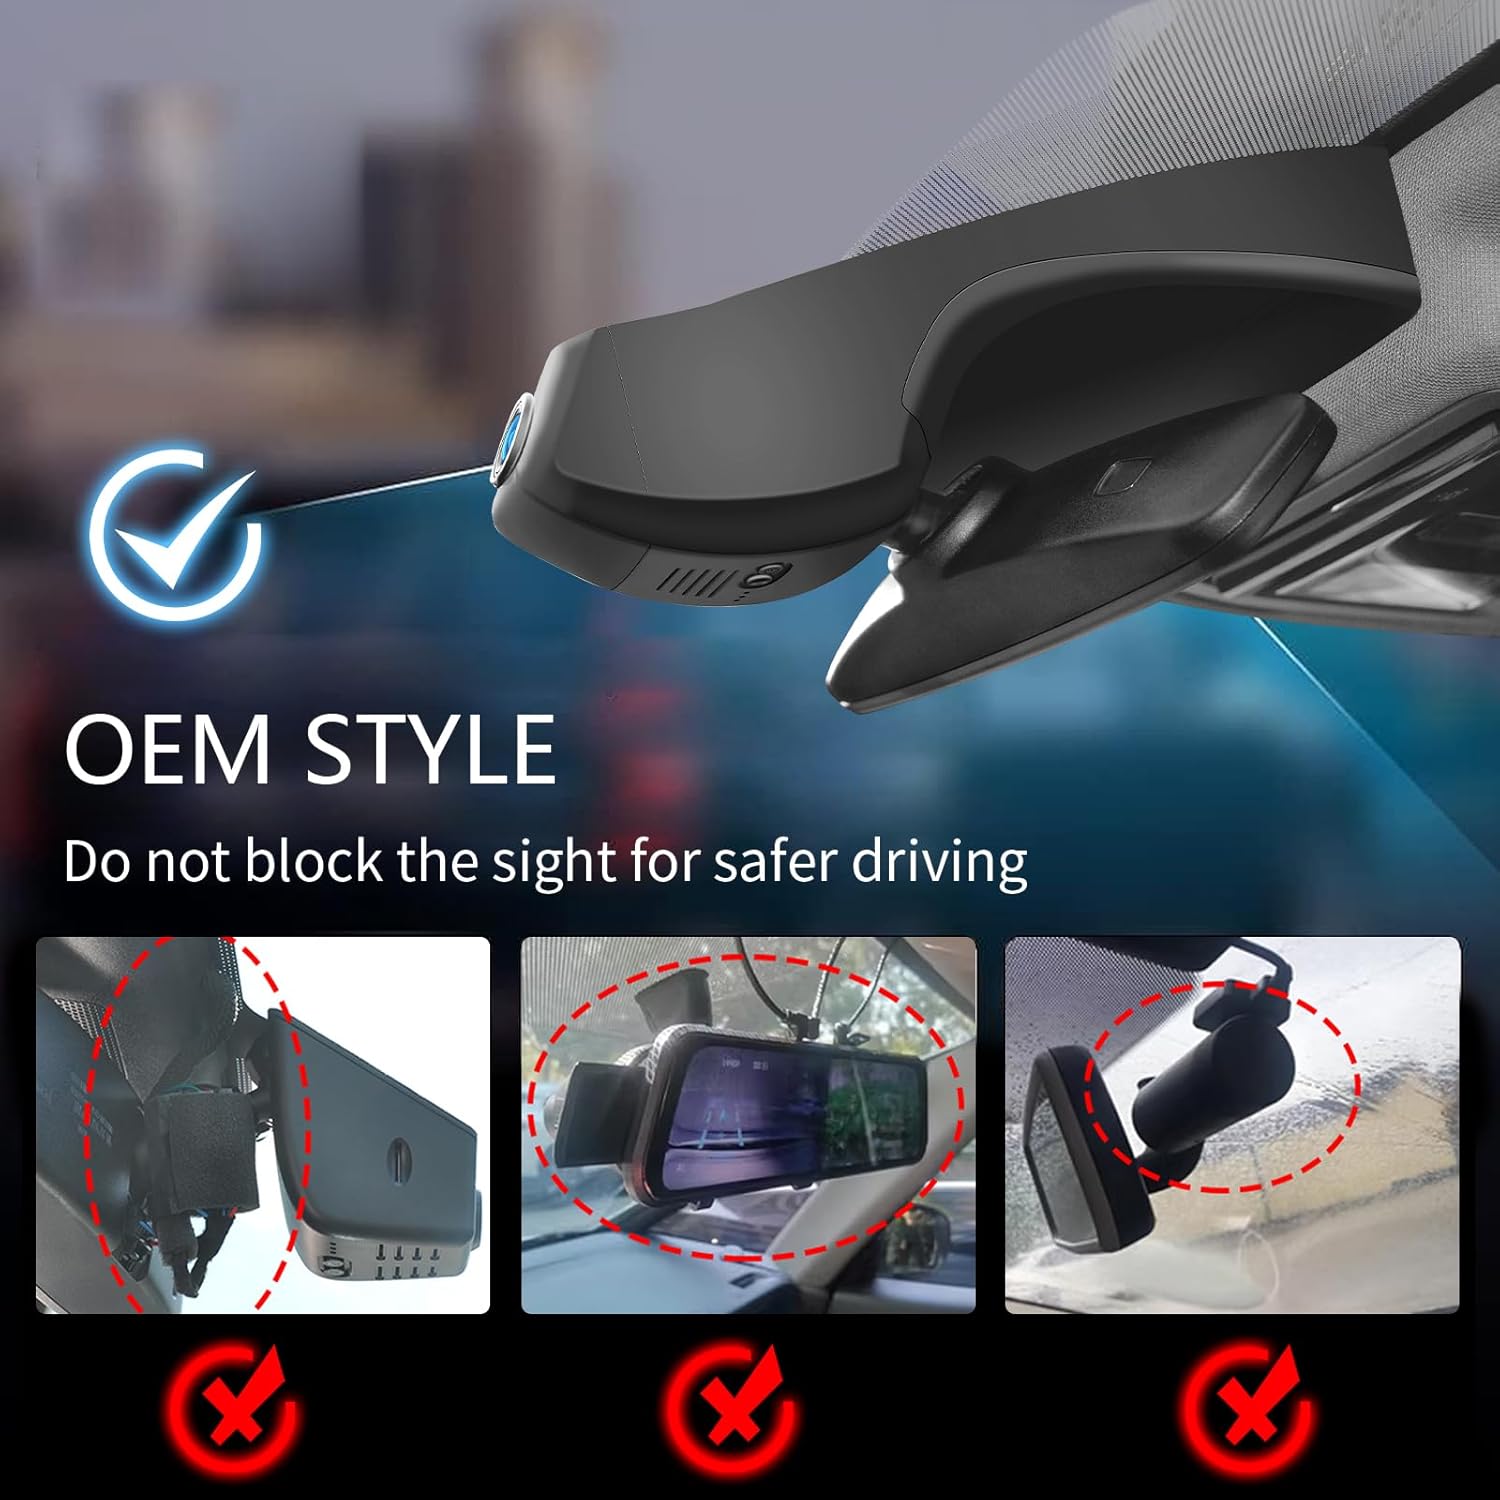
Figure 5: Connecting the power adapter.
Step 4: Hide the Wiring Harness
Carefully tuck the wiring harness into the available space behind the sensor unit. Ensure no wires are pinched or exposed.

Figure 6: Hiding the wiring.
Step 5: Close the Dash Cam
Align the dash cam unit with the sensor housing and gently push it into place until it clicks securely. Ensure it is flush with the car's interior.

Figure 7: Dash cam installed, showing OEM style integration.
Step 6: Recover the Cover
Reattach the rain-fall sensor cover, ensuring it is properly seated and secured.
Rear Dash Cam Installation
Step 1: Route the Rear Cam Cable
Connect the rear cam cable to the main dash cam unit. Use the car wire trim tool to carefully tuck the cable along the headliner and down the side pillars to the rear of the vehicle. Ensure the cable is hidden and does not interfere with airbags or other vehicle functions.
Video 1: Installation Video of Audi Q4 Dash Cam. This video demonstrates the process of routing the dash cam cable from the front to the rear of the vehicle, ensuring a clean and hidden installation.
Step 2: Mount the Rear Cam
Mount the rear cam on the rear glass indoors, typically at the top center, ensuring a clear view. Use the adhesive provided. Before final mounting, connect the rear cam to the dash cam and open the "SkyCamm" APP to connect to the dash camera. Enter the camera preview interface to adjust the angle of the rear cam for optimal recording.
Video 2: Installation Video of Audi Q4 Rear Dash Cam. This video guides you through connecting and positioning the rear dash cam, including using the mobile app for angle adjustment.
Operating Instructions
Power On/Off
The dash cam is designed to power on automatically when your vehicle starts and power off when the vehicle is turned off. No manual intervention is typically required for basic operation.
Video Recording
The dash cam automatically begins recording upon power-on. It records in a continuous loop, overwriting the oldest footage when the memory card is full. The front camera records in 4K UHD (2160P/30fps) and the rear camera in 1080P.
Figure 8: Example of 4K Front and 1080P Rear video capture.
Wi-Fi and App Control
The dash cam features built-in Wi-Fi for seamless connection to your smartphone via the dedicated "SkyCamm" app. This app allows you to:
- View real-time video feeds from both cameras.
- Download recorded videos and photos directly to your phone.
- Adjust camera settings.
- Share footage to social media.

Figure 9: Easy access with the mobile app.
G-Sensor (Automatic Incident Detection)
The integrated G-Sensor detects sudden impacts or collisions. When an event is detected, the dash cam automatically locks the current video footage to a specified folder, preventing it from being overwritten by loop recording. This ensures critical evidence is preserved.

Figure 10: G-Sensor functionality.
Parking Monitor
With an optional OBD Power Adapter or Fuse Box Power Adapter (sold separately), the dash cam can provide 24-hour parking protection. It automatically switches to parking mode and records incidents when motion or impact is detected while the vehicle is parked.
Note: Parking monitor requires an external power source (e.g., OBD Power Adapter ASIN: B0CVTKTCVY or Fuse Box Power Adapter ASIN: B0CXXXV4YG).

Figure 11: Parking Monitor feature.
Maintenance
Memory Card Management
The dash cam supports seamless loop recording. While the included 128GB MicroSD card provides ample storage, it is recommended to periodically format the card (e.g., once a month) using the dash cam's app settings to maintain optimal performance and prevent data corruption. Back up any important footage before formatting.

Figure 12: Loop Recording explanation.
Cleaning
To ensure clear video quality, regularly clean the dash cam lenses with a soft, lint-free cloth. Avoid using abrasive cleaners or solvents that could damage the lens coating.
Troubleshooting
| Problem | Possible Cause | Solution |
|---|---|---|
| Dash cam does not power on. | Incorrect power connection; vehicle power issue. | Verify all power connections are secure. Ensure the vehicle's ignition is on. |
| Video footage is blurry or unclear. | Dirty lens; protective film still on lens; improper focus. | Clean the lens with a soft cloth. Remove any protective film. Adjust the lens angle if necessary. |
| Wi-Fi connection issues. | Incorrect Wi-Fi password; too far from dash cam; app issue. | Ensure correct Wi-Fi password. Stay within close proximity to the dash cam. Restart the app or your phone. |
| Memory card full/recording stopped. | Loop recording not enabled; too many locked files; faulty card. | Format the MicroSD card via the app. Check app settings to ensure loop recording is enabled. Delete unnecessary locked files. Replace the card if issues persist. |
Specifications
- Model: MG-010U
- Product Dimensions: 8.6 x 3.8 x 2.14 inches
- Item Weight: 1.95 pounds
- Video Capture Resolution: Front 4K (2160P), Rear 1080P
- Connectivity: Wi-Fi
- Special Features: Built-In Microphone, Built-In Speaker, Built-In Supercapacitor, OEM Style, Motion Sensing, Mute Function, Night Vision, Loop Recording, G-Sensor, Automatic Incident Detection, Parking Monitor, App Control
- Vehicle Service Type: Audi Q4 e-tron 2022 2023 2024
- Mounting Type: Windshield Mount
- Color: Black
- Batteries: 1 Lithium Metal battery required (included)
Warranty and Support
Your Mangoal Dash Cam comes with a worry-free 12-month warranty. For any questions, technical support, or warranty claims, please contact Mangoal customer service. Refer to the contact information provided on the product packaging or the official Mangoal website.
Customer Service: [Insert Manufacturer Contact Information Here, if available]
Ask a question about this manual
Ask about setup, troubleshooting, compatibility, parts, safety, or missing instructions. Manuals+ will review the question and use this page’s manual context to help answer it.