1. Introduction
The Leo Jaymz IR BOX is a compact and versatile effects pedal designed for guitar and bass players. It functions as an amplifier simulator and IR (Impulse Response) loader, offering 32 built-in presets and advanced sound shaping capabilities. This manual provides detailed instructions for setup, operation, and maintenance of your IR BOX.
2. Product Features
- 32 built-in presets: 25 electric guitar and 7 bass cab simulations.
- High-quality sound: 103dB SNR, 44.1kHz/24-bit sampling rate.
- Customizable with third-party IR files via PC software or mobile application.
- Professional 9-band EQ (20Hz-18kHz, ±12dB range) for fine-tuning.
- Low latency (<1.5ms) for responsive playing experience.
- USB connectivity for easy preset management and updates.
- Versatile: Suitable for electric guitar, bass, and acoustic simulations.
3. Panel Function Diagram
This diagram illustrates the various inputs, outputs, and controls on the IR BOX.

Image 3.1: Front and side view of the IR BOX with labels for each component. Key components include the Output Interface, Low Cut Knob, Vol Knob, Hi Cut Knob, Power Interface, USB Interface, Headphone Port, Balance Output Interface (XLR), Display Screen, Left Button, Right Button, and Input Interface.
Component Descriptions:
- Output Interface (1/4" Jack): Connects to an amplifier, mixer, or audio interface.
- Low Cut Knob: Adjusts the frequency point of the global low frequency cut.
- Vol Knob: Adjusts the total output volume of the IR BOX.
- Hi Cut Knob: Adjusts the frequency point of the global high frequency cut.
- Power Interface: Connects to a 9V DC, 1A power adapter.
- USB Interface: Connects to a computer for software control, IR loading, and firmware updates.
- Headphone Port: For direct monitoring with headphones.
- Balance Output Interface (XLR): Provides a balanced output for direct connection to a PA system or recording console.
- Display Screen: Shows the current preset number (01-32) or 'byp' for bypass mode.
- Left Button (-): Decreases the preset number.
- Right Button (+): Increases the preset number.
- Input Interface (1/4" Jack): Connects your instrument (guitar or bass).
4. Flexible Controls
The IR BOX features intuitive controls for quick sound adjustments.

Image 4.1: Detailed view of the control knobs and buttons on the IR BOX.
- Low Cut Knob: Rotate to adjust the low-frequency cutoff point. This helps to remove unwanted muddiness from your tone.
- Hi Cut Knob: Rotate to adjust the high-frequency cutoff point. This can smooth out harsh high frequencies.
- Vol Knob: Controls the overall output volume of the pedal.
- Left Button (-): Press to navigate to the previous preset.
- Right Button (+): Press to navigate to the next preset.
- Bypass Mode: Press both the Left Button (-) and Right Button (+) simultaneously to toggle bypass mode. The display will show 'byp' when in bypass.
5. Setup
Follow these steps to set up your Leo Jaymz IR BOX:
- Power Connection: Connect a 9V DC, 1A power adapter (center negative) to the Power Interface on the side of the unit. Ensure the power source is stable.
- Instrument Connection: Connect your guitar or bass to the Input Interface (IN) using a standard 1/4" instrument cable.
- Output Connection:
- For unbalanced output, connect the Output Interface (OUT) to your amplifier, effects loop return, or audio interface using a 1/4" instrument cable.
- For balanced output, connect the Balance Output Interface (XLR) to a PA system, mixing console, or recording interface using an XLR cable.
- Headphone Connection: For silent practice or monitoring, connect headphones to the Headphone Port.
- USB Connection (Optional): Connect the USB Interface to your computer using a USB cable to access the dedicated software for advanced customization and IR loading.
6. Operating Instructions
Once connected, operate your IR BOX as follows:
- Power On: Ensure all connections are secure, then connect the power adapter to a wall outlet. The display screen will light up, showing the current preset number.
- Selecting Presets: Use the Left Button (-) to decrease the preset number and the Right Button (+) to increase it. The display will show the active preset (01-32).
- Adjusting Volume: Use the Vol Knob to set the overall output volume to a desired level.
- Tone Shaping: Utilize the Low Cut Knob and Hi Cut Knob to fine-tune the frequency response of your tone.
- Bypass Mode: To temporarily disable the IR BOX effects, press both the Left Button (-) and Right Button (+) simultaneously. The display will show 'byp'. Press them again to re-engage the effects.
7. Connectivity and Versatility
The IR BOX offers multiple connectivity options for various setups.
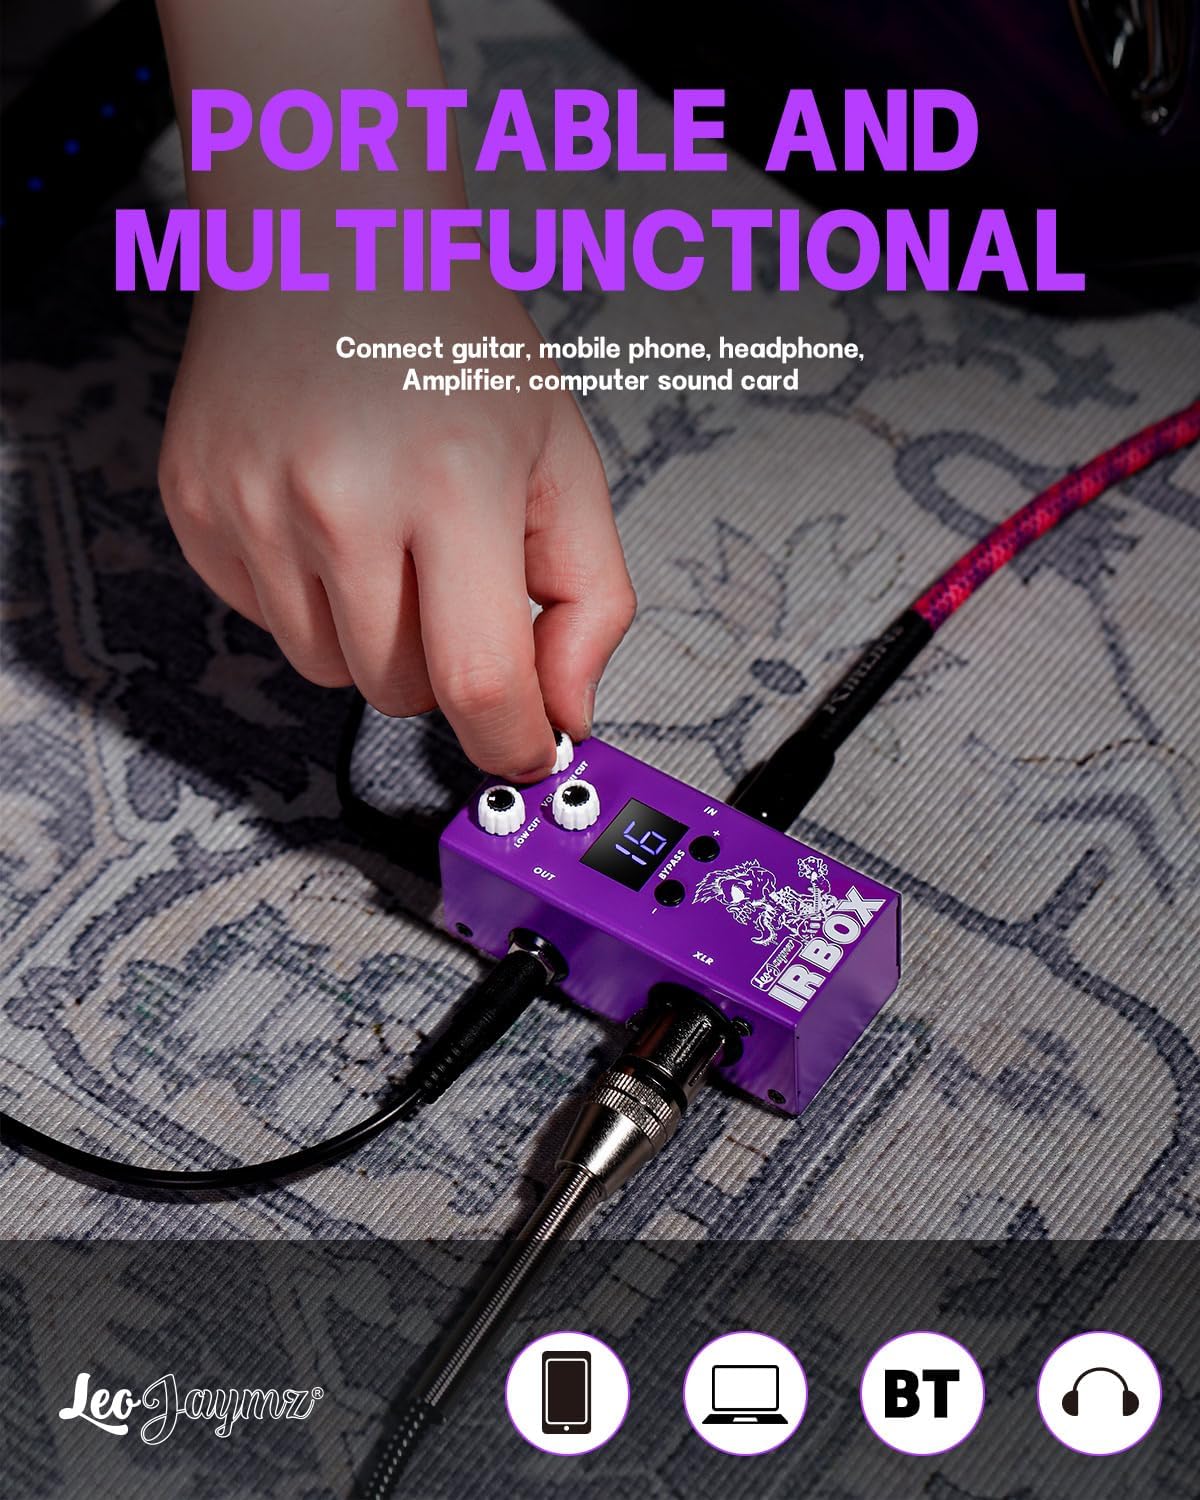
Image 7.1: The IR BOX demonstrating connections to a guitar, mobile phone, and headphones, highlighting its portable and multifunctional use.
- Direct to Amplifier: Connect the OUT jack to your amplifier's input or effects loop return.
- Direct to PA/Mixer: Use the XLR balanced output for a clean signal directly to a sound system.
- Recording Interface: Connect via 1/4" OUT or XLR to your audio interface for studio recording.
- Headphone Practice: Use the dedicated headphone output for silent practice sessions.
- USB Audio: The USB port can function as an audio interface, allowing direct recording to a computer.
- Mobile Device Integration: Connect to a mobile phone for app control and potentially audio routing (check app compatibility).
8. Software and Customization
The Leo Jaymz IR BOX can be further customized using dedicated software.
- PC Software: Connect the IR BOX to your computer via the USB port. Download and install the official Leo Jaymz software (available from the manufacturer's website). This software allows you to:
- Load third-party IR files.
- Adjust the 9-band EQ settings.
- Manage and organize presets.
- Perform firmware updates.
- Mobile Application: A mobile application may also be available for certain functions. Scan the QR code provided with your product or refer to the manufacturer's website for download instructions and compatibility.
9. Maintenance
Proper care will ensure the longevity of your IR BOX.
- Cleaning: Use a soft, dry cloth to clean the exterior of the unit. Do not use abrasive cleaners, solvents, or waxes.
- Storage: Store the pedal in a cool, dry place away from direct sunlight and extreme temperatures.
- Handling: Avoid dropping the unit or subjecting it to strong impacts.
- Power: Always use the specified 9V DC, 1A power adapter. Disconnect power when not in use for extended periods.
10. Troubleshooting
If you encounter issues with your IR BOX, refer to the following common problems and solutions:
- No Sound:
- Check all cable connections (instrument, output, power).
- Ensure the power adapter is correctly connected and supplying power.
- Verify the volume knob on the IR BOX and your amplifier/mixer is turned up.
- Confirm the IR BOX is not in bypass mode (display should show a preset number, not 'byp').
- Distorted or Unwanted Noise:
- Check for faulty cables.
- Ensure the input signal is not too hot, causing clipping.
- Adjust the Low Cut and Hi Cut knobs to remove unwanted frequencies.
- Try a different power outlet or power supply to rule out interference.
- Cannot Connect to Software:
- Ensure the USB cable is securely connected to both the IR BOX and your computer.
- Verify that the correct drivers (if required) and software are installed.
- Try a different USB port on your computer.
- Presets Not Changing:
- Ensure you are pressing the Left (-) or Right (+) buttons firmly.
- If stuck in bypass, press both buttons simultaneously to exit.
If the issue persists, please contact customer support.
11. Specifications
| Model Number | SK14 |
| Item Weight | 7.4 ounces (210 grams) |
| Package Dimensions | 4.13 x 2.76 x 2.01 inches (10.5 x 7 x 5.1 cm) |
| Material Type | Electronic |
| Power Source | Corded Electric |
| Voltage | 9 Volts DC |
| Amperage | 1 Amp |
| Connector Type | USB |
| Hardware Interface | USB |
| Signal Format | Analog |
| Audio Output Effects | Multi-Effect (IR Cab Simulation, EQ) |
| Sampling Rate | 44.1kHz/24-bit |
| Signal-to-Noise Ratio (SNR) | 103dB |
| Latency | <1.5ms |
12. Warranty Information
Leo Jaymz products are manufactured to high quality standards. This product is covered by a limited warranty against defects in materials and workmanship for a period specified by your retailer or local distributor from the original date of purchase. Please retain your proof of purchase for warranty claims. The warranty does not cover damage caused by misuse, unauthorized modification, accident, or neglect.
13. Support
For technical assistance, product inquiries, or warranty service, please contact Leo Jaymz customer support through the retailer where you purchased the product or visit the official Leo Jaymz website for contact information. Please have your product model number (SK14) and proof of purchase ready when contacting support.