MSI PROMT81D
MSI PRO MT81D Dual Monitor Stand Arms User Manual
Model: PROMT81D
1. Introduction
Thank you for choosing the MSI PRO MT81D Dual Monitor Stand Arms. This product is designed to enhance your workspace by providing a sturdy, adjustable, and ergonomic solution for mounting two monitors. Please read this manual carefully before installation and use to ensure proper setup and safe operation.

Figure 1.1: MSI PRO MT81D Dual Monitor Stand Arms with two monitors.
2. Safety Information
- Ensure all components are present and undamaged before assembly.
- Do not exceed the maximum weight capacity of 17.6 lbs (8 kg) per screen.
- Ensure your desk surface is stable and strong enough to support the combined weight of the stand and monitors.
- Keep small parts away from children.
- Use only the provided tools and hardware for installation.
- Adjustments should be made slowly and carefully to prevent injury or damage to equipment.
3. Package Contents
Verify that all parts listed below are included in your package:

Figure 3.1: All components included in the box.
| Item | Description | Quantity |
|---|---|---|
| Monitor Arms | Dual articulating arms | 2 |
| Desk Clamp Base | For clamping to desk edge | 1 |
| Grommet Mount Base | For mounting through a desk hole | 1 |
| VESA Plates | Quick release VESA mounting plates | 2 |
| Pole | Central support pole | 1 |
| Hardware Kit | Screws, washers, Allen keys | 1 set |
4. Setup and Installation
4.1 Choose Your Mounting Option
The MSI PRO MT81D offers two installation methods: Desk Clamp or Grommet Mount.
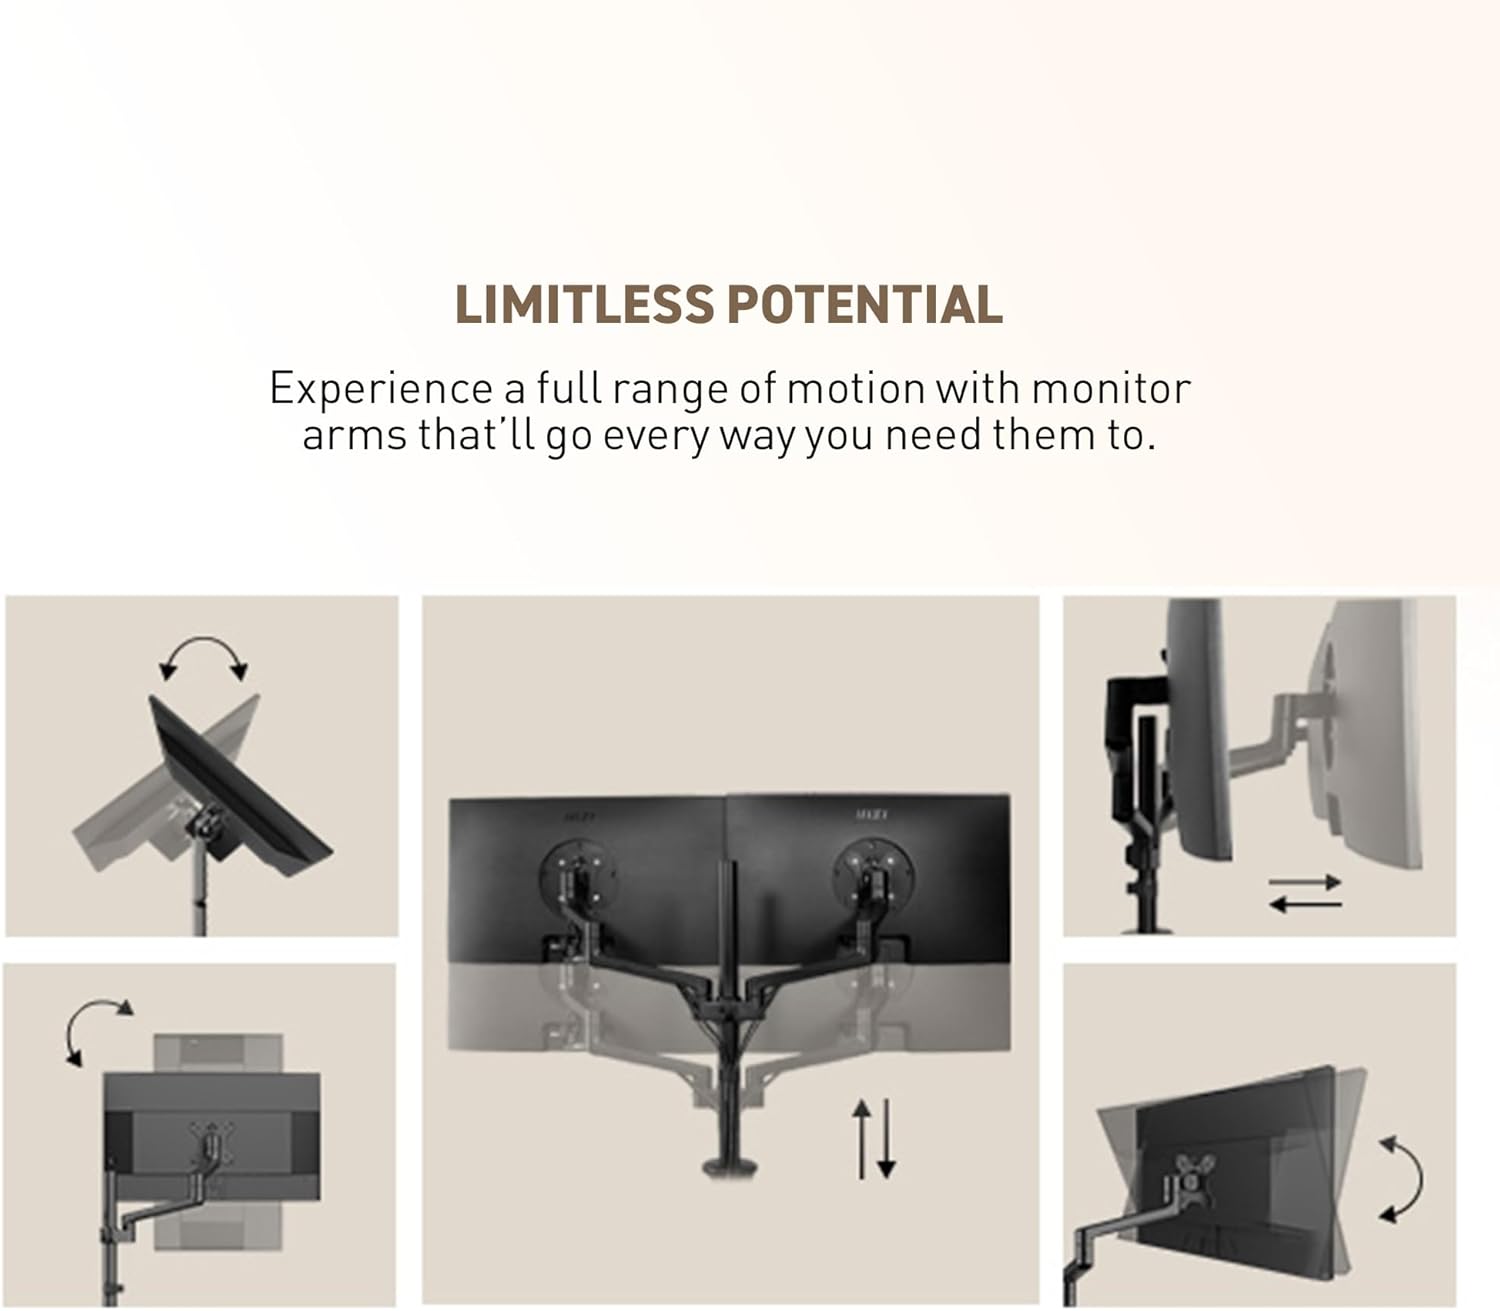
Figure 4.1: Desk Clamp (left) and Grommet Mount (right) options.
4.1.1 Desk Clamp Installation
- Attach the desk clamp base to the bottom of the central pole using the provided screws.
- Place the assembled base onto the edge of your desk.
- Tighten the clamp screw until the base is securely fastened to the desk. Ensure the desk thickness is between 10-85 mm.
4.1.2 Grommet Mount Installation
- If your desk has a grommet hole, remove the existing grommet cover.
- Assemble the grommet mount base components as per the diagram in your quick start guide.
- Insert the central pole through the grommet hole.
- Secure the base from underneath the desk using the provided plate and tightening knob. Ensure the desk thickness is between 10-35 mm.
4.2 Attaching Monitor Arms and Monitors
- Slide the monitor arms onto the central pole at your desired height. Tighten the locking screws to secure them.
- Attach the VESA quick release plates to the back of your monitors using the appropriate screws (M4 or M5, depending on your monitor). Ensure VESA compatibility (75x75mm or 100x100mm).
- Slide the monitors (with VESA plates attached) onto the monitor arms until they click securely into place.

Figure 4.2: VESA Quick Release Plate.
4.3 Cable Management
Route your monitor cables through the integrated cable management channels on the arms and down the central pole. Use the provided cable clips to keep cables tidy and out of the way.

Figure 4.3: Cable management through the monitor arm.
5. Operating and Adjustments
The MSI PRO MT81D offers extensive adjustability for optimal viewing comfort and productivity.

Figure 5.1: Full range of motion for the monitor arms.
- Height Adjustment: Loosen the locking screw on the central pole, adjust the arm height, and then re-tighten.
- Tilt Adjustment: Tilt your monitor up to +50° or down to -20° to find your preferred viewing angle.
- Swivel Adjustment: Swivel your monitor up to +90° or -90° horizontally.
- Pivot (Rotation) Adjustment: Rotate your monitor 360° (up to +180° or -180°) for portrait or landscape orientation.
- Horizontal/Forward/Backward Adjustment: Extend or retract the monitor arms to position your screens at the ideal distance from your eyes.
Adjust the tension of the arm joints using the provided Allen keys if the monitors are too loose or too stiff to move.
6. Maintenance
- Regularly check all screws and connections to ensure they remain tight and secure.
- Clean the stand with a soft, dry cloth. Avoid abrasive cleaners or solvents.
- Periodically inspect the arms for any signs of wear or damage.
7. Troubleshooting
| Problem | Possible Cause | Solution |
|---|---|---|
| Monitor sags or doesn't hold position | Arm tension is too loose; monitor weight exceeds capacity | Adjust the tension screws on the arm joints. Ensure monitor weight is within 17.6 lbs (8 kg). |
| Stand is wobbly | Desk clamp/grommet mount is not tight enough | Re-tighten the desk clamp or grommet mount screws. Ensure desk is stable. |
| Cannot attach VESA plate to monitor | Incorrect screw size; VESA pattern mismatch | Use appropriate M4/M5 screws. Verify monitor VESA pattern (75x75mm or 100x100mm). |
| Cables are messy | Cables not routed through channels | Route cables through the integrated cable management channels and use clips. |
8. Specifications
| Feature | Detail |
|---|---|
| Model Number | PROMT81D |
| Screen Size Compatibility | 17 - 32 Inches |
| Weight Capacity | 17.6 lbs (8 kg) per screen |
| VESA Compatibility | 75x75mm, 100x100mm |
| Desk Thickness (Clamp) | 10 - 85 mm |
| Desk Thickness (Grommet) | 10 - 35 mm |
| Material | Metal |
| Color | Black |
| Adjustments | Tilt (+50°/-20°), Swivel (+90°/-90°), Pivot (360°), Height, Horizontal, Forward/Backward |
9. Warranty and Support
MSI provides comprehensive support for its products. For warranty information, technical assistance, or service inquiries, please refer to the official MSI website or contact their customer support directly.
Online Support: Visit www.msi.com for drivers, manuals, and FAQs.
Customer Service: Refer to your product packaging or the MSI website for regional contact information.
Ask a question about this manual
Ask about setup, troubleshooting, compatibility, parts, safety, or missing instructions. Manuals+ will review the question and use this page’s manual context to help answer it.