GOOJODOQ AC1041
GOOJODOQ Professional Android WiFi Projector User Manual
Model: AC1041
1. Introduction
Thank you for purchasing the GOOJODOQ Professional Android WiFi Projector. This manual provides essential information for setting up, operating, and maintaining your projector. Please read this manual thoroughly before using the product to ensure proper operation and to extend its lifespan. This projector is designed to deliver a high-quality visual experience with its 1080P Full HD resolution, advanced connectivity options, and user-friendly features.
2. Safety Instructions
To ensure safe operation and prevent damage, please observe the following safety precautions:
- Do not block the ventilation openings. Ensure adequate airflow around the projector to prevent overheating.
- Use only the power adapter supplied with the projector.
- Do not expose the projector to rain, moisture, or extreme temperatures.
- Avoid looking directly into the projector lens when the lamp is on, as it can cause eye damage.
- Place the projector on a stable, level surface to prevent it from falling.
- Do not attempt to disassemble or repair the projector yourself. Refer all servicing to qualified personnel.
- Keep the projector away from water and other liquids.
3. Package Contents
Please check that all items are present and in good condition:
- GOOJODOQ Projector (Model: AC1041)
- Remote Control
- Power Cable
- AV Cable
- User Manual (this document)

Image: The GOOJODOQ projector shown with its remote control, illustrating the main unit and a key accessory.
4. Product Overview
4.1. Components and Controls
Familiarize yourself with the various parts of your projector:
- Lens: Projects the image onto the screen.
- Ventilation Openings: Located on the sides and rear, crucial for heat dissipation.
- Control Panel: Fabric-covered buttons on the top for basic navigation and settings (Power, OK, Navigation arrows).
- Input Ports:
- HDMI (x2): For connecting laptops, TV boxes, gaming consoles (PS5, Switch), etc.
- USB (x2): For connecting USB drives, mice, keyboards.
- AV: For connecting older devices using an AV cable.
- 3.5mm Audio Jack: For connecting external speakers or headphones.
- Built-in Speaker: Provides audio output.

Image: Close-up view of the projector's smart design, highlighting the fabric-covered control buttons, efficient heat dissipation system, and the internal speaker component.

Image: Diagram showing the various input and output ports on the projector, including USB, HDMI, AV, and headphone jack, along with examples of compatible devices.
5. Setup
5.1. Placement
Place the projector on a stable, flat surface such as a table. Ensure there is enough space around the projector for proper ventilation. The optimal projection distance will vary based on the desired screen size. This projector supports a maximum projection size of 200 inches.

Image: Visual representation of different projection sizes (35", 90", 200") from the projector, demonstrating its versatility in various room sizes.
5.2. Power Connection
Connect the supplied power cable to the projector's power input port, then plug the other end into a power outlet.
5.3. Initial Power On
Press the power button on the projector or the remote control to turn on the device. The indicator light will illuminate.
5.4. Focus and Keystone Correction
This projector features electronic focus and automatic keystone correction. Use the remote control to adjust the focus until the image is clear. The automatic keystone correction will adjust the image shape to be rectangular, even if the projector is not perfectly aligned with the screen.

Image: Illustration demonstrating the electronic focus and automatic keystone correction features, showing how the projector adjusts the image to maintain a perfect rectangular shape.
6. Operating Instructions
6.1. Connecting Devices
You can connect various devices to your projector:
- HDMI: Connect your laptop, TV stick, DVD player, computer, PS5, or Switch using an HDMI cable. Select the corresponding HDMI input source from the projector's menu.
- USB: Insert a USB disk to play media files directly. You can also connect a USB mouse or keyboard for easier navigation.
- AV: Use the provided AV cable to connect older devices like VCRs or some set-top boxes.
- Bluetooth 5.0: Pair with Bluetooth headphones, speakers, or AirPods for an immersive audio experience. Navigate to the Bluetooth settings in the projector's menu to pair devices.
- WiFi 6 (2.4G/5G): Connect to your home network for online streaming and screen mirroring. WiFi 6 technology ensures reduced latency and smooth streaming.
6.2. Screen Mirroring (Android/iOS)
The projector supports wireless screen mirroring from Android and iOS devices. Ensure your mobile device and the projector are connected to the same WiFi network. Follow the on-screen instructions on the projector to initiate screen mirroring from your smartphone or tablet.
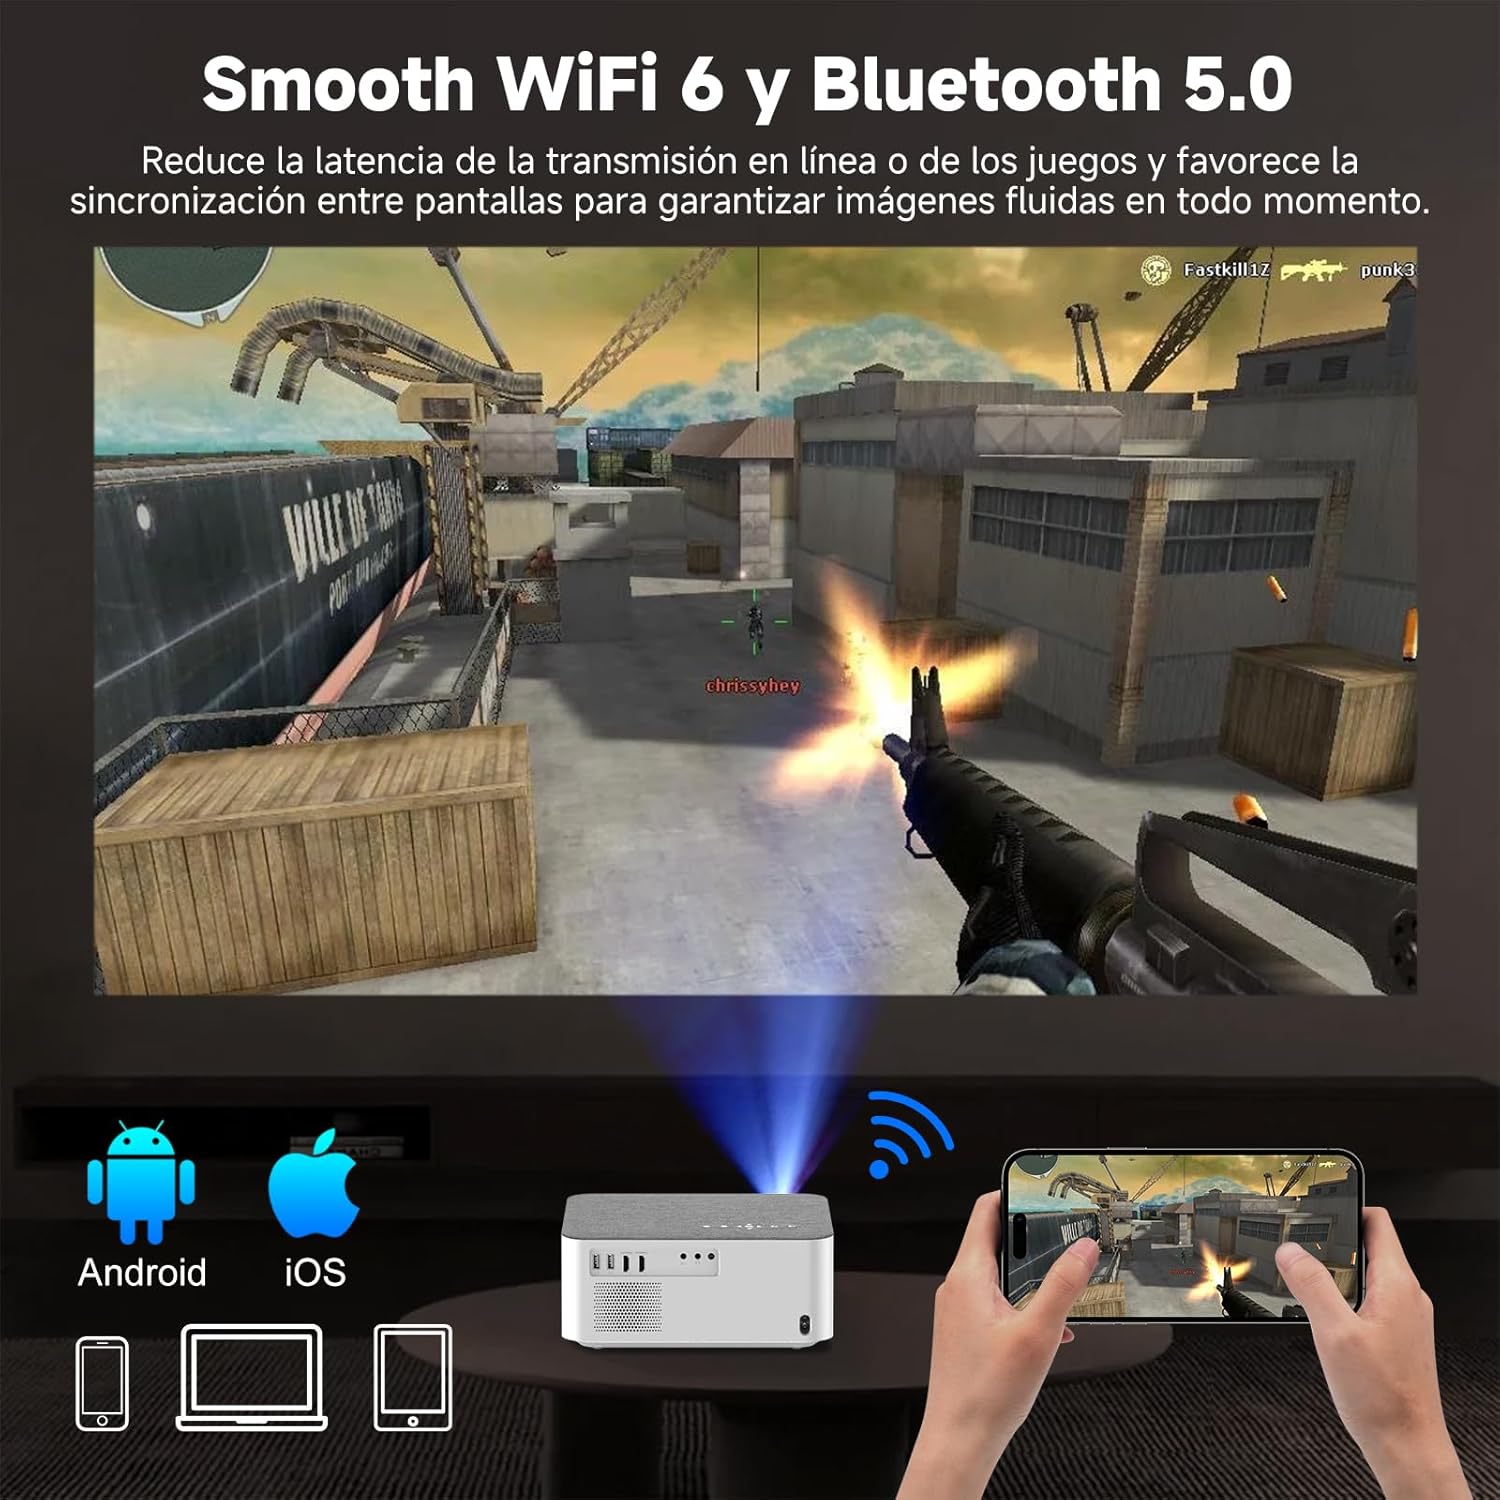
Image: Depiction of the projector's WiFi 6 and Bluetooth 5.0 capabilities, showing a smartphone wirelessly mirroring its screen to the projector, enabling seamless online streaming and gaming.
6.3. Audio Output
You can use the built-in speaker for audio. For a more immersive experience, connect external speakers or headphones via the 3.5mm audio jack or Bluetooth.
7. Maintenance
Proper maintenance ensures the longevity and optimal performance of your projector:
- Lens Cleaning: Use a soft, lint-free cloth specifically designed for optical lenses to gently wipe the projector lens. Do not use abrasive cleaners or excessive force.
- Vent Cleaning: Regularly check and clean the ventilation openings to prevent dust buildup, which can hinder heat dissipation and affect performance. Use a soft brush or compressed air.
- Storage: When not in use for extended periods, store the projector in a cool, dry place, away from direct sunlight and extreme temperatures. Use the original packaging or a protective case if available.
- General Cleaning: Wipe the exterior of the projector with a soft, dry cloth. Avoid using liquid cleaners directly on the surface.
8. Troubleshooting
If you encounter issues with your projector, refer to the following common problems and solutions:
| Problem | Possible Cause | Solution |
|---|---|---|
| No image on screen | Power cable loose, incorrect input source, device not connected properly. | Check power connection. Select correct input source (HDMI, USB, AV). Ensure source device is on and connected securely. |
| Image is blurry | Out of focus, projector too close/far, dirty lens. | Adjust electronic focus using the remote control. Ensure projector is within optimal projection distance. Clean the lens. |
| No sound | Volume too low, external audio device not connected, incorrect audio output setting. | Increase projector volume. Check if external speakers/headphones are connected and powered on. Verify audio output settings in the projector menu. |
| Cannot connect to WiFi/Bluetooth | Incorrect password, device out of range, interference. | Re-enter WiFi password. Ensure devices are within range. Reduce interference from other electronic devices. Restart projector and router. |
| Remote control not working | Dead batteries, obstruction, remote not pointed at sensor. | Replace batteries. Remove any obstructions between remote and projector. Point remote directly at the projector's IR sensor. |
9. Specifications
| Feature | Detail |
|---|---|
| Brand | GOOJODOQ |
| Model | AC1041 |
| Native Resolution | 1920 x 1080 Pixels (Full HD) |
| Brightness | 15000 Lumens (600 ANSI Lumens) |
| Contrast Ratio | 800:1 |
| Aspect Ratio | 16:9, 4:3 |
| Display Technology | LCD |
| Noise Level | 40 dB (reduced by 80% with latest temperature control technology) |
| Connectivity | WiFi 6 (2.4G/5G), Bluetooth 5.0 |
| Interface | 2x HDMI, 2x USB, AV, 3.5mm Audio Jack |
| Compatible Devices | Smartphone, Tablet, Laptop, PC, TV Box, PS5, Switch, Speakers, Headphones |
| Special Features | Electronic Focus, Auto Keystone Correction, Portable, Fabric-covered design |
| Power Consumption | 99 Watts |
| Dimensions (Package) | 33 x 24.9 x 15.6 cm |
| Weight (Package) | 2.58 kg |
10. Warranty and Support
For warranty information and technical support, please refer to the warranty card included with your purchase or visit the official GOOJODOQ website. You may also contact the retailer where you purchased the product for assistance.
Online Resources:
- For the latest updates and FAQs, visit the GOOJODOQ official support page.
- Check the product listing on the platform where you purchased for additional support contact details.
Related Documents - AC1041
 |
GOOJODOQ A1895 Pro Wireless Keyboard User Manual User manual for the GOOJODOQ A1895 Pro Wireless Keyboard, detailing product description, instructions for use, trackpad gestures, indicator lights, and product parameters. |
 |
GOOJODOQ A1895 Pro Wireless Keyboard for 12.9-inch Tablets - User Manual This user manual provides instructions for setting up and using the GOOJODOQ A1895 Pro Wireless Keyboard for 12.9-inch tablets. It covers product description, instructions for use, iOS trackpad gestures, indicator lights, product parameters, and tips for usage and maintenance. |
 |
GOOJODOQ A1895 Pro Wireless Keyboard User Manual Comprehensive user manual for the GOOJODOQ A1895 Pro Wireless Keyboard, detailing product features, setup instructions, iOS trackpad gestures, and technical specifications. |
 |
GOOJODOQ GD13 Pencil User Manual and Instructions A comprehensive guide to the GOOJODOQ GD13 Pencil, covering product details, usage instructions, charging methods, and compatibility with various iPad models. Learn how to pair, use features like palm rejection and tilt sensitivity, and manage battery life. |
 |
Goojodoq AB4063 Wireless K-song Bluetooth Speaker User Manual User manual for the Goojodoq AB4063 Wireless K-song Bluetooth speaker, covering Bluetooth, FM, charging, technical parameters, and microphone operations. |
 |
GD13 Stylus Pen User Manual - Compatible with Wireless Charging iPads User manual for the GD13 stylus pen, detailing features, specifications, and usage instructions for compatible iPad models, including wireless charging capabilities. Learn how to pair, use gestures, and manage battery life. |