OJIAMI OJM14A
OJIAMI 14-Inch Portable Monitor User Manual
Model: OJM14A
Introduction
Thank you for choosing the OJIAMI 14-inch Portable Monitor. This ultra-slim, Full HD 1080P IPS display is designed to enhance your productivity and entertainment experience on the go. Featuring versatile connectivity options including USB-C and HDMI, built-in speakers, and a protective case, it offers a seamless second screen solution for a wide range of devices.

Figure 1: OJIAMI 14-inch Portable Monitor
Safety Information
- Do not expose the monitor to rain or moisture to prevent fire or electric shock hazards.
- Do not open the monitor casing. There are no user-serviceable parts inside. Refer all servicing to qualified service personnel.
- Place the monitor on a stable, flat surface to prevent it from falling.
- Avoid placing the monitor near heat sources such as radiators, heat registers, stoves, or other apparatus (including amplifiers) that produce heat.
- Use only attachments/accessories specified by the manufacturer.
- Unplug this apparatus during lightning storms or when unused for long periods of time.
- Clean the screen with a soft, lint-free cloth. Do not use liquid cleaners or aerosol cleaners directly on the screen.
Package Contents
Please check the package contents upon opening. If any items are missing or damaged, contact customer support.
- OJIAMI 14-inch Portable Monitor (Model: OJM14A)
- Protective Case / Stand
- USB-C to USB-C Cable (for power and display)
- Mini HDMI to HDMI Cable (for display)
- USB-A to USB-C Cable (for power)
- User Manual
Product Overview
Familiarize yourself with the ports and controls on your portable monitor.
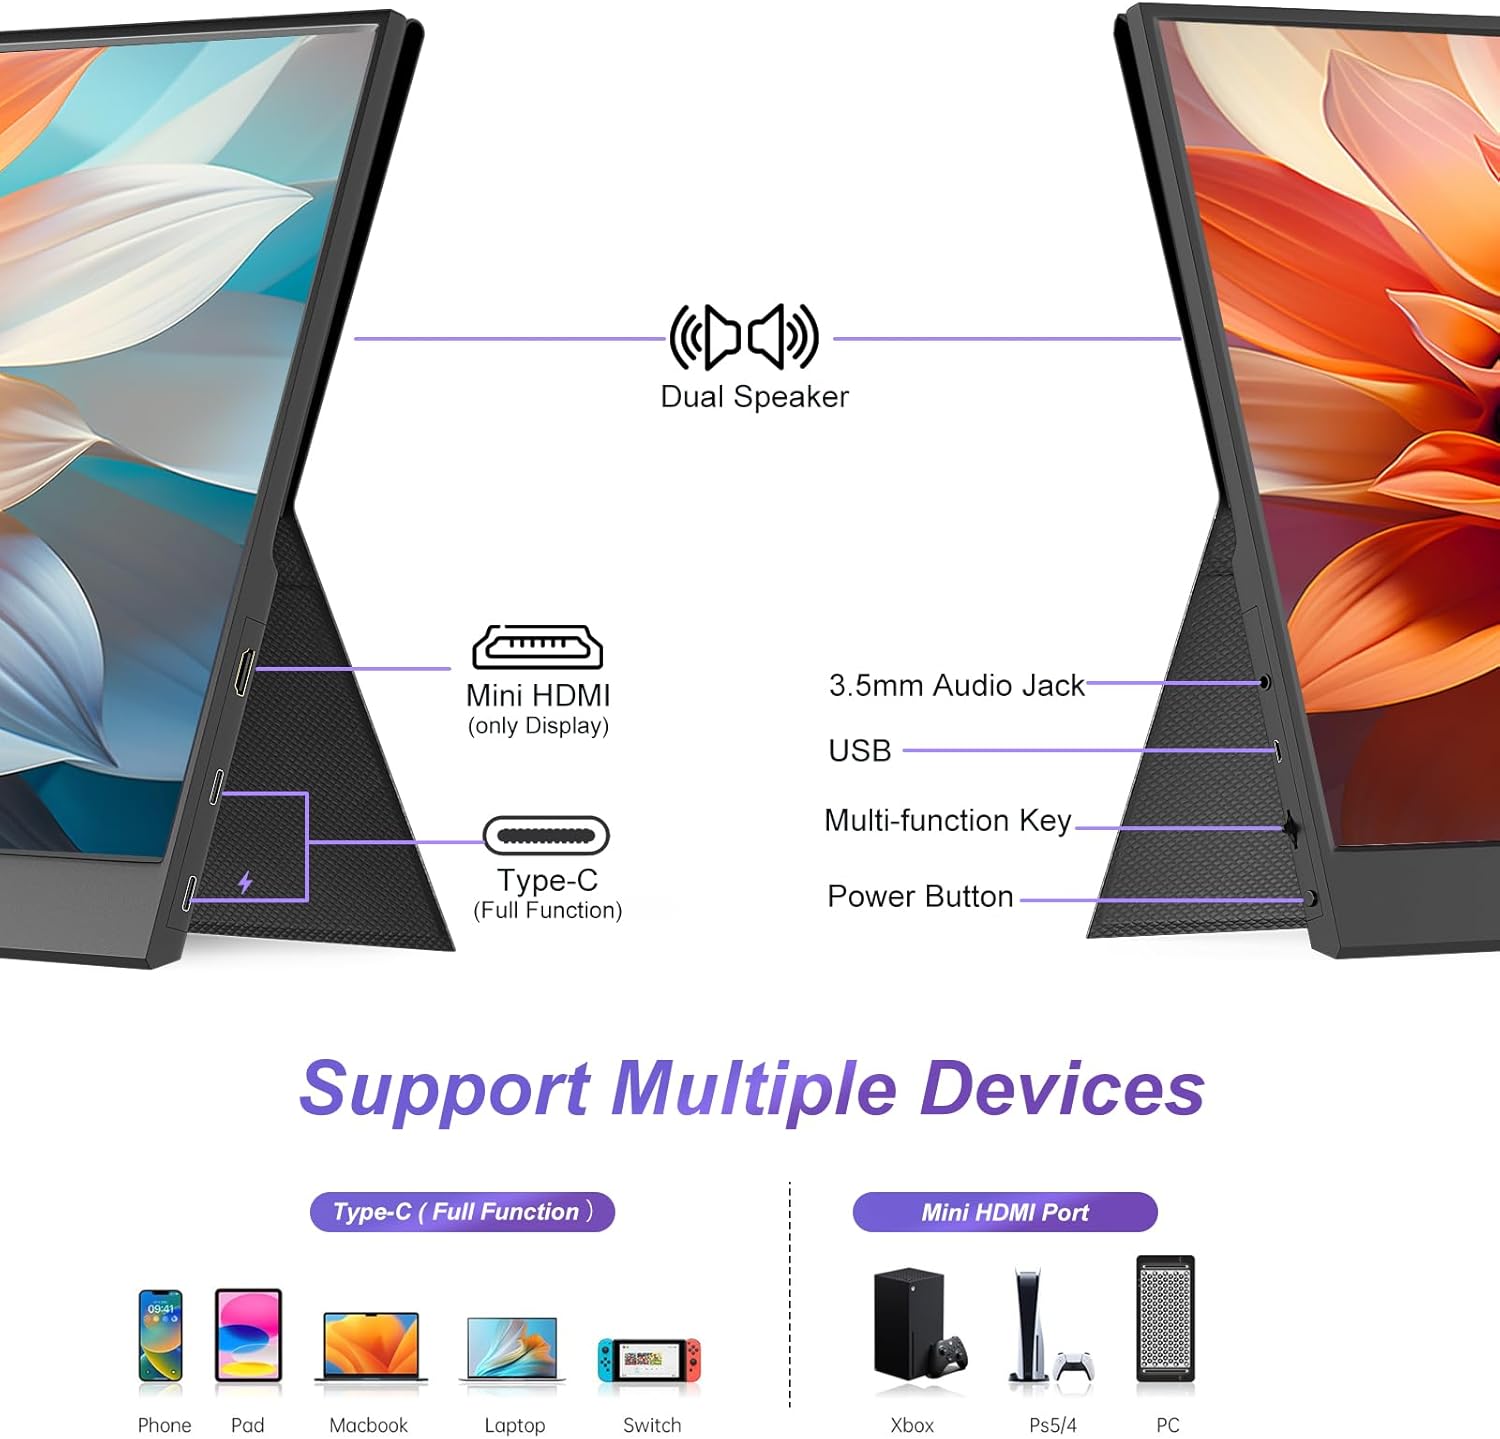
Figure 2: Monitor Ports and Controls
- Dual Speaker: Integrated audio output.
- Mini HDMI (only Display): Connects to devices via HDMI for video input.
- Type-C (Full Function): Supports both power and display signal via a single USB-C cable.
- 3.5mm Audio Jack: For connecting external headphones or speakers.
- USB: For connecting USB devices or peripherals.
- Multi-function Key: Used for navigating the OSD menu and adjusting settings.
- Power Button: Turns the monitor on/off.
Setup
Connecting Your Monitor
1. One Cable Connection (USB-C Full Function)
If your device (e.g., laptop, smartphone, Switch) has a full-function USB-C port that supports DisplayPort Alternate Mode and power delivery, you can connect the monitor with a single USB-C to USB-C cable.
- Connect one end of the USB-C to USB-C cable to the Type-C (Full Function) port on the monitor.
- Connect the other end of the USB-C to USB-C cable to the full-function USB-C port on your device.
- The monitor will automatically power on and display the content from your device.

Figure 3: One Cable (USB-C) and Two Cable (HDMI + USB-C Power) Connections
Note: Ensure your device's USB-C port supports Thunderbolt 3/4 or DisplayPort Alt Mode for full functionality with a single cable.
2. Two Cable Connection (Mini HDMI + USB-C for Power)
If your device does not have a full-function USB-C port, or if you prefer to use HDMI, you will need two cables: one for video and one for power.
- Connect one end of the Mini HDMI to HDMI cable to the Mini HDMI port on the monitor.
- Connect the other end of the Mini HDMI to HDMI cable to the HDMI port on your device (e.g., PC, Xbox, PS, Switch dock).
- Connect one end of the USB-A to USB-C cable to the Type-C (Full Function) port on the monitor.
- Connect the USB-A end of the cable to a power source (e.g., wall adapter, laptop USB-A port, power bank).
- The monitor will power on and display the content.
This method is suitable for devices like desktop PCs, older laptops, gaming consoles (Xbox, PlayStation), and Nintendo Switch (when using its dock).
Operating the Monitor
Power On/Off
- To turn on: Press the Power Button.
- To turn off: Press and hold the Power Button for a few seconds until the screen goes blank.
OSD Menu Navigation
The Multi-function Key is used to access and navigate the On-Screen Display (OSD) menu.
- Press the Multi-function Key: To open the OSD menu.
- Roll the Multi-function Key Up/Down: To navigate through menu options.
- Press the Multi-function Key again: To select an option or confirm a setting.
- Roll the Multi-function Key Left/Right: To adjust values within a selected option.
- Press the Power Button: To exit the OSD menu.
Display Settings
Adjust visual parameters for optimal viewing.
- Brightness: Adjust the overall luminance of the screen.
- Contrast: Control the difference between the brightest and darkest areas of the image.
- Color Temperature: Select from preset modes (e.g., Warm, Cool, User) or adjust RGB values manually.
- HDR Mode: Enable or disable High Dynamic Range for enhanced contrast and color.
- Aspect Ratio: Switch between 16:9 (widescreen) and other available ratios.
- Low Blue Light: Reduce blue light emission to minimize eye strain.

Figure 4: High Definition Display Features
Audio Settings
- Volume: Adjust the output level of the built-in dual speakers.
- Mute: Toggle audio output on or off.
- External Audio: Connect headphones or external speakers to the 3.5mm Audio Jack for private listening or enhanced sound.
Screen Orientation (Landscape/Portrait)
The monitor supports both landscape and portrait modes. You may need to adjust the display settings on your connected device's operating system to match the physical orientation of the monitor.

Figure 5: Landscape and Portrait Mode Functionality
Display Modes
When connected to a computer, you can configure how the portable monitor interacts with your primary display.
- Duplicated Mode (Mirror Mode): The portable monitor displays the same content as your primary screen. Ideal for presentations or sharing content.
- Extend Mode: The portable monitor acts as an extension of your primary desktop, allowing you to drag windows between screens and expand your workspace.
- Second Screen Only: Only the portable monitor displays content, while your primary screen remains off.

Figure 6: Various Display Modes and Connections
Maintenance
Cleaning the Monitor
- Always unplug the monitor before cleaning.
- Use a soft, lint-free cloth slightly dampened with water or a non-abrasive screen cleaner.
- Do not spray liquid directly onto the screen.
- Avoid using benzene, thinner, ammonia, or other volatile substances, as they may damage the screen surface.
Storage
- When not in use, store the monitor in its protective case to prevent scratches and damage.
- Store in a cool, dry place away from direct sunlight and extreme temperatures.

Figure 7: Protective Case for the Monitor
Troubleshooting
| Problem | Possible Cause / Solution |
|---|---|
| No signal / Black screen |
|
| No power |
|
| Image is distorted or flickering |
|
| No sound from speakers |
|
| Cannot change screen orientation |
|
Specifications
| Feature | Detail |
|---|---|
| Model Number | OJM14A |
| Screen Size | 14 Inches |
| Display Type | IPS Panel |
| Resolution | 1920 x 1080 (FHD 1080p) |
| Aspect Ratio | 16:9 |
| Refresh Rate | 60Hz |
| Contrast Ratio | 1000:1 (Typical) |
| Color Support | 16.7 Million Colors, 100% sRGB |
| Viewing Angle | 178° (H/V) |
| Surface Description | Glossy |
| Audio | Built-in Dual Speakers, 3.5mm Audio Jack |
| Connectivity | 1x Full Function USB-C, 1x Mini HDMI, 1x USB |
| Product Dimensions | 0.47 x 12.68 x 8.07 inches |
| Item Weight | 2.88 pounds |

Figure 8: Lightweight and Portable Design
Warranty and Support
For warranty information and technical support, please refer to the warranty card included in your product packaging or visit the official OJIAMI website. Please have your model number (OJM14A) and purchase details ready when contacting support.
Manufacturer: OJIAMI
Ask a question about this manual
Ask about setup, troubleshooting, compatibility, parts, safety, or missing instructions. Manuals+ will review the question and use this page’s manual context to help answer it.