1. Introduction
Thank you for choosing the Delmicure 16-Channel Digital Rechargeable Hearing Amplifier. This manual provides detailed instructions for the proper use, maintenance, and troubleshooting of your device. Please read this manual thoroughly before using the hearing amplifier to ensure optimal performance and longevity.
This device is designed to assist individuals with hearing difficulties by amplifying sounds, featuring 16 digital channels, 4 frequency modes, and 8 volume levels for a personalized listening experience. Its rechargeable design offers convenience and environmental benefits.
2. Product Overview
Familiarize yourself with the components of your Delmicure hearing amplifier:
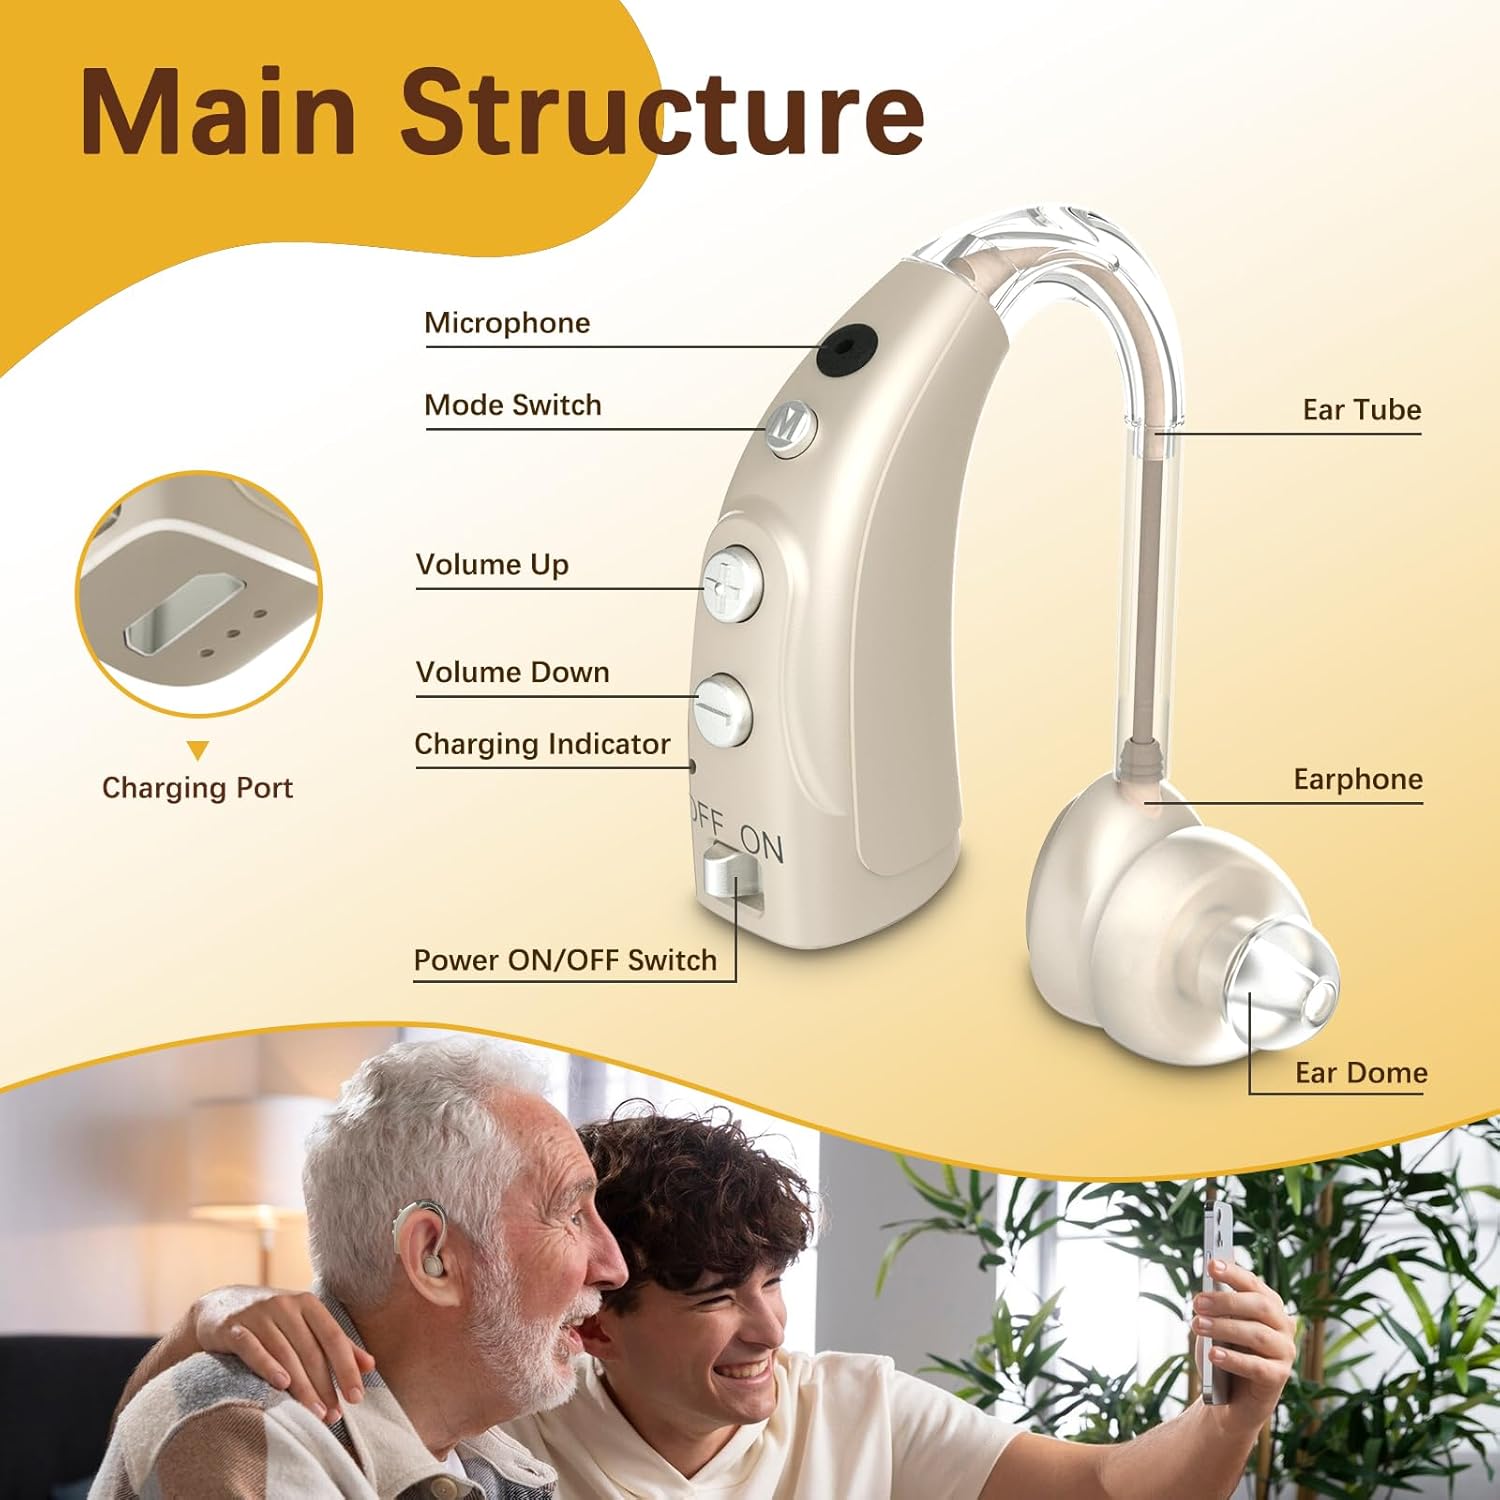
Image 2.1: Main Structure of the Hearing Amplifier
This image illustrates the key components of the Delmicure hearing amplifier, including the microphone, mode switch, volume controls, charging indicator, power switch, ear tube, earphone, ear dome, and charging port.
- Microphone: Captures sound from the environment.
- Mode Switch (M button): Allows selection between 4 different frequency modes.
- Volume Up (+ button): Increases the sound amplification level.
- Volume Down (- button): Decreases the sound amplification level.
- Charging Indicator: Displays the charging status.
- Power ON/OFF Switch: Toggles the device on or off.
- Ear Tube: Connects the main unit to the earphone.
- Earphone: Delivers amplified sound into the ear canal.
- Ear Dome: Soft tip that fits into the ear canal for comfort and sound delivery.
- Charging Port: Micro USB input for recharging the device.
3. Setup
Proper setup is crucial for comfort and sound quality.
3.1 Choosing the Right Ear Dome
The package includes replaceable ear domes in Small (S), Medium (M), and Large (L) sizes. Select the ear dome that provides a snug and comfortable fit in your ear canal. A proper fit is essential to prevent whistling (feedback) and ensure clear sound.

Image 3.1: Steps for Initial Use
This image demonstrates selecting the correct ear dome, correctly positioning the hearing aid behind the ear, and adjusting the settings.
3.2 Wearing the Hearing Amplifier
- Ensure the power switch is in the 'OFF' position before placing the device in your ear.
- Gently place the ear dome into your ear canal.
- Position the main unit of the hearing amplifier behind your ear, ensuring the ear tube is comfortably routed.
- Once comfortably in place, switch the power to 'ON'.
4. Charging
The Delmicure hearing amplifier features a rechargeable battery.
4.1 Charging Instructions
- Locate the Micro USB charging port on the device.
- Connect the provided Micro USB charging cable to the hearing amplifier and a suitable USB power source (e.g., wall adapter, computer USB port).
- The charging indicator light will illuminate during charging.
- A full charge typically takes approximately 2 hours.
- Once fully charged, the device can provide up to 40 hours of use.

Image 4.1: Connecting the Micro USB Charger
This image shows how to connect the Micro USB charging cable to the hearing amplifier.

Image 4.2: Charging Duration and Usage Time
This graphic highlights that the device fully charges in 2 hours, providing up to 40 hours of operational use.
5. Operation
Operating your hearing amplifier is straightforward.
5.1 Power ON/OFF
Slide the 'ON/OFF' switch located on the device to turn it on or off.
5.2 Volume Adjustment
The device offers 8 levels of volume adjustment.
- Press the '+' button to increase the volume.
- Press the '-' button to decrease the volume.
5.3 Mode Selection
Press the 'M' button to cycle through the 4 available frequency modes. Each mode is designed for different listening environments:

Image 5.1: Frequency Modes and Volume Levels
This image illustrates the four distinct frequency modes and the concept of eight volume levels, indicating how to switch between them.
- Full Frequency Mode (1 Beep): General use, balanced sound amplification across all frequencies.
- High Frequency Mode (2 Beeps): Enhances high-pitched sounds, useful for understanding speech in quiet environments.
- Mid Frequency Mode (3 Beeps): Focuses on mid-range sounds, suitable for group conversations or music.
- Low Frequency Mode (4 Beeps): Amplifies low-pitched sounds, beneficial in noisy environments to reduce background rumble.
5.4 Noise Cancellation
The advanced digital chip in your Delmicure hearing amplifier includes noise-cancelling technology. This feature works to suppress background noise, making speech clearer and allowing you to focus on desired sounds in various listening environments.
6. Maintenance
Regular maintenance ensures the longevity and optimal performance of your hearing amplifier.
6.1 Cleaning
- Use the provided cleaning brush to gently remove any earwax or debris from the ear dome and microphone port daily.
- Wipe the main unit with a soft, dry cloth. Do not use water or cleaning solutions directly on the device.
- Ensure the ear dome is free of blockages for clear sound transmission.
6.2 Storage
- When not in use, store the hearing amplifier in its shockproof case to protect it from dust, moisture, and physical damage.
- Store in a cool, dry place away from direct sunlight and extreme temperatures.
6.3 Battery Care
- Avoid completely draining the battery frequently. Recharge the device when the battery is low.
- If storing for an extended period, charge the device to about 50% capacity and recharge every few months to maintain battery health.
7. Troubleshooting
If you encounter issues, refer to the following common problems and solutions:
| Problem | Possible Cause | Solution |
|---|---|---|
| Whistling or Feedback Sound | Improper ear dome fit, earwax blockage, or device not fully inserted. | Replace the ear dome with a more suitable size. Ensure the device is properly seated in the ear canal. Clean the ear dome and ear canal. |
| No Sound | Device is off, low battery, ear dome blocked, or volume too low. | Turn the device on. Recharge the battery. Clean the ear dome. Increase the volume. |
| Weak or Distorted Sound | Low battery, ear dome blockage, or microphone obstruction. | Recharge the battery. Clean the ear dome and microphone port. |
| Device Not Charging | Charging cable or adapter faulty, or improper connection. | Ensure the cable is securely connected. Try a different USB port or charging adapter. |
If the problem persists after attempting these solutions, please contact customer support.
8. Specifications
| Feature | Description |
|---|---|
| Model Name | 16-Channel Digital Hearing Amplifier |
| Channels | 16 Digital Channels |
| Frequency Modes | 4 (Full, High, Mid, Low) |
| Volume Levels | 8 |
| Battery Type | 1 Lithium Ion (included) |
| Charging Time | Approximately 2 hours |
| Usage Time (per charge) | Up to 40 hours |
| Dimensions | 5.55 x 3.94 x 1.54 inches (Package) |
| Weight | 5.93 ounces (Package) |
| Material | Plastic or Metal |
| Style | Behind-the-Ear (BTE) |
9. Warranty and Support
Your Delmicure hearing amplifier comes with a 365-day product warranty. This warranty covers manufacturing defects and ensures you receive high-quality products and services.
If you encounter any problems or quality concerns during the use of your hearing aids, please contact our customer support team. We are committed to providing timely after-sales support and solutions.
For support, please refer to the contact information provided with your purchase or visit the official Delmicure website.
10. Package Contents
Upon opening your package, you should find the following items:

Image 10.1: Package Contents
This image displays all components included in the Delmicure hearing amplifier kit.
- Delmicure Digital Hearing Aid x1
- Micro USB Charging Cable x1
- Cleaning Brush x1
- Instruction Manual x1 (this document)
- Shockproof Case x1
- Replaceable Earplugs (S, M, L sizes)