68028-15
Instruction Manual
Generic Replacement Cylinder Seal
For Central Pneumatic Harbor Freight Model #68028 Nailer
1. Introduction
This manual provides detailed instructions for replacing the cylinder seal (piston o-ring) in the Central Pneumatic Harbor Freight Model #68028 framing air nail gun. This replacement part is designed to address common issues such as air leaks and poor performance, restoring your nail gun to optimal working condition.
The cylinder seal is a critical component that ensures proper air pressure and operation within the nail gun's cylinder assembly. A worn or damaged seal can lead to significant loss of power and efficiency.
2. Product Overview
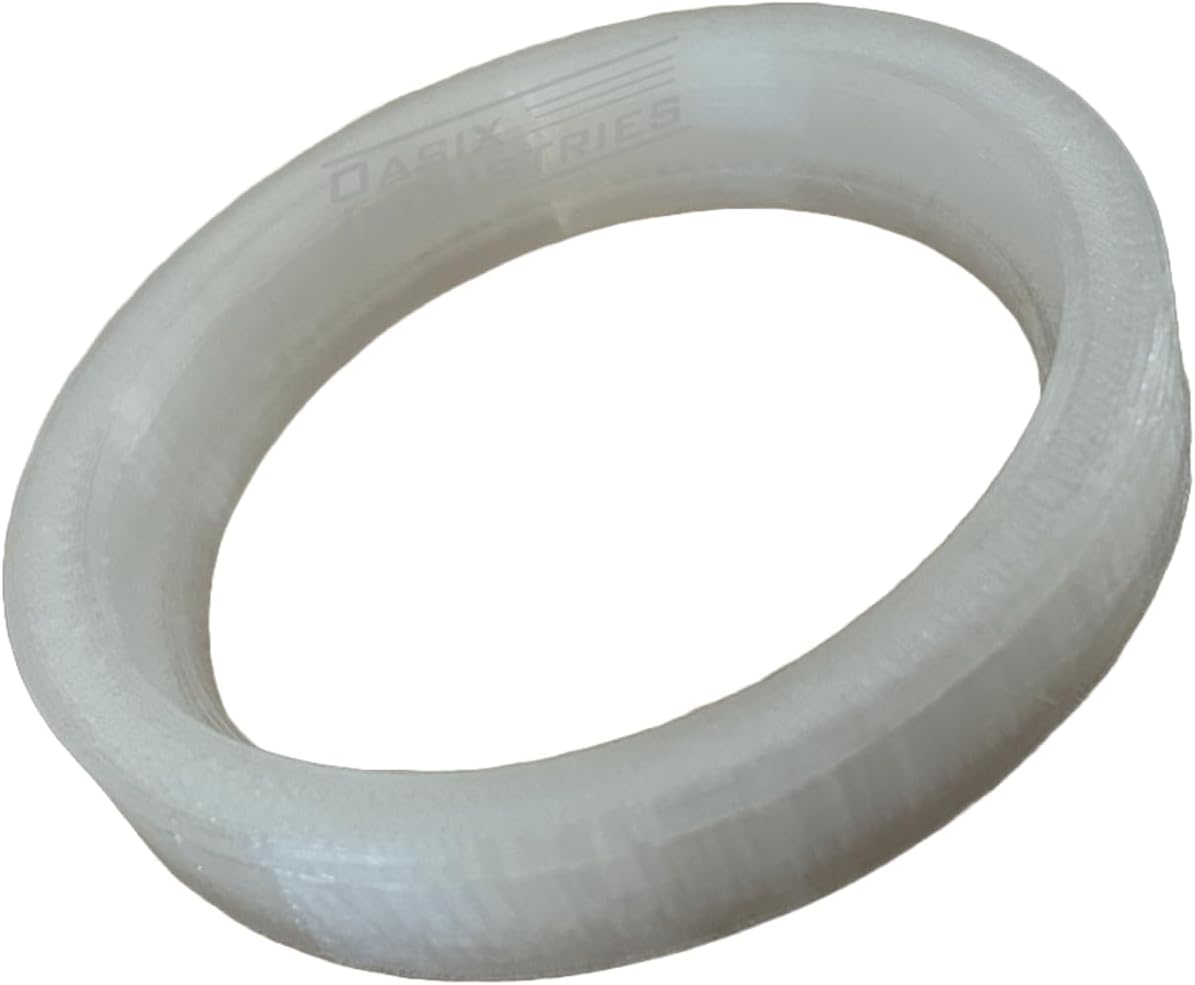
Figure 2.1: Front view of the replacement cylinder seal.
This image shows the main view of the translucent white cylinder seal, designed for the Central Pneumatic Harbor Freight Model #68028 nailer.

Figure 2.2: Side view of the replacement cylinder seal.
A side perspective of the cylinder seal, highlighting its circular shape and the internal groove where it seats within the nail gun's piston assembly.

Figure 2.3: Top-down view of the replacement cylinder seal.
This image provides a direct overhead view of the seal, showing its perfectly circular form and the Oasix Industries branding subtly visible on the inner surface.
3. Symptoms of Cylinder Seal Failure
A failing cylinder seal is a common cause of operational issues in pneumatic nail guns. Look for the following symptoms:
- Reduced Power: The nail gun may not drive nails fully or consistently.
- Air Leaks: Audible hissing sounds, especially around the cylinder or piston area, indicating air escaping.
- Slow Cycling: The tool may cycle slowly or fail to reset properly after firing.
- Inconsistent Firing: Nails may misfire or fail to fire at all.
If you experience any of these issues, inspecting and potentially replacing the cylinder seal is a recommended troubleshooting step.
4. Installation Instructions
Replacing the cylinder seal requires careful disassembly and reassembly of the nail gun's head and cylinder assembly. Always ensure the tool is disconnected from its air supply before beginning any maintenance or repair.
4.1. Safety Precautions
- Disconnect Air Supply: Always disconnect the nail gun from the air compressor before performing any work.
- Wear Safety Glasses: Protect your eyes from debris or unexpected air bursts.
- Depressurize Tool: Ensure all residual air pressure is released from the tool.
- Work in a Clean Area: Prevent dirt and foreign objects from entering the tool's internal components.
4.2. Required Tools
You may need the following tools for disassembly and reassembly:
- Hex keys or wrenches (various sizes, specific to your nail gun model)
- Screwdrivers (Phillips and flathead)
- Pliers (optional, for stubborn parts)
- Clean rags or paper towels
- Pneumatic tool oil or silicone grease (for lubricating new seals)
4.3. Disassembly Steps
- Locate the Cylinder Assembly: Refer to the exploded diagram (Figure 4.1) to identify the main components of the nail gun's head and cylinder assembly. The cylinder seal (part #15 in the diagram) is typically located around the piston.
- Remove the Top Cap/Housing: Carefully unfasten the screws or bolts securing the top cap or housing of the nail gun. Keep track of all fasteners.
- Access the Cylinder and Piston: Once the top housing is removed, you should gain access to the cylinder and piston assembly.
- Remove the Old Seal: Gently remove the old cylinder seal from its groove on the piston or within the cylinder. Note its orientation for correct installation of the new seal.
- Clean Components: Thoroughly clean the piston, cylinder walls, and any other related components to remove old grease, dirt, and debris.
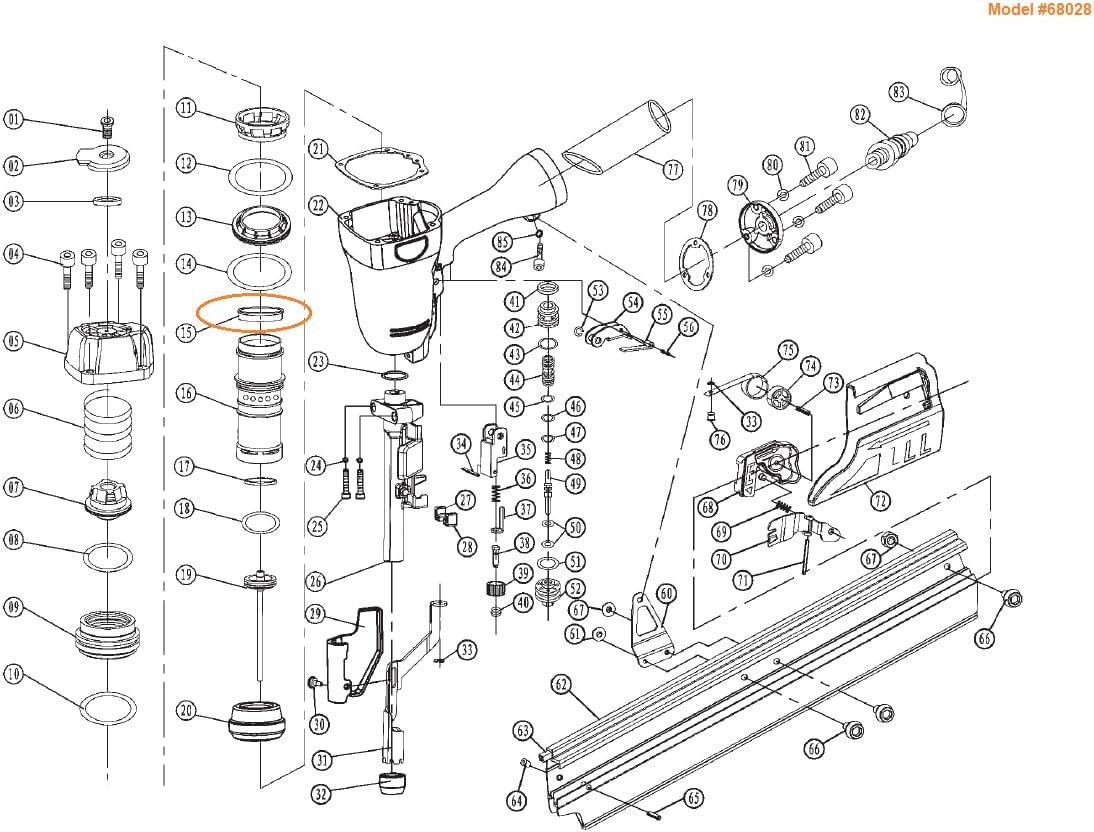
Figure 4.1: Exploded diagram of the Central Pneumatic Harbor Freight Model #68028 Nailer.
This diagram illustrates the internal components of the nail gun. The replacement cylinder seal is identified as part number 15, circled in orange, located within the cylinder assembly.
4.4. Installation Steps
- Lubricate the New Seal: Apply a thin coat of pneumatic tool oil or silicone grease to the new cylinder seal. This lubrication helps with installation and ensures a proper seal.
- Install the New Seal: Carefully slide the new seal into its designated groove on the piston or within the cylinder, ensuring it is seated correctly and not twisted or pinched.
- Reassemble Components: Reassemble the cylinder, piston, and top housing in reverse order of disassembly. Ensure all parts are aligned correctly and fasteners are tightened securely, but do not overtighten.
- Test Functionality: Once reassembled, connect the nail gun to the air supply and perform a functional test. Listen for air leaks and check for proper firing and cycling.
5. Specifications
| Specification | Detail |
|---|---|
| Part Number | 68028-15 |
| Compatible Model | Central Pneumatic Harbor Freight Model #68028 Framing Air Nail Gun |
| Material | Thermoplastic polyurethane |
| Item Weight | Approximately 2 ounces |
| Product Dimensions | Approximately 2.95 x 2.26 x 0.46 inches |
6. Troubleshooting
If you continue to experience issues after replacing the cylinder seal, consider the following:
- Check for Proper Seating: Ensure the new seal is not twisted, pinched, or improperly seated in its groove.
- Inspect Other Seals/O-rings: The nail gun has multiple seals. Other O-rings might also be worn and require replacement. Refer to the nail gun's full service manual for a complete list of seals.
- Verify Air Supply: Ensure your air compressor is providing adequate and consistent air pressure.
- Lubrication: Insufficient lubrication can cause premature wear or improper function. Ensure all moving parts and seals are adequately lubricated with pneumatic tool oil.
- Foreign Objects: Check for any debris or foreign objects inside the cylinder or air passages that might obstruct operation.
7. Important Notes
While this seal is designed for easy replacement, proper tool repair requires attention to detail. If you are unsure about any step, it is recommended to consult a qualified technician or refer to the original service manual for your specific nail gun model.
Regular maintenance, including proper lubrication and cleaning, can extend the life of your pneumatic tools and their components.
Related Documents - 68028-15
 |
BANKS 15° Full Round Head Roofing Nailer Owner's Manual & Safety Instructions Owner's manual and safety guide for the BANKS 15° Full Round Head Roofing Nailer (Model 63993). Covers operation, maintenance, safety, and troubleshooting. Visit harborfreight.com for more information. |
 |
Paslode PF350-S Strip Nailer Operating Manual and Schematic This document is the operating manual and schematic for the Paslode PF350-S strip nailer. It provides detailed information on tool and fastener specifications, safety instructions, installation and operation, air systems, features and benefits, parts list, maintenance, troubleshooting, warranty, and accessories. Essential for safe and efficient use of the tool. |
 |
Arrow FN50 3-in-1 Flooring Nailer & Stapler User Manual Comprehensive user manual for the Arrow FN50 3-in-1 Flooring Nailer & Stapler, covering safety, operation, maintenance, and troubleshooting for 15.5GA staples and 16GA L/T cleats. |
 |
Xinyoec CC11200-A 15° Roofing Nailer: Easy Assembly and Nail Compatibility Detailed information on the Xinyoec CC11200-A 15° roofing nailer, including its easy assembly, compatibility with 3/4 in. to 1-3/4 in. wire collated roofing nails, and technical specifications for nail dimensions and driving angle. |
 |
DEWALT DC628-XE DC629-XE 15 Gauge Cordless Nailer Instruction Manual Comprehensive instruction manual for the DEWALT DC628-XE and DC629-XE 15 Gauge Cordless Nailers, covering safety guidelines, specifications, operation, maintenance, and troubleshooting. |
 |
FLEX FT433 Nailer/Stapler Air Refill Kit: Operator's Manual and Instructions Comprehensive guide for the FLEX FT433 Nailer/Stapler Air Refill Kit. Learn how to safely connect and use the air refill kit with FLEX nailers and staplers, including pressure recommendations and troubleshooting. |
Ask a question about this manual
Ask about setup, troubleshooting, compatibility, parts, safety, or missing instructions. Manuals+ will review the question and use this page’s manual context to help answer it.