1. Introduction
The Teyleten Robot ESP32-C6 Development Board is a compact and versatile microcontroller board designed for programming, learning, and various embedded applications. It integrates advanced wireless communication capabilities and a powerful processor, making it suitable for a wide range of IoT and automation projects.
2. Product Overview and Features
This development board utilizes the ESP32-C6FH4 chip, featuring a RISC-V 32-bit single-core processor capable of clock frequencies up to 160 MHz. It includes 320KB ROM, 512KB HP, 16KB LP, and 4MB Flash memory, providing ample resources for complex applications.
Key Features:
- ESP32-C6FH4 Chip: Equipped with a RISC-V 32-bit single-core processor.
- High Clock Frequency: Supports up to 160 MHz.
- Integrated Memory: 320KB ROM, 512KB HP, 16KB LP, and 4MB Flash.
- Wireless Connectivity: Integrated 2.4GHz Wi-Fi 6 (802.11 b/g/n) and low-power Bluetooth 5 (LE).
- USB Type-C Interface: For power and data communication.
- Rich Peripheral Interfaces: Compatible with various peripheral devices.
- Low-Power Operation: Supports multiple low-power working states for efficient energy consumption.
- Software Development: Compatible with ESP-IDF and Arduino IDE.

Figure 1: Multiple Teyleten Robot ESP32-C6 Development Boards, showcasing their compact design and included pin headers.
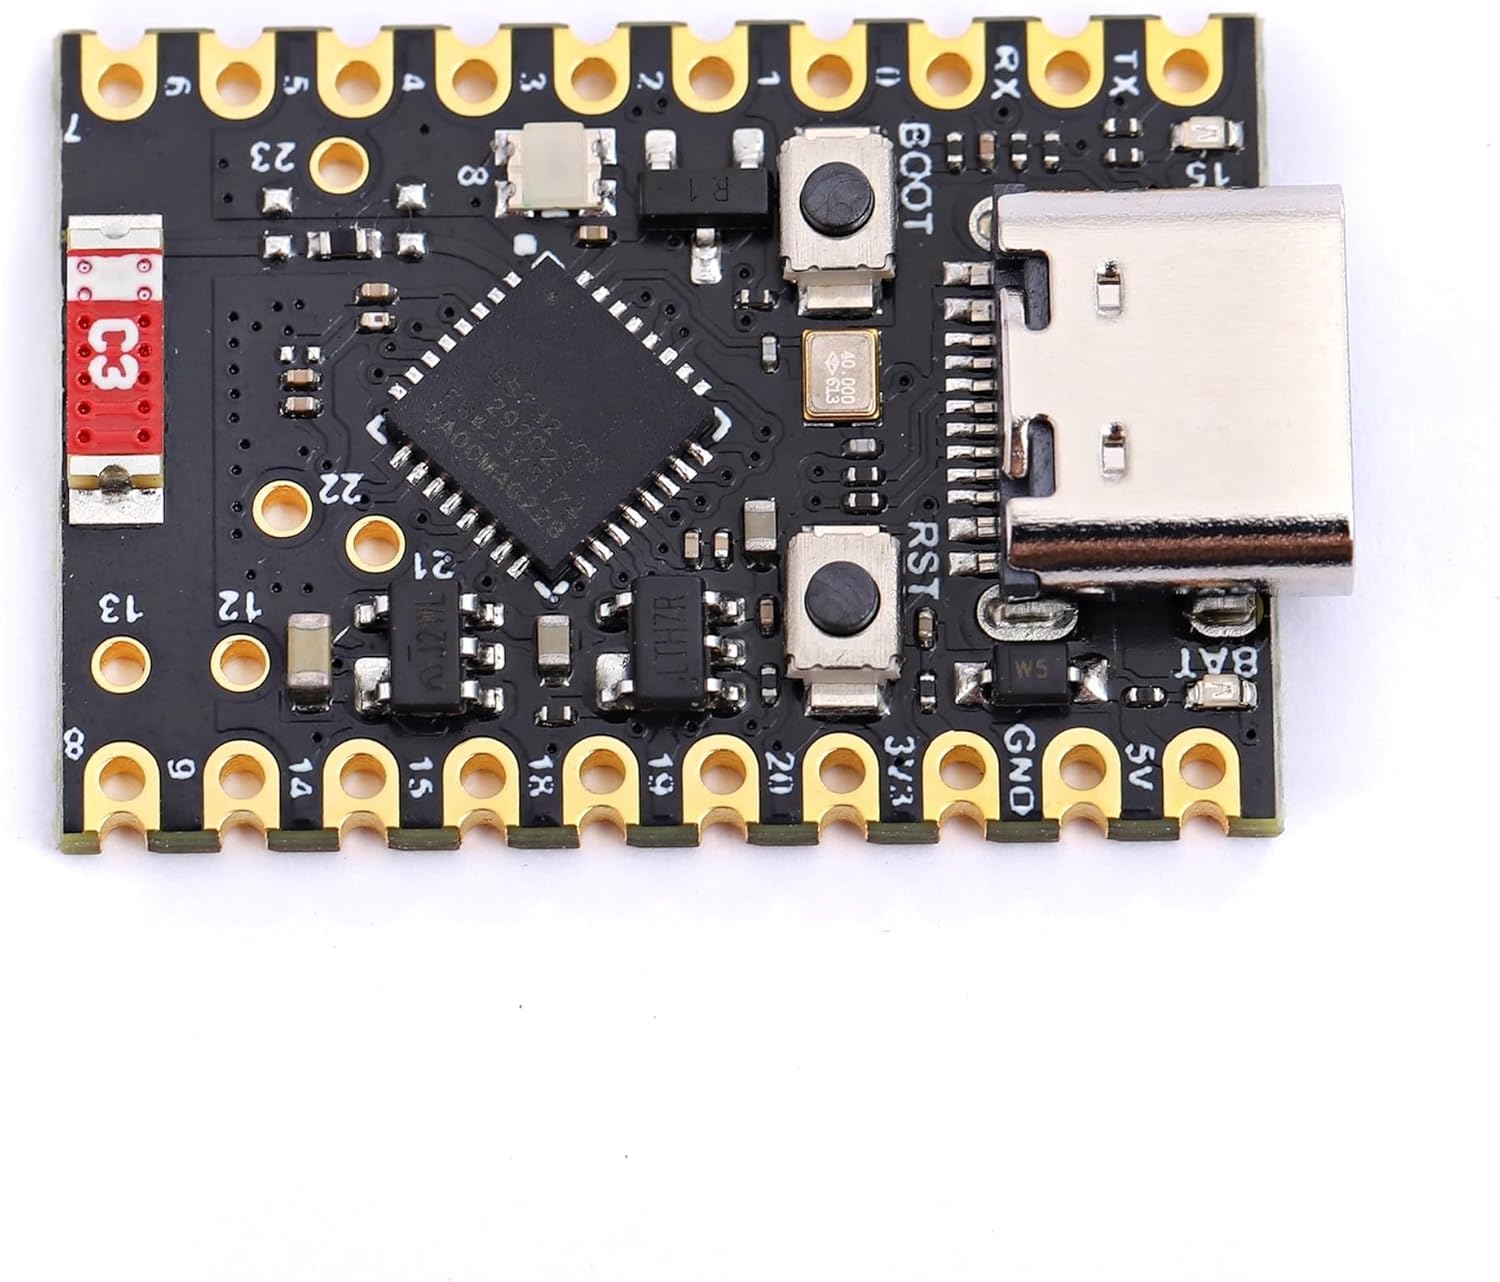
Figure 2: A detailed view of the ESP32-C6 board, highlighting the USB Type-C port, ESP32-C6FH4 chip, and various surface-mounted components.

Figure 3: The reverse side of the ESP32-C6 development board, showing the 'Super Mini ESP32-C6' label and through-hole pin connections.
3. Setup Guide
3.1. Initial Inspection
Upon receiving your Teyleten Robot ESP32-C6 Development Board, carefully inspect the board for any visible damage. Ensure all components are securely attached.
3.2. Connecting to a Computer
Connect the ESP32-C6 board to your computer using a USB Type-C cable. The board should be recognized as a serial device. If drivers are required, they are typically part of the ESP-IDF or Arduino IDE installation process.
3.3. Development Environment Setup
The ESP32-C6 supports development using either the Espressif IoT Development Framework (ESP-IDF) or the Arduino IDE. Refer to the official documentation for detailed installation and configuration instructions for your chosen environment.
- ESP-IDF: For advanced users and production-grade applications, offering comprehensive control.
- Arduino IDE: Ideal for beginners and rapid prototyping, with a large community and extensive libraries.
4. Operating Instructions
4.1. Programming the Board
Once your development environment is set up and the board is connected, you can upload your code (firmware) to the ESP32-C6. Typically, this involves selecting the correct board and serial port in your IDE and then initiating the upload process.
4.2. Serial Communication
For debugging and monitoring, utilize the serial monitor feature in your development environment. Ensure the correct baud rate is selected to view output from the ESP32-C6.
4.3. GPIO Pin Usage
The board provides numerous General Purpose Input/Output (GPIO) pins for interfacing with external sensors, actuators, and other components. Consult the pinout diagram for specific pin functions and capabilities (e.g., UART, PWM, I2S, ADC, I2C).
5. Connectivity
The Teyleten Robot ESP32-C6 features integrated 2.4GHz Wi-Fi 6 and Bluetooth 5 (LE) for robust wireless communication. These capabilities enable the board to connect to networks, communicate with other Bluetooth devices, and support various IoT applications.
6. GPIO and Peripheral Expansion
The board is designed for extensive peripheral expansion. It includes a TF card slot for additional storage, allowing for data logging or storing larger firmware images. The numerous GPIO pins support various communication protocols and functionalities, enabling complex projects.
Video 1: This video demonstrates the features and capabilities of an ESP32-C6 development board with a 1.47-inch LCD, highlighting its compact design, dual RISC-V processors, Wi-Fi 6 and Bluetooth 5 support, TF card slot, and onboard RGB LEDs. It also shows GUI interface programs for DIY development and provides information on accessing tutorials and demo codes.
7. Specifications
| Feature | Specification |
|---|---|
| Processor | RISC-V 32-bit single-core |
| CPU Speed | 160 MHz |
| ROM | 320KB |
| HP SRAM | 512KB |
| LP SRAM | 16KB |
| Flash Memory | 4MB |
| Wireless Type | 2.4GHz Wi-Fi 6 (802.11 b/g/n), Bluetooth 5 (LE) |
| Interface | USB Type-C |
| Operating System Compatibility | Linux, Arduino |
| Item Weight | 0.317 ounces |
| Package Dimensions | 4.72 x 2.99 x 0.39 inches |
8. Troubleshooting
- Board Not Recognized: Ensure the USB Type-C cable is functional and properly connected. Check if necessary drivers are installed for your operating system.
- Upload Errors: Verify that the correct board type and serial port are selected in your IDE. Ensure no other applications are using the serial port. Try pressing the BOOT button while resetting the board during upload if issues persist.
- No Serial Output: Confirm the baud rate in your serial monitor matches the rate set in your code. For Arduino IDE, ensure "USB CDC On Boot" is enabled in Tools settings if applicable.
- Wi-Fi/Bluetooth Connectivity Issues: Check your code for correct network credentials or Bluetooth pairing procedures. Ensure the antenna (if external) is properly connected.
9. Maintenance
To ensure the longevity and optimal performance of your Teyleten Robot ESP32-C6 Development Board, follow these maintenance guidelines:
- Handle with Care: Avoid dropping the board or subjecting it to excessive force.
- Static Discharge: Always handle the board in an anti-static environment or take precautions to prevent electrostatic discharge.
- Storage: Store the board in a dry, cool place, away from direct sunlight and extreme temperatures.
- Cleaning: Use a soft, dry brush or compressed air to remove dust. Avoid using liquids or harsh chemicals.
10. Warranty and Support
For warranty information and technical support, please refer to the official Teyleten Robot website or contact their customer service directly. Detailed resources, including additional tutorials and community forums, may also be available online to assist with your development projects.