CAMWORLD AC09A
CAMWORLD AC09A 5K-56MP Dual Lens Video Camera User Manual
Model: AC09A
Introduction
This manual provides detailed instructions for the setup, operation, and maintenance of your CAMWORLD AC09A 5K-56MP Dual Lens Video Camera. Please read this manual thoroughly before using the product to ensure proper functionality and to maximize your recording experience. Keep this manual for future reference.
Package Contents
Verify that all items listed below are included in your package:
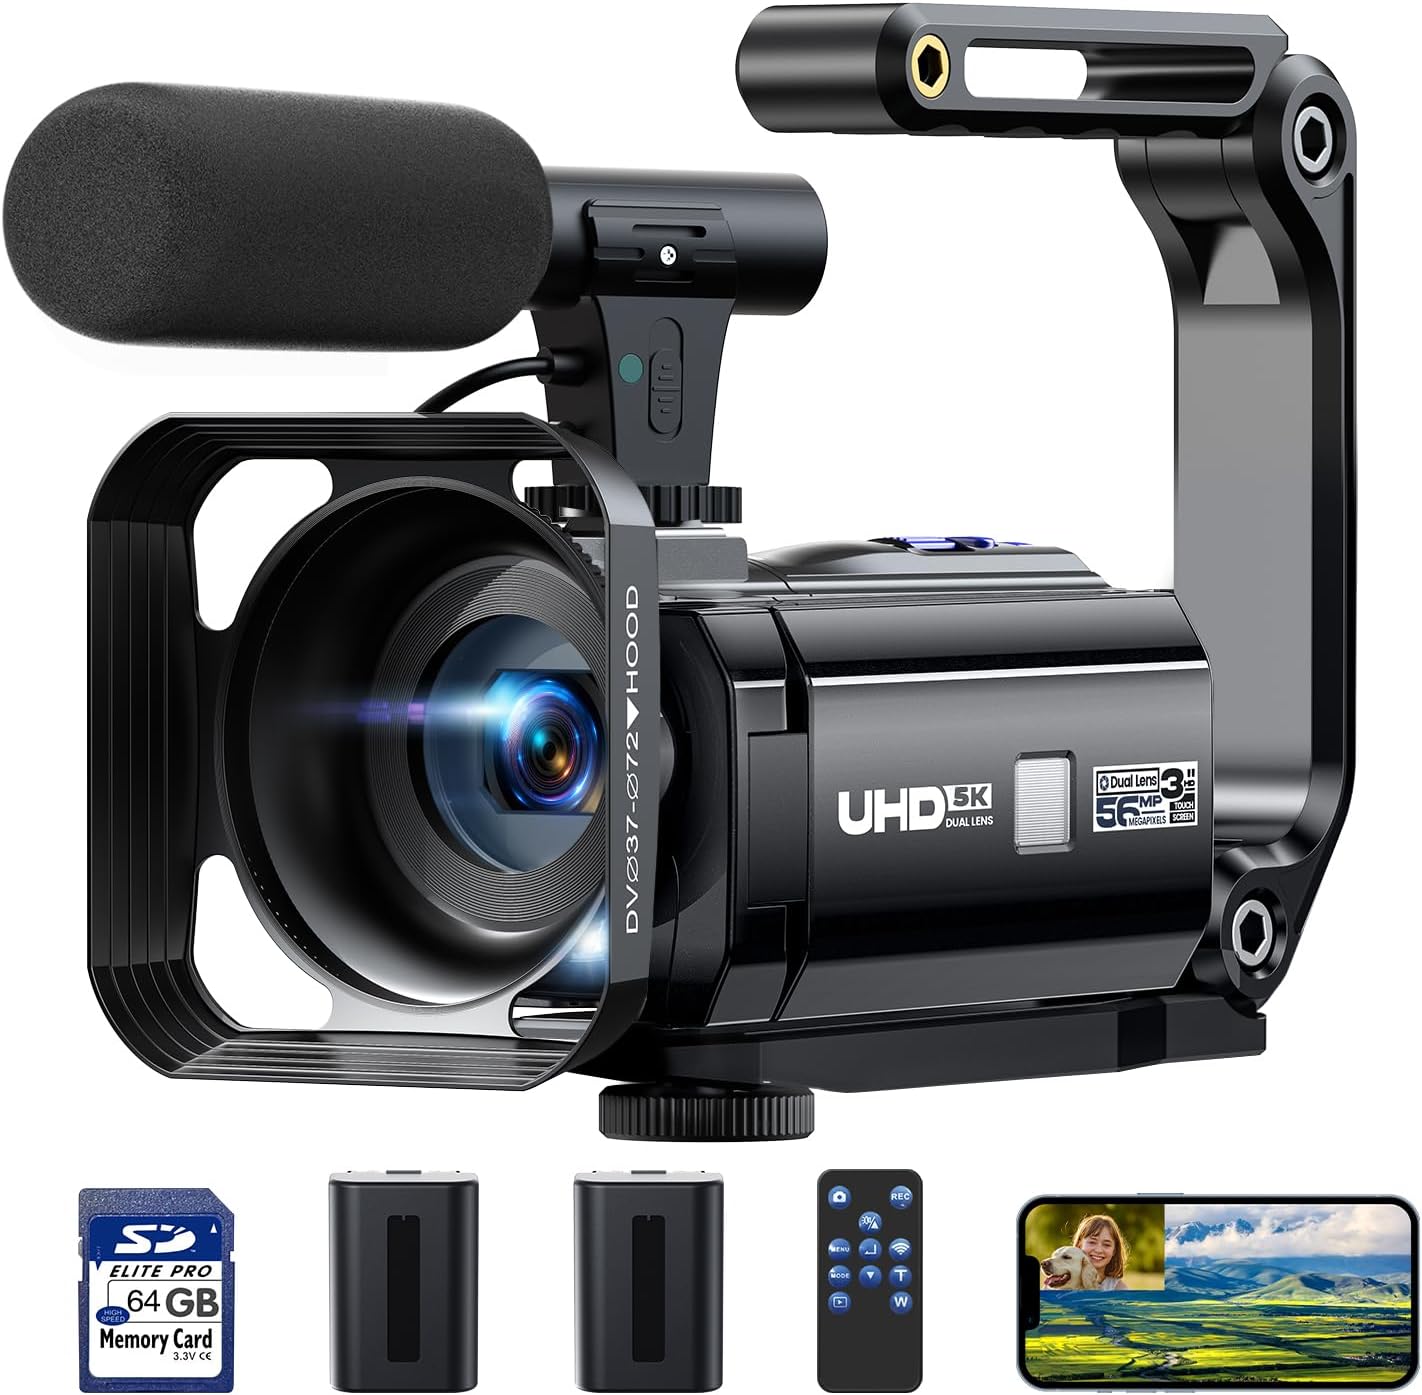
- 1 × CAMWORLD AC09A Video Camera Camcorder
- 1 × 64GB SD Card
- 1 × USB Cable
- 1 × HDMI Cable
- 2 × Rechargeable Batteries
- 1 × Camcorder Bag
- 1 × Handheld Stabilizer
- 1 × External Microphone
- 1 × Mini Tripod
- 1 × Remote Control
- 1 × User Manual (this document)

Product Overview
The CAMWORLD AC09A is a versatile 5K video camera designed for various recording needs, featuring a dual-lens system and a 3.0-inch 270° rotation touchscreen. Key components include:
- Main Lens: Captures 5K video and 56MP still images.
- Rear Lens: Records 1080P video, ideal for dual-view recording.
- 3.0" IPS Touchscreen: Rotates 270 degrees for flexible viewing and control.
- External Microphone Port: For enhanced audio recording.
- HDMI Output: Connects to external displays.
- USB Port: For data transfer and webcam functionality.
- SD Card Slot: Supports up to 64GB SD cards.
Setup Guide
1. Battery Installation and Charging
- Open the battery compartment cover located on the bottom of the camcorder.
- Insert a fully charged battery, ensuring the correct orientation. Close the cover securely.
- To charge the battery, connect the camcorder to a power source using the provided USB cable. The charging indicator will illuminate.
- The camcorder can record while charging, extending shooting time.
2. SD Card Installation
- Locate the SD card slot on the side of the camcorder.
- Insert the provided 64GB SD card with the metal contacts facing the front of the camera until it clicks into place.
- To remove, gently press the SD card until it ejects.
3. Attaching Accessories
- External Microphone: Attach the microphone to the hot shoe mount on top of the camcorder and connect its cable to the microphone input port. This enhances audio quality by reducing ambient noise.
- Lens Hood: Secure the lens hood to the front of the main lens. This helps prevent lens reflections from external light sources and protects the lens.
- Handheld Stabilizer: Attach the camcorder to the handheld stabilizer for improved stability during recording, especially for low-angle shots. The stabilizer can be folded 90° for storage.
- Mini Tripod: Screw the camcorder onto the mini tripod's standard mounting screw for stable, stationary recording. The tripod is adjustable for different angles.


Operating Instructions
1. Powering On/Off
Press and hold the power button to turn the camcorder on or off. The 3.0" IPS touchscreen will activate upon power-on.
2. Basic Recording
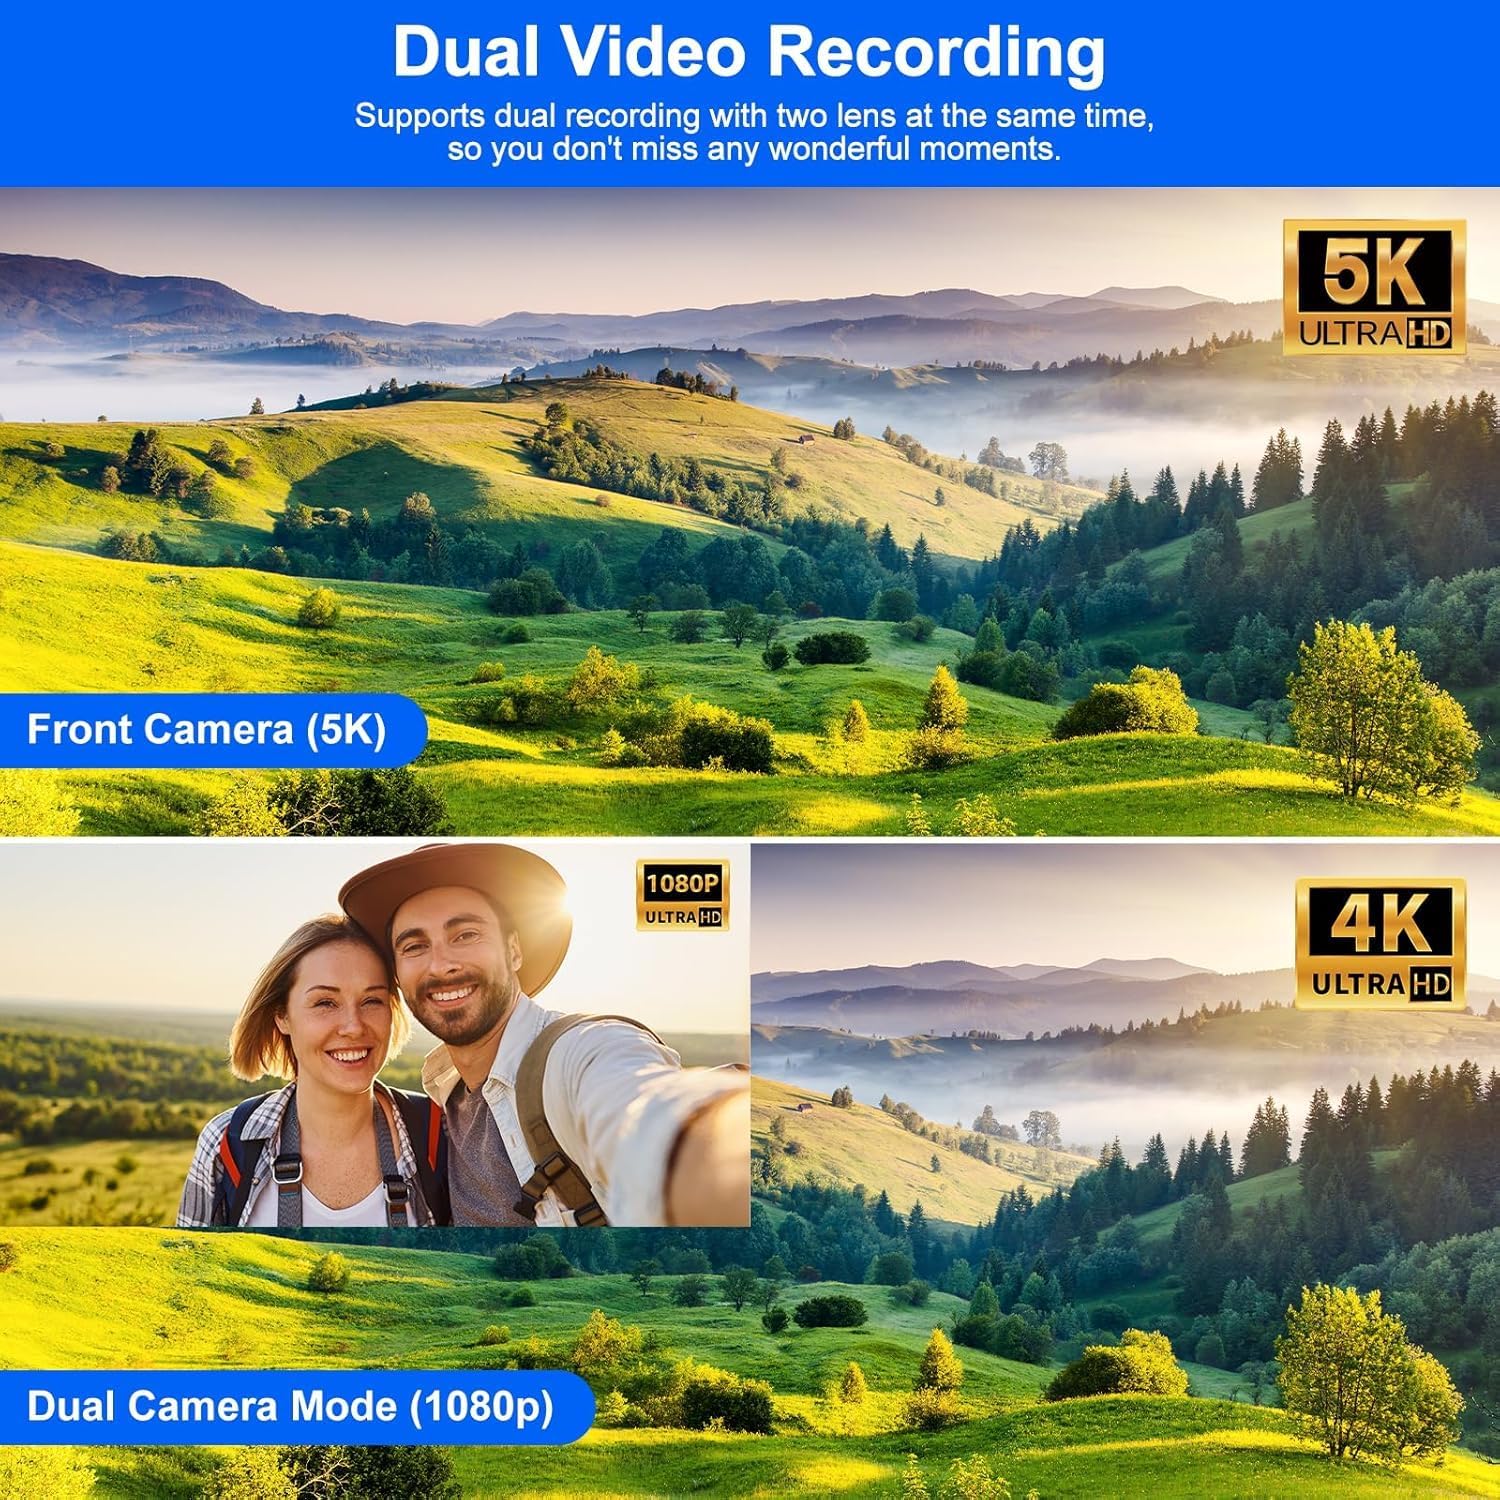
- Single Lens Recording (5K): The main front camera records video at 5K resolution. Press the record button to start and stop recording.
- Dual Lens Recording (4K Front + 1080P Rear): This mode allows simultaneous recording from both the front (4K) and rear (1080P) cameras. This is useful for capturing both the subject and the audience or environment. Select this mode via the touchscreen menu.
- Photo Capture: Switch to photo mode via the menu and press the shutter button to take 56MP still images.
3. Touchscreen Operation
The 3.0" IPS touchscreen rotates 270 degrees, allowing for flexible viewing angles, including self-recording. Navigate menus and settings by tapping the screen.

4. Digital Zoom
Utilize the 16x digital zoom to magnify subjects. Adjust zoom levels using the dedicated zoom controls on the camcorder or via the touchscreen interface.

5. IR Night Vision
Activate the IR Night Vision function to record clear black and white videos or photos in low-light conditions or complete darkness.
6. Webcam Function
Connect the camcorder to your computer via the USB cable to use it as a webcam for live streaming on platforms like YouTube or TikTok, or for video calls.

7. HDMI Output
Connect the camcorder to a TV or monitor using the provided HDMI cable to view your recordings on a larger screen.
8. WiFi Connection and App Usage
Download the "Lercerker" app on your mobile phone. Connect your camcorder to your phone via WiFi to remotely control the camcorder, browse images, and transfer files for sharing.

9. Special Functions
- Anti-shake: Activates electronic image stabilization to reduce blur from camera movement.
- Continuous Shooting: Captures a series of photos in quick succession.
- Time-lapse Recording: Records frames at set intervals to create a sped-up video.
- Slow Motion: Records video at a higher frame rate for slow-motion playback.
- Pause Function: Allows pausing and resuming recording within a single video file.
- Self-Timer: Sets a delay before photo capture.
- Loop Recording: Records continuously, overwriting the oldest files when the memory card is full.

10. Remote Control Usage
Ensure the camcorder is powered on. Point the remote control directly at the camera's IR receiver window, located within 8 meters, to operate functions remotely.
Maintenance
- Cleaning: Use a soft, dry cloth to clean the camera body. For the lens, use a specialized lens cleaning cloth and solution. Avoid harsh chemicals.
- Storage: Store the camcorder in a cool, dry place away from direct sunlight and extreme temperatures. Remove batteries if storing for extended periods.
- Battery Care: Fully charge batteries before first use. Do not expose batteries to fire or extreme heat.
- SD Card Care: Format the SD card periodically to maintain optimal performance. Back up important data regularly.
Troubleshooting
| Problem | Possible Cause | Solution |
|---|---|---|
| Camera does not power on. | Battery is depleted or incorrectly inserted. | Ensure battery is fully charged and correctly inserted. Try a different charged battery. |
| Cannot record video/take photos. | SD card is full, not inserted, or corrupted. | Check SD card insertion. Delete unnecessary files or format the card. Replace if corrupted. |
| Poor audio quality. | External microphone not connected or faulty. High ambient noise. | Ensure external microphone is securely connected. Test microphone functionality. Record in a quieter environment. |
| Remote control not working. | Camera not powered on. Remote battery depleted. Obstruction between remote and camera. | Ensure camera is on. Replace remote battery. Ensure clear line of sight within 8 meters. |
| Video appears shaky. | Anti-shake function is off. Excessive camera movement. | Activate anti-shake function in settings. Use the handheld stabilizer or tripod for stability. |
| Lens flare in recordings. | Strong light source directly hitting the lens. | Ensure the lens hood is properly attached. Adjust shooting angle to avoid direct light sources. |
Specifications
| Feature | Detail |
|---|---|
| Brand | CAMWORLD |
| Model Number | AC09A |
| Video Capture Resolution | 5K (Main Lens), 4K (Front Lens in Dual Mode), 1080P (Rear Lens in Dual Mode) |
| Image Resolution | 56MP |
| Digital Zoom | 16X |
| Screen Size | 3.0 Inches IPS Touchscreen |
| Screen Rotation | 270° |
| Special Features | Anti-Shake, Night Vision, Remote Control, Slow Motion, Time Lapse, Webcam Function, HDMI Output, WiFi Connectivity |
| Photo Sensor Technology | CMOS |
| Flash Memory Type | SDHC (64GB SD Card included) |
| Connectivity Technology | HDMI, USB, WiFi |
| Batteries | 2 A batteries required (included) |
| Product Dimensions | 5.12 x 2.17 x 2.36 inches |
| Item Weight | 1.87 pounds |
Warranty and Support
For any questions or assistance with your CAMWORLD 5K camcorder, please contact customer support. The manufacturer aims to reply within 8 hours.
This product is covered by a standard manufacturer's warranty. Please refer to the warranty card included in your package for specific terms and conditions.
Additional protection plans may be available for purchase separately:
- 2-Year Protection Plan
- 3-Year Protection Plan
- Complete Protect (monthly plan)
Ask a question about this manual
Ask about setup, troubleshooting, compatibility, parts, safety, or missing instructions. Manuals+ will review the question and use this page’s manual context to help answer it.