eMylo AF904
eMylo 433Mhz Universal Wireless Remote Control Switch User Manual
Model: AF904 | Brand: eMylo
Product Overview
The eMylo 433Mhz Universal Wireless Remote Control Switch is designed for convenient wireless control of various electrical appliances, such as lights and gates. This system consists of a wireless relay receiver and an RF remote control transmitter, offering stable signal transmission and multiple operating modes for versatile applications.

Figure 1: eMylo 433Mhz Universal Wireless Remote Control Switch and Receiver. The image displays the compact black remote control with 'A' and 'B' buttons, alongside the black plastic-cased receiver unit, showing its internal blue relay and circuit board.
Key features include a wide operating voltage range (DC 6V to 30V), high receiving sensitivity, and a control range of up to 50 meters in open spaces. The system supports four programmable operation modes: Momentary, Toggle, Latched, and Delay, allowing customization to suit specific control needs.
Setup and Installation
This section provides instructions for connecting the wireless relay receiver to your electrical appliance.
Receiver Wiring
The receiver supports a DC voltage input from 6V to 30V. Ensure the power supply matches the receiver's requirements. The receiver features three terminals: Normally Open (NO), Common (COM), and Normally Closed (NC), providing flexibility for various wiring configurations.
- DC 6V-30V Wiring (Diagram I): Connect the positive (+) and negative (-) terminals of your DC power supply to the V+ and V- inputs on the receiver. Connect your light or appliance between the COM and NO terminals for standard operation (e.g., turning on when activated).
- AC 110V/240V Wiring (Diagram II): For AC applications, a separate power supply for the receiver is required (DC 6V-30V). The relay contacts (NO, COM, NC) can then be used to switch the AC load. Connect the Live line to COM and the appliance to NO.
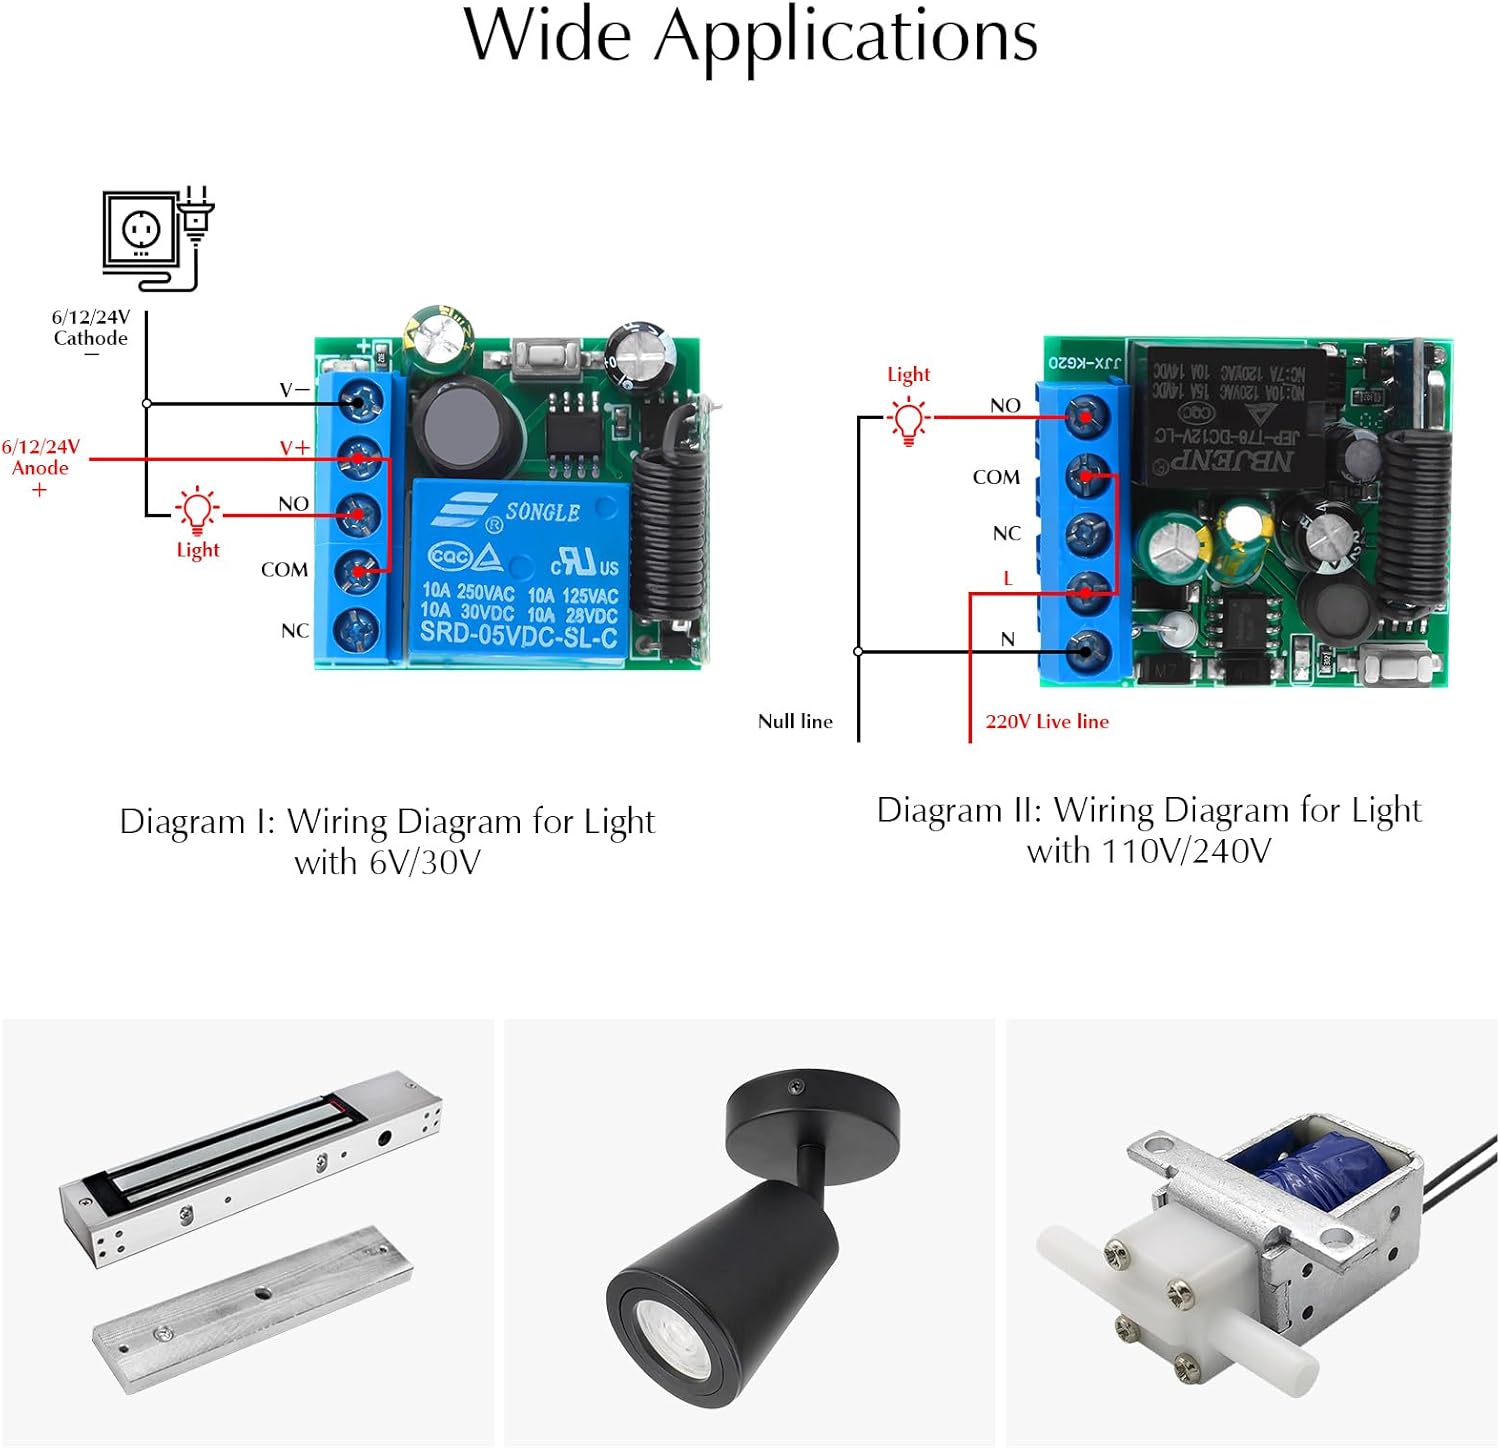
Figure 2: Wiring Diagrams for eMylo Wireless Relay Switch. Diagram I illustrates wiring for a DC 6V/30V light, showing connections to V+, V-, NO, COM, and NC terminals. Diagram II shows wiring for a 110V/240V light, indicating connections for Null line, Live line, and the relay terminals.
Important Note: Always ensure the black signal cable on the receiver is placed outside the casing for optimal RF signal reception. Do not connect the receiver to a voltage outside its specified range (DC 6V-30V).

Figure 3: Example setup showing the eMylo Wireless Relay Switch controlling a light. The image depicts the receiver connected to a light fixture, with a remote control being used to operate it, illustrating the concept of turning lights ON/OFF wirelessly.
Operating Modes and Programming
The eMylo wireless remote control system offers four programmable operating modes to suit different control requirements. The remote control transmitter is compact and includes a sliding lid to prevent accidental activation.

Figure 4: eMylo Remote Control Transmitter. This image highlights the compact design of the remote control and its protective sliding lid, which helps prevent unintended button presses.
Programming the Receiver
To change the operating mode, follow the specific programming steps for each mode. The LED indicator on the receiver will flash to confirm successful programming.
Operation Modes:

Figure 5: Visual guide to eMylo Remote Control Operating Modes. This image illustrates the programming steps and operational behavior for Momentary, Latched, and Toggle modes using the remote control and receiver.
- Momentary Mode:
- Programming: Press the receiver's learning button 1 time. The LED indicator will flash 3 times.
- Operation: Press and hold the remote button (e.g., 'A') to turn the device ON. Release the button to turn the device OFF.
- Latched Mode:
- Programming: Press the receiver's learning button 2 times continuously. The LED indicator will flash 3 times.
- Operation: Press button 'A' to turn the device ON. Press button 'A' again to turn the device OFF.
- Toggle Mode:
- Programming: Press the receiver's learning button 3 times continuously. The LED indicator will flash 3 times.
- Operation: Press button 'A' to turn the device ON. Press button 'B' to turn the device OFF.
- Delay Mode: (Information not explicitly detailed in provided images/text, but mentioned in feature bullets. Assuming standard delay functionality.)
- Programming: Refer to the specific instructions provided with your product for Delay mode programming, as it typically involves pressing the learning button 4 times.
- Operation: The device will turn ON and remain ON for a set duration after the remote button is pressed, then automatically turn OFF.
To clear all programmed remotes from the receiver, press and hold the learning button on the receiver for approximately 8 seconds until the LED indicator flashes rapidly, then turns off. This will reset the receiver to its default state.
Wide Applications
The eMylo wireless remote control switch is versatile and can be used in numerous applications due to its robust design and flexible operating modes. Common applications include:
- Lighting Control: Remotely turn on/off indoor and outdoor lights.
- Gate and Door Control: Operate electric gates, garage doors, or other access control systems.
- Motor Control: Control small DC motors for various projects.
- Other Electrical Appliances: Any low-power electrical device within the voltage and current limits of the relay.

Figure 6: Illustration of the eMylo Wireless Remote Control Switch's effective control range. The image shows a remote control being used outside a house, with light icons illuminating inside, demonstrating the ability to control devices up to 50 meters away.
The strong penetration capability of the 433Mhz RF signal allows for reliable control through walls and floors, enhancing convenience in various environments.

Figure 7: Depiction of the eMylo Remote Control's signal penetration. The image shows the remote control operating a device through multiple walls, illustrating its strong signal and ability to penetrate obstacles.
Maintenance
The eMylo Wireless Remote Control Switch and receiver are designed for durability and long-term performance, with the relay rated for over 100,000 operations. Minimal maintenance is required.
- Cleaning: Keep the receiver and remote control clean and free from dust and debris. Use a soft, dry cloth for cleaning.
- Environment: Ensure the receiver is installed in a dry environment, away from excessive moisture or extreme temperatures, to prevent damage to the electronic components.
- Battery Replacement: The remote control transmitter uses a DC 12V 27A battery. Replace the battery when the remote's range decreases or it becomes unresponsive.
Troubleshooting
If you encounter issues with your eMylo Wireless Remote Control Switch, consider the following troubleshooting steps:
| Problem | Possible Cause | Solution |
|---|---|---|
| Device does not respond to remote. |
|
|
| Poor signal reception or reduced range. |
|
|
| Receiver LED does not light up. |
|
|
Specifications
| Feature | Detail |
|---|---|
| Model Number | AF904 |
| Operating Voltage | DC 6V - 30V |
| RF Frequency | 433MHz |
| Receiving Sensitivity | > 100 dBm |
| Control Range | Up to 50 meters (open space) |
| Relay Current | 10A |
| Operating Modes | Momentary, Toggle, Latched, Delay |
| Transmitter Battery | DC 12V 27A |
| Product Dimensions | 1 x 1 x 1 inches (Receiver) |
| Item Weight | 2.08 ounces |
Customer Support
eMylo is committed to providing excellent customer service and technical support. If you have any questions, require assistance with installation, or need troubleshooting guidance, please contact our support team.
- Online Customer Service: Available for quick answers to your questions.
- Technical Support: Professional assistance for product-related inquiries.
Please refer to the eMylo official website or your purchase platform for specific contact details and support channels.
Ask a question about this manual
Ask about setup, troubleshooting, compatibility, parts, safety, or missing instructions. Manuals+ will review the question and use this page’s manual context to help answer it.