Introduction
Thank you for choosing the CIONAOR Custom LED Neon Sign. This manual provides essential information for the safe and effective use of your new personalized neon light. Please read these instructions carefully before installation and operation, and retain them for future reference.
Package Contents
Your CIONAOR Custom LED Neon Sign package includes the following items:
- Neon Sign
- DC12V 5A Power Adapter
- Plug (specific to your region)
- Dimmer and Remote Control
- Hanging Chain Installation Kit
- Screw Installation Kit
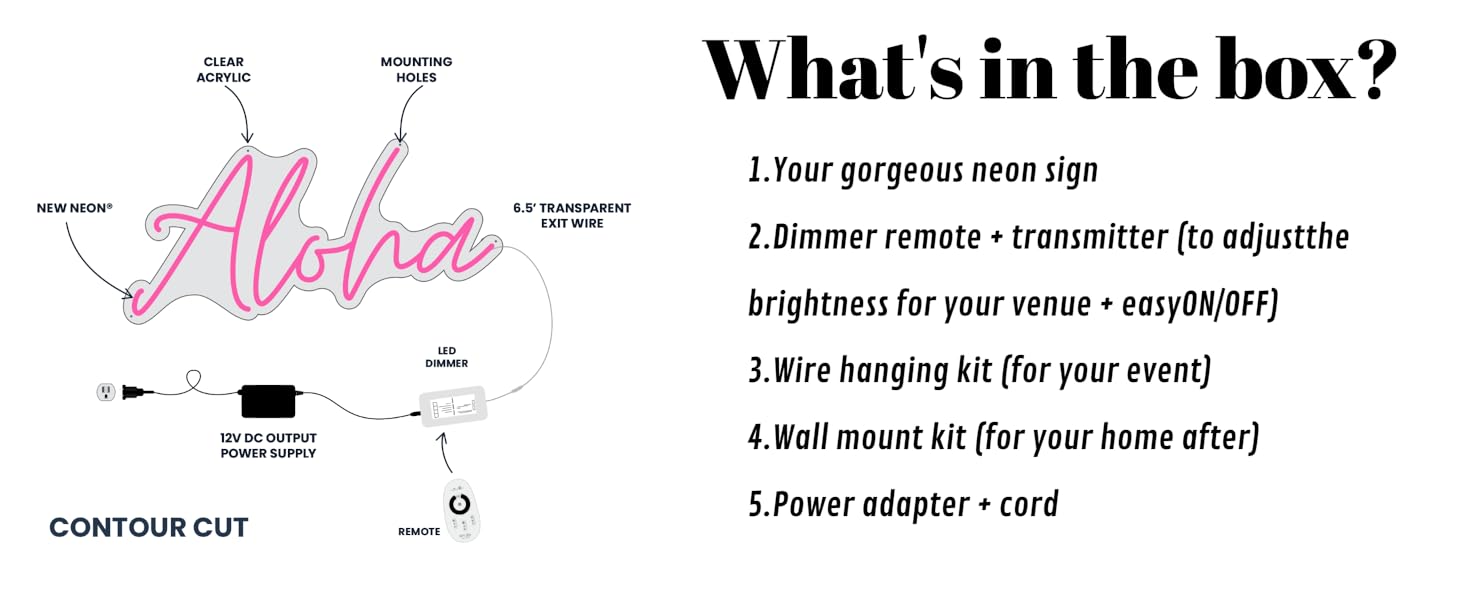
Image: An illustrative diagram detailing the components included with the neon sign, such as the sign itself, dimmer, remote, hanging kit, wall mount kit, and power adapter.
Setup and Installation
The CIONAOR LED neon lights are designed for easy installation. You have two primary options for mounting:
Option 1: Hanging Installation (Using Chain Kit)
- Identify the pre-drilled holes on the acrylic backing board of your neon sign.
- Attach the provided hanging chains to these holes.
- Securely hang the sign in your desired location using appropriate hooks or fasteners (not included, depending on wall type).

Image: A custom neon sign displaying "The Walkers" hanging on a wall, illustrating a typical hanging installation.
Option 2: Screw Installation (Using Screw Kit)
- Position the neon sign on your desired wall and mark the locations of the pre-drilled holes.
- Drill pilot holes into the wall at the marked locations.
- Insert the provided wall anchors (if necessary for your wall type).
- Secure the sign to the wall using the provided screws and stand-offs.
Important: Ensure the mounting surface is clean and dry before installation. For optimal stability, especially for larger signs, consider professional installation.
Video: A demonstration of a 2-row, 35-inch neon sign with "Brittany Signature" font, showcasing its appearance and potential for various settings. Creator: Beauty-Sign (Seller).

Image: A chart illustrating various size options for custom neon signs, ranging from 20 inches to 60 inches in length, with corresponding centimeter measurements.
Operating Instructions
Once your neon sign is securely installed, connect the DC12V 5A adapter to the sign and then plug it into a power outlet. The sign will illuminate.
Using the Dimmer and Remote Control
Your CIONAOR neon sign comes with a dimmer and remote control for adjusting brightness and power.
- Power On/Off: Use the power button on the remote or the inline switch on the power cable to turn the sign on or off.
- Brightness Adjustment: Use the brightness control buttons on the remote to increase or decrease the light intensity.
- Mode Selection: If your sign supports multiple lighting modes or colors, use the mode buttons on the remote to cycle through the available options.
Maintenance
To ensure the longevity and optimal performance of your CIONAOR Custom LED Neon Sign, follow these maintenance guidelines:
- Cleaning: Gently wipe the acrylic surface with a soft, dry, or slightly damp cloth. Avoid abrasive cleaners or solvents, as they can damage the material.
- Handling: Always handle the sign with care to prevent bending or breaking the LED strips or acrylic backing.
- Power: Disconnect the power adapter from the outlet when cleaning or performing any maintenance.
- Environment: While the sign is designed with high-quality, waterproof acrylic, it is recommended for indoor use or sheltered outdoor areas to protect electronic components from extreme weather.
Troubleshooting
If you encounter any issues with your neon sign, refer to the following common troubleshooting steps:
- Sign does not light up:
- Ensure the power adapter is securely connected to both the sign and a working electrical outlet.
- Check if the power outlet is functional by plugging in another device.
- Verify that the inline switch on the power cable is in the "on" position.
- Confirm the remote control batteries are not depleted and that the remote is pointed directly at the receiver.
- Lights are dim or flickering:
- Adjust the brightness settings using the remote control.
- Ensure the power adapter is providing sufficient power (DC12V 5A).
- Remote control not responding:
- Replace the remote control batteries.
- Ensure there are no obstructions between the remote and the sign's receiver.
If these steps do not resolve the issue, please contact CIONAOR customer support for further assistance.
Specifications
| Feature | Detail |
|---|---|
| Mounting Type | Wall Mount, Window Mount, Tabletop, Door Mount |
| Product Dimensions | 16"L x 5"W (Note: Actual dimensions vary based on customization) |
| Item Weight | 1.1 pounds (0.5 Kilograms) |
| Light Type | Neon LED Strip |
| Material | 8MM Thick Acrylic, 6MM Super Bright LED Strip, Eco-Friendly Silicone |
| Power Supply | DC12V 5A Adapter |
| Colors Available | 13 Colors (customizable) |
| Style Features | Waterproof and Non-Slip, High Temperature Resistance, CNC Precision Cut |
Warranty and Support
CIONAOR LED neon signs are CE certified for power safety. We offer 8 hours of customer support to assist with any questions or issues you may have regarding your neon sign. Please contact us directly for support.
For further information or assistance, please visit the CIONAOR Store.