Introduction
This manual provides instructions for the VSDISPLAY 14.5 Inch Touch Monitor (Model VS145TZJ01-T). This 2K (2560x720) IPS stretched bar display is designed for use as a secondary display, particularly suitable for DIY PC cases like the Y70, enabling GPU/CPU data monitoring and touch functionality.
Package Contents
Verify that all items are present in the package:
- 1x 14.5 inch 2560x720 2K VS145TZJ01-T LCD Touch Monitor
- 1x USB-C cable
- 1x Signal Cable (Mini HDMI to HDMI)

Image: Contents of the VSDISPLAY 14.5 Inch Touch Monitor package.
Specifications
| Feature | Detail |
|---|---|
| Screen Size | 14.5 Inches |
| Resolution | 2560x720 |
| Panel Type | IPS |
| Touch Function | Yes (3-5 ms response) |
| Video Input | HDMI, USB-C |
| Screen Brightness | 350 cd/m2 |
| Screen Contrast | 1000:1 |
| View Angle | 85/85/85/85 (Typ.)(CR≥10) [Left/Right/ Up/Down] |
| Product Dimensions | 0.65 x 15 x 4.5 inches |
| Item Weight | 2.4 pounds |
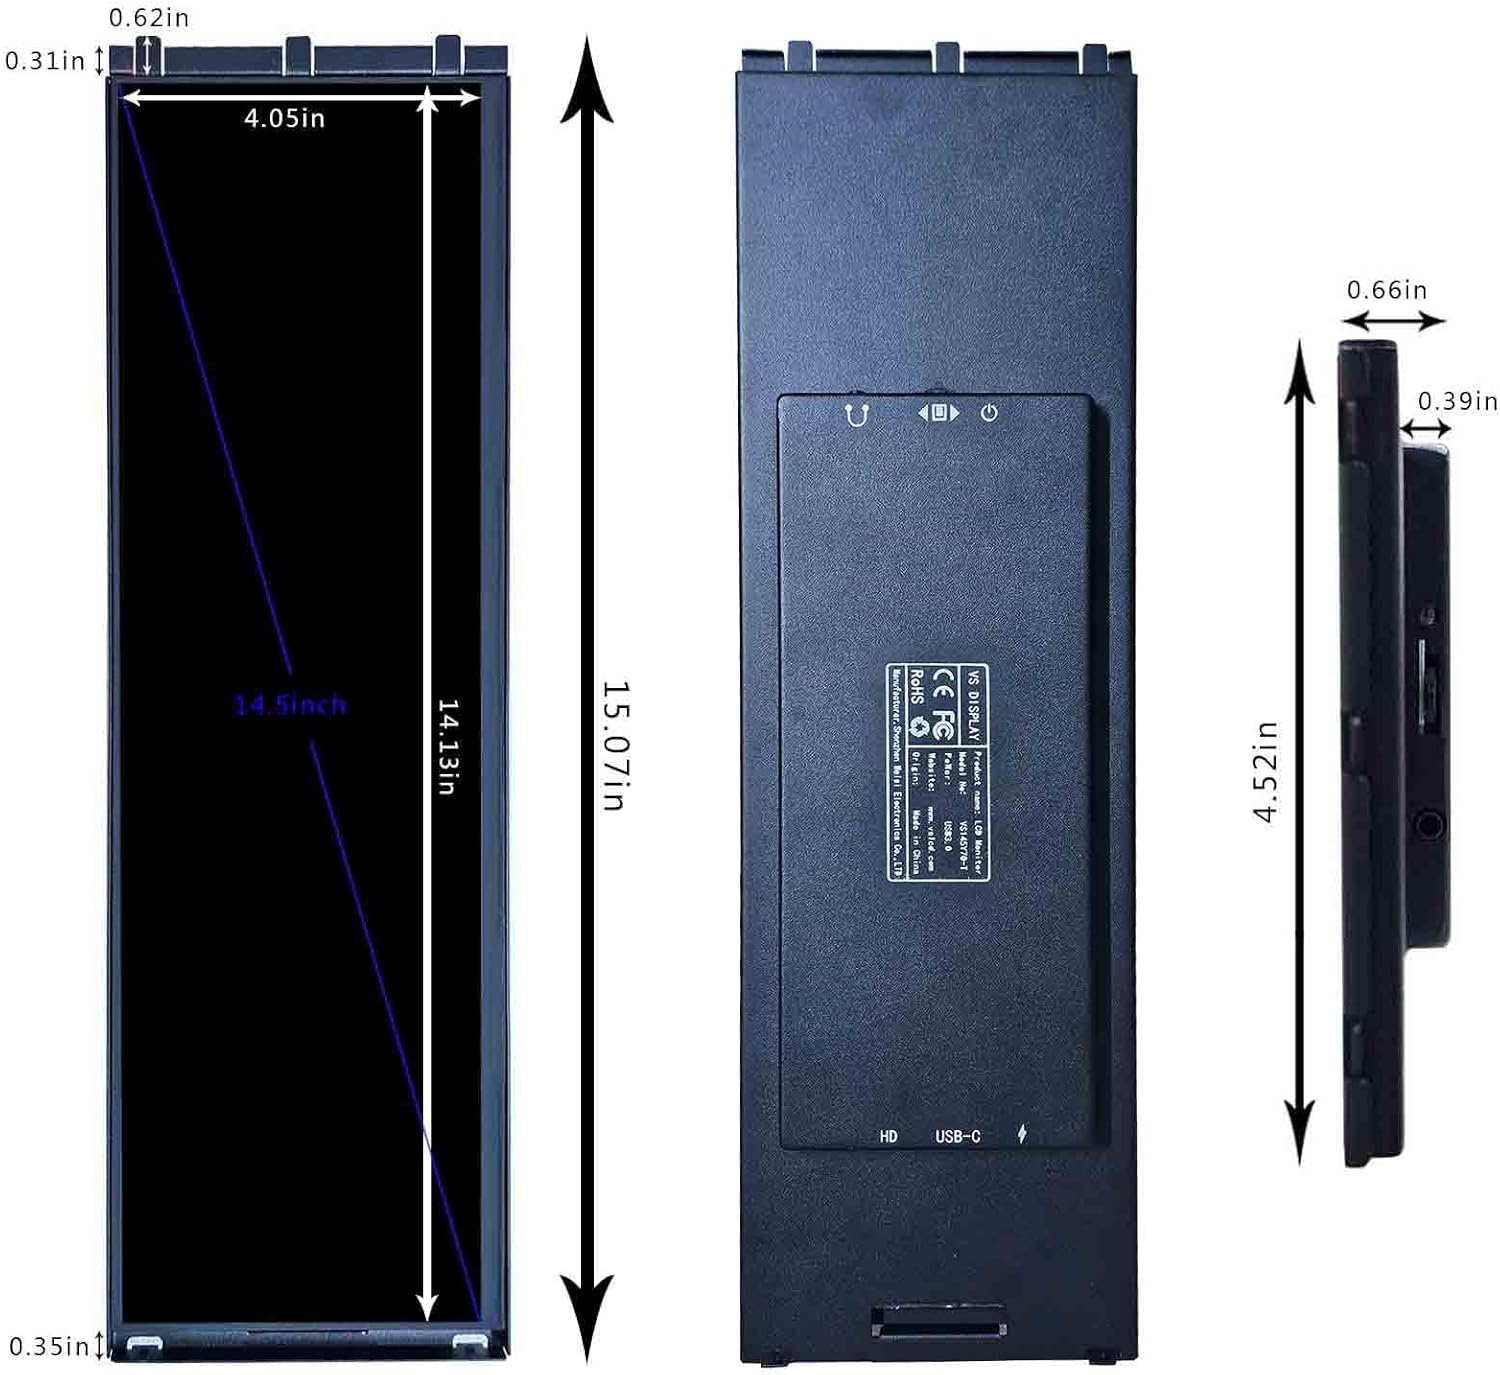
Image: Physical dimensions of the monitor.
Setup & Installation
This monitor is designed for integration into PC cases, particularly the Y70. Follow these steps for proper installation and connection.
1. Preparing the PC Case (Y70 Example)
- Carefully disassemble the glass panels on both sides of the PC case.
- Align the monitor with the card slot in the PC case.
- Insert the monitor into the designated slot.
- Attach the monitor to the glass panel and secure it using screws.

Image: Detailed installation guide for Y70 PC case.

Image: Correct monitor placement against the glass panel.
Video: Guide on installing the VSDISPLAY touch screen behind the corner glass of a Y70 PC case.
Video: Easy installation process for the 14.5 Inch Touch LCD Screen Monitor.
Video: Installation details and settings for the 14.5 inch touch monitor.
2. Connecting the Monitor
The monitor supports HDMI and USB-C video input. For touch functionality, a USB connection is required.
- Connect the provided signal cable (Mini HDMI to HDMI) from your computer's graphics card to the monitor's Mini HD port.
- Connect the provided USB-C cable from your computer's USB 2.0 port to the monitor's USB-C port (labeled "USB-C For Charge & Signal Transmission"). This connection is essential for touch functionality.
- An additional USB-C port is available for power only ("USB-C For Only Charge") if needed.
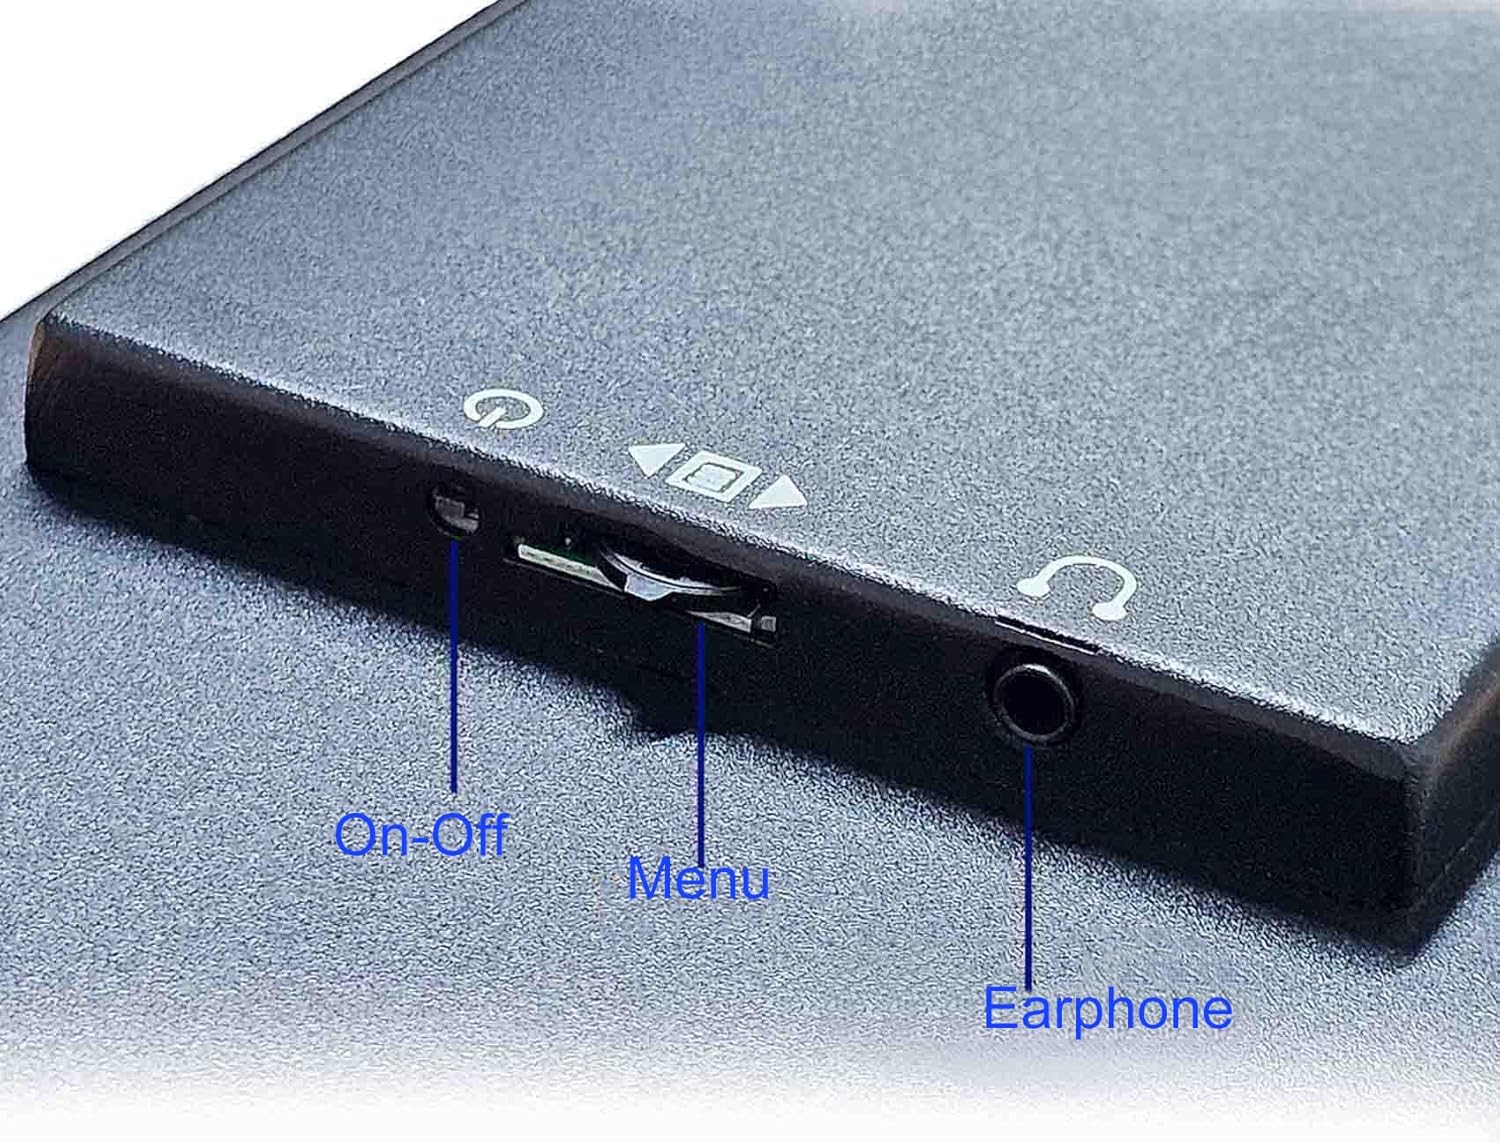
Image: Monitor input ports.

Image: Signal and touch cable connection diagram.
Important Note:
- The touch function requires a device USB 2.0 port. If your device uses a USB 3.0 port, the touch function may not work.
- If the screen flickers due to insufficient power, connect the monitor to an external power source (5V/2A) using the dedicated USB-C charge port.
Operating Instructions
1. Basic Controls
The monitor features physical buttons for basic control:
- On-Off Button: Powers the monitor on or off.
- Menu Button: Accesses the on-screen display (OSD) menu for settings adjustments.
- Earphone Jack: For audio output.

Image: Monitor in operation, showing touch interaction.
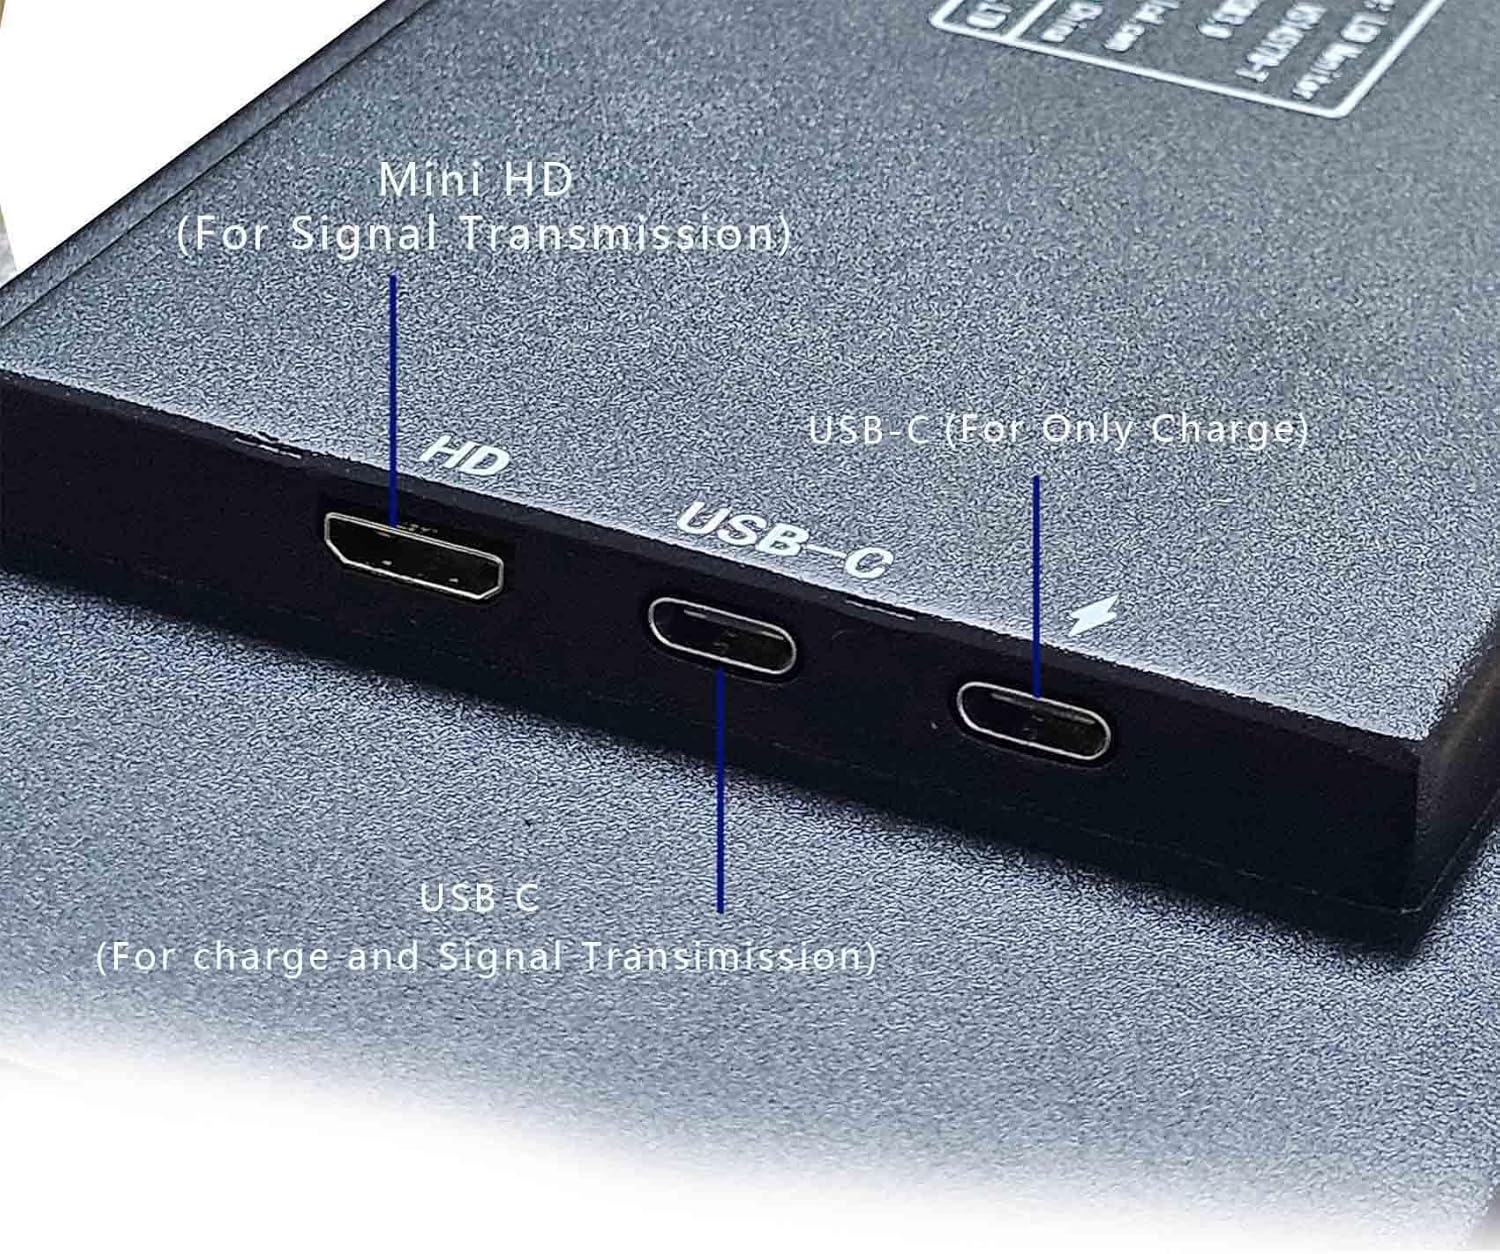
Image: Location of control buttons and earphone jack.
2. Touch Functionality
The touch panel allows for intuitive interaction with the display, including swiping, scrolling, selecting, zooming, and cursor movement. Ensure the USB-C data cable is connected to a compatible USB 2.0 port on your computer for touch functionality to work.
3. Display Settings (Windows)
After connecting, configure your display settings in Windows:
- Go to Display Settings.
- Identify the VSDISPLAY monitor (it will appear as a secondary display).
- Adjust resolution to 2560x720.
- Set display orientation to Portrait or Landscape as desired.
- Enable touch input for the monitor in Tablet PC Settings if not automatically detected.
4. Data Monitoring Software
This monitor does not support Y70 Nexus software. To monitor system data (GPU, CPU, etc.), you will need to download third-party software. Recommended options include:
Troubleshooting
- No Display / Flickering Screen:
- Ensure both the HDMI (or USB-C video) and USB-C power/data cables are securely connected.
- If flickering occurs, connect an external 5V/2A power adapter to the monitor's dedicated USB-C charge port.
- Verify your computer's display settings recognize the monitor and are set to the correct resolution (2560x720).
- Touch Function Not Working:
- Confirm the USB-C data cable is connected to a USB 2.0 port on your computer. Some USB 3.0 ports may not support the touch function.
- Check Windows Tablet PC Settings to ensure touch input is enabled for the VSDISPLAY monitor.
- Restart your computer and the monitor.
- Monitor Not Fitting Y70 Case:
- Refer to the installation steps and images provided in this manual. Ensure the glass panels are correctly disassembled and the monitor is aligned with the internal card slot.
- The monitor is designed to fit behind the corner glass, not replace it entirely.
Maintenance
- Cleaning: Use a soft, lint-free cloth to clean the screen. For stubborn marks, lightly dampen the cloth with water or a screen-safe cleaning solution. Avoid harsh chemicals.
- Storage: When not in use for extended periods, store the monitor in a cool, dry place, ideally in its original packaging to protect it from dust and physical damage.
- Handling: Always handle the monitor by its edges. Avoid applying pressure directly to the screen.
Warranty and Support
For warranty information and technical support, please refer to the product's official website or contact VSDISPLAY customer service directly. Keep your purchase receipt for warranty claims.


