1. Introduction
Thank you for choosing the EasyCom DYJD-001 Extra Large Printer Stand. This versatile 3-tier stand is designed to optimize your workspace, providing dedicated storage for printers, office supplies, and other items. It features adjustable heights, a convenient pull-out drawer basket, and two installation options (with or without wheels) to suit your specific needs. Please read this manual carefully before assembly and use to ensure proper installation and safe operation.
2. Package Contents
Before beginning assembly, please verify that all parts listed below are present and undamaged. If any parts are missing or damaged, please contact EasyCom customer service.
- 1 x Printer Stand (Disassembled components)
- 1 x Assembly Kit (Includes screws, Allen wrench, casters, and adjustable feet)
- 1 x Instruction Manual
3. Safety Information
- Always assemble the product on a soft, clean surface to prevent scratches.
- Ensure all screws and fasteners are securely tightened before use. Periodically check and re-tighten as necessary.
- Do not overload the shelves. Each shelf has a maximum weight capacity of 100 lbs (45 kg).
- Keep small parts and packaging materials away from children and pets.
- Use the product on a level surface to prevent tipping.
- If using casters, ensure they are locked when the stand is in a stationary position.
4. Assembly Instructions
Assembly is straightforward and typically takes about 20 minutes. Follow the numbered steps provided in the included assembly guide. Ensure you use the correct screws for each part.
- Unpack Components: Carefully remove all parts from the packaging and lay them out on a protected surface.
- Assemble Frame: Attach the metal frame pieces together using the provided screws and Allen wrench. Ensure the frame is stable.
- Install Shelves: Secure the wooden shelves to the metal frame. Pay attention to the orientation of the shelves, especially the top shelf which supports the drawer basket.
- Install Drawer Basket: Slide the mesh drawer basket into its designated slot beneath the top shelf.
- Choose Installation Option: Decide whether to install the casters for mobility or the adjustable feet for stationary use. (Refer to Section 6 for details).
- Final Tightening: Once all parts are assembled, gently tighten all screws to ensure stability. Do not overtighten.

Image: The assembled EasyCom printer stand, demonstrating its capacity for two printers and various office supplies. This image provides an overview of the product's intended use and storage capabilities.
5. Adjustable Height Feature
The EasyCom printer stand offers 5 adjustable height levels for the middle shelf, allowing you to customize the vertical space to accommodate different printer sizes or storage needs. This feature maximizes flexibility and efficient organization.
- To adjust the height, loosen the screws securing the middle shelf to the frame.
- Carefully lift or lower the shelf to the desired position, aligning it with the pre-drilled holes.
- Securely re-tighten all screws to ensure the shelf is stable before placing items on it.

Image: A side view of the printer stand highlighting the five distinct adjustable height levels for the middle shelf, offering flexibility for various storage requirements.
6. Installation Options
Your printer stand comes with two installation options for its base: sturdy metal casters for mobility or adjustable feet for increased stability.
6.1. With Casters
Install the 360-degree swivel casters if you require easy movement of the printer stand. Each caster includes a lockable mechanism to secure the stand in place.
- Screw the casters into the designated holes at the bottom of the stand's legs.
- Ensure all casters are securely tightened.
- To move the stand, unlock the casters. To keep it stationary, press the lock lever down on each caster.
6.2. With Adjustable Feet
Install the adjustable feet if you prefer a stationary setup with enhanced stability and the ability to level the stand on uneven surfaces.
- Screw the adjustable feet into the designated holes at the bottom of the stand's legs.
- Adjust the height of each foot by rotating it to achieve a level and stable surface.

Image: A visual comparison of the two installation methods: with sturdy metal casters for mobility and with adjustable feet for increased stability, demonstrating how each option is attached to the stand's legs.
7. Drawer Basket Usage
The integrated pull-out mesh drawer basket provides convenient storage for office supplies such as paper, ink cartridges, cables, or other accessories. Its design allows for easy access and helps reduce clutter.
- To access items, gently pull the basket outwards.
- To close, push the basket back into its slot until it is fully recessed.
- Avoid placing excessively heavy or sharp objects in the basket to prevent damage.

Image: A hand demonstrating the easy pull-out functionality of the mesh drawer basket, which offers efficient storage for office essentials.
8. Versatile Functionality
Beyond its primary use as a printer stand, this multifunctional 3-tier shelf can serve various purposes in your home or office. Its robust design and ample storage make it suitable for:
- Showcasing speakers, DVD players, or other small appliances.
- Storing books, magazines, and decorative items as a side table.
- Organizing craft supplies or other household items.

Image: The printer stand repurposed as a stylish side table in a living room, holding books, a record player, and decorative items, showcasing its versatile functionality.
9. Maintenance
To ensure the longevity and appearance of your EasyCom printer stand, follow these maintenance guidelines:
- Cleaning: Wipe surfaces with a soft, damp cloth. Avoid harsh chemicals or abrasive cleaners that may damage the finish.
- Dusting: Regularly dust the stand to prevent buildup.
- Inspection: Periodically check all screws and connections to ensure they remain tight. Re-tighten if necessary.
- Weight Distribution: Distribute weight evenly across the shelves to maintain stability and prevent warping.
10. Troubleshooting
If you encounter any issues with your printer stand, refer to the following common solutions:
- Stand is Wobbly: Ensure all screws are fully tightened. If using adjustable feet, rotate them to level the stand on uneven floors. If using casters, ensure they are locked when stationary.
- Difficulty Assembling: Double-check the instruction manual and ensure all parts are oriented correctly. Do not force parts together. If screws are stripping, ensure you are using the correct size and not overtightening.
- Drawer Basket Not Sliding Smoothly: Check for any obstructions in the drawer runners. Ensure the basket is inserted correctly and not bent.
If problems persist, please contact EasyCom customer support for assistance.
11. Specifications
| Feature | Detail |
|---|---|
| Model Number | DYJD-001 |
| Product Dimensions | 59.94 x 48.01 x 82.3 cm (23.6 x 18.9 x 32.2 inches) |
| Item Weight | 8.53 kg (18.81 lbs) |
| Material | Wood, Metal (Solid Particle Board, Thickened Metal Frame) |
| Color | Rustic Brown |
| Number of Tiers | 3 |
| Adjustable Heights | 5 levels for middle shelf |
| Installation Options | Casters (with locks) or Adjustable Feet |
| Special Features | 23.6"x18.9" Larger Desktop, 5 Adjustable Heights, Two Installation Options, With Drawer Basket |
| Weight Capacity (per shelf) | 100 lbs (45 kg) |
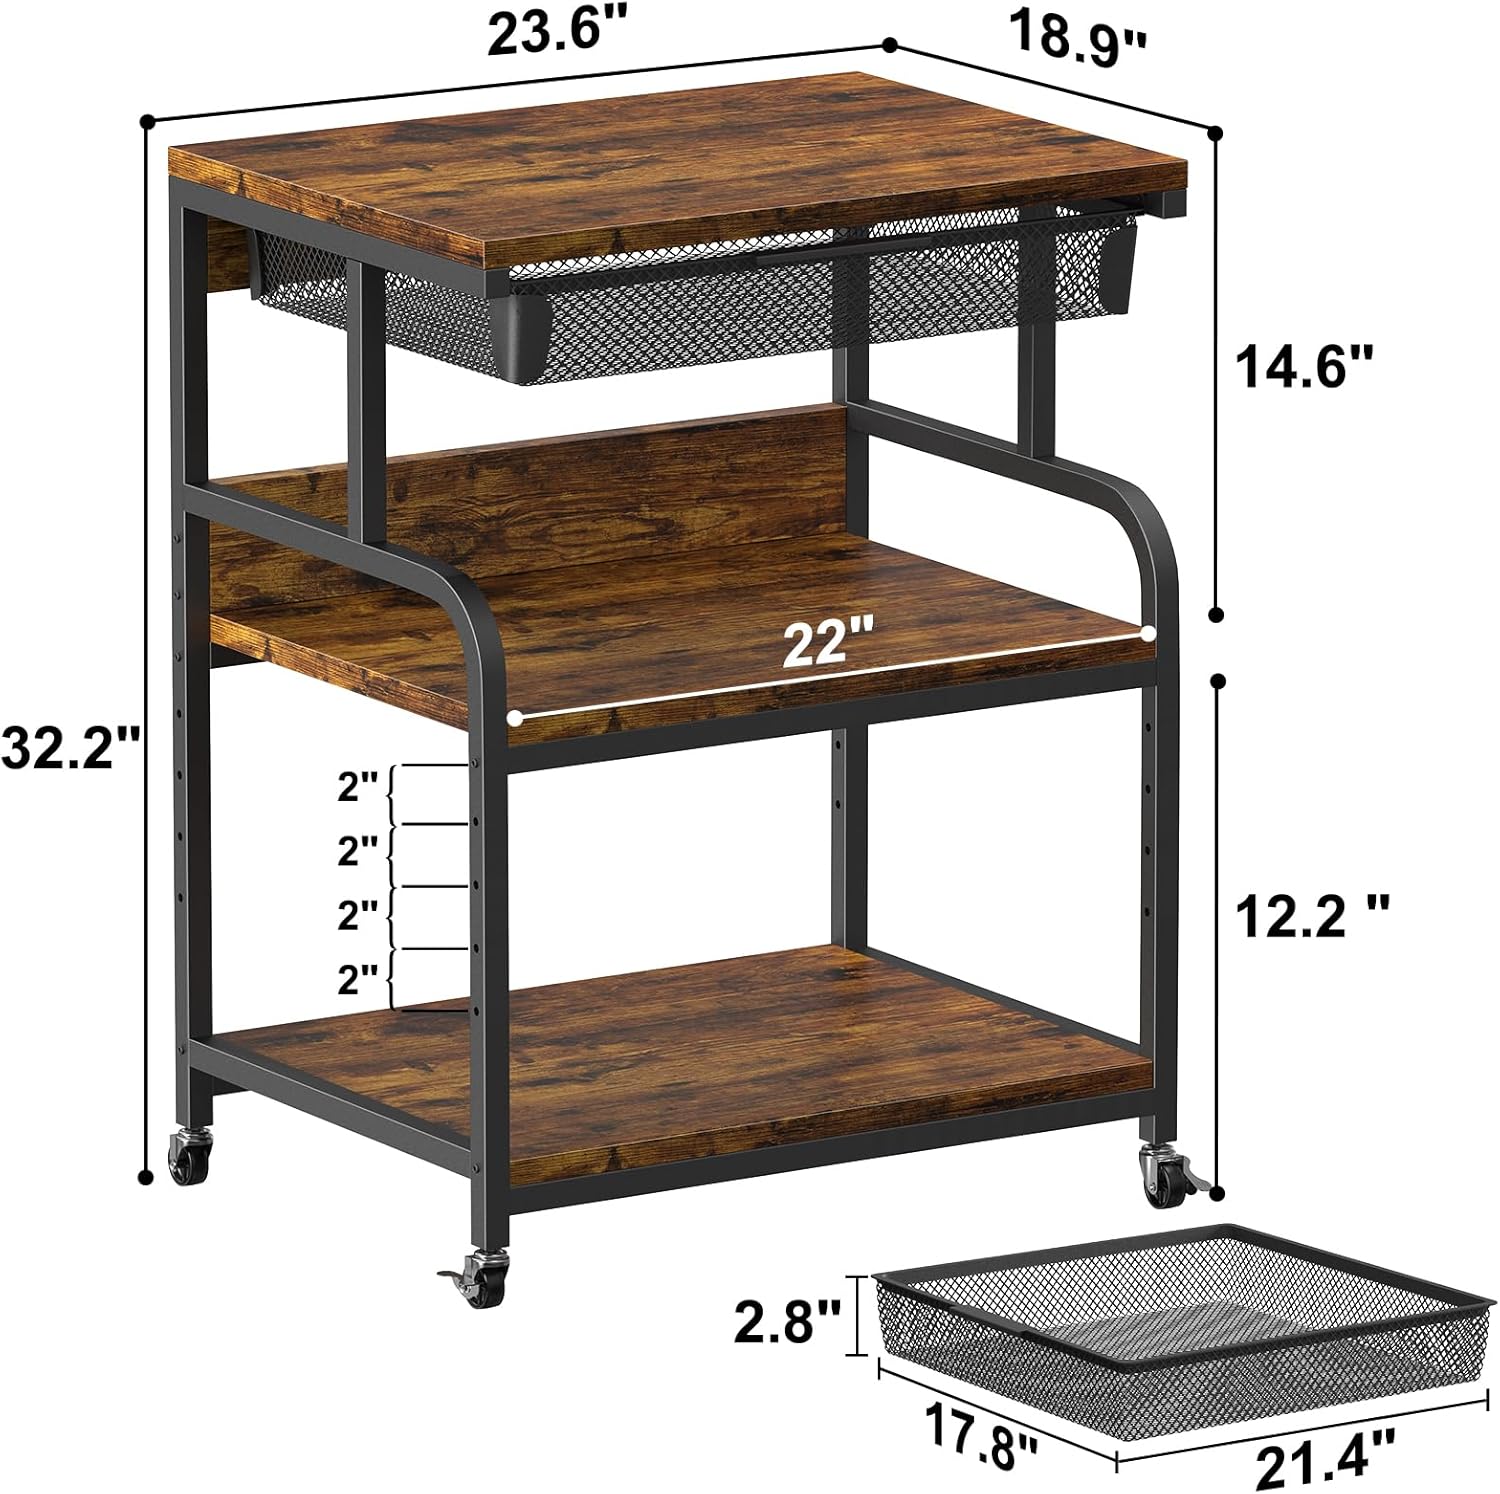
Image: A detailed diagram illustrating the overall dimensions of the printer stand, including width, depth, height, and internal shelf measurements.
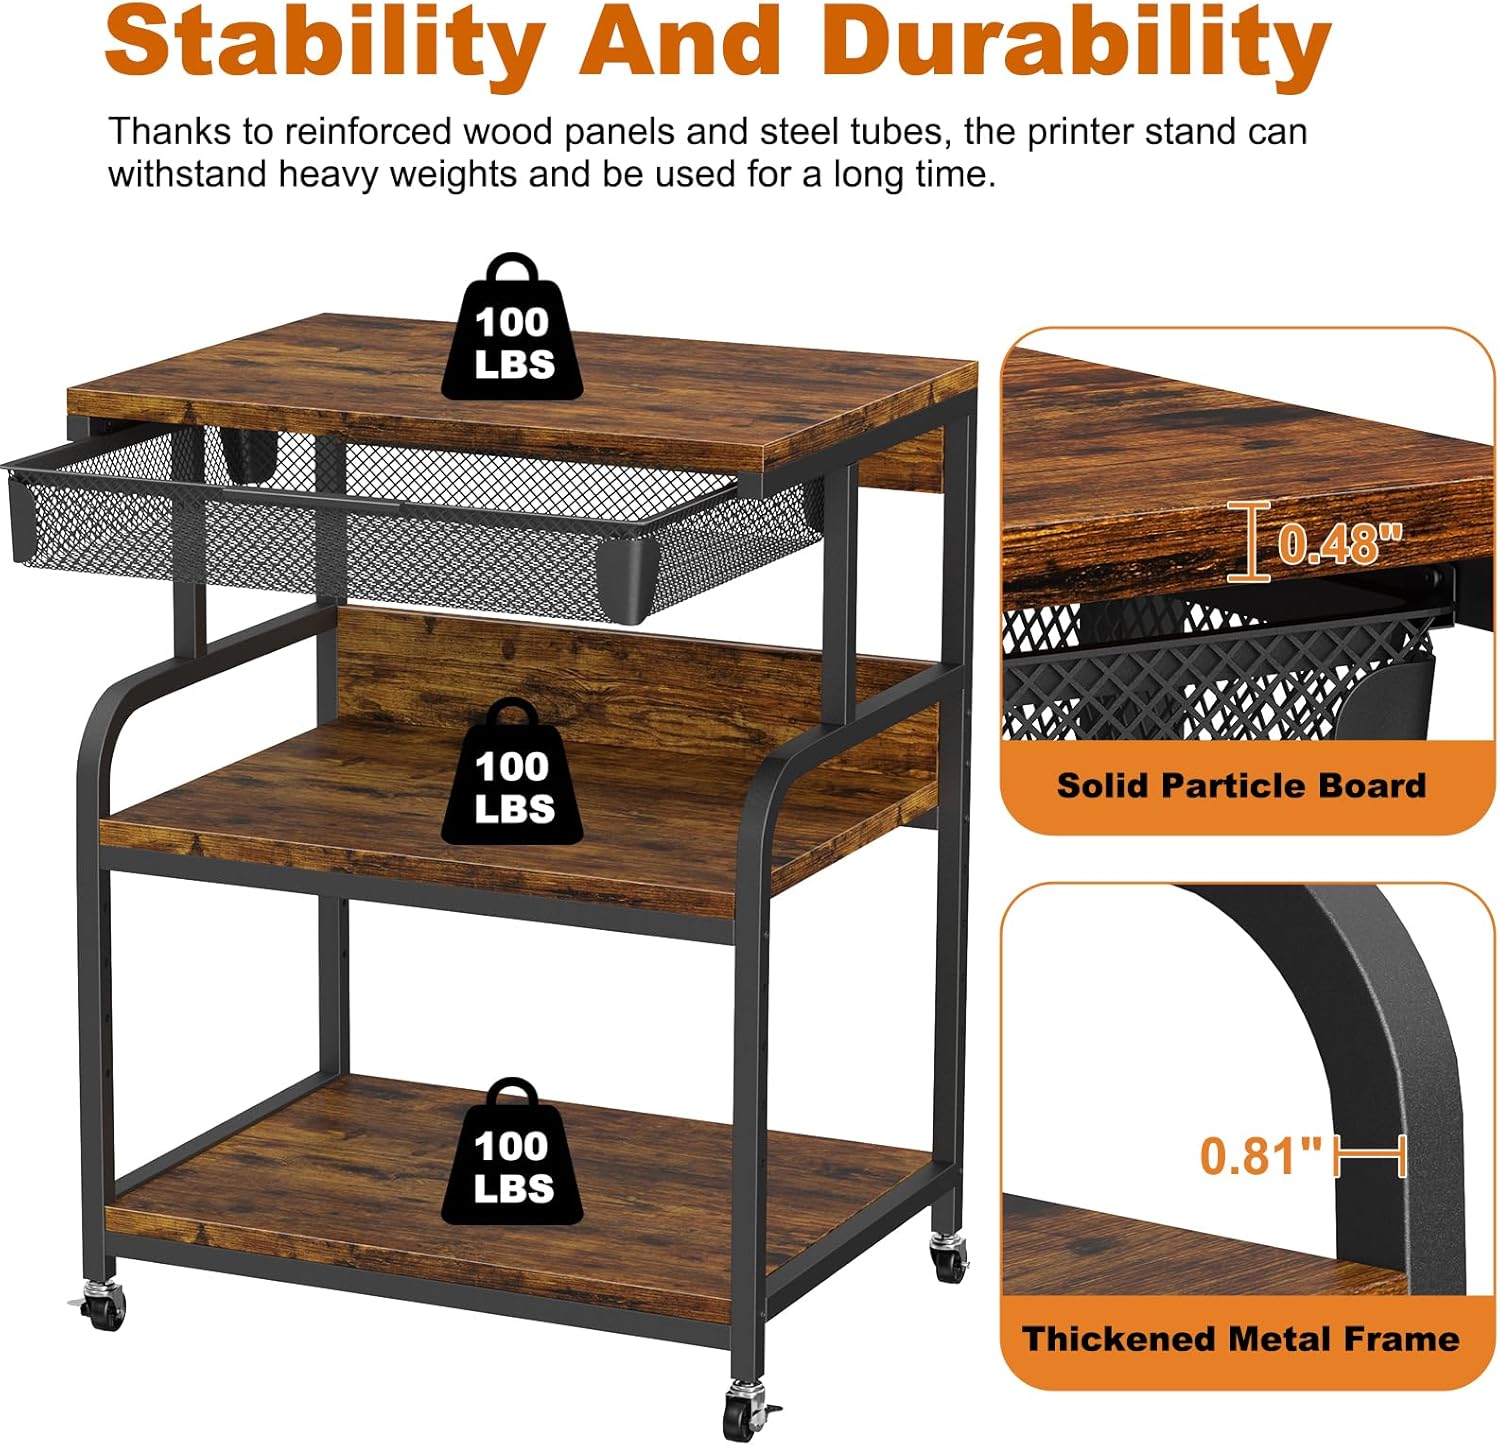
Image: This image highlights the stability and durability of the stand, showing the 100 lbs weight capacity per shelf, the solid particle board material, and the thickened metal frame.
12. Official Product Video
Video: An official product video demonstrating the EasyCom printer stand's features, including its dimensions, pull-out basket, adjustable height, and dual installation options (casters or feet). The video showcases the stand in various office and home settings.
13. Warranty and Support
EasyCom is committed to providing high-quality products and customer satisfaction. If you have any questions, concerns, or require assistance with assembly or use, please do not hesitate to contact our professional service team.
- Our customer service team aims to respond to all inquiries within 24 hours.
- Please refer to your purchase documentation for specific warranty details.