1. Introduction
This manual provides essential information for the installation, operation, and maintenance of your SZBOX N305 Mini-ITX Motherboard. This motherboard is designed for various applications including home storage (NAS), network security (firewall), and cloud stations, powered by an integrated Intel Alder Lake-N N305 processor.
2. Safety Information
- Power Supply: Ensure you use a new power supply with 24-pin and 4-pin power plugs. A rated power within 250W-450W is suitable, with 300W being recommended for optimal performance.
- Static Discharge: Always handle the motherboard by its edges and avoid touching components directly to prevent electrostatic discharge (ESD) damage.
- Installation Environment: Install the motherboard in a clean, dry environment. Ensure no metal objects, screws, or debris are left on the motherboard or inside the computer case, as this can cause short circuits.
- Cable Handling: When installing or removing the motherboard, avoid touching the metal parts of cables to prevent short circuits.
3. Package Contents
Verify that all items are present in your package:
- SZBOX N305 Mini-ITX Motherboard
- CPU Cooler (if included with your specific model)
- I/O Shield
- SATA Cables (quantity may vary)
- User Manual (this document)
4. Product Overview
The SZBOX N305 Mini-ITX Motherboard is a compact and versatile solution for various computing needs. It integrates an Intel Alder Lake-N N305 processor, offering efficient performance for its size.
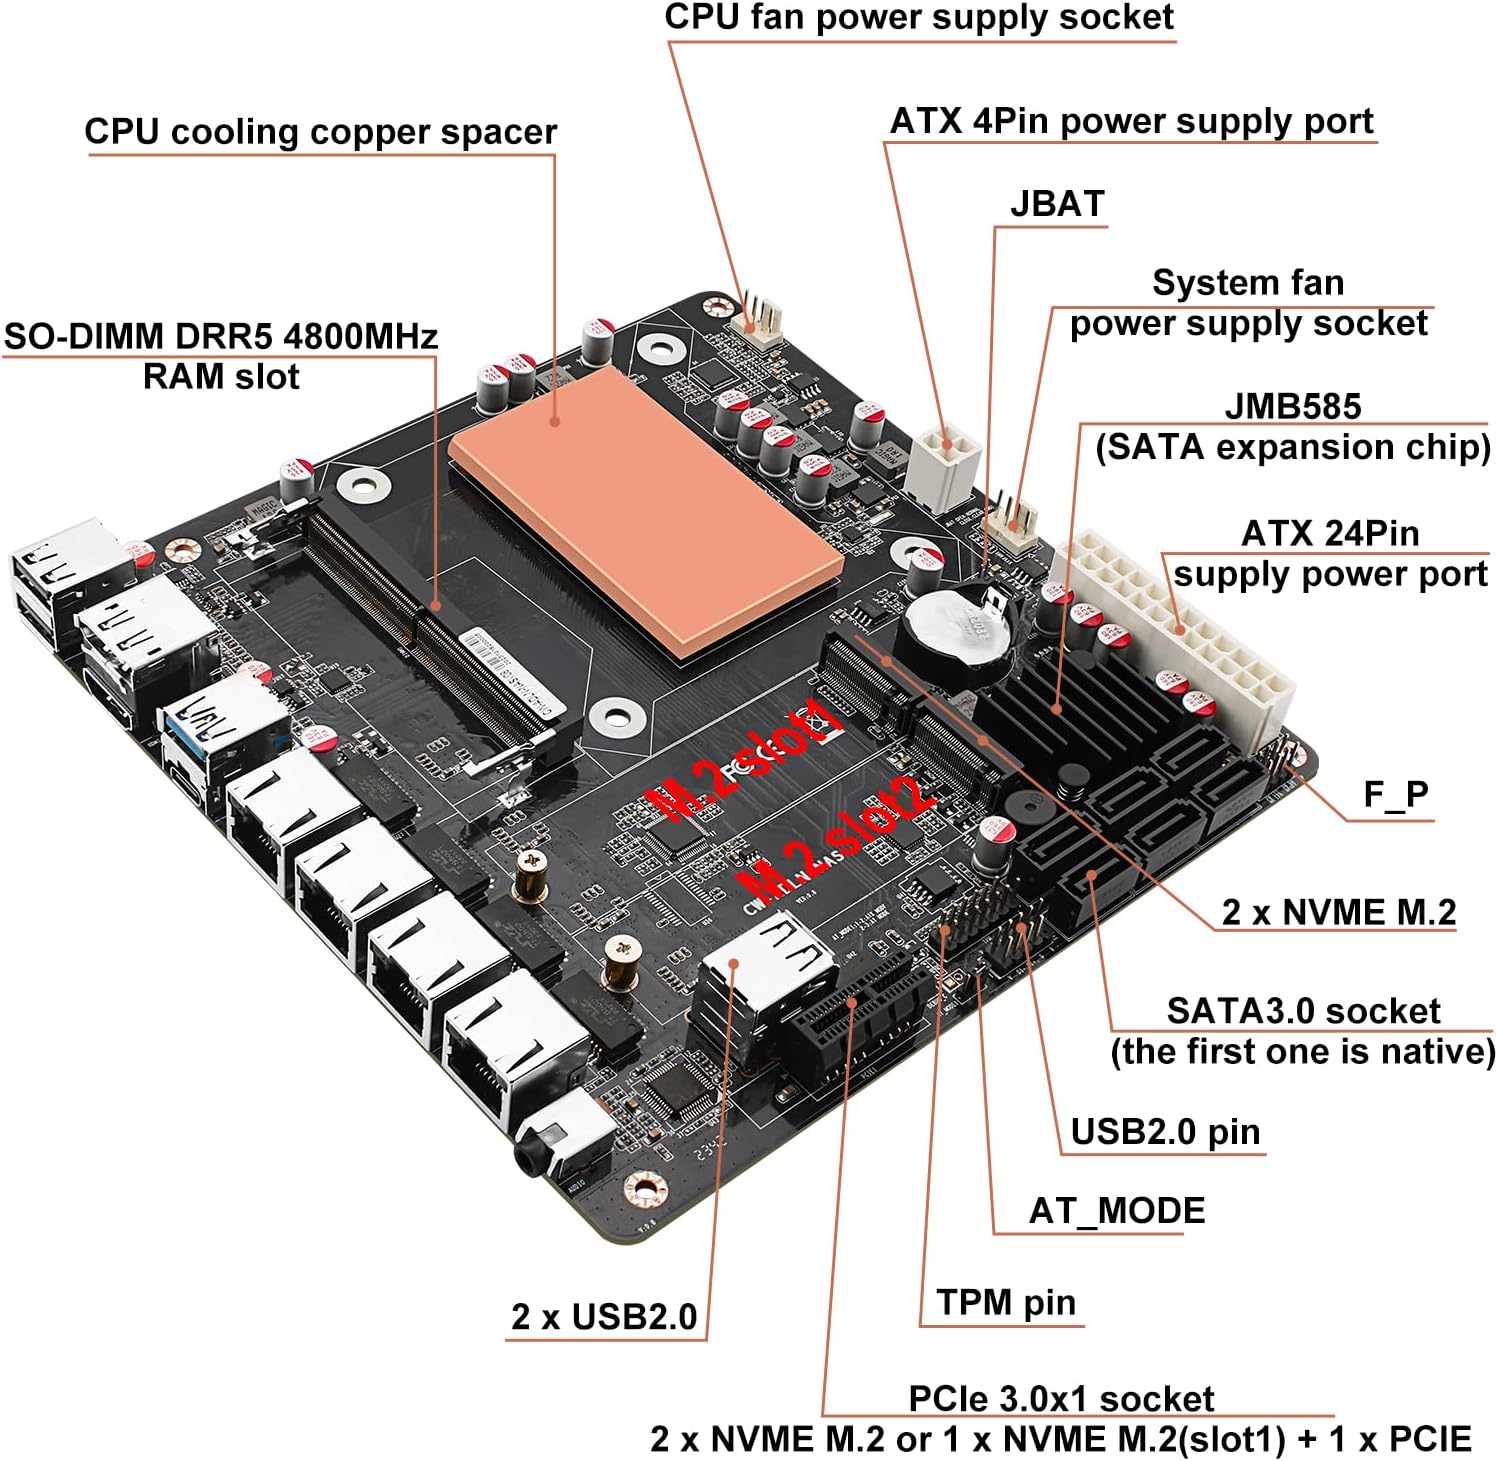
4.1. Motherboard Layout
Below is a diagram illustrating the key components and connectors on the motherboard.
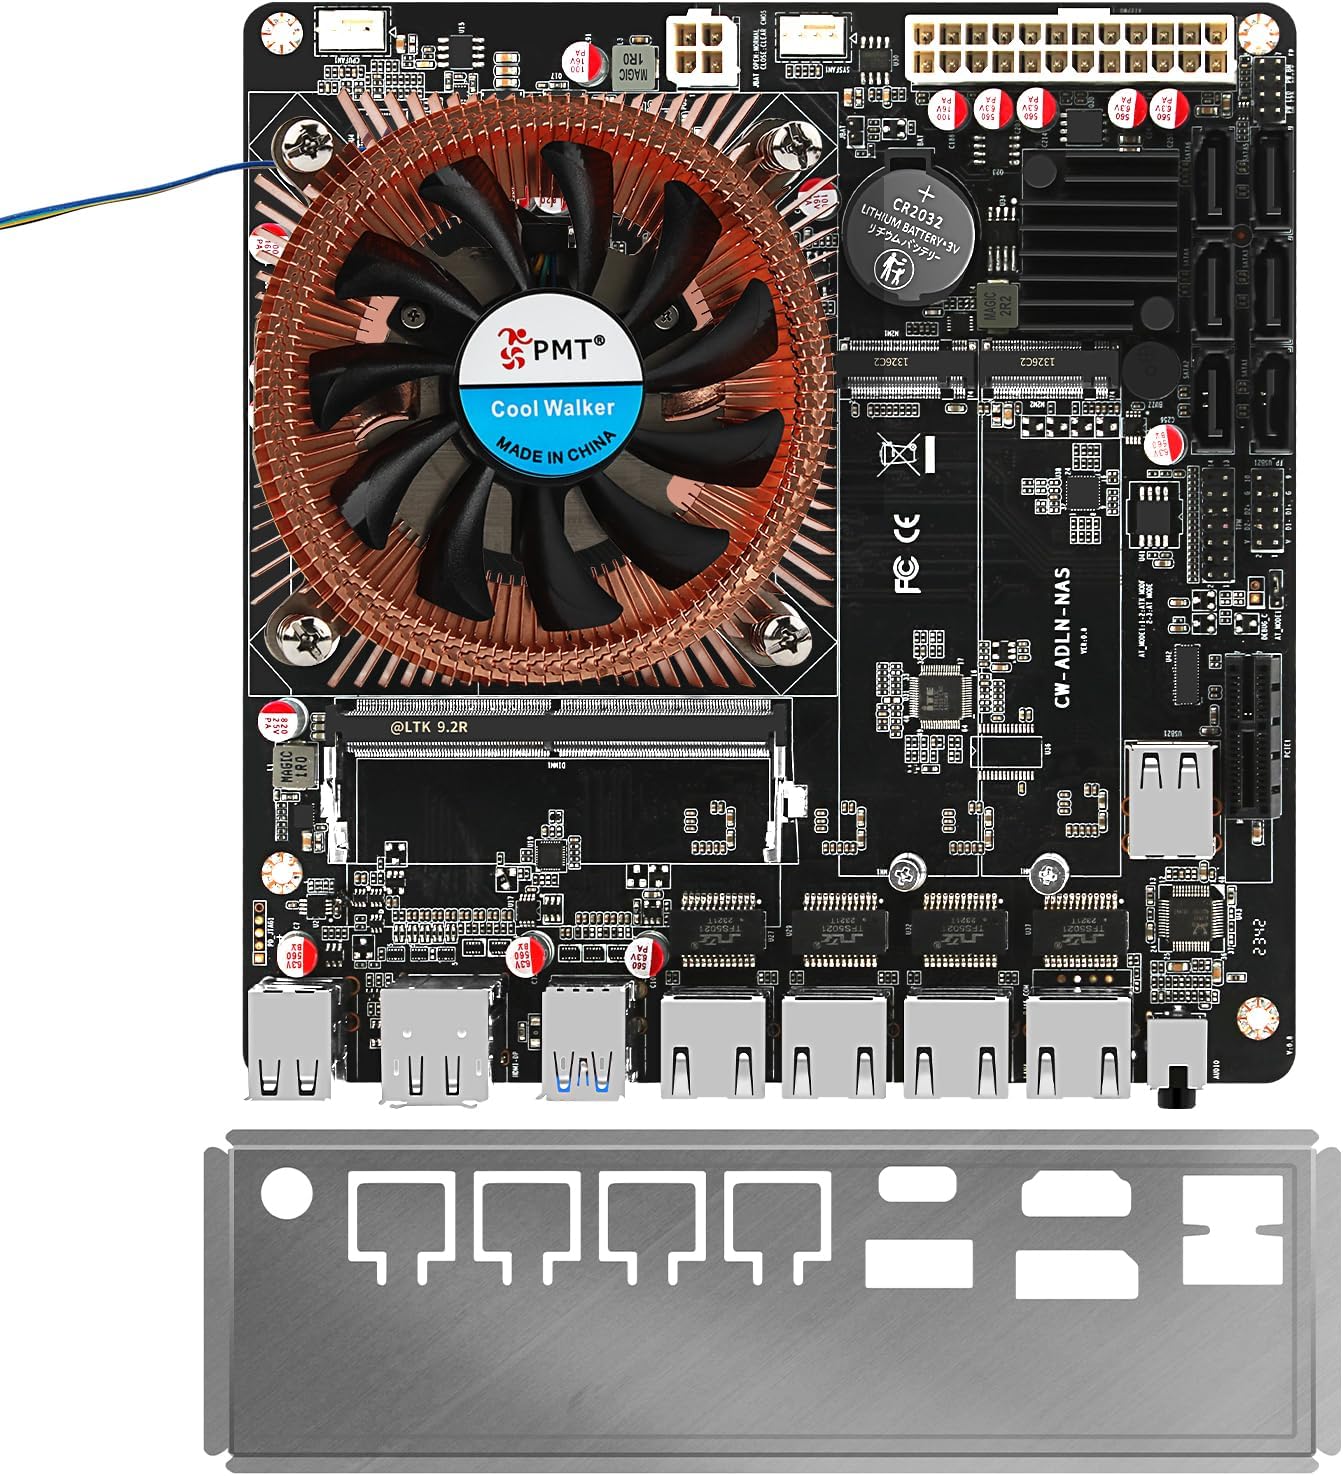
4.2. Rear I/O Ports
The rear panel provides various connectivity options for peripherals and network devices.

4.3. Processor and Core Features
The motherboard features an integrated Intel Core i3 Processor Alder Lake-N N305, capable of speeds up to 3.8GHz. This low-power processor is designed for efficiency.

Key features of the main board core include:
- Intel 12th Generation Alder Lake-N low-power processor.
- Standard 17x17 Mini ITX board compatible with market 115X series radiators.
- 2 x NVME M.2 slots, or 1 x NVME M.2 (slot1) + 1 x PCIe 3.0x1.
- 6 x SATA3.0 onboard (JMB585 chip) 6Gbps high-speed hard disk interfaces.
- 4 x Intel i226-V 2.5G LAN ports.
- 1 x SO-DIMM DDR5 4800 memory slot (compatible with 5200/5600MHz).
- HDMI 2.1 + DP 1.4b supports dual display 4K@60Hz.
- 1 x USB 3.0 + 2 x USB 2.0 + 1 x USB-C 2.0 signal.
- 1 x Realtek-ALC897 2-in-1 3.5mm audio interface.
- PCIe 3.0x1 slot supports inserting expansion cards (shared signal with the second M.2).
5. Setup Instructions
Follow these steps to properly set up your SZBOX N305 Mini-ITX Motherboard.
5.1. Power Supply Connection
Connect a compatible power supply to the 24-pin ATX power connector and the 4-pin ATX 12V power connector on the motherboard. Ensure the power supply meets the recommended specifications (250W-450W, 300W recommended).
5.2. Memory (RAM) Installation
- Locate the SO-DIMM DDR5 memory slot on the motherboard.
- Align the notch on the DDR5 SO-DIMM module with the notch in the memory slot.
- Insert the module firmly into the slot at an angle, then push down until the clips on both sides snap into place.
Note: When using the motherboard for the first time or after re-plugging memory, the motherboard will take longer than usual (3-5 minutes) to detect hardware information during boot. Please wait patiently.
5.3. Storage Device Installation
The motherboard supports both SATA and M.2 NVMe storage devices.
- SATA Drives: Connect your SATA 3.0 (6Gbps) hard drives or SSDs to the available SATA ports using SATA data and power cables.
- M.2 NVMe SSDs: Insert M.2 NVMe PCIe 3.0 SSDs into the M.2 slots. Secure them with the provided screw. Note that one M.2 slot may share bandwidth with the PCIe 3.0x1 slot.
5.4. CPU Cooler Installation
The motherboard is compatible with standard 115X series coolers. If your model includes a cooler, install it according to the cooler's specific instructions, ensuring proper contact with the CPU and secure mounting.
5.5. Peripheral Connections
Connect your monitor to the HDMI or DisplayPort, and connect network cables to the RJ45 LAN ports. Attach USB peripherals to the available USB 2.0, USB 3.0, or Type-C ports.
6. Operating System Installation
The SZBOX N305 motherboard supports a variety of operating systems. Ensure your chosen OS supports UEFI boot.
- Windows 10/11 (64-bit)
- Linux distributions
- FreeBSD
- pfSense
- OPNsense
- VMware
- Proxmox
- TrueNAS
- OpenMediaVault
To install an operating system, create a bootable USB drive with your preferred OS installer. Access the BIOS/UEFI settings during startup (usually by pressing DEL or F2) to configure the boot order and initiate the installation process.
7. Operating the Motherboard
Once the operating system is installed, the motherboard is ready for use in your desired application. Its robust connectivity and processing power make it suitable for:
- Network Attached Storage (NAS): Utilize the 6 SATA ports and M.2 slots for extensive storage configurations.
- Network Security Appliance (Firewall/Router): Leverage the 4x 2.5G LAN ports for high-throughput network routing and security functions.
- Mini PC/Home Server: Its compact size and low power consumption are ideal for a quiet, always-on home server or general-purpose mini PC.
8. Maintenance
Regular maintenance helps ensure the longevity and stable operation of your motherboard.
- Dust Removal: Periodically clean dust from the motherboard and cooler using compressed air. Ensure the system is powered off and unplugged before cleaning.
- Cooling System: Verify that the CPU cooler fan (if present) is functioning correctly and that airflow within the case is unobstructed.
- Cable Management: Ensure all cables are neatly routed and not interfering with cooling or other components.
9. Troubleshooting
This section addresses common issues you might encounter.
- Long Boot Time (First Use/Memory Change): If the system takes 3-5 minutes to boot after initial setup or memory changes, this is normal. The motherboard is detecting hardware. Do not power off during this process.
- System Instability/Random Reboots:
- Verify that the power supply meets the recommended wattage and is functioning correctly.
- Ensure RAM modules are correctly seated and compatible. Test with a single RAM stick if multiple are installed.
- Check for proper CPU cooler installation and adequate thermal paste application.
- Ensure no loose screws or metal objects are causing short circuits on the motherboard.
- Update BIOS/UEFI firmware if available from the manufacturer's support channels.
- No Display Output:
- Check monitor connections (HDMI/DP).
- Ensure RAM is properly installed.
- Try clearing the CMOS (refer to motherboard diagram for JBAT or CMOS clear pins).
10. Specifications
| Feature | Specification |
|---|---|
| Brand | SZBOX |
| Model Number | N305 |
| Product Dimensions | 17 x 17 x 5 cm |
| Item Weight | 770 grams |
| Processor Type | Intel Core i3-N305 (Alder Lake-N) |
| Processor Speed | Up to 3.8 GHz |
| Processor Socket | Socket F (Integrated) |
| RAM Technology | DDR5 SO-DIMM |
| Max Supported RAM | 32 GB |
| Memory Clock Speed | 4800 MHz (compatible with 5200/5600MHz) |
| Graphics Card Interface | Integrated (Intel UHD Graphics) |
| Connectivity Type | Wi-Fi (if module installed), Ethernet |
| USB 2.0 Ports | 2 (rear) + 1 (internal header) |
| USB 3.0 Ports | 1 (rear) |
| USB Type-C Ports | 1 (rear, USB 2.0 speed) |
| HDMI Ports | 1 (HDMI 2.1) |
| DisplayPort | 1 (DP 1.4b) |
| Ethernet Ports | 4 (2.5G RJ45) |
| SATA Ports | 6 (SATA 3.0 6Gbps) |
| M.2 Slots | 2 (NVMe PCIe 3.0) |
| PCIe Slot | 1 (PCIe 3.0x1, shared with one M.2 slot) |
| Audio Interface | Realtek ALC897 3.5mm Audio Jack |
| Compatible Devices | Personal Computer |
| Supported OS | Win 10/11 64bit, Linux, FreeBSD, pfSense, OPNsense, VMware, Proxmox, TrueNAS, OpenMediaVault (UEFI boot only) |
11. Warranty and Support
For warranty information and technical support, please refer to the documentation provided with your purchase or contact the retailer/manufacturer directly. Keep your proof of purchase for warranty claims.