1. Important Safety Information
Read all safety warnings, instructions, illustrations, and specifications provided with this power tool. Failure to follow all instructions listed below may result in electric shock, fire, and/or serious injury.
- Personal Protective Equipment: Always wear safety glasses and Level 5 cut-resistant gloves during operation. A hand guard is integrated to protect against flying debris.
- Safe Operation: The chainsaw is designed with a safety lock. It will only start when both the safety switch and the on/off switch are pressed simultaneously to prevent accidental activation.
- Work Area: Keep the work area clean and well-lit. Cluttered or dark areas invite accidents.
- Stability: Ensure stable footing and balance when operating the chainsaw. Avoid overreaching.

Image 1: Chainsaw featuring a safety lock on the handle and an adjustable anti-baffle for enhanced user protection during operation.
2. Package Contents
Verify that all items are present in your package:
- 1 x highsam Mini Chainsaw Unit
- 2 x 4000 mAh Batteries
- 1 x 8-inch Guide Bar (pre-installed)
- 1 x 6-inch Guide Bar
- 2 x 8-inch Chains (1 pre-installed)
- 2 x 6-inch Chains
- 1 x Battery Charger
- 1 x Screwdriver
- 1 x User Manual
- 1 x Pair of Cut-Resistant Gloves
- 1 x Pair of Safety Glasses
- 1 x Oil Bottle
- 1 x Carrying Case
3. Setup and Assembly
3.1. Battery Installation and Charging
The chainsaw is powered by two 4000 mAh lithium-ion batteries. Ensure batteries are fully charged before first use.
- Insert a charged battery into the battery slot at the base of the chainsaw handle until it clicks into place.
- To charge, connect the charger to a power outlet and then to the battery. The indicator light on the charger will show charging status.

Image 2: Illustration of the upgraded battery design, showing internal components, security protection features, and long lifespan.
3.2. Guide Bar and Chain Installation (for 6-inch bar)
Your chainsaw comes with an 8-inch guide bar and chain pre-installed. To switch to the 6-inch setup:
- Ensure the battery is removed for safety.
- Loosen the side cover knob and remove the side cover.
- Carefully remove the pre-installed 8-inch guide bar and chain.
- Place the 6-inch chain around the drive sprocket and then align it with the groove of the 6-inch guide bar.
- Mount the guide bar and chain onto the chainsaw body, ensuring the chain tensioning pin fits into the hole on the guide bar.
- Replace the side cover and tighten the knob slightly.

Image 3: The chainsaw shown with both 8-inch and 6-inch guide bars and chains, demonstrating its 2-in-1 design for diverse cutting needs.
3.3. Chain Tensioning
This model features tool-free chain tensioning for quick adjustments.
- With the side cover loosely attached, turn the chain tensioning knob clockwise to increase tension or counter-clockwise to decrease tension.
- The chain should be snug against the guide bar, but still able to be pulled freely by hand. There should be no excessive slack.
- Once tension is correct, fully tighten the side cover knob.
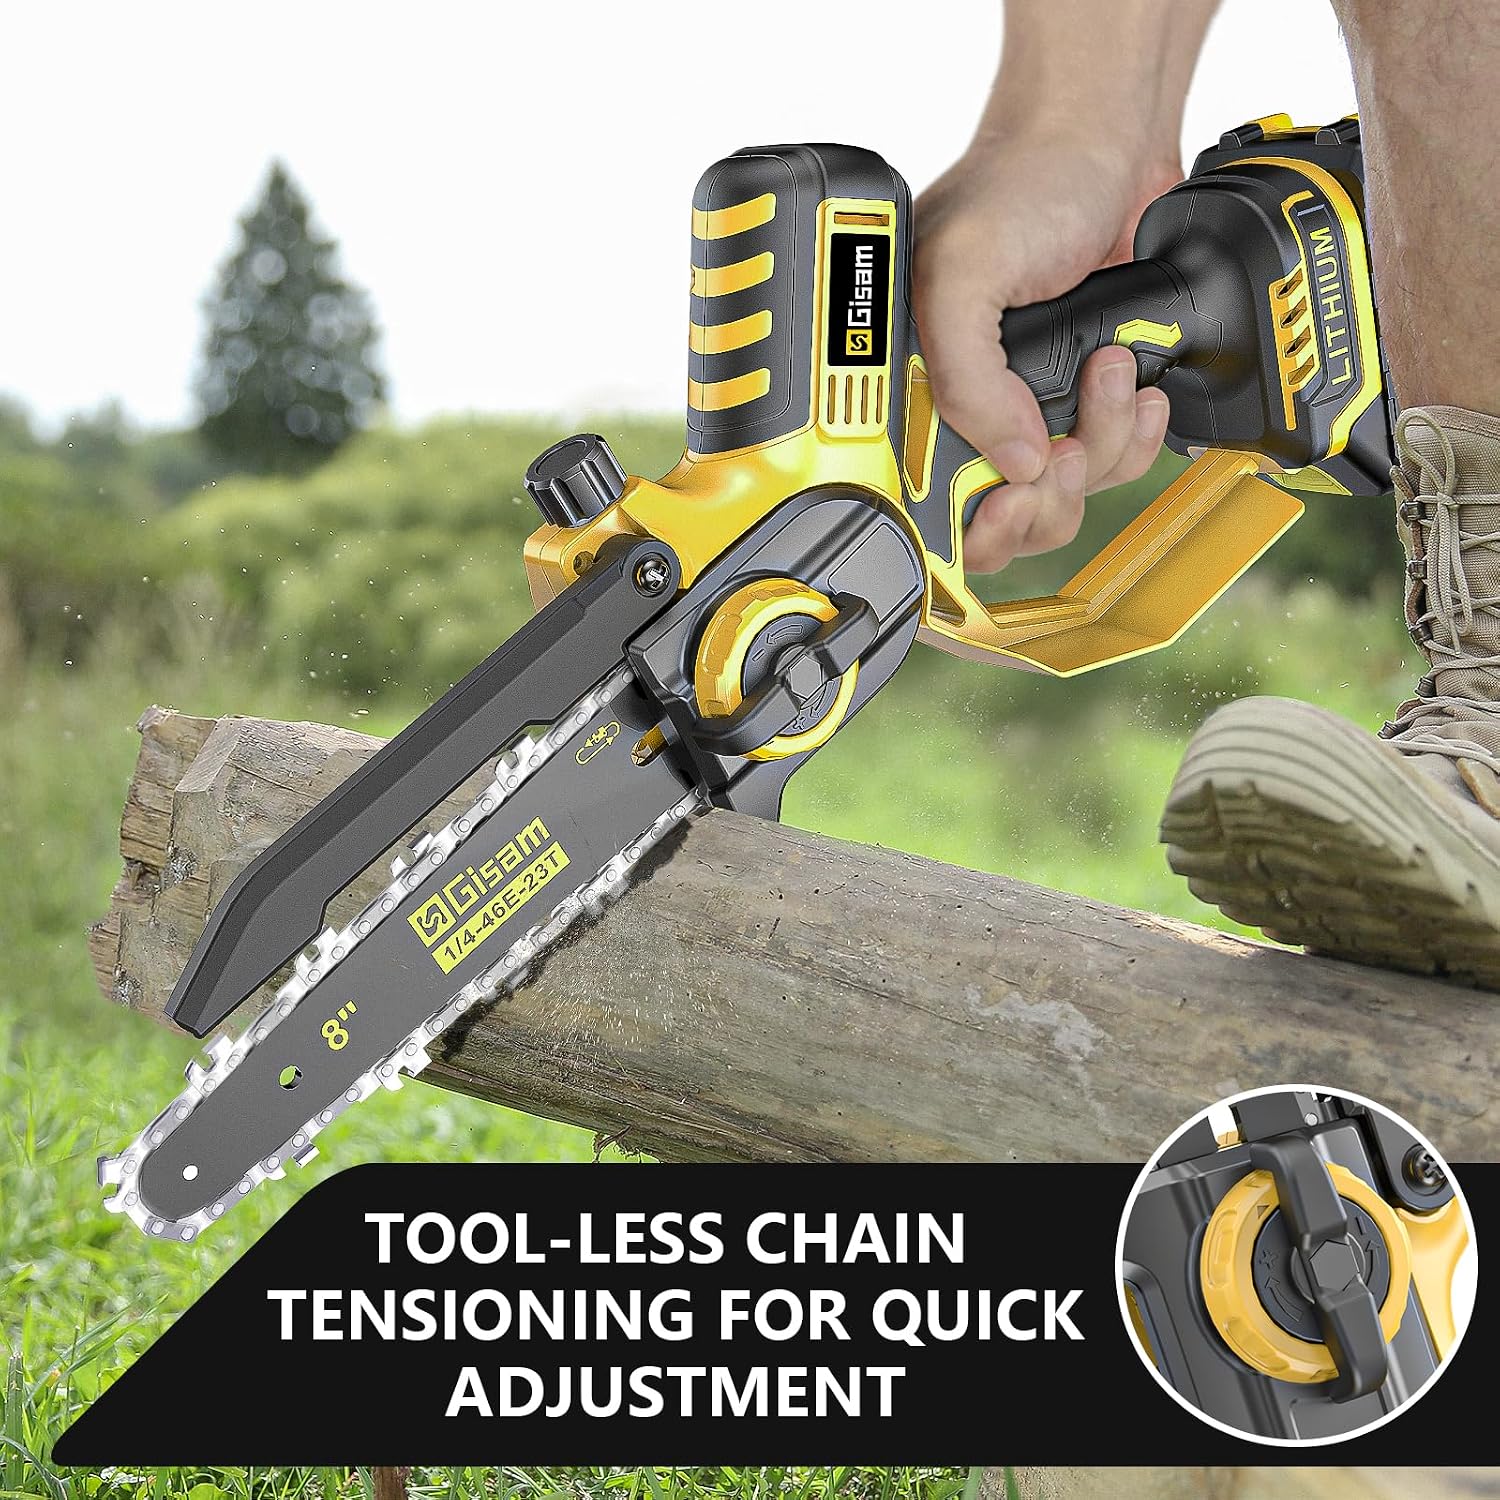
Image 4: A close-up view of the tool-less chain tensioning knob, highlighting its ease of use for quick adjustments.
3.4. Automatic Oiling System
The chainsaw is equipped with an automatic oiler to ensure continuous lubrication of the chain and guide bar.
- Locate the oil reservoir cap on the chainsaw body.
- Unscrew the cap and fill the reservoir with appropriate chainsaw bar and chain oil (provided oil bottle can be used for filling).
- Replace the cap securely. The system will automatically lubricate the chain during operation.

Image 5: The chainsaw's automatic oiler system, showing oil being poured into the reservoir to lubricate the blade and chain.
4. Operating Instructions
This highsam mini chainsaw features a powerful 900W brushless motor for efficient cutting.

Image 6: Internal view highlighting the powerful copper brushless motor, indicating increased efficiency, power, and lifespan.
4.1. Starting the Chainsaw
- Ensure the battery is securely installed and the chain is properly tensioned and lubricated.
- Grip the chainsaw firmly with both hands.
- Press and hold the safety lock button (usually located on the side of the handle).
- While holding the safety lock, press the trigger switch to start the chainsaw. Release the safety lock once the chainsaw is running.
4.2. Cutting Techniques
- Pruning Branches: For smaller branches, make a relief cut on the underside first to prevent bark stripping, then cut from the top.
- Cutting Logs: For logs up to 8 inches thick, ensure the log is stable. Begin cutting with the bottom of the guide bar, allowing the chain to pull itself into the wood.
- Avoid Kickback: Always be aware of the guide bar tip. Contact with the tip can cause kickback, leading to loss of control.
- Cutting Speed: The chainsaw offers a high cutting speed of 36.5 FT/S for efficient operation.
5. Maintenance
5.1. General Cleaning
- Always remove the battery before cleaning.
- Use a brush or compressed air to remove sawdust and debris from the motor housing, guide bar, and chain.
- Wipe down the exterior with a damp cloth. Do not use harsh chemicals.
5.2. Chain Sharpening
A sharp chain is crucial for safe and efficient cutting. Sharpen the chain regularly or replace it when dull.
- Refer to the chain manufacturer's instructions for proper sharpening angles and file sizes.
- If unsure, have the chain professionally sharpened or replaced.
5.3. Guide Bar Maintenance
- Periodically clean the guide bar groove to remove accumulated sawdust and debris.
- Flip the guide bar regularly to ensure even wear.
5.4. Automatic Oiler Check
- Regularly check the oil level in the reservoir and refill as needed.
- Ensure the oil outlet is not clogged.
5.5. Storage
- Store the chainsaw in a dry, secure place, out of reach of children.
- Remove the battery before storing for extended periods.
- Use the provided carrying case for protection.
6. Troubleshooting
| Problem | Possible Cause | Solution |
|---|---|---|
| Chainsaw does not start | Battery not charged or improperly installed. Safety lock not engaged. | Charge battery fully and ensure it is clicked into place. Press safety lock and trigger simultaneously. |
| Chain not moving or moving slowly | Chain tension too tight. Chain dull or damaged. Battery low. | Adjust chain tension. Sharpen or replace chain. Recharge battery. |
| Excessive smoke or burning smell | Chain dull. Insufficient lubrication. Overloading the motor. | Sharpen or replace chain. Refill oil reservoir. Reduce cutting pressure. |
| Oil not dispensing | Oil reservoir empty. Oil outlet clogged. | Refill oil reservoir. Clean oil outlet. |
7. Specifications
| Feature | Detail |
|---|---|
| Model Number | 202 |
| Brand | highsam |
| Motor Type | 900W Brushless Motor |
| Power Source | Battery Powered |
| Battery Type | 2 x 4000 mAh Lithium-ion (included) |
| Guide Bar Lengths | 6 inches (15.2 cm) and 8 inches (20.3 cm) |
| Chain Speed | 8 m/s (36.5 FT/S) |
| Product Dimensions (L x W x H) | 10 x 10 x 10 cm |
| Item Weight | 3.5 Kilograms |
| Special Features | Automatic Oiler, Tool-Free Chain Tensioning, Safety Lock, Hand Guard |
8. Warranty and Support
highsam provides a 2-year warranty for this product. We are committed to providing excellent customer service.
If you have any questions, concerns, or require warranty service, please do not hesitate to contact our customer support team. Our experts are available 24/7 and will respond to your inquiries within 24 hours.
Contact information (e.g., email, phone number, website) would typically be provided here by the manufacturer.