HP4
Generic HP4 Mini Portable Bluetooth Label Printer
Model: HP4 - User Manual
1. Introduction
Thank you for choosing the Generic HP4 Mini Portable Bluetooth Label Printer. This compact and versatile device is designed to simplify your organization tasks at home, in the office, or for school. Utilizing thermal printing technology, it requires no ink cartridges, offering a clean and efficient labeling solution. This manual provides detailed instructions for setup, operation, maintenance, and troubleshooting to ensure optimal performance of your label printer.
The HP4 supports both continuous and fixed-length labels and features a built-in paper cutter for convenience. Connect wirelessly via Bluetooth to the 'Xeasy label' app on your smartphone for a wide range of customization options.

Image: The HP4 label printer, showcasing its compact and portable design.
2. Package Contents
Please verify that all items are present in your package:
- HP4 Mini Portable Bluetooth Label Printer
- One roll of thermal label paper
- USB Type-C Charging Cable
- User Manual (this document)
3. Product Overview
Familiarize yourself with the main components of your HP4 label printer:
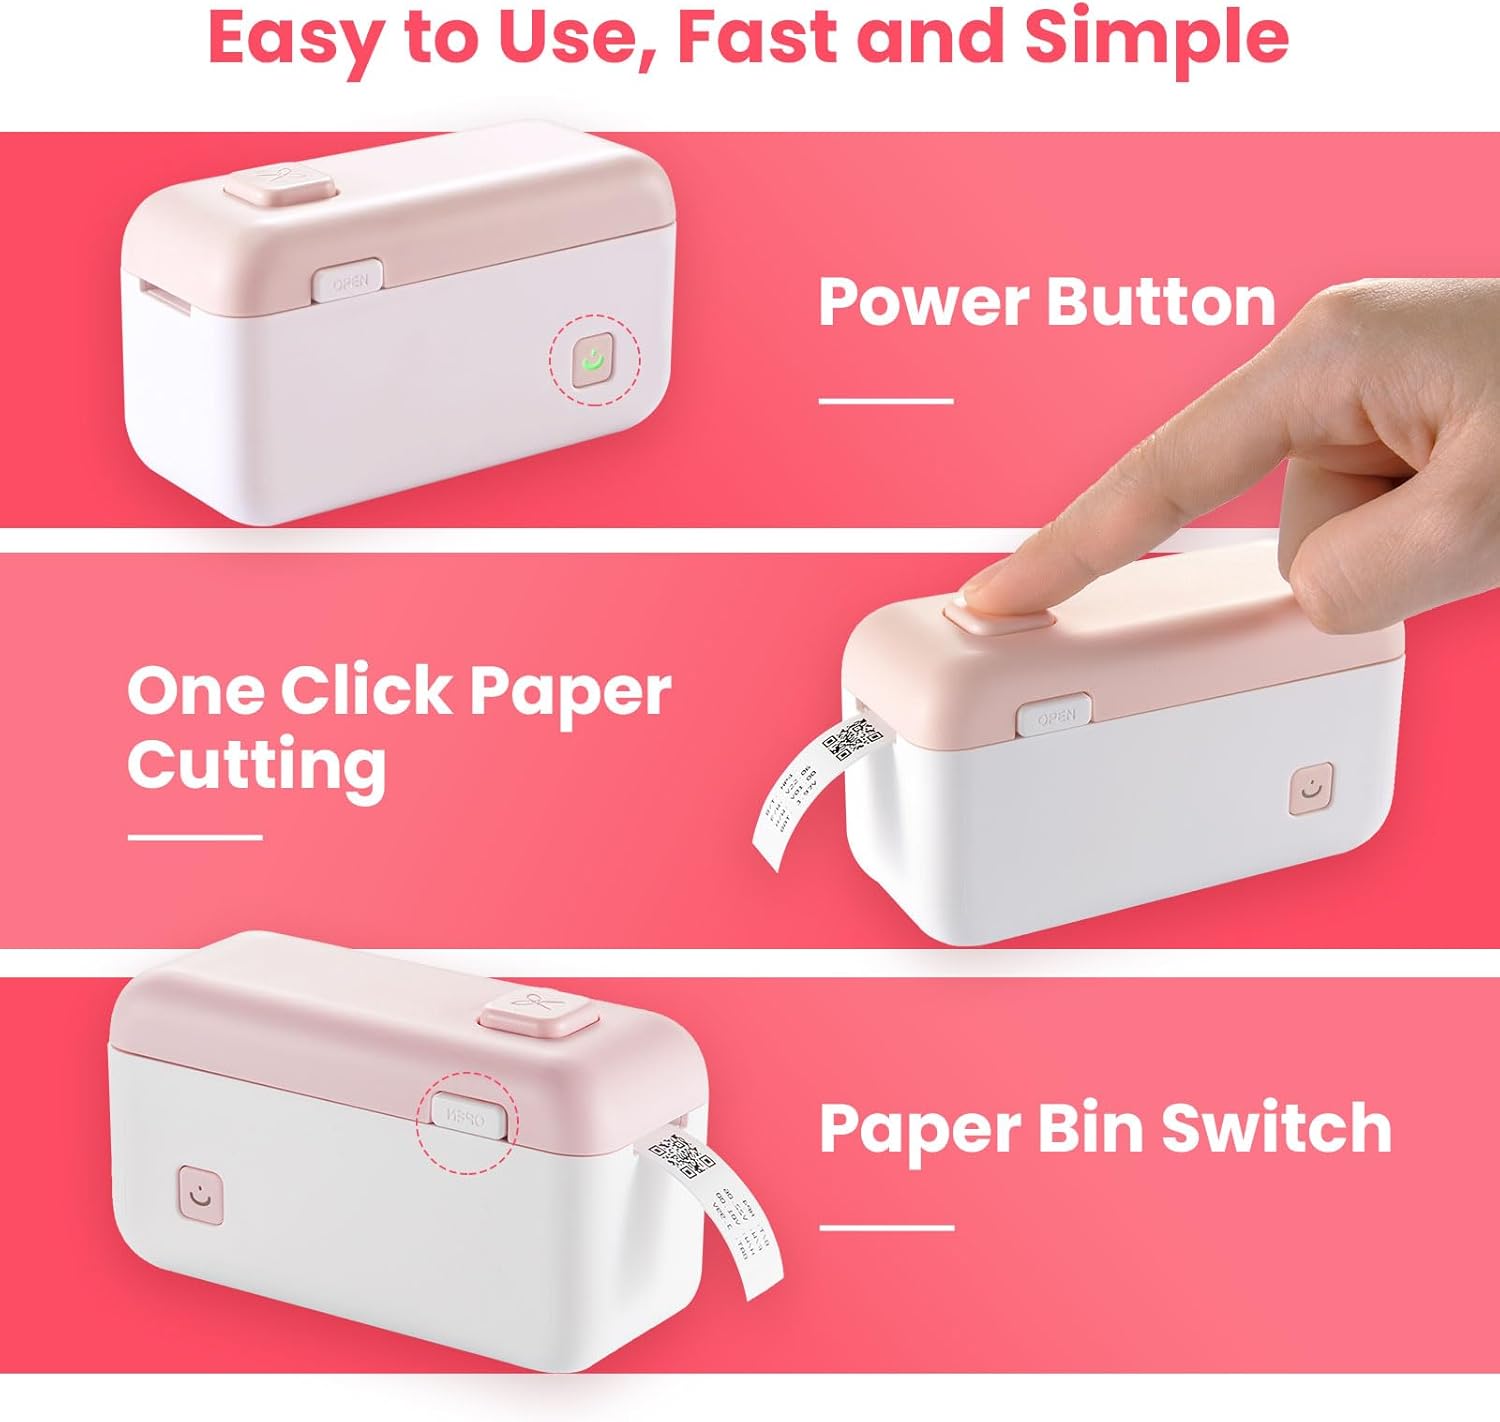
Image: Key functional areas of the HP4 label printer.
- Power Button: Press and hold to turn the printer on or off. A short press can also initiate certain functions.
- Paper Bin Switch: Slide or press to open the label paper compartment.
- One-Click Paper Cutting Button: Press this button to activate the built-in cutter and neatly cut the printed label.
- Charging Port: USB Type-C port for charging the device.
- Indicator Light: Displays device status (e.g., power on, charging, error).
4. Setup Guide
4.1 Charging the Printer
Before first use, fully charge the printer using the provided USB Type-C cable. Connect the cable to the printer's charging port and a compatible USB power source. The indicator light will show charging status and turn off or change color when fully charged.
4.2 Downloading the App
The HP4 printer operates via the 'Xeasy label' mobile application.
- For iOS devices, download 'Xeasy label' from the Apple App Store.
- For Android devices, download 'Xeasy label' from the Google Play Store.
No registration is required to use the app, ensuring your privacy.
4.3 Loading Label Paper
- Open the paper bin by sliding or pressing the paper bin switch.
- Insert the label roll into the compartment, ensuring the printing side of the label faces upwards and the leading edge extends slightly out of the printer's output slot.
- Close the paper bin cover firmly until it clicks into place.
4.4 Connecting via Bluetooth
- Turn on the HP4 label printer by pressing and holding the power button until the indicator light illuminates.
- Enable Bluetooth on your smartphone.
- Open the 'Xeasy label' app. The app will automatically search for nearby devices.
- Select your HP4 printer from the list of available devices to establish a connection. The app will indicate when the printer is successfully connected.
5. Operating Instructions
5.1 Creating Labels with the 'Xeasy label' App
The 'Xeasy label' app offers extensive features for label creation:

Image: The 'Xeasy label' app interface for designing labels.
- Text: Enter custom text, choose fonts, sizes, and styles.
- Icons & Symbols: Access a library of over 1000 symbols and icons to enhance your labels.
- Frames: Select from over 30 decorative frames.
- Barcodes & QR Codes: Generate and print various types of barcodes and QR codes.
- Images: Insert images from your device.
- Time & Date: Add current time or date stamps.
- Excel Import: Import data from Excel for batch printing.
- Templates: Utilize pre-designed templates for common labeling needs.
Ensure you select the correct label type (continuous or fixed-length) within the app to prevent wasted label material.
5.2 Printing Labels
Once your label design is complete in the app:
- Review the preview of your label in the app.
- Tap the 'Print' button within the app.
- The printer will begin printing the label.
5.3 Cutting Labels
The HP4 features a built-in cutter for clean label separation.

Image: Using the one-click paper cutting function.
After printing, press the dedicated one-click paper cutting button located on the printer to cleanly cut the label from the roll.
6. Maintenance
6.1 Cleaning the Print Head
To maintain print quality, periodically clean the thermal print head:
- Ensure the printer is turned off and disconnected from power.
- Open the paper bin cover.
- Gently wipe the print head (the dark strip inside the cover) with a cotton swab lightly dampened with isopropyl alcohol.
- Allow the print head to dry completely before closing the cover and using the printer.
6.2 Storing Label Rolls
Store unused thermal label rolls in a cool, dry place away from direct sunlight and heat to preserve their adhesive and print quality.
7. Troubleshooting
| Problem | Possible Cause | Solution |
|---|---|---|
| Printer does not turn on | Low battery; Power button not pressed long enough | Charge the printer; Press and hold the power button for 3-5 seconds. |
| Cannot connect via Bluetooth | Bluetooth off on phone; Printer not in pairing mode; App issue | Ensure phone Bluetooth is on; Restart printer and app; Try pairing again. |
| Poor print quality / Faint labels | Dirty print head; Incorrect label type; Low battery | Clean the print head; Ensure correct label type is selected in app; Charge printer. |
| Labels not feeding correctly | Label roll improperly loaded; Paper jam | Re-load label roll correctly; Open cover and clear any jammed paper. |
| App crashes or freezes | Software glitch; Outdated app version | Restart the app; Check for app updates in your app store. |
8. Specifications
| Feature | Detail |
|---|---|
| Model | HP4 |
| Printing Technology | Thermal Printing (Inkless) |
| Connectivity | Bluetooth |
| Compatible App | 'Xeasy label' (iOS & Android) |
| Label Width Support | 12mm - 15mm |
| Print Resolution | 203 dpi |
| Battery Type | Rechargeable (Type-C USB) |
| Product Dimensions | 4.9 x 2 x 2 inches (approx.) |
| Item Weight | 6.7 ounces (approx.) |
| Special Features | Built-in Cutter, Portable, Inkless |
9. Warranty and Support
9.1 Warranty Information
This product comes with a limited warranty. Please refer to the warranty card included in your package or contact customer support for specific terms and conditions. The warranty typically covers manufacturing defects under normal use.
9.2 Customer Support
For technical assistance, troubleshooting, or warranty claims, please contact our customer support team. Contact details can usually be found on the product packaging or the official brand website. When contacting support, please have your product model (HP4) and purchase information ready.
Ask a question about this manual
Ask about setup, troubleshooting, compatibility, parts, safety, or missing instructions. Manuals+ will review the question and use this page’s manual context to help answer it.