
1. Important Safety Information
Please read all instructions carefully before assembly and use. Failure to follow these safety guidelines may result in injury or damage to the product.
- Secure Anchoring: Ensure the carport is securely anchored to a stable, level foundation. Use all provided anchor bolts and ground pegs.
- Careful Handling: Handle all components carefully during unpacking and assembly to prevent personal injury or damage to parts.
- Follow Instructions: Adhere strictly to the detailed installation instructions provided in this manual.
- Safety Gear: Always wear appropriate personal protective equipment, including gloves and eye protection, during assembly.
- Clear Area: Ensure the assembly area is clear of obstructions, children, and pets.
- Weather Conditions: Do not attempt to assemble the carport in high winds, heavy rain, or other severe weather conditions.
- Regular Inspection: Periodically inspect the carport for any signs of damage, loose connections, or wear. Tighten fasteners as needed.
- Weight Limits: Do not hang heavy objects from the carport frame or roof.
- Snow Load: Be aware of the snow load capacity (35 PSF). Clear heavy snow accumulation promptly to prevent structural damage.
- Wind Rating: The carport has a wind rating of 100 MPH. In extreme wind conditions, additional securing measures may be necessary.
2. Product Overview
The Xilingol Metal Carport provides a durable and reliable shelter solution for vehicles and outdoor equipment. Its robust design offers protection against various weather elements.
Key Features
- Unique Galvanized Frame: Features a fully galvanized frame for superior corrosion resistance and a stronger surface, avoiding peeling or scratching common with powder-coated frames.
- Superior Pipe-Shrinkage Process: Each joint undergoes a pipe-shrinkage process, pressing original steel tubes to form small-size wave tubes, enhancing bending resistance and strengthening weak joints.
- All-Weather Protection: Constructed with heavy-duty alloy steel, galvanized frame, and waterproof roof to shield against sun, hail, and snowstorms. Wind Rating: 100 MPH; Snow Load Capacity: 35 PSF.
- Larger Roof Space: Heightened roof design provides expanded storage capacity for taller and wider vehicles or equipment. Flatter roof design reduces lateral wind exposure.
- Upgraded Features: Includes safety eaves, reinforced base with anchor bolts and thick steel plates, and waterproof plugs to minimize ground water penetration.

Image: The Xilingol Metal Carport providing shelter for a truck during rain, highlighting its waterproof roof and galvanized steel frame.
3. Package Contents
Before beginning assembly, verify that all components listed below are present and undamaged. If any parts are missing or damaged, please contact customer service.
- Galvanized Steel Frame Components (legs, beams, roof arches)
- Metal Roof Panels
- Reinforced Ground Pegs and Anchor Bolts
- Waterproof Plugs
- Waterproof Sealing Gaskets
- Fasteners (screws, nuts, washers)
- Installation Gloves (2 pairs)
- Waterproof Tape and Application Tool
- Instruction Manual
4. Assembly Instructions
4.1 Before You Begin
- Site Selection: Choose a level, stable area for installation, away from overhead power lines or obstructions.
- Tools Required (Not Included): Ladder, measuring tape, wrench set, drill (for anchor bolts), level, safety glasses.
- Teamwork: Assembly is recommended with at least two people for safety and efficiency.
4.2 Step-by-Step Assembly
- Unpack and Identify Components: Lay out all parts and compare them with the package contents list. Familiarize yourself with each component.
- Assemble the Base Frame: Connect the horizontal base tubes according to the diagram in your detailed manual. Ensure all connections are secure but do not fully tighten bolts until the frame is complete.
- Attach Vertical Support Posts: Insert the vertical support posts into the base frame connections.
- Assemble Roof Arches: Utilize the superior pipe-shrinkage process to connect the curved sections of the roof arches. These joints are designed for enhanced bending resistance.
- Secure Roof Arches to Vertical Supports: Lift and attach the assembled roof arches to the top of the vertical support posts. Ensure proper alignment and secure with fasteners.
- Install Roof Panels: Carefully place and secure the metal roof panels onto the roof arches. Ensure panels overlap correctly to create a stacked, sealed, no-gap waterproof roof. Use the provided pre-drilled points for accurate fastening.
- Install Safety Eaves: Attach the safety eaves at the front and rear of the carport as per the manual's diagrams.
- Secure to Ground: Use the reinforced ground pegs and anchor bolts to securely link the carport base to the ground. This is crucial for stability, especially in windy areas.
- Insert Waterproof Plugs: Fit waterproof plugs into any open ends of the frame tubes to minimize ground water penetration.
- Apply Waterproof Tape: Use the provided waterproof tape and tool to seal any seams or gaps as instructed in the detailed manual to ensure maximum waterproofing.
- Final Tightening: Once all components are in place and aligned, go back and fully tighten all bolts and fasteners.

Image: The carport standing strong in snow, illustrating the pipe-shrinkage process for enhanced frame stability.

Image: Detailed view of the 40% thicker roof panel and 40mm tube, highlighting the robust construction.

Image: Close-up of the safety eaves, designed to enhance both aesthetics and roof safety.

Image: Reinforced ground pegs featuring a 3mm thick L-shaped steel plate and anchor bolts for secure ground attachment.

Image: Waterproof plugs designed to prevent water ingress into the frame tubes.

Image: Included waterproof tape and application tool for sealing seams.
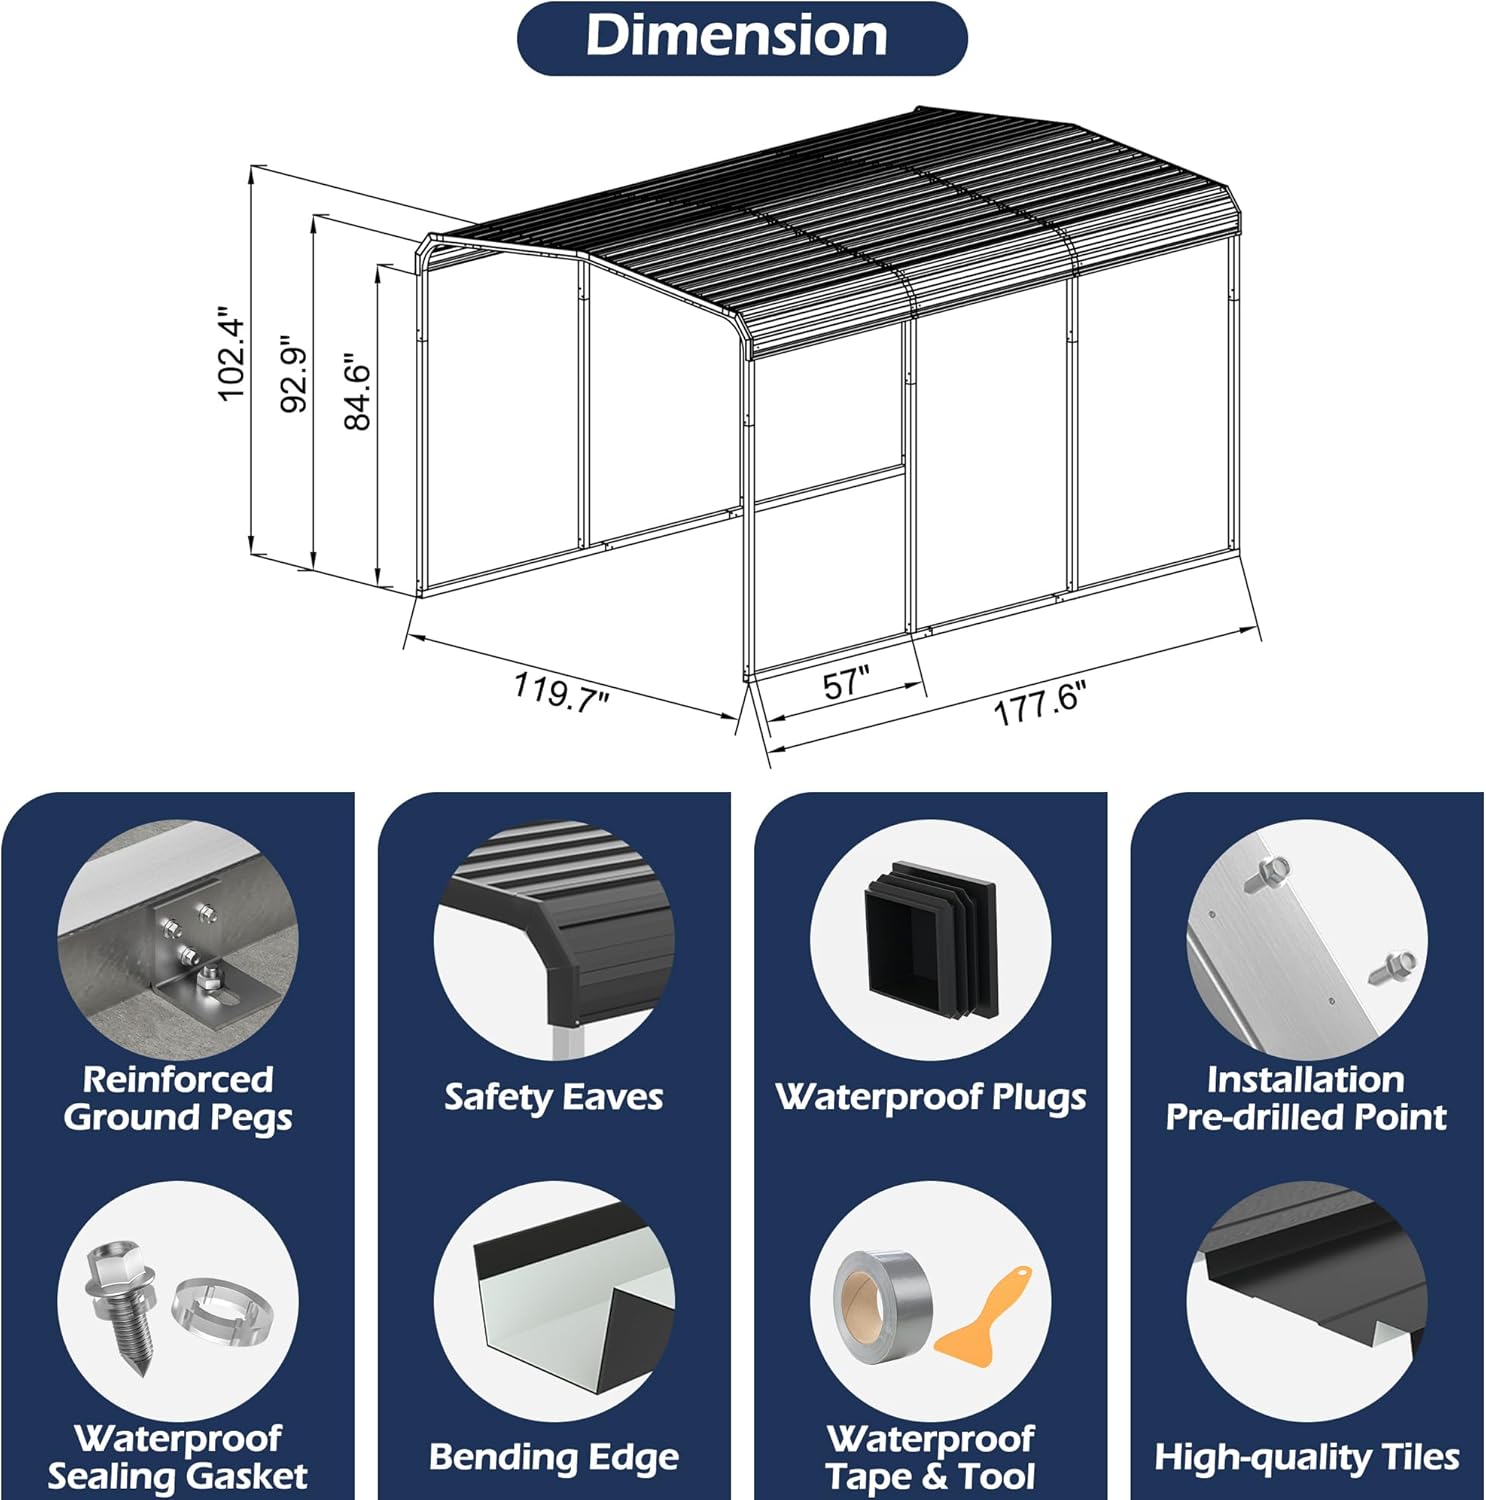
Image: A diagram illustrating the carport's dimensions and various integrated features like reinforced ground pegs, safety eaves, and waterproof plugs.
5. Operation
The Xilingol Metal Carport is designed for straightforward use as a protective shelter.
- Vehicle Placement: Position your vehicle (car, truck, boat, tractor) centrally within the carport for maximum protection from sun, rain, and snow.
- Clearance: Ensure adequate clearance around your vehicle to prevent accidental contact with the frame or roof.
- Storage: The carport can also be used for storing other outdoor equipment, providing shade and protection.

Image: Illustration demonstrating the larger roof space of the Xilingol carport, adaptable for various vehicles like boats.
6. Maintenance
Regular maintenance will extend the lifespan and ensure the continued performance of your carport.
- Cleaning: Periodically clean the roof panels and frame with mild soap and water to remove dirt, debris, and prevent buildup. Avoid abrasive cleaners.
- Fastener Check: Annually, or after severe weather, check all bolts and fasteners for tightness. Re-tighten as necessary.
- Snow Removal: In areas with heavy snowfall, regularly remove accumulated snow from the roof to prevent exceeding the snow load capacity (35 PSF).
- Damage Inspection: Inspect the frame and roof panels for any signs of rust, dents, or other damage. Address minor issues promptly to prevent further deterioration.
- Anchoring: Verify that the ground pegs and anchor bolts remain securely in place and are not loose or corroded.
7. Troubleshooting
This section addresses common issues you might encounter with your carport.
| Problem | Possible Cause | Solution |
|---|---|---|
| Carport feels unstable or sways in wind. | Loose anchor bolts or inadequate ground anchoring. | Ensure all anchor bolts and ground pegs are fully tightened and properly installed into a stable foundation. Consider additional anchoring in very windy areas. |
| Water leakage from the roof. | Improper roof panel overlap or insufficient sealing. | Check roof panel alignment and overlap. Apply waterproof tape to any visible gaps or seams. Ensure all fasteners are tight. |
| Rust spots appearing on the frame. | Surface damage exposing bare metal, or prolonged exposure to moisture. | Clean the affected area, remove any loose rust, and apply a rust-inhibiting primer followed by a suitable metal paint. The galvanized frame is designed to resist corrosion, but extreme conditions or damage can lead to rust. |
| Difficulty during assembly. | Parts misalignment or incorrect sequence. | Refer to the detailed assembly diagrams and instructions. Ensure parts are correctly oriented before tightening. Do not force components. |
8. Specifications
| Feature | Detail |
|---|---|
| Brand | Xilingol |
| Model Number | 001 |
| Material | Metal (Galvanized Steel Frame) |
| Color | Gray |
| Product Dimensions (L x W x H) | 56.6"L x 143.7"W x 120.4"H (Approx. 4.7 ft L x 12 ft W x 10 ft H) |
| Floor Area | 150 Square Feet |
| Water Resistance Level | Waterproof |
| Ultraviolet Light Protection | No |
| Assembly Required | Yes |
| Wind Rating | 100 MPH |
| Snow Load Capacity | 35 PSF |
9. Warranty and Support
Xilingol is committed to providing high-quality products and customer satisfaction.
- Customer Service: If you have any questions, require assistance with assembly, or encounter any issues with your Xilingol Metal Carport, please contact our customer service team. We aim to provide a satisfactory solution within 24 hours.
- Warranty Information: Specific warranty details are typically included with your purchase documentation. Please refer to those documents for terms and conditions. Keep your proof of purchase for warranty claims.