TDA-VW9-9
Targa TDA-VW9-9 Inch VW Android Bluetooth Multimedia Head Unit
User Manual
1. Introduction
This manual provides detailed instructions for the installation, operation, and maintenance of your Targa TDA-VW9-9 Inch VW Android Bluetooth Multimedia Head Unit. Please read this manual thoroughly before using the product to ensure proper functionality and safety.
The Targa TDA-VW9-9 is a sophisticated in-car entertainment system designed for select VW models, offering advanced features such as Android 12, Apple CarPlay, Android Auto, Bluetooth connectivity, and multimedia playback capabilities.
2. Product Features
- Operating System: Android 12
- Memory & Storage: 2GB RAM / 32GB Internal ROM
- Display: 9-inch IPS Screen with 1024x600 resolution
- Connectivity: Bluetooth Hands-Free, Wireless Apple CarPlay, Wired Android Auto
- Multimedia: Multi-Format Audio & Video Playback, USB Input
- Radio: AM / FM Radio
- Applications: Download apps via Play Store
- Camera Support: Supports Aftermarket Rear View Cameras (may not be compatible with OEM factory cameras)
- Compatibility: Suitable for VW Polo 6R, VW Golf 5 / 6, VW Amarok, VW Tiguan, VW Scirocco, VW Caddy Panel Van (Non-OEM product)
3. Package Contents
Verify that all items are present in the package before proceeding with installation:
- Targa TDA-VW9-9 Inch Android Multimedia Head Unit
- Power Harness
- USB Cables
- GPS Antenna
- RCA Cables
- Evo Tweeters (Pair)
- Keyring
- User Manual (this document)

Image 1: Targa TDA-VW9-9 Head Unit, Evo Tweeters, and Keyring. This image displays the main head unit, two small black tweeters, and a black keyring with yellow text.
4. Safety Information
Always observe the following safety precautions:
- Do not attempt to install or service the unit yourself if you are not qualified. Professional installation is recommended.
- Ensure the vehicle's ignition is off and the battery is disconnected before beginning installation to prevent electrical short circuits.
- Do not operate the unit in a way that distracts you from driving. Always prioritize road safety.
- Avoid exposing the unit to extreme temperatures, direct sunlight for prolonged periods, or excessive moisture.
- Use only specified voltage and power sources.
5. Setup and Installation
5.1 Pre-Installation Checks
- Confirm vehicle compatibility (VW Polo 6R, Golf 5/6, Amarok, Tiguan, Scirocco, Caddy Panel Van).
- Gather necessary tools (e.g., trim removal tools, screwdrivers, wire strippers).
- Disconnect the negative terminal of the car battery.
5.2 Head Unit Installation
- Carefully remove the existing factory radio or blank panel from the dashboard. Refer to your vehicle's specific service manual for trim removal instructions.
- Connect the provided power harness to the vehicle's wiring harness. Ensure all connections are secure.
- Connect the GPS antenna to the designated port on the head unit and route it to a location with a clear view of the sky (e.g., dashboard corner).
- Connect USB cables and route them to a convenient location (e.g., glove compartment or center console).
- If installing a rear view camera, connect its video input to the "CAM IN" or similar port on the head unit's RCA harness. Connect the camera's power to the vehicle's reverse light circuit.
- Carefully slide the TDA-VW9-9 head unit into the dashboard opening until it clicks into place or can be secured with screws.
- Reconnect the car battery.
- Turn on the ignition and test the unit's basic functions (power, audio, touch screen).
- Reassemble any removed trim panels.

Image 2: Front view of the Targa TDA-VW9-9 Head Unit display. This image shows the 9-inch screen with a car dashboard interface, including navigation, radio, apps, music, and settings icons at the bottom.
5.3 Tweeter Installation
The included Evo Tweeters are designed to enhance your vehicle's audio experience. Consult a professional audio installer for optimal placement and wiring, as incorrect installation can damage your vehicle's audio system.
6. Operating Instructions
6.1 Basic Operation
- Power On/Off: The unit typically powers on with the vehicle's ignition. Press and hold the power button (if available) or the home button to turn off the screen or put the unit into standby.
- Volume Control: Use the on-screen volume controls or steering wheel controls (if supported and configured) to adjust audio levels.
- Home Screen: Tap the "Home" icon to return to the main interface.
- Navigation: Tap the "Navi" icon to access navigation applications.
- Radio: Tap the "Radio" icon to access the AM/FM tuner.
- All Apps: Tap the "All App" icon to view all installed applications.
- Music: Tap the "Music" icon to access local music files or streaming apps.
- Settings: Tap the "Setting" icon to access system settings, network settings, display settings, etc.
6.2 Bluetooth Hands-Free
- Go to "Settings" and select "Bluetooth".
- Enable Bluetooth on the head unit and your mobile device.
- Search for available devices on your mobile device and select the head unit's Bluetooth name (e.g., "TDA-VW9-9").
- Confirm the pairing code on both devices.
- Once paired, you can make/receive calls and stream audio wirelessly.
6.3 Apple CarPlay / Android Auto
- Wireless Apple CarPlay: Connect your iPhone via Bluetooth. Once paired, CarPlay should automatically launch or prompt you to connect.
- Wired Android Auto: Connect your Android phone to one of the USB ports using a high-quality USB cable. Android Auto should launch automatically. Ensure Android Auto is installed on your phone.
- Follow on-screen prompts for initial setup.
6.4 Multimedia Playback (USB)
- Insert a USB drive containing audio or video files into one of the USB ports.
- Navigate to the "Music" or "Video" application.
- Select the USB source and browse your files for playback.
- The unit supports multi-format audio and video.
6.5 App Installation (Play Store)
- Connect the head unit to a Wi-Fi network (e.g., mobile hotspot).
- Open the "Play Store" application.
- Log in with your Google account.
- Search for and install desired applications.
7. Maintenance
- Cleaning: Use a soft, dry cloth to clean the screen and unit surface. For stubborn marks, slightly dampen the cloth with water or a screen cleaner. Do not use abrasive cleaners or solvents.
- Software Updates: Periodically check for system software updates through the unit's settings or the manufacturer's website to ensure optimal performance and access to new features.
- Data Backup: Regularly back up important data or settings if the unit allows for it.
8. Troubleshooting
| Problem | Possible Cause | Solution |
|---|---|---|
| Unit does not power on. | Loose power connection, blown fuse, vehicle battery issue. | Check power harness connections. Inspect vehicle fuses. Ensure car battery is charged. |
| No sound. | Volume too low, mute enabled, speaker wiring issue, incorrect audio source. | Increase volume. Check if unit is muted. Verify speaker connections. Select correct audio source. |
| Bluetooth not connecting. | Bluetooth not enabled, device not discoverable, pairing issue. | Ensure Bluetooth is on for both devices. Make unit discoverable. Delete previous pairings and re-pair. |
| CarPlay/Android Auto not launching. | Incorrect USB cable, phone settings, app not installed (Android Auto). | Use a high-quality USB cable. Check phone settings for CarPlay/Android Auto permissions. Ensure Android Auto app is installed on your phone. |
| Rear camera not displaying. | Incorrect wiring, camera faulty, unit settings. | Verify camera power and video input connections. Check unit's camera settings. Note: May not be compatible with OEM cameras. |
9. Specifications
| Feature | Detail |
|---|---|
| Model | TDA-VW9-9 |
| Operating System | Android 12 |
| RAM | 2GB |
| Internal Storage | 32GB |
| Screen Size | 9 Inch |
| Screen Type | IPS |
| Resolution | 1024x600 |
| Bluetooth | Yes (Hands-Free) |
| Apple CarPlay | Wireless Support |
| Android Auto | Wired Support |
| Radio Tuner | AM / FM |
| USB Input | Yes |
| Rear View Camera Support | Aftermarket cameras (OEM compatibility not guaranteed) |
| UPC | 745853358259 |
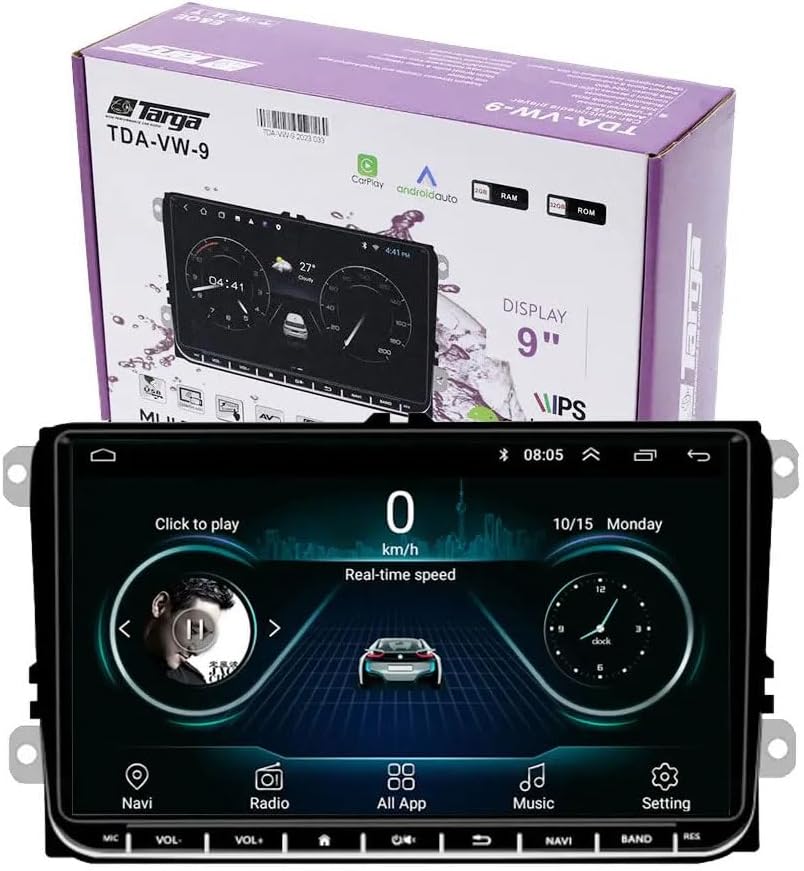
Image 3: Targa TDA-VW9-9 Head Unit shown with its retail packaging. The image features the head unit in the foreground and its product box in the background, displaying the model number and key features like CarPlay and Android Auto.
10. Warranty and Support
This Targa TDA-VW9-9 Head Unit comes with a manufacturer's warranty of 6 months from the date of purchase.
For technical support, warranty claims, or service inquiries, please contact the seller or the manufacturer directly. Keep your proof of purchase for warranty validation.
Spare part information is not available or provided by the manufacturer at this time.
Ask a question about this manual
Ask about setup, troubleshooting, compatibility, parts, safety, or missing instructions. Manuals+ will review the question and use this page’s manual context to help answer it.