1. Product Overview
This manual provides instructions for the MULS 14.4V 5600mAh Lithium-Ion replacement battery. This battery is designed to provide reliable power for compatible robot vacuum cleaner models, ensuring optimal performance and extended cleaning cycles.
Compatible Models:
- Neabot N2 Robot Vacuum Cleaner
- NOMO N1 Plus Robot Vacuum Cleaner
- Neabot DS0060B Robot Vacuum Cleaner
- Neabot L8850 DS0060B N1plus Robot Vacuum Cleaner

Figure 1: Product compatibility with Neabot N2 and NOMO N1 Plus robot vacuums.
2. Safety Information
Please read and understand all safety instructions before installing or using the battery. Failure to follow these instructions may result in electric shock, fire, or serious injury.
- Do not connect improperly.
- Do not short circuit.
- Use only the specified charger for your robot vacuum cleaner.
- Do not dispose of the battery in fire or expose it to excessive heat.
- Keep the battery away from water and moisture.
- Do not disassemble, crush, or puncture the battery.
- Store the battery in a cool, dry place when not in use.
Integrated Safety Features:
This MULS replacement battery is equipped with multiple protection mechanisms to ensure safe operation:
- Over-Current Protection: Prevents damage from excessive current flow.
- Over-Heating Protection: Monitors and regulates battery temperature.
- Over-Discharge Protection: Prevents the battery from discharging below a safe voltage level.
- Short-Circuit Protection: Automatically cuts off power in case of a short circuit.
- Over-Voltage Protection: Protects against damage from excessive charging voltage.
- Over-Charge Protection: Prevents the battery from being overcharged.

Figure 2: Overview of the battery's safety and protection features.
3. Setup and Installation
Follow these steps to safely replace the battery in your compatible robot vacuum cleaner.
- Power Off: Ensure your robot vacuum cleaner is completely powered off and disconnected from its charging base.
- Access Battery Compartment: Carefully turn the robot vacuum cleaner upside down to access the battery compartment. The compartment is typically secured by screws.
- Remove Screws: Use a suitable screwdriver (a small screwdriver is often included with the battery for convenience, as shown in Figure 3) to remove the two screws securing the battery compartment cover.
- Remove Cover: Gently lift and remove the battery compartment cover.
- Disconnect Old Battery: Locate the old battery. Carefully disconnect its connector from the vacuum cleaner's port. Do not pull on the wires; grasp the connector itself.
- Insert New Battery: Place the new MULS replacement battery into the compartment. Ensure the battery's connector matches the vacuum cleaner's port (refer to Figure 4 for connector type).
- Connect New Battery: Firmly connect the new battery's connector to the vacuum cleaner's port. Ensure it clicks securely into place.
- Replace Cover: Position the battery compartment cover back into place.
- Secure Screws: Reinsert and tighten the two screws to secure the cover. Do not overtighten.
- Initial Charge: Place the robot vacuum cleaner back on its charging base to allow the new battery to fully charge before its first use.

Figure 3: MULS replacement battery and included screwdriver for installation.
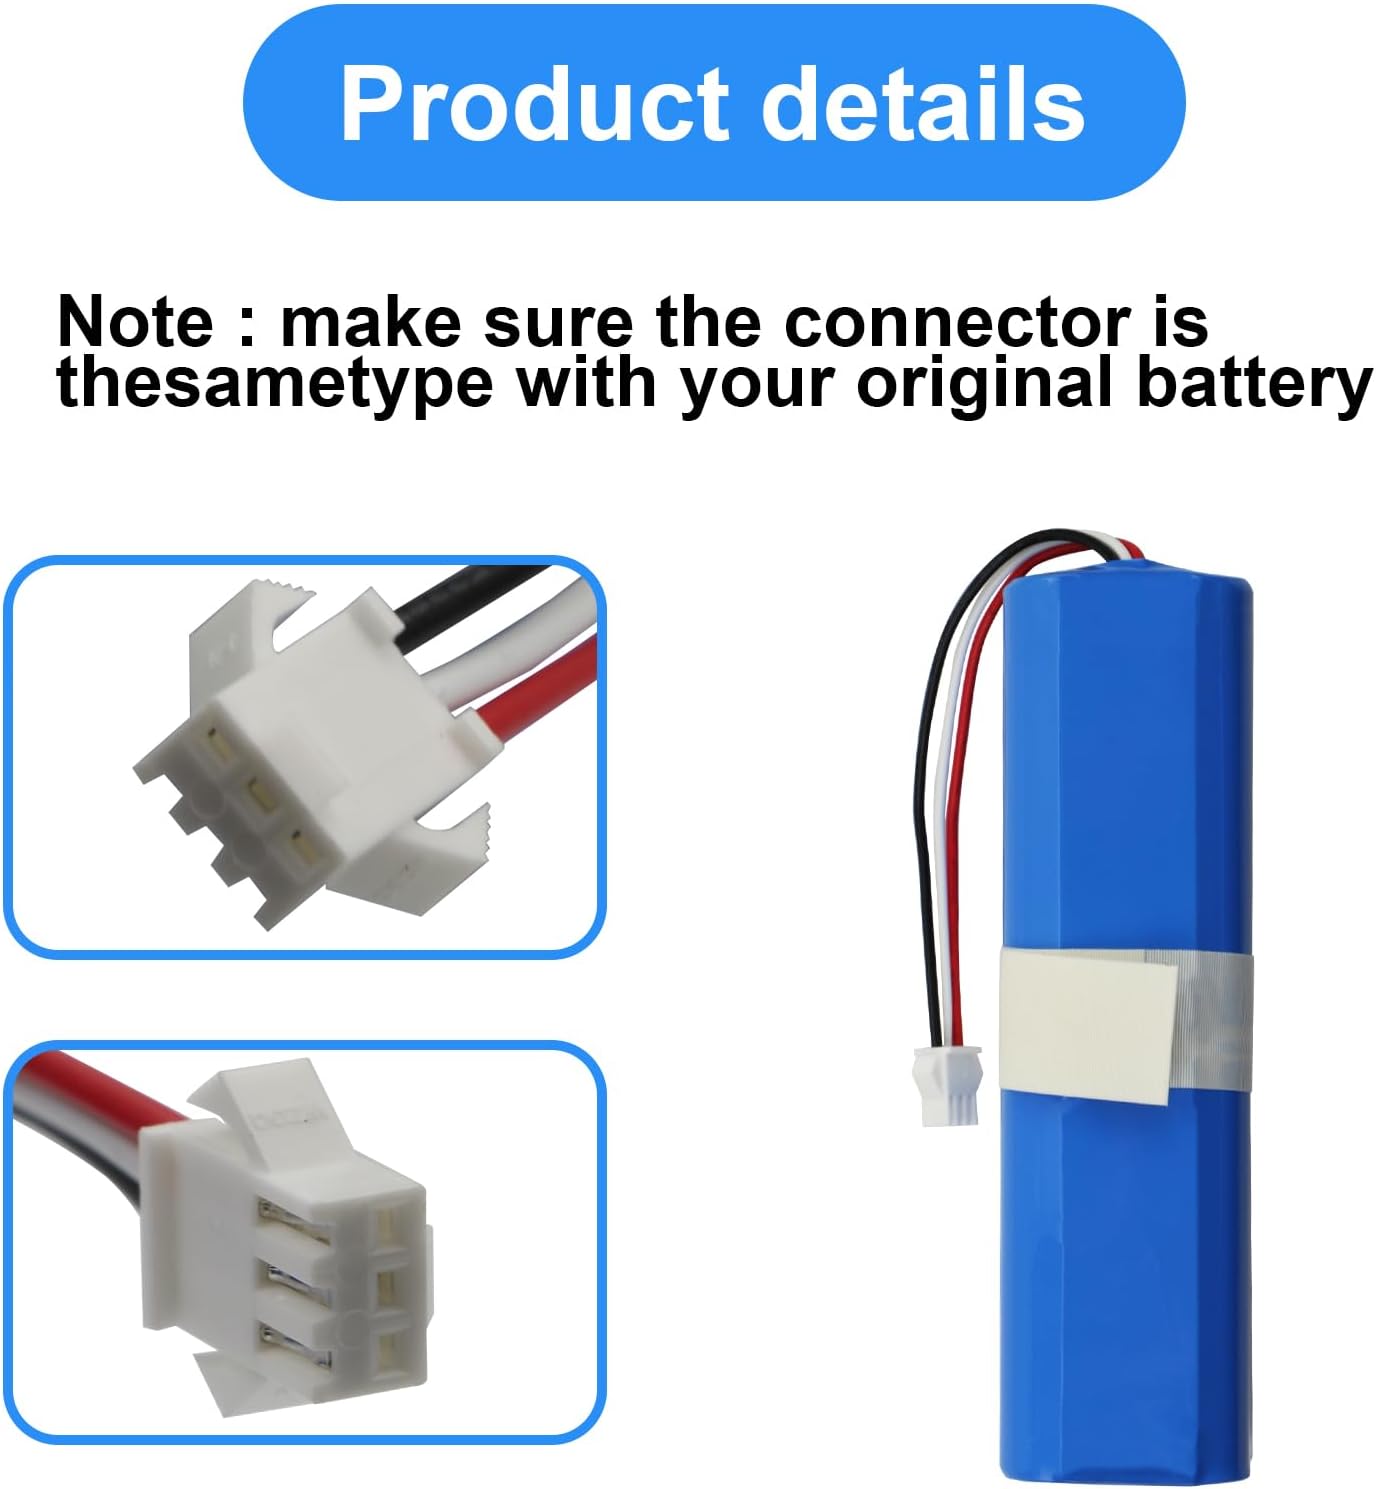
Figure 4: Detail of the battery connector. Ensure this matches your original battery's connector.
4. Operating Instructions
Once the new battery is installed and fully charged, your robot vacuum cleaner is ready for operation. The battery functions automatically with your device.
- First Use: For optimal performance, fully charge the battery before its initial use.
- Charging: Always charge the battery using the original charging base or adapter provided with your robot vacuum cleaner.
- Discharging: Allow the robot vacuum to operate until its battery is low or depleted, then return it to the charging base.
- Storage: If the battery will not be used for an extended period, charge it to approximately 50% and store it in a cool, dry place. Recharge every 3-6 months to prevent deep discharge.
5. Maintenance
Proper maintenance can extend the lifespan and performance of your MULS replacement battery.
- Regular Cleaning: Keep the battery contacts and the vacuum cleaner's charging contacts clean and free of dust or debris. Use a dry cloth to wipe them if necessary.
- Avoid Extreme Temperatures: Do not expose the battery or the vacuum cleaner to extreme hot or cold temperatures, as this can degrade battery performance and lifespan.
- Proper Charging: Always use the manufacturer-recommended charging equipment. Avoid using third-party chargers that are not specified for your device.
- Deep Discharge Prevention: Avoid completely draining the battery frequently. Recharge the vacuum cleaner promptly when the battery level is low.
6. Troubleshooting
If you encounter issues with your MULS replacement battery, consider the following troubleshooting steps:
- Battery Not Charging:
- Ensure the battery is correctly installed and its connector is securely attached.
- Verify that the charging base and power adapter are properly connected to a working power outlet.
- Clean the charging contacts on both the vacuum cleaner and the charging base.
- Try resetting the vacuum cleaner (refer to your vacuum's original manual for specific instructions).
- Short Operating Time:
- Ensure the battery has been fully charged before use.
- Check if the vacuum cleaner's filters or brushes are clogged, which can increase power consumption.
- Environmental factors like thick carpets or large debris can also affect runtime.
- Vacuum Cleaner Not Powering On:
- Confirm the battery is fully charged.
- Recheck the battery installation to ensure it is seated correctly and the connector is firm.
If problems persist after attempting these steps, please contact customer support for further assistance.
7. Specifications
| Feature | Specification |
|---|---|
| Battery Type | Rechargeable Lithium-Ion |
| Voltage | 14.4V |
| Capacity | 5600mAh (80.64Wh) |
| Dimensions (L x W x H) | Approximately 5.19 x 1.41 x 1.41 inches (13.18 x 3.58 x 3.58 cm) |
| Weight | Approximately 12.8 ounces (363 grams) |
| Certifications | CE, FCC, RoHS |
| Compatible Devices | Neabot N2, NOMO N1 Plus, Neabot DS0060B, Neabot L8850 DS0060B N1plus Robot Vacuum Cleaners |

Figure 5: Physical dimensions of the MULS replacement battery.
8. Warranty and Support
MULS is committed to providing high-quality products and customer satisfaction.
Warranty Information:
- 30-Day Money-Back Guarantee: If you are not satisfied with your purchase, you may return it for a full refund within 30 days.
- 12-Month Exchange Guarantee: The battery is covered by a 12-month exchange guarantee for manufacturing defects or performance issues.
Customer Support:
For any questions, concerns, or assistance with your MULS replacement battery, please contact our customer support team. We provide 24/7 email service to support you with any problem.
Please refer to your purchase documentation or the retailer's website for specific contact details.