PriceDumb SK-790.4
SK-790.4 4-Channel 7900W Car Class A/B Stereo Surround Audio Player Amplifier User Manual
Model: SK-790.4 | Brand: PriceDumb
Introduction
Thank you for choosing the PriceDumb SK-790.4 4-Channel 7900W Car Class A/B Stereo Surround Audio Player Amplifier. This manual provides essential information for the proper installation, operation, and maintenance of your new amplifier. Please read this manual thoroughly before using the product to ensure optimal performance and safety.

Image: The PriceDumb SK-790.4 car audio amplifier, showcasing its sleek black design and input/output connections.
Safety Information
Always observe the following safety precautions when installing and operating your amplifier:
- Ensure the vehicle's battery is disconnected before starting any installation work to prevent electrical shorts.
- Install the amplifier in a well-ventilated area to prevent overheating. Avoid placing it in direct sunlight or near heat sources.
- Use appropriate gauge wiring for power, ground, and speaker connections as recommended by professional installers.
- Securely mount the amplifier to prevent it from moving during vehicle operation.
- Do not expose the amplifier to moisture or liquids.
- If you are unsure about any installation steps, consult a qualified car audio professional.
Package Contents
Upon opening the package, please verify that all the following items are included:
- 1 x Car Audio Amplifier (SK-790.4)
- 1 x User Manual
Product Features
The SK-790.4 amplifier is designed with advanced features to enhance your car audio experience:
- 4-Channel Output: Capable of driving four speakers or a combination of speakers and a bridged subwoofer.
- Class A/B Amplifier: Provides a balance of sound quality and efficiency.
- Stereo Surround: Delivers an immersive audio experience.
- Main Push Four-Door Speaker: Optimized for powering standard car door speakers.
- Passive Subwoofer Support: Can be configured to power a passive subwoofer.
- Slim Design: Compact form factor for easier installation in various vehicle spaces.
- Aluminium Alloy Casting Drawing Process: Durable and aesthetically pleasing construction.
- External Heat Sink: Designed for efficient heat dissipation, ensuring stable operation.
- Thermal Overload & Speaker's Short Protection: Built-in safeguards to protect the amplifier and speakers from damage.
- Standard Safety Interface Shell: Ensures secure and reliable connections.

Image: An overview highlighting key features of the SK-790.4 amplifier, including its slim design, subwoofer capability, 4 channels, and stereo surround.
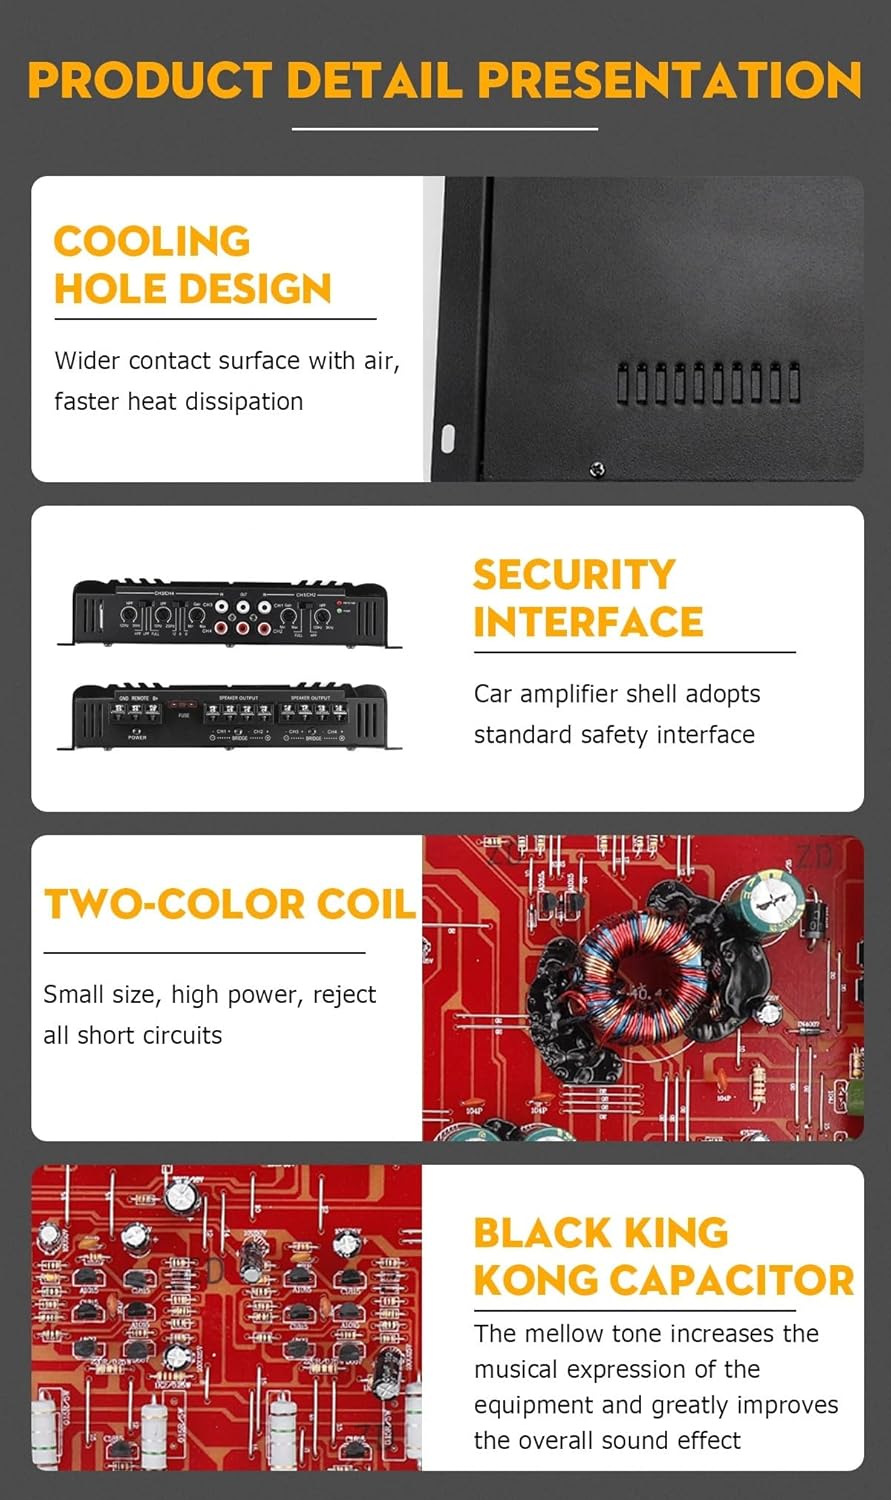
Image: Detailed view of the amplifier's internal components and design elements, such as the cooling hole design for heat dissipation, the secure interface, the two-color coil, and the Black King Kong capacitor for improved sound quality.
Specifications
| Feature | Specification |
|---|---|
| Model | SK-790.4 |
| Material | Aluminium alloy |
| Channel | 4 |
| Working Voltage | DC 12V |
| Peak Power Output | 7900 W |
| Peak Power Output (2 Ohms) | 2000W x 4 Channels |
| Peak Bridged Power Output (4 Ohms) | 3900W x 2 Channels |
| RMS Power Output (4 Ohms) | 120W x 4 Channels |
| Total Harmonic Distortion (THD) RMS Output | <0.01% |
| Signal-to-Noise Ratio (SNR) | 95dB |
| Sensitivity | 150mV |
| Impedance | 2Ω-4Ω |
| Frequency Response | 20Hz-40KHz |
| Dimensions (approx.) | 31cm (12in) x 22cm (8.7in) x 4.3cm (1.7in) |

Image: The physical dimensions of the SK-790.4 amplifier, showing its length, width, and height.
Setup and Installation
Proper installation is crucial for the performance and longevity of your amplifier. Follow these steps carefully:
1. Choosing a Mounting Location
Select a location that is dry, well-ventilated, and away from direct heat sources. Ensure there is enough space around the amplifier for air circulation. Common locations include under a seat, in the trunk, or mounted to a custom amplifier rack.
2. Wiring Connections
Refer to the diagrams below for proper wiring of power, ground, remote, and speaker outputs. Use high-quality, appropriately gauged wiring.

Image: The rear panel of the SK-790.4 amplifier, showing the power, ground, remote, fuse, and speaker output terminals.

Image: A detailed diagram illustrating the various connection points on the SK-790.4 amplifier, including power supply, control line, audio input/output, and speaker connections, along with internal component labels.
- Power (B+): Connect to the positive terminal of the car battery via a fuse holder (not included, but highly recommended) located within 18 inches of the battery.
- Ground (GND): Connect to a clean, unpainted metal surface of the vehicle's chassis. Ensure a good electrical connection.
- Remote (REM): Connect to the remote turn-on lead from your head unit. This wire turns the amplifier on and off with your car stereo.
- Speaker Outputs (CH1-CH4): Connect your speakers to the appropriate channels. Observe correct polarity (+ to + and - to -). For bridged mode, refer to the markings on the amplifier.
- Audio Input (IN): Connect RCA cables from your head unit's pre-amp outputs to the amplifier's RCA inputs.
3. General Installation Steps
The following sequence outlines the typical installation process:

Image: A visual guide to the installation process, showing steps like removing the car radio, connecting wiring harnesses, inserting terminals into the DSP amplifier, and adjusting sound via computer or phone app.
- Step 1: Disconnect the car battery's negative terminal.
- Step 2: Remove your car radio/head unit to access wiring.
- Step 3: Connect the radio's car tail line using an ISO wiring harness or DSP cable if applicable.
- Step 4: Insert the necessary terminals into the DSP amplifier.
- Step 5: Securely mount the amplifier in your chosen location.
- Step 6: Reconnect the car battery.
- Step 7: Finish installation and proceed to adjust the DSP sound using a computer or phone application if your system supports it.
4. Vehicle Compatibility
The SK-790.4 amplifier is designed for broad compatibility with 12V vehicle electrical systems. For trucks, buses, and other vehicles requiring 24V systems, a 24V~12V 30A converter is necessary.

Image: An illustration indicating that the amplifier is suitable for 99% of car models, and can also be installed in trucks and buses with the use of a 24V~12V 30A converter.
Operating Instructions
Once installed, you can adjust the amplifier's settings to optimize sound performance.

Image: The front panel of the SK-790.4 amplifier, displaying the various controls for gain, high-pass filter (HPF), low-pass filter (LPF), and full-range settings for channels CH1/CH2 and CH3/CH4.
- Gain Control (CH1/CH2 Gain, CH3/CH4 Gain): Adjusts the input sensitivity of the amplifier to match the output level of your head unit. Start with the gain at minimum and slowly increase until desired volume is achieved without distortion.
- High-Pass Filter (HPF): Allows frequencies above the set point to pass through, blocking lower frequencies. Useful for protecting smaller speakers from bass overload.
- Low-Pass Filter (LPF): Allows frequencies below the set point to pass through, blocking higher frequencies. Essential for subwoofers to reproduce only bass frequencies.
- FULL: Bypasses the HPF and LPF, allowing the full frequency range to pass through.
- Protection Indicator: A red LED light indicates if the amplifier is in protection mode due to overheating, short circuit, or other issues.
- Power Indicator: A green LED light indicates that the amplifier is powered on and operating normally.
Note: Fine-tuning amplifier settings often requires a bit of experimentation and listening to different types of music. For advanced tuning, consider consulting a car audio specialist.
Maintenance
To ensure the longevity and optimal performance of your SK-790.4 amplifier, follow these simple maintenance guidelines:
- Keep Clean: Regularly wipe the amplifier's exterior with a soft, dry cloth to remove dust and debris. Avoid using harsh chemicals or abrasive cleaners.
- Ensure Ventilation: Periodically check that the amplifier's cooling fins and surrounding area are free from obstructions to allow for proper airflow and heat dissipation.
- Check Connections: Occasionally inspect all wiring connections (power, ground, remote, speaker, RCA) to ensure they are secure and free from corrosion. Loose connections can lead to poor performance or damage.
- Avoid Overloading: Do not operate the amplifier beyond its specified power ratings or with speaker impedances lower than recommended, as this can cause overheating and damage.
Troubleshooting
If you encounter issues with your amplifier, refer to the following common problems and solutions before seeking professional assistance:
| Problem | Possible Cause | Solution |
|---|---|---|
| Amplifier does not turn on (Power LED off) | No power, poor ground connection, blown fuse, no remote signal. | Check power and ground connections. Verify the fuse on the amplifier and in the power line. Ensure the remote wire is connected and receiving 12V from the head unit. |
| Amplifier goes into protection mode (Protection LED on) | Overheating, speaker short circuit, impedance too low, DC offset. | Allow amplifier to cool down. Check speaker wiring for shorts (wires touching, speaker coil shorted). Verify speaker impedance matches amplifier's rating. Disconnect speakers and check if protection light goes off. |
| No sound from speakers | No input signal, incorrect gain setting, speaker wires disconnected, amplifier in protection. | Check RCA input cables from head unit. Adjust gain. Verify speaker connections. Refer to protection mode troubleshooting. |
| Distorted sound | Gain set too high, poor ground, damaged speakers, incorrect filter settings. | Reduce gain. Check ground connection. Inspect speakers for damage. Adjust HPF/LPF settings. |
| Engine noise/whining sound | Ground loop, poor RCA cable shielding, power wire too close to signal wires. | Ensure good ground connection. Use high-quality shielded RCA cables. Route power wires away from signal cables. Consider a ground loop isolator if necessary. |
Warranty and Support
For specific warranty information regarding your PriceDumb SK-790.4 amplifier, please refer to the warranty card included with your product or contact the manufacturer directly. Warranty terms and conditions may vary.
If you require technical support or have questions not covered in this manual, please contact PriceDumb customer service through their official website or the retailer from whom you purchased the product.
Related Documents - SK-790.4
 |
SK-790.4 4-Channel Car Amplifier User Manual | 7900W Power Detailed user manual for the SK-790.4 4-channel car amplifier. Learn about its 12V Class A/B operation, digital stereo, surround sound, and passive subwoofer capabilities for your car audio system. |
 |
DS18 GEN-X Series Class D Car Audio Amplifiers Owner's Manual This owner's manual provides comprehensive details on DS18 GEN-X series Class D car audio amplifiers, including installation, features, controls, and troubleshooting for models such as G1800.1D, G700.2D, G1000.4D, G1800.4D, G3600.4D, G8400.4D, and G4000.5D. |
 |
Blaupunkt GTA 460 Power Amplifier: Operating and Installation Manual Comprehensive operating and installation manual for the Blaupunkt GTA 460 4-Channel Class AB Power Amplifier, detailing specifications, wiring diagrams, and troubleshooting steps. |
 |
JL Audio MX280/4 Amplifier Owner's Manual and Installation Guide Comprehensive owner's manual for the JL Audio MX280/4 280W Full-Range 4-Channel Class D Amplifier, covering installation, setup, specifications, and troubleshooting. |
 |
Bass Habit Rebel RA Series Amplifiers: User Manual & Specifications Comprehensive user manual for Bass Habit Rebel RA series amplifiers (RA800W, RA1200W, RA2000W), covering installation, specifications, control panel, and troubleshooting. |
 |
Pyle Marine Bluetooth Amplifier User Manual - PLMRMBT5B/PLMRMBT7B Series Comprehensive user manual for Pyle's PLMRMBT5B, PLMRMBT5S, PLMRMBT7B, and PLMRMBT7S marine grade Bluetooth amplifiers. Details features, technical specifications, installation, wiring diagrams, and Bluetooth operation for watercraft audio systems. |