Hotloop Blue
Hotloop 18V Cordless HVLP Paint Sprayer User Manual
Model: Blue
Introduction
Thank you for choosing the Hotloop 18V Cordless HVLP Paint Sprayer. This manual provides essential information for the safe and efficient operation, maintenance, and troubleshooting of your new paint sprayer. Please read this manual thoroughly before first use and keep it for future reference.
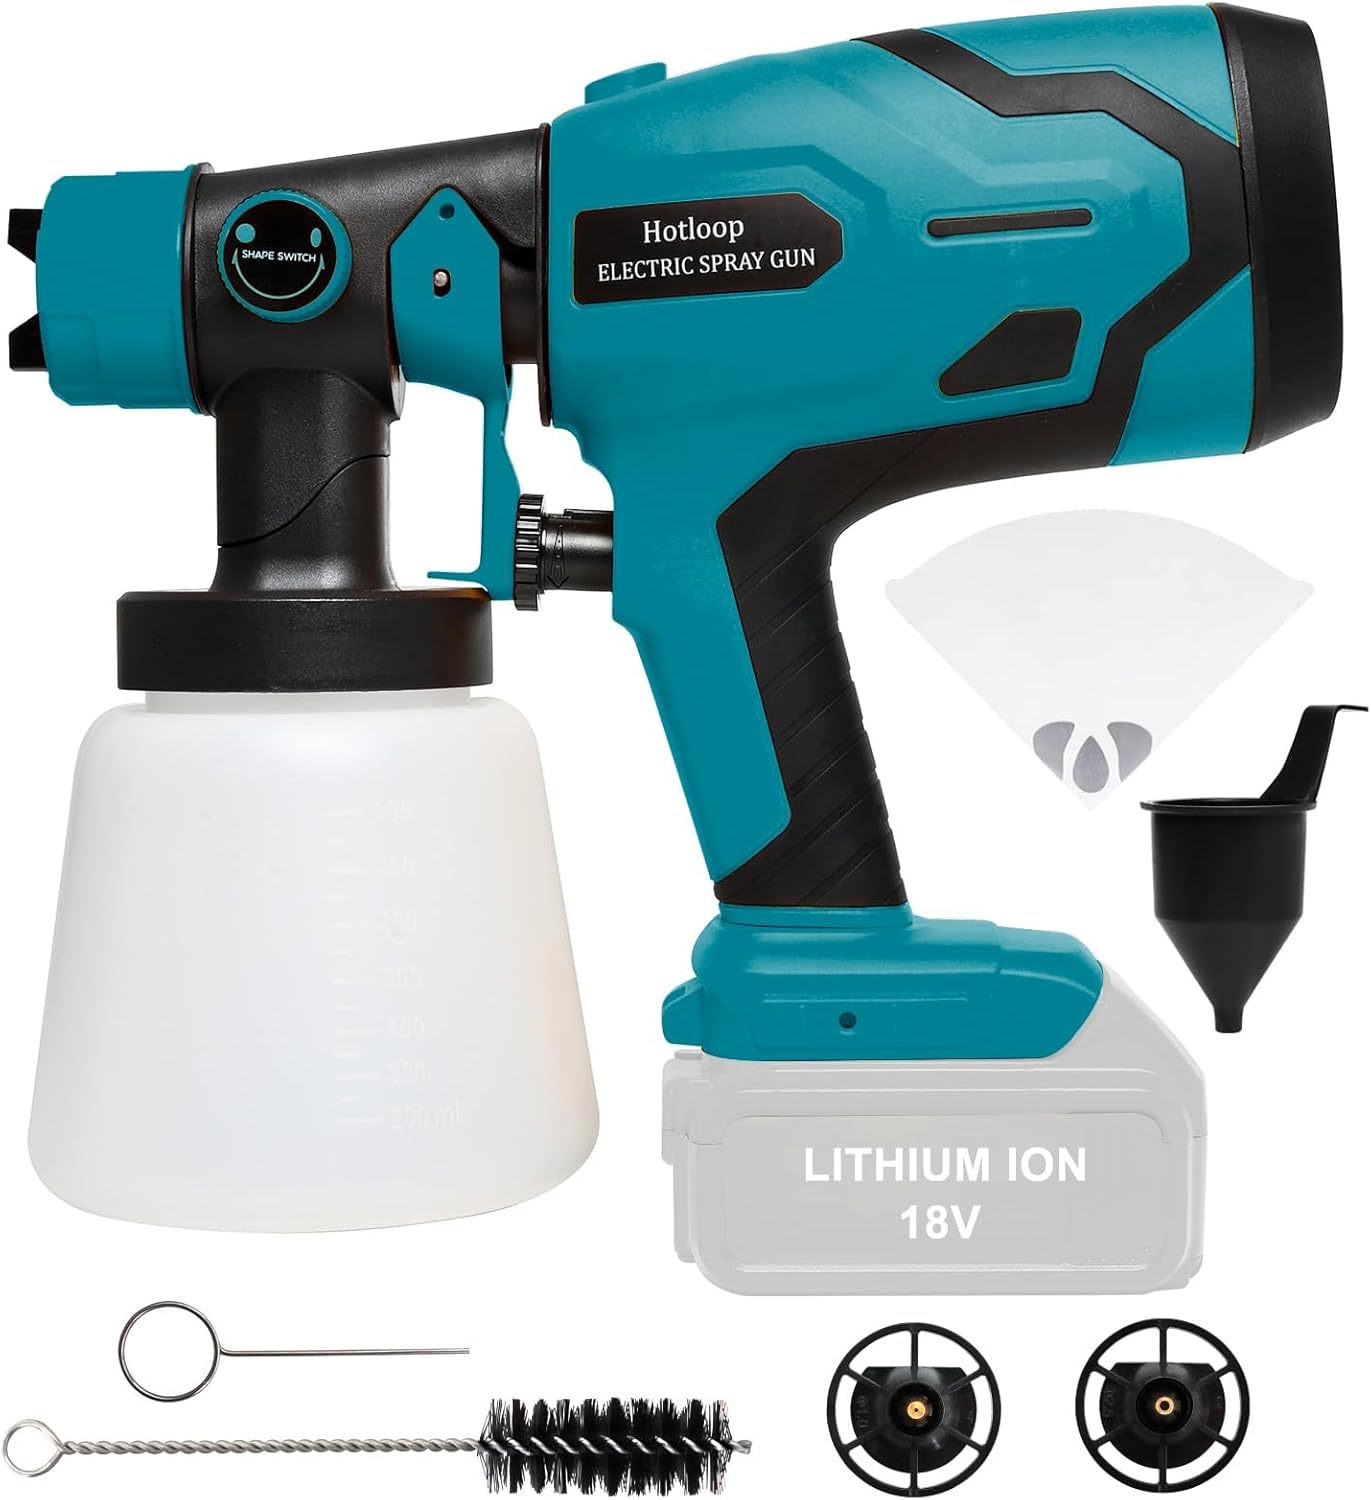
Figure 1: Hotloop 18V Cordless HVLP Paint Sprayer and included accessories.
Safety Information
WARNING: Always exercise extreme caution when working with pressurized liquids. Failure to follow these safety guidelines may result in serious injury or property damage.
- Always wear appropriate personal protective equipment (PPE), including safety glasses, gloves, and a respirator, especially when spraying paints, solvents, or other chemicals.
- Ensure adequate ventilation in the work area to prevent the buildup of hazardous fumes.
- Do not spray flammable liquids near open flames, sparks, or other ignition sources.
- Keep children and pets away from the work area.
- Disconnect the battery pack before performing any adjustments, changing accessories, or cleaning the sprayer.
- Never point the spray gun at yourself or others.
- Refer to the safety data sheet (SDS) for the specific material you are spraying for additional safety precautions.
Product Components and Features
Familiarize yourself with the various parts of your Hotloop paint sprayer for optimal use and maintenance.

Figure 2: Key components of the Hotloop Cordless HVLP Paint Sprayer.
- Shape Switch: Adjusts the spray pattern (horizontal, vertical, circular).
- Release Knob: Used to detach the spray gun body from the motor body.
- Air Outlet: Where compressed air exits.
- Flow Control Knob: Regulates the paint flow rate.
- Container: Holds the paint or liquid to be sprayed (800 ml capacity).
- Nozzles: Includes 1.0mm and 2.5mm brass nozzles for different material viscosities and spray requirements.
Setup
- Battery Installation: This sprayer is compatible with 18V batteries such as BL1850B, BL1830, BL1840, BL1850, BL1860, BL1840B, BL1860B, BL1820, and others. Insert a fully charged 18V battery into the battery slot at the base of the sprayer handle. Note: Battery and charger are not included.
- Assembling the Sprayer:
- Press the release knob on the sprayer.
- Pull the spray gun body away from the motor body.
- Align the protrusion on the spray gun body with the hole on the motor body and insert it firmly until it clicks into place.
- Selecting and Installing Nozzle: Choose the appropriate nozzle (1.0mm or 2.5mm) based on the viscosity of your material. Screw the selected nozzle onto the front of the spray gun.
- Preparing Material: Fill the 800ml container with your desired paint or liquid. Ensure the material is properly thinned according to the manufacturer's recommendations for HVLP sprayers. Use the included viscosity cup to check consistency if needed.
- Attaching Container: Screw the filled container securely onto the bottom of the spray gun body.
Operating Instructions
Follow these steps for effective and controlled spraying.
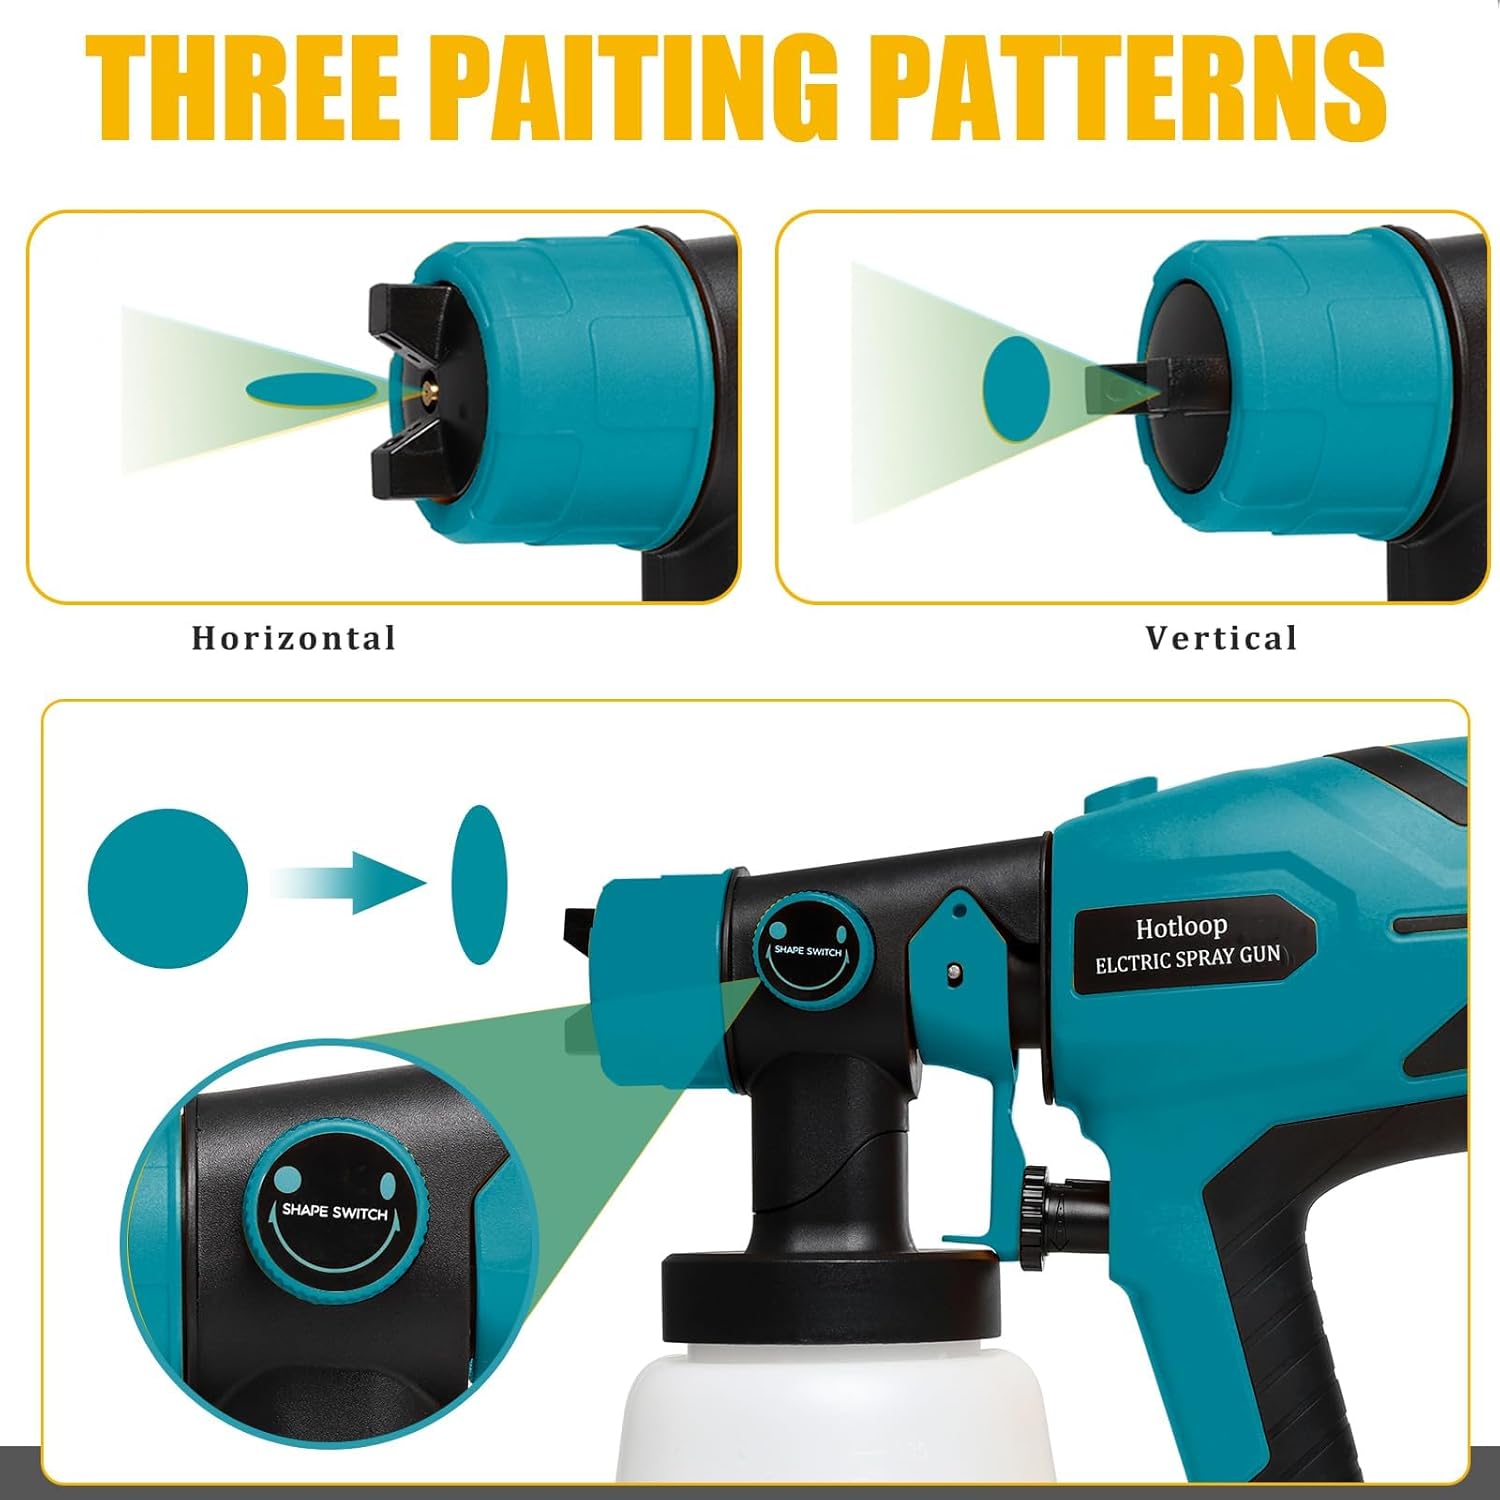
Figure 3: Available spray patterns: Horizontal, Vertical, and Circular.
- Adjusting Spray Pattern: The sprayer offers three spray patterns: horizontal, vertical, and circular. Rotate the Shape Switch at the front of the gun to select the desired pattern.
- Horizontal: For spraying wider surfaces with vertical strokes.
- Vertical: For spraying taller surfaces with horizontal strokes.
- Circular: For small areas, corners, or detailed work.
- Adjusting Flow Control: The Flow Control Knob allows you to regulate the paint output.

Figure 4: Adjusting paint flow from minimum to maximum.
- Turn the knob downwards to increase the flow rate.
- Turn the knob upwards to decrease the flow rate.
- Adjust the flow to achieve the desired coverage and avoid paint waste.
- Pre-Spraying Dust Removal (Unique Feature): Before applying paint, you can use the blow connector with the paint sprayer to blow dust and debris off the surface. This helps achieve a smoother, better spraying effect.
- Spraying: Hold the sprayer at a consistent distance (typically 6-12 inches) from the surface and move it in smooth, even strokes. Press the trigger to begin spraying. Release the trigger to stop.

Figure 5: Proper technique for spraying with the Hotloop sprayer.

Figure 6: Examples of surfaces that can be painted with the sprayer.
Maintenance and Cleaning
Thorough cleaning after each use is crucial for the longevity and performance of your sprayer.
- Emptying Container: After spraying, empty any remaining material from the container.
- Initial Rinse: Fill the container with an appropriate cleaning solution (water for water-based paints, mineral spirits for oil-based paints). Spray the cleaning solution through the gun until it runs clear.
- Disassembly: Disconnect the battery. Press the release knob and separate the spray gun body from the motor body. Unscrew the container.
- Detailed Cleaning:
- Use the included cleaning brush to clean the container and the suction tube.
- Use the included cleaning needle to clear any paint residue from the nozzle and air cap.
- Thoroughly clean all parts that came into contact with paint.
- Internal Pipe Cleaning (Unique Feature): After spraying, connect the cleaning connector to a faucet. This allows you to clean residual paint inside the pipe, making the cleaning process easier and more effective.
- Drying and Storage: Allow all components to dry completely before reassembling or storing the sprayer. Store in a clean, dry place away from direct sunlight and extreme temperatures.
Troubleshooting
This section addresses common issues you might encounter.
| Problem | Possible Cause | Solution |
|---|---|---|
| No spray or weak spray | Clogged nozzle; Insufficient material; Air leak; Low battery. | Clean nozzle with needle; Refill container; Check connections for tightness; Recharge/replace battery. |
| Uneven spray pattern | Incorrect nozzle selection; Material too thick; Clogged air cap/nozzle; Improper flow setting. | Select appropriate nozzle; Thin material; Clean air cap/nozzle; Adjust flow control knob. |
| Paint dripping | Material too thin; Nozzle loose; Excessive flow. | Thicken material or use smaller nozzle; Tighten nozzle; Reduce flow. |
| Motor runs but no spray | Suction tube blocked; Nozzle completely clogged; Container empty. | Clean suction tube; Clear nozzle; Refill container. |
Specifications
- Model Name: Blue
- Power Source: Battery Powered (18V compatible, battery not included)
- Tank Capacity: 800 ml
- Nozzle Sizes: 1.0 mm, 2.5 mm (Brass)
- Product Dimensions: 30 x 15 x 27 cm
- Product Weight: 570 g
- Manufacturer: Hotloop
- Included Components: 1 x Cordless Paint Sprayer, 1 x 800ml Container, 2 x Brass Nozzles, 1 x Through Needle, 1 x Viscosity Cup, 1 x Cleaning Brush, 2 x Paint Filters, 1 x User Manual.
Warranty and Support
For warranty information, technical support, or replacement parts, please refer to the official Hotloop website or contact their customer service directly. Keep your purchase receipt as proof of purchase.
For further assistance, you may visit the product page on Amazon.pl.
Ask a question about this manual
Ask about setup, troubleshooting, compatibility, parts, safety, or missing instructions. Manuals+ will review the question and use this page’s manual context to help answer it.